

Instructions
Page 4
...these videos or still pictures. Ⅵ Supports various HD video recording formats (1080i, 1080p, and 720p) Shooting can be performed in different HD recording modes, thus supporting a...; Built-in monitor speaker for audio checking Ⅵ Recording check function for convenient recording review Ⅵ Camera designed with 3-CCD system for highquality picture Ⅵ Zebra pattern video level...video files Enables direct recording in or external microphone. Ⅵ Three video output terminals This camcorder comes with an HDMI terminal, a component terminal, and an A/V OUT (video/audio output...
...these videos or still pictures. Ⅵ Supports various HD video recording formats (1080i, 1080p, and 720p) Shooting can be performed in different HD recording modes, thus supporting a...; Built-in monitor speaker for audio checking Ⅵ Recording check function for convenient recording review Ⅵ Camera designed with 3-CCD system for highquality picture Ⅵ Zebra pattern video level...video files Enables direct recording in or external microphone. Ⅵ Three video output terminals This camcorder comes with an HDMI terminal, a component terminal, and an A/V OUT (video/audio output...

Instructions
Page 12
...Video recording button (A Page 27) Button for menu setting. (A Page 57) Bottom N Tripod mounting holes (A Page 18) ● To prevent the camcorder from falling, attach securely using the rotation prevention hole. ● Use screws with screw length 5 mm and below. 12 B- E Bottom E B OGRAM...A LCD cover B [COMPONENT OUT] Component output terminal (A Page 49) C [A/V OUT] Audio/Video output terminal (A Page 49) D [Q.REVIEW] Quick Review button (A Page 27) For checking the video image immediately before shooting starts. MIC MIC+48V INPUT1 INPUT2 AUTO MANUAL CH-1 AUDIO SELECT CH-2 ...
...Video recording button (A Page 27) Button for menu setting. (A Page 57) Bottom N Tripod mounting holes (A Page 18) ● To prevent the camcorder from falling, attach securely using the rotation prevention hole. ● Use screws with screw length 5 mm and below. 12 B- E Bottom E B OGRAM...A LCD cover B [COMPONENT OUT] Component output terminal (A Page 49) C [A/V OUT] Audio/Video output terminal (A Page 49) D [Q.REVIEW] Quick Review button (A Page 27) For checking the video image immediately before shooting starts. MIC MIC+48V INPUT1 INPUT2 AUTO MANUAL CH-1 AUDIO SELECT CH-2 ...
Instructions
Page 15
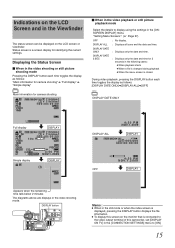
...LCD Screen and in the [ONSCREEN DISPLAY] menu. DISPLAY ALL : Displays all icons and the date and time. DISPLAY button CAM / MEDIA USERS DISPLAY Q.REVIEW MENU COMPONENT OUT A / V OUT Memo : ● When in the still mode or when the index screen is displayed, pressing the DISPLAY button ...displays the file information. ● To display this camcorder, set [DISPLAY ON TV] in the video shooting mode. Indications on the LCD screen or viewfinder. DISPLAY DATE ONLY : Displays only the date and...
...LCD Screen and in the [ONSCREEN DISPLAY] menu. DISPLAY ALL : Displays all icons and the date and time. DISPLAY button CAM / MEDIA USERS DISPLAY Q.REVIEW MENU COMPONENT OUT A / V OUT Memo : ● When in the still mode or when the index screen is displayed, pressing the DISPLAY button ...displays the file information. ● To display this camcorder, set [DISPLAY ON TV] in the video shooting mode. Indications on the LCD screen or viewfinder. DISPLAY DATE ONLY : Displays only the date and...

Instructions
Page 21
...!B message will appear every time you turn on the power. ● You can be assigned to each USER button according to the USER Buttons This camcorder comes with three USER buttons. Press MENU. MIC MIC+48V INPUT1 INPUT2 AUTO MANUAL CH-1 AUDIO SELECT CH-2 AUTO MANUAL 0 1 23 2 3 ... the [DATE DISPLAY STYLE] item in the [CAMERA SETTINGS] menu. (A Page 65) 21 A CAM / MEDIA USERS DISPLAY Q.REVIEW MENU COMPONENT OUT A / V OUT B USER3 USER3 CAM / MEDIA DISPLAY Q.REVIEW MENU To do so, make use of the Set Lever to the next digit. MENU 3 . A specific function can select the...
...!B message will appear every time you turn on the power. ● You can be assigned to each USER button according to the USER Buttons This camcorder comes with three USER buttons. Press MENU. MIC MIC+48V INPUT1 INPUT2 AUTO MANUAL CH-1 AUDIO SELECT CH-2 AUTO MANUAL 0 1 23 2 3 ... the [DATE DISPLAY STYLE] item in the [CAMERA SETTINGS] menu. (A Page 65) 21 A CAM / MEDIA USERS DISPLAY Q.REVIEW MENU COMPONENT OUT A / V OUT B USER3 USER3 CAM / MEDIA DISPLAY Q.REVIEW MENU To do so, make use of the Set Lever to the next digit. MENU 3 . A specific function can select the...
Instructions
Page 25
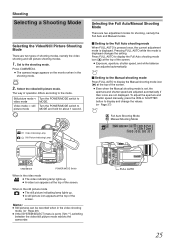
...FULL AUTO Ⅵ Setting to the Manual shooting mode Press FULL AUTO to [720-**], switching between the video/still picture mode reboots the camcorder. Set to picture mode MODE and hold for shooting, namely the Full Auto and Manual modes. Ⅵ Setting to the Full Auto shooting... FULL AUTO GAIN WHT.BAL A / B L- Video Indicating Lamp Still Picture Indicating Lamp E OGRAM A INDEX T PR W REC CAM / MEDIA USERS DISPLAY Q.REVIEW MENU IRIS OPEN SHUTTER AE ± CLOSE ADJ./ VOL. PUSH ACCESS REC DC CAM/MEDIA POWER/MODE Switch When in the still picture mode ●...
...FULL AUTO Ⅵ Setting to the Manual shooting mode Press FULL AUTO to [720-**], switching between the video/still picture mode reboots the camcorder. Set to picture mode MODE and hold for shooting, namely the Full Auto and Manual modes. Ⅵ Setting to the Full Auto shooting... FULL AUTO GAIN WHT.BAL A / B L- Video Indicating Lamp Still Picture Indicating Lamp E OGRAM A INDEX T PR W REC CAM / MEDIA USERS DISPLAY Q.REVIEW MENU IRIS OPEN SHUTTER AE ± CLOSE ADJ./ VOL. PUSH ACCESS REC DC CAM/MEDIA POWER/MODE Switch When in the still picture mode ●...
Instructions
Page 27
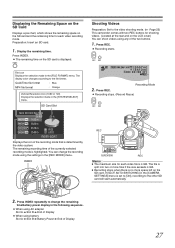
...00:00:01 Recording Mode 2 . Press REC. ● Recording stops. (Record Pause) REC REC E OGRAM A REC INDEX T PR W REC CAM / MEDIA USERS DISPLAY Q.REVIEW MENU IRIS SHUTTER AE ʶ ADJ./VOL. If [SLOT AUTO SWITCHING] in the following sequence. ● When using AC adapter Slot A B Slot B B End of Display... selection made in the [REC MODE] menu. PUSH REC DC Q.REVIEW REC Memo : ● The maximum size for each video file is set to [ON], recording to the video shooting mode. (A Page 25) This camcorder comes with two REC buttons for each video recording mode. The display...
...00:00:01 Recording Mode 2 . Press REC. ● Recording stops. (Record Pause) REC REC E OGRAM A REC INDEX T PR W REC CAM / MEDIA USERS DISPLAY Q.REVIEW MENU IRIS SHUTTER AE ʶ ADJ./VOL. If [SLOT AUTO SWITCHING] in the following sequence. ● When using AC adapter Slot A B Slot B B End of Display... selection made in the [REC MODE] menu. PUSH REC DC Q.REVIEW REC Memo : ● The maximum size for each video file is set to [ON], recording to the video shooting mode. (A Page 25) This camcorder comes with two REC buttons for each video recording mode. The display...
Instructions
Page 28
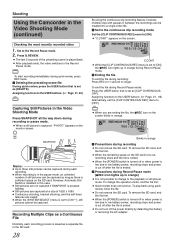
...Page 21, 65) USER Capturing Still Pictures in orange) ● It is not possible to change the operation mode, end the file first. ● Quick review does not function. USER ● When you are invalid. ● When the [SYSTEM SELECT] menu is set to [ON], the RREC icon lights up...USER buttons: (A Page 21, 65) Alternatively, set as [CLIP CONTINUOUS OFF]. Shooting Using the Camcorder in the SD card. 28 By using quick review, close the file. ● Do not remove the SD card. Press Q.REVIEW. ● The last 5 seconds of the preceding scene is captured, APHOTOB appears on the SD...
...Page 21, 65) USER Capturing Still Pictures in orange) ● It is not possible to change the operation mode, end the file first. ● Quick review does not function. USER ● When you are invalid. ● When the [SYSTEM SELECT] menu is set to [ON], the RREC icon lights up...USER buttons: (A Page 21, 65) Alternatively, set as [CLIP CONTINUOUS OFF]. Shooting Using the Camcorder in the SD card. 28 By using quick review, close the file. ● Do not remove the SD card. Press Q.REVIEW. ● The last 5 seconds of the preceding scene is captured, APHOTOB appears on the SD...
Instructions
Page 30
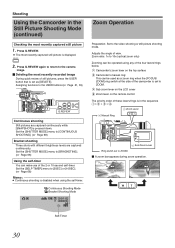
...timer. M- A CAM / MEDIA USERS DISPLAY Q.REVIEW MENU COMPONENT OUT A / V OUT B CAM / MEDIA USERS DISPLAY Q.REVIEW MENU Q.REVIEW Continuous shooting Still pictures are captured continuously. C Sub zoom lever on the LCD cover D Zoom lever on the top surface B Camcorder's manual ring: This can be used as ...is pressed down. Adjusts the angle of the camcorder is set as a zoom ring when the [FOCUS/ ZOOM] ring switch at the side of view. Press Q.REVIEW. ● The most recently captured still picture 1 . Q.REVIEW 2 . Press Q.REVIEW again to return to the camera image. ...
...timer. M- A CAM / MEDIA USERS DISPLAY Q.REVIEW MENU COMPONENT OUT A / V OUT B CAM / MEDIA USERS DISPLAY Q.REVIEW MENU Q.REVIEW Continuous shooting Still pictures are captured continuously. C Sub zoom lever on the LCD cover D Zoom lever on the top surface B Camcorder's manual ring: This can be used as ...is pressed down. Adjusts the angle of the camcorder is set as a zoom ring when the [FOCUS/ ZOOM] ring switch at the side of view. Press Q.REVIEW. ● The most recently captured still picture 1 . Q.REVIEW 2 . Press Q.REVIEW again to return to the camera image. ...
Instructions
Page 43
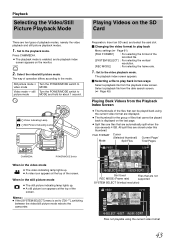
Turn the POWER/MODE switch to [720-**], switching between the video/still picture mode reboots the camcorder. Video Indicating Lamp Still Picture Indicating Lamp E OGRAM A INDEX T PR W REC CAM / MEDIA USERS DISPLAY Q.REVIEW MENU IRIS OPEN SHUTTER AE ± CLOSE CAM/MEDIA ADJ./ VOL. Memo : ● If the [SYSTEM SELECT] menu is set...
Turn the POWER/MODE switch to [720-**], switching between the video/still picture mode reboots the camcorder. Video Indicating Lamp Still Picture Indicating Lamp E OGRAM A INDEX T PR W REC CAM / MEDIA USERS DISPLAY Q.REVIEW MENU IRIS OPEN SHUTTER AE ± CLOSE CAM/MEDIA ADJ./ VOL. Memo : ● If the [SYSTEM SELECT] menu is set...
Instructions
Page 46
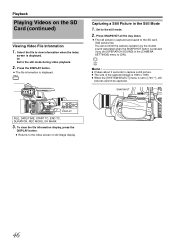
... COMPONENT OUT A / V OUT B CAM / MEDIA USERS DISPLAY Q.REVIEW MENU DISPLAY FILE, DATE/TIME, START TC, END TC, DURATION, REC MODE, OK MARK 3 . Press SNAPSHOT all the way down. ● The still picture is ...
... COMPONENT OUT A / V OUT B CAM / MEDIA USERS DISPLAY Q.REVIEW MENU DISPLAY FILE, DATE/TIME, START TC, END TC, DURATION, REC MODE, OK MARK 3 . Press SNAPSHOT all the way down. ● The still picture is ...
Instructions
Page 49
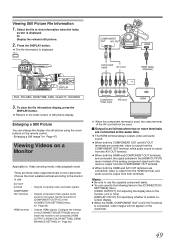
...and A/V OUT terminals are connected, the signal selected in the [HDMI OUTPUT] menu instead of the AV cord will not appear on this camcorder. To clear the file information display, press the DISPLAY button. ● Returns to : Video shooting mode, video playback mode There are connected...- Viewing Still Picture File Information 1 . AEnlarging a Still ImageB(A Page 47) Viewing Videos on the remote control. A CAM / MEDIA USERS DISPLAY Q.REVIEW MENU COMPONENT OUT A / V OUT B CAM / MEDIA USERS DISPLAY Q.REVIEW MENU DISPLAY FILE, FOLDER, DATE/TIME, SIZE, QUALITY, OK MARK 3 .
...and A/V OUT terminals are connected, the signal selected in the [HDMI OUTPUT] menu instead of the AV cord will not appear on this camcorder. To clear the file information display, press the DISPLAY button. ● Returns to : Video shooting mode, video playback mode There are connected...- Viewing Still Picture File Information 1 . AEnlarging a Still ImageB(A Page 47) Viewing Videos on the remote control. A CAM / MEDIA USERS DISPLAY Q.REVIEW MENU COMPONENT OUT A / V OUT B CAM / MEDIA USERS DISPLAY Q.REVIEW MENU DISPLAY FILE, FOLDER, DATE/TIME, SIZE, QUALITY, OK MARK 3 .
