
Instructions
Page 6
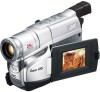
...• 5 Sec. Tracking Indicator pg. 10 " VOLUME: Speaker Volume Indicator pg. 10 6 REC pg. 10 3 Power Zoom Lever [T/W pg. 10 4 • Manual Focus Button [ FOCUS].... ੬ pg. 10 • Time Base Corrector Button [TBC]..... ੬ pg. 11 5 Shoulder Strap Eyelets pg. 9 6 S-Video Output ... } Bright Level Indicator pg. 15 V Focus Indicator pg. 10 0 Exposure Control Level Counter pg. 13 1 White Balance Mode Indicator pg. 14 2 S-VHS/S-VHS ET Recording Indicator..... ੬ pg. 15 3 Record-Standby Mode Indicator pg. 9 4 : Cassette Indicator pg. 9 5 TBC Indicator pg. 11 6 ...
...• 5 Sec. Tracking Indicator pg. 10 " VOLUME: Speaker Volume Indicator pg. 10 6 REC pg. 10 3 Power Zoom Lever [T/W pg. 10 4 • Manual Focus Button [ FOCUS].... ੬ pg. 10 • Time Base Corrector Button [TBC]..... ੬ pg. 11 5 Shoulder Strap Eyelets pg. 9 6 S-Video Output ... } Bright Level Indicator pg. 15 V Focus Indicator pg. 10 0 Exposure Control Level Counter pg. 13 1 White Balance Mode Indicator pg. 14 2 S-VHS/S-VHS ET Recording Indicator..... ੬ pg. 15 3 Record-Standby Mode Indicator pg. 9 4 : Cassette Indicator pg. 9 5 TBC Indicator pg. 11 6 ...
Instructions
Page 8
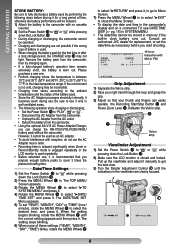
...wrong type of battery is closed and locked. Pull up the viewfinder and adjust it manually to get the best view. 3) Turn the Diopter Adjustment Control , until the correct setting appears ... Pass your thumb and fingers can charge the BN-V10U/V12U/V20U/V400U battery pack without the camcorder. The DATE/TIME SET Menu appears. 5) To set the date/time as an AC adapter. •... press it. 4) Rotate the MENU Wheel 1 to select "3DATE/ TIME SET" and press it. Consult an authorised JVC dealer for replacement, or set "YEAR", "MONTH", "DAY" or "TIME" (hour/ minute), rotate the MENU Wheel...
...wrong type of battery is closed and locked. Pull up the viewfinder and adjust it manually to get the best view. 3) Turn the Diopter Adjustment Control , until the correct setting appears ... Pass your thumb and fingers can charge the BN-V10U/V12U/V20U/V400U battery pack without the camcorder. The DATE/TIME SET Menu appears. 5) To set the date/time as an AC adapter. •... press it. 4) Rotate the MENU Wheel 1 to select "3DATE/ TIME SET" and press it. Consult an authorised JVC dealer for replacement, or set "YEAR", "MONTH", "DAY" or "TIME" (hour/ minute), rotate the MENU Wheel...

Instructions
Page 10
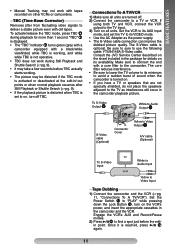
...Backlight Compensation, press BACKLIGHT ( again. BASIC FEATURES 5Sec. Backlight Compensation To increase the brightness of the last recording. 1) Make sure the camcorder is rewound for approx. 1 second and played back automatically, then pauses in Record-Standby mode for new recording. 3) Press the Recording... Start/Stop Button " to start of image may suffer. "3" appears and blinks. 4) To cancel the Manual Focus, press FOCUS 4. When Auto Tracking finishes, the indication disappears. • When noise bars appear during recording. " " < ...
...Backlight Compensation, press BACKLIGHT ( again. BASIC FEATURES 5Sec. Backlight Compensation To increase the brightness of the last recording. 1) Make sure the camcorder is rewound for approx. 1 second and played back automatically, then pauses in Record-Standby mode for new recording. 3) Press the Recording... Start/Stop Button " to start of image may suffer. "3" appears and blinks. 4) To cancel the Manual Focus, press FOCUS 4. When Auto Tracking finishes, the indication disappears. • When noise bars appear during recording. " " < ...
Instructions
Page 11
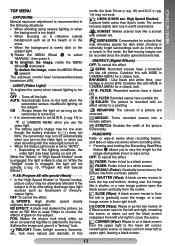
... to lower the TV volume to its VIDEO mode. • Use the AC Adapter as interference will occur in the camcorder playback picture. BASIC FEATURES • Manual Tracking may be distorted if the TBC mode is activated or deactivated at the edit-in/-out points or when normal playback... TBC is working, and white while TBC is displayed. • The "TBC" indicator 5 turns green (grey with a camcorder equipped with tapes recorded on other VCRs or camcorders. Consult the JVC Service Center described on all units are not specially shielded, do not place the speakers adjacent to a TV or VCR...
... to lower the TV volume to its VIDEO mode. • Use the AC Adapter as interference will occur in the camcorder playback picture. BASIC FEATURES • Manual Tracking may be distorted if the TBC mode is activated or deactivated at the edit-in/-out points or when normal playback... TBC is working, and white while TBC is displayed. • The "TBC" indicator 5 turns green (grey with a camcorder equipped with tapes recorded on other VCRs or camcorders. Consult the JVC Service Center described on all units are not specially shielded, do not place the speakers adjacent to a TV or VCR...
Instructions
Page 13
... in/out to a white screen. MOSAIC (Fader): Gradually turns/returns the picture into a mosaic pattern. AUTO: Automatically turns on the light when the camcorder senses insufficient lighting on the subject. While the "Sports" or "High Speed Shutter" mode is engaged, the light is likely to stay on...in the snow. • When the background is overly dark or the subject light. 1) Rotate the MENU Wheel 1 to select "MANUAL", then press it a "fantasy" look misty white, as the camcorder is turned on. • It is set M.W.B. (੬pg. 14) to in CAMERA MENU when you use the video light...
... in/out to a white screen. MOSAIC (Fader): Gradually turns/returns the picture into a mosaic pattern. AUTO: Automatically turns on the light when the camcorder senses insufficient lighting on the subject. While the "Sports" or "High Speed Shutter" mode is engaged, the light is likely to stay on...in the snow. • When the background is overly dark or the subject light. 1) Rotate the MENU Wheel 1 to select "MANUAL", then press it a "fantasy" look misty white, as the camcorder is turned on. • It is set M.W.B. (੬pg. 14) to in CAMERA MENU when you use the video light...

Instructions
Page 14
..." 1 stops blinking. • Once you can function. \ WIDE When set the tape length depending on the white paper, adjust focus manually (੬pg. 10, "Auto/Manual Focus"). Change the language in "LANGUAGE" in "TITLE SETUP" in CAMERA MENU. • { shows the selected title which remains until ...REC MODE Allows you to set to shoot dark scenes with a brighter image even if the picture becomes slightly coarse. TELE MACRO When set manually. HALOGEN: A video light or similar type of lighting is twice enlarged vertically than "NORMAL". Press the MENU Wheel 1 in 4 different languages...
..." 1 stops blinking. • Once you can function. \ WIDE When set the tape length depending on the white paper, adjust focus manually (੬pg. 10, "Auto/Manual Focus"). Change the language in "LANGUAGE" in "TITLE SETUP" in CAMERA MENU. • { shows the selected title which remains until ...REC MODE Allows you to set to shoot dark scenes with a brighter image even if the picture becomes slightly coarse. TELE MACRO When set manually. HALOGEN: A video light or similar type of lighting is twice enlarged vertically than "NORMAL". Press the MENU Wheel 1 in 4 different languages...
Instructions
Page 20
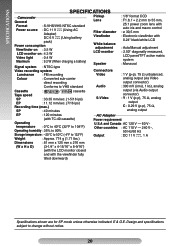
...the viewfinder fully tilted downward) Specifications shown are for SP mode unless otherwise indicated. E & O.E. SPECIFICATIONS SPECIFICATIONS Camcorder General Format : S-VHS/VHS NTSC standard Power source : DC 11 V (Using AC Adapter) DC 6 V (Using battery pack) Power consumption Viewfi...lens with auto iris and macro control : ø 30,5 mm : Electronic viewfinder with 0.24" black/white LCD : Auto/Manual adjustment : 2.50" diagonally measured, LCD panel/TFT active matrix system : Monaural Video recording system Luminance : FM recording Connectors Video : ...
...the viewfinder fully tilted downward) Specifications shown are for SP mode unless otherwise indicated. E & O.E. SPECIFICATIONS SPECIFICATIONS Camcorder General Format : S-VHS/VHS NTSC standard Power source : DC 11 V (Using AC Adapter) DC 6 V (Using battery pack) Power consumption Viewfi...lens with auto iris and macro control : ø 30,5 mm : Electronic viewfinder with 0.24" black/white LCD : Auto/Manual adjustment : 2.50" diagonally measured, LCD panel/TFT active matrix system : Monaural Video recording system Luminance : FM recording Connectors Video : ...
Instructions
Page 24
.... 15 Playback pg. 9 Auto Date Record pg. 15 Program AE with Special Effects pg. 13 Auto/Manual Focus pg. 10 Provided Accessories pg. 2 Auto Shut Off pg. 9 B Backlight Compensation pg. 10 ...The LCD Monitor.......... pg. 9, 15 C Q Quick Review pg. 10 R Recording pg. 9 Recording Format (S-VHS/ S-VHS ET).......pg. 15 Recording Mode pg. 14 Retake pg. 10 Cassette Adapter pg. 12 Rewind The Tape pg.... 9 Charging The Battery Pack pg. 7 Clean The Camcorder pg. 19 Connection To a VCR/ TV pg. 11 Counter Memory pg. 16 D Date/ Time Display...
.... 15 Playback pg. 9 Auto Date Record pg. 15 Program AE with Special Effects pg. 13 Auto/Manual Focus pg. 10 Provided Accessories pg. 2 Auto Shut Off pg. 9 B Backlight Compensation pg. 10 ...The LCD Monitor.......... pg. 9, 15 C Q Quick Review pg. 10 R Recording pg. 9 Recording Format (S-VHS/ S-VHS ET).......pg. 15 Recording Mode pg. 14 Retake pg. 10 Cassette Adapter pg. 12 Rewind The Tape pg.... 9 Charging The Battery Pack pg. 7 Clean The Camcorder pg. 19 Connection To a VCR/ TV pg. 11 Counter Memory pg. 16 D Date/ Time Display...


