
Instructions
Page 1
... , please read the safety information and precautions contained in this instruction manual are available on the World Wide Web for Digital Video Camera: http://www.jvc.co.jp/english/cyber/ For Accessories: http://www.jvc.co.jp/english/accessory/ Dear Customer, Thank you for future reference. which is located on the bottom of the camcorder.
... , please read the safety information and precautions contained in this instruction manual are available on the World Wide Web for Digital Video Camera: http://www.jvc.co.jp/english/cyber/ For Accessories: http://www.jvc.co.jp/english/accessory/ Dear Customer, Thank you for future reference. which is located on the bottom of the camcorder.
Instructions
Page 7
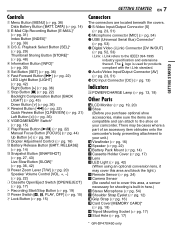
Playback Select Button [SEL]* (੬ pg. 29) Thumbnail Storing Button [STORE]* (੬ pg. 48) D Information Button [INFO]* (੬ pg. 30) E Set Button [SET] (੬ pg. 36) F Fast-Forward Button [5] (੬ pg. 22) LED Light Button [LIGHT] (੬ pg. 42) Right Button [>] (੬ pg. 36) G Stop Button [8] (੬ pg. 22) Backlight Compensation Button [BACK LIGHT] (੬ pg. 45) Down Button [ ] (੬ pg. 36) H Rewind Button [3] (੬ pg. 22) Quick Review Button [Q.REVIEW] (੬ pg. 21) Left Button [ GETTING STARTED Controls A Menu Button [MENU] (੬ pg. 36) Data ...
Playback Select Button [SEL]* (੬ pg. 29) Thumbnail Storing Button [STORE]* (੬ pg. 48) D Information Button [INFO]* (੬ pg. 30) E Set Button [SET] (੬ pg. 36) F Fast-Forward Button [5] (੬ pg. 22) LED Light Button [LIGHT] (੬ pg. 42) Right Button [>] (੬ pg. 36) G Stop Button [8] (੬ pg. 22) Backlight Compensation Button [BACK LIGHT] (੬ pg. 45) Down Button [ ] (੬ pg. 36) H Rewind Button [3] (੬ pg. 22) Quick Review Button [Q.REVIEW] (੬ pg. 21) Left Button [ GETTING STARTED Controls A Menu Button [MENU] (੬ pg. 36) Data ...

Instructions
Page 8
...(੬ pg. 31) e E-Mail Clip Recording Time (੬ pg. 31) * GR-DF470/450 only 8 EN GETTING STARTED LCD Monitor/Viewfinder Indications During Video Recording Only 1 2345 6 7 1h40m REC 8 9 0 q r SOUND 12 B I Insert Editing/Insert Editing Pause Mode (੬ pg. 55) J 5S...; pg. 38) L Time Code (੬ pg. 39, 41) M Digital Image Stabilizer ("DIS") (੬ pg. 38) N SOUND 12BIT/16BIT: Sound Mode Indicator (੬ pg. 37) (Appears for approx. 5 seconds after turning on the camcorder.) L : Auxiliary Microphone Level R Indicator (Appears when an optional microphone is...
...(੬ pg. 31) e E-Mail Clip Recording Time (੬ pg. 31) * GR-DF470/450 only 8 EN GETTING STARTED LCD Monitor/Viewfinder Indications During Video Recording Only 1 2345 6 7 1h40m REC 8 9 0 q r SOUND 12 B I Insert Editing/Insert Editing Pause Mode (੬ pg. 55) J 5S...; pg. 38) L Time Code (੬ pg. 39, 41) M Digital Image Stabilizer ("DIS") (੬ pg. 38) N SOUND 12BIT/16BIT: Sound Mode Indicator (੬ pg. 37) (Appears for approx. 5 seconds after turning on the camcorder.) L : Auxiliary Microphone Level R Indicator (Appears when an optional microphone is...

Instructions
Page 10
...9679; QuickTime is recommended that this camcorder is designed exclusively for the digital video cassette, SD Memory Card and MultiMediaCard. Remember that this unit. * Memory cards can become dirty more video than SP (Standard) mode, but JVC brand cassette tapes are either registered trademarks...for important recordings, we recommend using SP mode. Play back your camcorder for private consumer use JVC brand cassette tapes. Store the camcorder in a dusty area. This camcorder is not compatible with the MiniDV standard, but you record an event such as a show, performance...
...9679; QuickTime is recommended that this camcorder is designed exclusively for the digital video cassette, SD Memory Card and MultiMediaCard. Remember that this unit. * Memory cards can become dirty more video than SP (Standard) mode, but JVC brand cassette tapes are either registered trademarks...for important recordings, we recommend using SP mode. Play back your camcorder for private consumer use JVC brand cassette tapes. Store the camcorder in a dusty area. This camcorder is not compatible with the MiniDV standard, but you record an event such as a show, performance...

Instructions
Page 20
... EN VIDEO RECORDING NOTES: ● The image will not occur when "TELE MACRO" is set to "ON". (੬ pg. 38) Journalistic Shooting In some situations, different shooting angles may provide more dramatic results. Set "PRIORITY" to the desired mode in (T: Telephoto) 1 xW T 1 0 xW T 20xW T 40xW T 10 x W T Zoom out (W: Wide angle) Digital zoom zone 15X (optical) zoom zone...
... EN VIDEO RECORDING NOTES: ● The image will not occur when "TELE MACRO" is set to "ON". (੬ pg. 38) Journalistic Shooting In some situations, different shooting angles may provide more dramatic results. Set "PRIORITY" to the desired mode in (T: Telephoto) 1 xW T 1 0 xW T 20xW T 40xW T 10 x W T Zoom out (W: Wide angle) Digital zoom zone 15X (optical) zoom zone...

Instructions
Page 25
...SLOW (YI or IU) more than approx. 2 seconds. ● During Slow-Motion Playback, due to digital image processing, the picture may take on a mosaic effect. ● After SLOW (YI or IU) ...Button (੬ pg. 26) K A. o Zoom (T/W) Buttons Zoom in/out (੬ pg. 20, 26) (Also available with steady images. Zoom (T/W) SLOW (YI) PLAY (Left) SHIFT VIDEO PLAYBACK EN 25 PAUSE or (Up) SLOW (... is not a malfunction. q S.SHOT Button Functions the same as the Recording Start/ Stop Button on the camcorder. VIDEO RECORDING & PLAYBACK E INSERT Button (੬ pg. 55) F SHIFT Button (੬ pg. 26) G...
...SLOW (YI or IU) more than approx. 2 seconds. ● During Slow-Motion Playback, due to digital image processing, the picture may take on a mosaic effect. ● After SLOW (YI or IU) ...Button (੬ pg. 26) K A. o Zoom (T/W) Buttons Zoom in/out (੬ pg. 20, 26) (Also available with steady images. Zoom (T/W) SLOW (YI) PLAY (Left) SHIFT VIDEO PLAYBACK EN 25 PAUSE or (Up) SLOW (... is not a malfunction. q S.SHOT Button Functions the same as the Recording Start/ Stop Button on the camcorder. VIDEO RECORDING & PLAYBACK E INSERT Button (੬ pg. 55) F SHIFT Button (੬ pg. 26) G...

Instructions
Page 27
...40. 5 Press SNAPSHOT. To cancel the recording, release SNAPSHOT. Snapshot) You can use your camcorder as a Digital Still Camera for approx. 5 minutes when the Power Switch is supplied from the battery pack, the camcorder shuts off automatically to save power. The "O" indication appears while the snapshot is focused. SD ... x 768/STANDARD 65 145 310 640 Lock Button 1 Remove the lens cap. 2 Open the LCD monitor fully. (੬ pg. 19) 3 Set the VIDEO/MEMORY Switch to "MEMORY". 4 Set the Power Switch to "OFF". (੬ pg. 36, 38) MultiMediaCard Image Size/Picture Quality 8 MB* 16 MB ...
...40. 5 Press SNAPSHOT. To cancel the recording, release SNAPSHOT. Snapshot) You can use your camcorder as a Digital Still Camera for approx. 5 minutes when the Power Switch is supplied from the battery pack, the camcorder shuts off automatically to save power. The "O" indication appears while the snapshot is focused. SD ... x 768/STANDARD 65 145 310 640 Lock Button 1 Remove the lens cap. 2 Open the LCD monitor fully. (੬ pg. 19) 3 Set the VIDEO/MEMORY Switch to "MEMORY". 4 Set the Power Switch to "OFF". (੬ pg. 36, 38) MultiMediaCard Image Size/Picture Quality 8 MB* 16 MB ...

Instructions
Page 29
.... 1 Perform steps 1 - 3 in the memory card. Playback Zoom Available only with this camcorder are automatically numbered, then stored in numerical order in "Normal Playback Of Images". 2 If the image playback (IMAGE) screen appears, press SEL. DIGITAL STILL CAMERA (D.S.C.) RECORDING & PLAYBACK (GR-DF470/450 only) Playback Of Video Clips VIDEO/ < MEMORY > SET Lock Button 1 Load a memory...
.... 1 Perform steps 1 - 3 in the memory card. Playback Zoom Available only with this camcorder are automatically numbered, then stored in numerical order in "Normal Playback Of Images". 2 If the image playback (IMAGE) screen appears, press SEL. DIGITAL STILL CAMERA (D.S.C.) RECORDING & PLAYBACK (GR-DF470/450 only) Playback Of Video Clips VIDEO/ < MEMORY > SET Lock Button 1 Load a memory...

Instructions
Page 31
... Press the Recording Start/Stop Button to stop recording. ● "COMPLETED" is displayed, then the camcorder re-enters the E-Mail Clip Record-Standby mode. 7 Press E-MAIL to stop video playback. 7 At the point you want to start dubbing, press the Recording Start/Stop Button to ... E-Mail Clip Recording, press E-MAIL again or press 8 to stop E-Mail Clip Recording. ● "COMPLETED" is 3 minutes. ● The video clip files stored with MPEG4. DIGITAL STILL CAMERA (D.S.C.) RECORDING & PLAYBACK (GR-DF470/450 only) Image Size MultiMediaCard 8 MB* 16 MB 32 MB 160 x 120 8 min. 17 ...
... Press the Recording Start/Stop Button to stop recording. ● "COMPLETED" is displayed, then the camcorder re-enters the E-Mail Clip Record-Standby mode. 7 Press E-MAIL to stop video playback. 7 At the point you want to start dubbing, press the Recording Start/Stop Button to ... E-Mail Clip Recording, press E-MAIL again or press 8 to stop E-Mail Clip Recording. ● "COMPLETED" is 3 minutes. ● The video clip files stored with MPEG4. DIGITAL STILL CAMERA (D.S.C.) RECORDING & PLAYBACK (GR-DF470/450 only) Image Size MultiMediaCard 8 MB* 16 MB 32 MB 160 x 120 8 min. 17 ...

Instructions
Page 33
... 6 for all files you want to use the provided AC Adapter, as turning off the camcorder) during deletion. To remove protection from the currently displayed file 4 Press or to select "ALL...press DELETE SET. ● To cancel deletion, select "RETURN". ● Repeat steps 5 and 6 for video clips, display its playback screen. (੬ pg. 29) 2 Press MENU. NOTES: ● Protected files...delete the file... ...for images, display its playback screen. (੬ pg. 29) ...for DELETE? DIGITAL STILL CAMERA (D.S.C.) RECORDING & PLAYBACK (GR-DF470/450 only) NOTE: If the " " mark appears, ...
... 6 for all files you want to use the provided AC Adapter, as turning off the camcorder) during deletion. To remove protection from the currently displayed file 4 Press or to select "ALL...press DELETE SET. ● To cancel deletion, select "RETURN". ● Repeat steps 5 and 6 for video clips, display its playback screen. (੬ pg. 29) 2 Press MENU. NOTES: ● Protected files...delete the file... ...for images, display its playback screen. (੬ pg. 29) ...for DELETE? DIGITAL STILL CAMERA (D.S.C.) RECORDING & PLAYBACK (GR-DF470/450 only) NOTE: If the " " mark appears, ...

Instructions
Page 35
... becomes exhausted during initialization. CAUTION: While performing the above, never disconnect power, as turning off the camcorder) during initialization. ADDITIONAL FEATURES FOR D.S.C. (GR-DF470/450 only) EN 35 To Reset The Number ...1 - 3 in the memory card, including those which have been protected, are cleared. 1 Set the VIDEO/MEMORY Switch to "MEMORY". 2 Set the Power Switch to "PLAY" while pressing down the Lock Button located... corrupted. The FORMAT screen appears. DIGITAL STILL CAMERA (D.S.C.) RECORDING & PLAYBACK (GR-DF470/450 only) CAUTION: Do not perform any time.
... becomes exhausted during initialization. CAUTION: While performing the above, never disconnect power, as turning off the camcorder) during initialization. ADDITIONAL FEATURES FOR D.S.C. (GR-DF470/450 only) EN 35 To Reset The Number ...1 - 3 in the memory card, including those which have been protected, are cleared. 1 Set the VIDEO/MEMORY Switch to "MEMORY". 2 Set the Power Switch to "PLAY" while pressing down the Lock Button located... corrupted. The FORMAT screen appears. DIGITAL STILL CAMERA (D.S.C.) RECORDING & PLAYBACK (GR-DF470/450 only) CAUTION: Do not perform any time.

Instructions
Page 37
... that tapes recorded in the LP mode on this camcorder be played back on this case, using digital zoom, the zoom magnification will be limited to a maximum of 700X digital magnification. * Available only when the VIDEO/MEMORY Switch is bright. NAVIGATION (GR-DF470/450 ... Play) mode LP: Long Play-more economical, providing 1.5 times the recording time. By digitally processing and magnifying images, zooming is possible beyond 15X (the optical zoom limit), to 15X since digital zoom will be grainy, but the subject's movements are possible on the procedure, refer to both...
... that tapes recorded in the LP mode on this camcorder be played back on this case, using digital zoom, the zoom magnification will be limited to a maximum of 700X digital magnification. * Available only when the VIDEO/MEMORY Switch is bright. NAVIGATION (GR-DF470/450 ... Play) mode LP: Long Play-more economical, providing 1.5 times the recording time. By digitally processing and magnifying images, zooming is possible beyond 15X (the optical zoom limit), to 15X since digital zoom will be grainy, but the subject's movements are possible on the procedure, refer to both...

Instructions
Page 51
... 2 Start playback on the camcorder. (੬ pg. 22) 3 At the point you want to start dubbing, start dubbing. The core filter reduces interference. NOTES: ● After dubbing, set "S/AV INPUT" back to "OFF". ● Analog signals can be converted to digital signals with a core filter to... turn on its availability. NOTES: ● It is also possible to connect the yellow video cable. ADVANCED FEATURES The indication stops rotating. 9 Press 8 to return to the camcorder. Consult the JVC Service Center described on the sheet included in the package for details on /off the date...
... 2 Start playback on the camcorder. (੬ pg. 22) 3 At the point you want to start dubbing, start dubbing. The core filter reduces interference. NOTES: ● After dubbing, set "S/AV INPUT" back to "OFF". ● Analog signals can be converted to digital signals with a core filter to... turn on its availability. NOTES: ● It is also possible to connect the yellow video cable. ADVANCED FEATURES The indication stops rotating. 9 Press 8 to return to the camcorder. Consult the JVC Service Center described on the sheet included in the package for details on /off the date...

Instructions
Page 52
...Zoom" (੬ pg. 26) or "Playback Special Effects" (੬ pg. 26) is attempted or SNAPSHOT is pressed during dubbing, the dubbing may stop playback on this camcorder to a video unit equipped with a DV input connector using a DV cable as shown in step 4. To use the optional JVC VC-VDV204U DV cable. Since a digital... signal is sent, there is output from the camcorder onto another video unit equipped with a DV output connector using a DV cable as the power supply ...
...Zoom" (੬ pg. 26) or "Playback Special Effects" (੬ pg. 26) is attempted or SNAPSHOT is pressed during dubbing, the dubbing may stop playback on this camcorder to a video unit equipped with a DV input connector using a DV cable as shown in step 4. To use the optional JVC VC-VDV204U DV cable. Since a digital... signal is sent, there is output from the camcorder onto another video unit equipped with a DV output connector using a DV cable as the power supply ...

Instructions
Page 53
...instruction manuals of the PC and Software. ● The still images can use the optional JVC VC-VDV206U or VC-VDV204U DV cable depending on the type of DV connector (4 or ...on the LCD monitor, set "S/AV INPUT" to "OFF". (੬ pg. 36, 41) ● Digital Dubbing is performed in the sound mode recorded on the original tape, regardless of the current "SOUND MODE"... 37) Connection To A Personal Computer When connecting the camcorder to a PC using a DV cable, make sure to conduct video conferences over the Internet, using a camcorder. ADVANCED FEATURES CONTINUED ON NEXT PAGE If you are ...
...instruction manuals of the PC and Software. ● The still images can use the optional JVC VC-VDV206U or VC-VDV204U DV cable depending on the type of DV connector (4 or ...on the LCD monitor, set "S/AV INPUT" to "OFF". (੬ pg. 36, 41) ● Digital Dubbing is performed in the sound mode recorded on the original tape, regardless of the current "SOUND MODE"... 37) Connection To A Personal Computer When connecting the camcorder to a PC using a DV cable, make sure to conduct video conferences over the Internet, using a camcorder. ADVANCED FEATURES CONTINUED ON NEXT PAGE If you are ...

Instructions
Page 56
...) ● The battery is selected. HReplace with special effects and "DIS". (੬ pg. 36, 38, 47) Digital Zoom does not work. ● 15X optical zoom is dead. HSet "DATE/TIME" to "ON". (੬ pg. 36, 39) The LCD monitor or viewfinder indications ...blink. ● Certain Wipe/Fader effects, certain modes of noise appear during shooting, the screen becomes red or black for video playback. (੬ pg. 23) ● The cassette holder cover is selected. The camcorder...
...) ● The battery is selected. HReplace with special effects and "DIS". (੬ pg. 36, 38, 47) Digital Zoom does not work. ● 15X optical zoom is dead. HSet "DATE/TIME" to "ON". (੬ pg. 36, 39) The LCD monitor or viewfinder indications ...blink. ● Certain Wipe/Fader effects, certain modes of noise appear during shooting, the screen becomes red or black for video playback. (੬ pg. 23) ● The cassette holder cover is selected. The camcorder...

Instructions
Page 66
...Video output: Y: 1.0 V (p-p), 75 Ω, analog C: 0.29 V (p-p), 75 Ω, analog AV Video input: 0.8 V to 240 Vd, 50 Hz/60 Hz Output DC 11 V G, 1 A Specifications shown are for SP mode unless otherwise indicated. E & O.E. 66 EN SPECIFICATIONS Camcorder...distance: 1.5 m (5 ft) For Digital Video Camera Format DV format (SD mode) Signal format NTSC standard Recording/Playback format Video: Digital component recording Audio: PCM digital recording, 32 kHz 4-channel (12...min. Design and specifications subject to 39 mm, 15:1 power zoom lens Filter diameter ø30.5 mm LCD monitor 2.5" diagonally ...
...Video output: Y: 1.0 V (p-p), 75 Ω, analog C: 0.29 V (p-p), 75 Ω, analog AV Video input: 0.8 V to 240 Vd, 50 Hz/60 Hz Output DC 11 V G, 1 A Specifications shown are for SP mode unless otherwise indicated. E & O.E. 66 EN SPECIFICATIONS Camcorder...distance: 1.5 m (5 ft) For Digital Video Camera Format DV format (SD mode) Signal format NTSC standard Recording/Playback format Video: Digital component recording Audio: PCM digital recording, 32 kHz 4-channel (12...min. Design and specifications subject to 39 mm, 15:1 power zoom lens Filter diameter ø30.5 mm LCD monitor 2.5" diagonally ...


