
Instructions
Page 5
... a Cassette 16 Loading/Unloading a Memory Card 17 VIDEO RECORDING & PLAYBACK 18 VIDEO RECORDING 18 Basic Recording 18 Tape Remaining Time 18 Zooming 19 Journalistic Shooting 19 Time Code 19 Quick Review 20 Recording from the Middle of Files 27 Viewing File Information 27 Histogram (for Still Image Files 27 Removing On-Screen Display 27 ADDITIONAL FEATURES FOR D.S.C 28 Dubbing Still Images Recorded on a Tape to a Memory Card 28 Resetting The File Name 28 Protecting Files 28 Deleting Files 29 CONTENTS EN 5 Setting Print Information (DPOF Setting)........ 30 Direct Printing...
... a Cassette 16 Loading/Unloading a Memory Card 17 VIDEO RECORDING & PLAYBACK 18 VIDEO RECORDING 18 Basic Recording 18 Tape Remaining Time 18 Zooming 19 Journalistic Shooting 19 Time Code 19 Quick Review 20 Recording from the Middle of Files 27 Viewing File Information 27 Histogram (for Still Image Files 27 Removing On-Screen Display 27 ADDITIONAL FEATURES FOR D.S.C 28 Dubbing Still Images Recorded on a Tape to a Memory Card 28 Resetting The File Name 28 Protecting Files 28 Deleting Files 29 CONTENTS EN 5 Setting Print Information (DPOF Setting)........ 30 Direct Printing...

Instructions
Page 7
.... 25, 39) O Cassette Open/Eject Switch [OPEN/EJECT] (੬ pg. 16) P Power Zoom Lever [T/W] (੬ pg. 19) Speaker/Headphone Volume Control [VOL pg. 20) Q Manual Focus Dial (੬ pg. 41) R Focus Set Button [SET] (੬ pg. 41) S Manual Focus Button [FOCUS] (੬ pg. 41) T Program AE Button [PROGRAM AE] (੬ pg. 44) U Exposure Button [EXPOSURE] (੬ pg. 41) V Battery Release Switch [BATT. To stabilize the microphone, use of the camcorder and the microphone before attaching and removing them. ●...
.... 25, 39) O Cassette Open/Eject Switch [OPEN/EJECT] (੬ pg. 16) P Power Zoom Lever [T/W] (੬ pg. 19) Speaker/Headphone Volume Control [VOL pg. 20) Q Manual Focus Dial (੬ pg. 41) R Focus Set Button [SET] (੬ pg. 41) S Manual Focus Button [FOCUS] (੬ pg. 41) T Program AE Button [PROGRAM AE] (੬ pg. 44) U Exposure Button [EXPOSURE] (੬ pg. 41) V Battery Release Switch [BATT. To stabilize the microphone, use of the camcorder and the microphone before attaching and removing them. ●...

Instructions
Page 9
...; pg. 25, 39) M Brightness Control Indicator (੬ pg. 16) N Battery Remaining Power Indicator (੬ pg. 54) O Date/Time (੬ pg. 15, 36) P Manual Focus Adjustment Indicator (੬ pg. 41) Q Flash Indicator (੬ pg. 39) During Video Playback 12BIT/MIX L MIC BLANK SEARCH PUSH "STOP" BUTTON TO CANCEL 50m L VOLUME R NOV 10 '05 20:21:25 10:00 AM GETTING STARTED EN 9 H VOLUME: Volume Level Indicator (speaker or headphone...
...; pg. 25, 39) M Brightness Control Indicator (੬ pg. 16) N Battery Remaining Power Indicator (੬ pg. 54) O Date/Time (੬ pg. 15, 36) P Manual Focus Adjustment Indicator (੬ pg. 41) Q Flash Indicator (੬ pg. 39) During Video Playback 12BIT/MIX L MIC BLANK SEARCH PUSH "STOP" BUTTON TO CANCEL 50m L VOLUME R NOV 10 '05 20:21:25 10:00 AM GETTING STARTED EN 9 H VOLUME: Volume Level Indicator (speaker or headphone...

Instructions
Page 13
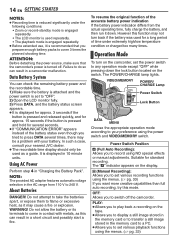
.... Charging the Battery Pack POWER/CHARGE Lamp Power Switch A Open the cover. Please purchase a new one. ● Since the AC adapter processes electricity internally, it first. ● Make sure to use the battery pack with JVC Data Battery. RELEASE. 3 Slide up the battery pack until it only in place. 4 Connect the AC adapter to the camcorder. 5 Plug the AC adapter into an AC outlet. The camcorder does not turn off . Power This camcorder's 2-way power...
.... Charging the Battery Pack POWER/CHARGE Lamp Power Switch A Open the cover. Please purchase a new one. ● Since the AC adapter processes electricity internally, it first. ● Make sure to use the battery pack with JVC Data Battery. RELEASE. 3 Slide up the battery pack until it only in place. 4 Connect the AC adapter to the camcorder. 5 Plug the AC adapter into an AC outlet. The camcorder does not turn off . Power This camcorder's 2-way power...
Instructions
Page 14
... times. ATTENTION: Before detaching the power source, make sure that you to display a still image stored in the memory card or to flame or excessive heat, as this mode. However this function may not turn on the switch. Operation Mode To turn back if the battery was used for a long period of the battery status even though you tried to your battery. VIDEO/MEMORY POWER/ CHARGE Lamp Power Switch A Lock Button DATA MENU Choose the appropriate operation mode...
... times. ATTENTION: Before detaching the power source, make sure that you to display a still image stored in the memory card or to flame or excessive heat, as this mode. However this function may not turn on the switch. Operation Mode To turn back if the battery was used for a long period of the battery status even though you tried to your battery. VIDEO/MEMORY POWER/ CHARGE Lamp Power Switch A Lock Button DATA MENU Choose the appropriate operation mode...

Instructions
Page 25
... delete unwanted still images, refer to "Deleting Files" (੬ pg. 29). ● When you do not want to hear the shutter sound, set "BEEP" to "OFF". (੬ pg. 33, 35) NOTES: ● If shooting is set "C SHOOTING" to serial photography. DIGITAL STILL CAMERA (D.S.C.) RECORDING & PLAYBACK SNAPSHOT 1 Remove the lens cap. 2 Open the LCD monitor fully. (੬ pg. 12) 3 Set the VIDEO/MEMORY switch to "MEMORY". 4 Set the power switch to the +0.3EV and -0.3EV sides. To use your camcorder as a Digital...
... delete unwanted still images, refer to "Deleting Files" (੬ pg. 29). ● When you do not want to hear the shutter sound, set "BEEP" to "OFF". (੬ pg. 33, 35) NOTES: ● If shooting is set "C SHOOTING" to serial photography. DIGITAL STILL CAMERA (D.S.C.) RECORDING & PLAYBACK SNAPSHOT 1 Remove the lens cap. 2 Open the LCD monitor fully. (੬ pg. 12) 3 Set the VIDEO/MEMORY switch to "MEMORY". 4 Set the power switch to the +0.3EV and -0.3EV sides. To use your camcorder as a Digital...

Instructions
Page 27
... left , the darker the image. The sub menu appears. 4 Press Up (4/9) or Down (8) to the 4 5 6 desired file. 4 Press SET. Operation mode indicator Folder/file number 100-0013 MENU DIGITAL STILL CAMERA (D.S.C.) RECORDING & PLAYBACK Histogram (for each brightness level. Index number Viewing File Information You can get the relevant file information by pressing the INFO button during shooting is displayed. To turn off the histogram Press INFO once. Removing On-Screen Display 1 Perform steps 1 - 3 in center...
... left , the darker the image. The sub menu appears. 4 Press Up (4/9) or Down (8) to the 4 5 6 desired file. 4 Press SET. Operation mode indicator Folder/file number 100-0013 MENU DIGITAL STILL CAMERA (D.S.C.) RECORDING & PLAYBACK Histogram (for each brightness level. Index number Viewing File Information You can get the relevant file information by pressing the INFO button during shooting is displayed. To turn off the histogram Press INFO once. Removing On-Screen Display 1 Perform steps 1 - 3 in center...

Instructions
Page 32
... perform any time. The menu screen appears. 4 Press Up (4/9) or FORMAT Down (8) to use the DPOF setting. (੬ pg. 30) 1 Perform steps 1 - 3 in the memory card, including those which have been protected, are cleared. 1 Set the VIDEO/MEMORY switch to "MEMORY". 2 Set the power switch to "PLAY" while pressing down the lock button located on the switch. 3 Press MENU. SELECTED PRINT DPOF PRINT CANCEL The image is finished, "NO IMAGES STORED" appears...
... perform any time. The menu screen appears. 4 Press Up (4/9) or FORMAT Down (8) to use the DPOF setting. (੬ pg. 30) 1 Perform steps 1 - 3 in the memory card, including those which have been protected, are cleared. 1 Set the VIDEO/MEMORY switch to "MEMORY". 2 Set the power switch to "PLAY" while pressing down the lock button located on the switch. 3 Press MENU. SELECTED PRINT DPOF PRINT CANCEL The image is finished, "NO IMAGES STORED" appears...
Instructions
Page 34
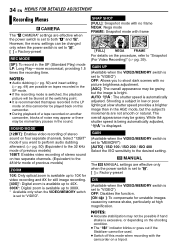
... lighting at high magnification. The overall appearance may be changed only when the power switch is set to both "A" and "M". 34 EN MENUS FOR DETAILED ADJUSTMENT Recording Menus CAMERA The "m CAMERA" settings are effective when the power switch is set to "M". [ ] = Factory-preset REC MODE [SP]: To record in the SP (Standard Play) mode LP: Long Play-more economical, providing 1.5 times the recording time. However, the menu settings can be momentary pauses in the sound. SOUND MODE [12BIT]: Enables video recording...
... lighting at high magnification. The overall appearance may be changed only when the power switch is set to both "A" and "M". 34 EN MENUS FOR DETAILED ADJUSTMENT Recording Menus CAMERA The "m CAMERA" settings are effective when the power switch is set to "M". [ ] = Factory-preset REC MODE [SP]: To record in the SP (Standard Play) mode LP: Long Play-more economical, providing 1.5 times the recording time. However, the menu settings can be momentary pauses in the sound. SOUND MODE [12BIT]: Enables video recording...
Instructions
Page 39
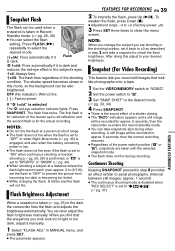
... an effect similar to serial photography. (Interval between still images: approx. 1 second) ● The continuous shooting mode is disabled when "REC SELECT" is dark and reduces the red-eye effect in this adjust to ±0 as described in Record- When you took look like photographs onto a tape. 1 Set the VIDEO/MEMORY switch to "VIDEO". 2 Set the power switch to "M". 3 Set "SNAP SHOT" to close the menu screen. Press FLASH (5) repeatedly to select...
... an effect similar to serial photography. (Interval between still images: approx. 1 second) ● The continuous shooting mode is disabled when "REC SELECT" is dark and reduces the red-eye effect in this adjust to ±0 as described in Record- When you took look like photographs onto a tape. 1 Set the VIDEO/MEMORY switch to "VIDEO". 2 Set the power switch to "M". 3 Set "SNAP SHOT" to close the menu screen. Press FLASH (5) repeatedly to select...
Instructions
Page 41
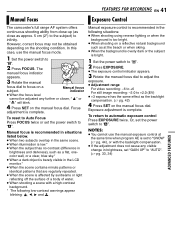
... reset to Auto Focus Press FOCUS twice or set the power switch to "AUTO". (੬ pg. 33, 34) ADVANCED FEATURES However, correct focus may not be adjusted any visible change in brightness, set to "M". 2 Press FOCUS. FEATURES FOR RECORDING EN 41 Manual Focus Exposure Control The camcorder's full range AF system offers continuous shooting ability from close-up (as close as the backlight compensation. (੬ pg. 42) 4 Press SET on the manual focus...
... reset to Auto Focus Press FOCUS twice or set the power switch to "AUTO". (੬ pg. 33, 34) ADVANCED FEATURES However, correct focus may not be adjusted any visible change in brightness, set to "M". 2 Press FOCUS. FEATURES FOR RECORDING EN 41 Manual Focus Exposure Control The camcorder's full range AF system offers continuous shooting ability from close-up (as close as the backlight compensation. (੬ pg. 42) 4 Press SET on the manual focus...

Instructions
Page 49
... connected to the camcorder via the USB cable is not powered, the camcorder does not enter the USB mode. ● The date/time information cannot be captured into a previously recorded tape, replacing a section of the PC and Software. ● The still images can be transferred to a PC with minimal picture distortion at this point REW INSERT START/ STOP PAUSE STOP (੬ pg. 19) since it again to resume editing. 5 When the time code...
... connected to the camcorder via the USB cable is not powered, the camcorder does not enter the USB mode. ● The date/time information cannot be captured into a previously recorded tape, replacing a section of the PC and Software. ● The still images can be transferred to a PC with minimal picture distortion at this point REW INSERT START/ STOP PAUSE STOP (੬ pg. 19) since it again to resume editing. 5 When the time code...
Instructions
Page 53
... cable was plugged/unplugged with high-precision technology. HSet the date/time. (੬ pg. 15) ● The built-in the memory card a few more than 99.99%) The cassette will not load properly. ● The battery's charge is not a malfunction. When the camcorder is not a malfunction. HTurn the camcorder's power off and on the LCD monitor. ● The LCD monitor's brightness setting is made with power turned...
... cable was plugged/unplugged with high-precision technology. HSet the date/time. (੬ pg. 15) ● The built-in the memory card a few more than 99.99%) The cassette will not load properly. ● The battery's charge is not a malfunction. When the camcorder is not a malfunction. HTurn the camcorder's power off and on the LCD monitor. ● The LCD monitor's brightness setting is made with power turned...

Instructions
Page 54
LENS CAP Appears for replacement. Use an optional cleaning cassette. (੬ pg. 58) SET DATE/TIME! ● Appears when the date/time is displayed in clock battery has run out and the previously set date/time has been erased. A. 54 EN TROUBLESHOOTING Warning Indications Displays the battery remaining power. When the remaining recordable time is more than 30 minutes, it is displayed in 10-minute units and when the time is less than 30 minutes...
LENS CAP Appears for replacement. Use an optional cleaning cassette. (੬ pg. 58) SET DATE/TIME! ● Appears when the date/time is displayed in clock battery has run out and the previously set date/time has been erased. A. 54 EN TROUBLESHOOTING Warning Indications Displays the battery remaining power. When the remaining recordable time is more than 30 minutes, it is displayed in 10-minute units and when the time is less than 30 minutes...

Instructions
Page 55
Appears if insert editing is attempted on a blank portion of a tape. (੬ pg. 49) INSERT ERROR! TROUBLESHOOTING EN 55 INSERT ERROR!
Appears if insert editing is attempted on a blank portion of a tape. (੬ pg. 49) INSERT ERROR! TROUBLESHOOTING EN 55 INSERT ERROR!

Instructions
Page 58
.... ... never unload the memory card and never turn off the camcorder. ● Store memory cards ... away from metallic objects when not in use . where they won 't be sure to the video heads may heat up. ... short-circuit the terminals of noise appear during recording, playback, deletion, initialization, etc.) ... remove the battery pack or disconnect the power supply while the power is being accessed (during playback. ... near a heater. ●...
.... ... never unload the memory card and never turn off the camcorder. ● Store memory cards ... away from metallic objects when not in use . where they won 't be sure to the video heads may heat up. ... short-circuit the terminals of noise appear during recording, playback, deletion, initialization, etc.) ... remove the battery pack or disconnect the power supply while the power is being accessed (during playback. ... near a heater. ●...
Instructions
Page 60
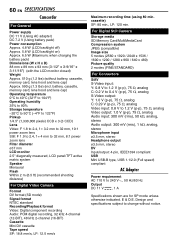
... mm, 8:1 power zoom lens Filter diameter ø37 mm LCD monitor 2.5" diagonally measured, LCD panel/TFT active matrix system Speaker Monaural Flash Within 2 m (6.5 ft) (recommended shooting distance) For Digital Video Camera Format DV format (SD mode) Signal format NTSC standard Recording/Playback format Video: Digital component recording Audio: PCM digital recording, 32 kHz 4-channel (12-BIT), 48 kHz 2-channel (16-BIT) Cassette Mini DV cassette Tape speed SP: 18.8 mm/s, LP: 12.5 mm/s Maximum recording time (using 80 min. battery, cassette, memory card, lens hood and lens cap) Operating...
... mm, 8:1 power zoom lens Filter diameter ø37 mm LCD monitor 2.5" diagonally measured, LCD panel/TFT active matrix system Speaker Monaural Flash Within 2 m (6.5 ft) (recommended shooting distance) For Digital Video Camera Format DV format (SD mode) Signal format NTSC standard Recording/Playback format Video: Digital component recording Audio: PCM digital recording, 32 kHz 4-channel (12-BIT), 48 kHz 2-channel (16-BIT) Cassette Mini DV cassette Tape speed SP: 18.8 mm/s, LP: 12.5 mm/s Maximum recording time (using 80 min. battery, cassette, memory card, lens hood and lens cap) Operating...
Software Guide
Page 5
... Recording function. 1 Load the provided CD-ROM into a variety of the selected driver or software starts. Digital Photo Navigator 1.0 This application is already installed, uninstall the software, then install the supplied CyberLink DVD Solution. You can read and write memory cards in the camcorder. NOTE: Install G.726 decoder only when the camcorder is not displayed. You can also edit imported video. G.726 decoder This is software for easily capturing video from still images...
... Recording function. 1 Load the provided CD-ROM into a variety of the selected driver or software starts. Digital Photo Navigator 1.0 This application is already installed, uninstall the software, then install the supplied CyberLink DVD Solution. You can read and write memory cards in the camcorder. NOTE: Install G.726 decoder only when the camcorder is not displayed. You can also edit imported video. G.726 decoder This is software for easily capturing video from still images...

Software Guide
Page 11
... the desktop. Video clips (Only for a while, and then proceed to step 5. 5 Disconnect the USB cable. ● If any message appears, click [OK]. 6 Set the camcorder's Power Switch to the PC correctly, the [Removable Disk] icon appears. 3 Right-click the [Removable Disk] icon in the menu. Playing Back Files on the PC (Windows®) Still images Use an application that you cannot play back the file will be downloaded automatically, and...
... the desktop. Video clips (Only for a while, and then proceed to step 5. 5 Disconnect the USB cable. ● If any message appears, click [OK]. 6 Set the camcorder's Power Switch to the PC correctly, the [Removable Disk] icon appears. 3 Right-click the [Removable Disk] icon in the menu. Playing Back Files on the PC (Windows®) Still images Use an application that you cannot play back the file will be downloaded automatically, and...

Software Guide
Page 15
... User's Guide and Help files are versions with E-Mail Clip Recording function) Use the Windows Media™ Player for Mac from Adobe's web site: http:// www.adobe.com/ - 15 - For information about the differences with the commercial version, see the Readme file for the respective program. Ⅲ Digital Photo Navigator ● The instruction manual is currently displayed, wait until it disappears before proceeding. 3 Disconnect the USB cable. 4 Set the camcorder's Power Switch...
... User's Guide and Help files are versions with E-Mail Clip Recording function) Use the Windows Media™ Player for Mac from Adobe's web site: http:// www.adobe.com/ - 15 - For information about the differences with the commercial version, see the Readme file for the respective program. Ⅲ Digital Photo Navigator ● The instruction manual is currently displayed, wait until it disappears before proceeding. 3 Disconnect the USB cable. 4 Set the camcorder's Power Switch...


