
Instructions
Page 2
...or more core filter. OPTIONAL ACCESSORIES • Battery Packs BN-V12U, BN-V20U, BN- PROVIDED ACCESSORIES PROVIDED ACCESSORIES How To Attach The Core filter Attach the core filters to the camcorder. Please consult your nearest JVC dealer for SVideo cable) QQR0491-002 or QQR1417-002 ...outside of the core filter. AC Adapter AP-V14U or AP-V18U Battery Pack BN-V10U Lens Cap Stopper 2) Run the cable through the core filter, leaving approx. 3 cm of the camcorder, provided cables may be connected to maintain optimum performance of cable between the...
...or more core filter. OPTIONAL ACCESSORIES • Battery Packs BN-V12U, BN-V20U, BN- PROVIDED ACCESSORIES PROVIDED ACCESSORIES How To Attach The Core filter Attach the core filters to the camcorder. Please consult your nearest JVC dealer for SVideo cable) QQR0491-002 or QQR1417-002 ...outside of the core filter. AC Adapter AP-V14U or AP-V18U Battery Pack BN-V10U Lens Cap Stopper 2) Run the cable through the core filter, leaving approx. 3 cm of the camcorder, provided cables may be connected to maintain optimum performance of cable between the...

Instructions
Page 3
...main unit. • The rating information and safety caution of the AC Adapter are possible anywhere. • Use the JVC BN-V10U/V12U/V20U/V400U battery packs and, to recharge them or to supply power to accommodate different designs of its upper and lower sides. At the... contact your local solid waste officials for playback with your local authorities, or the Electronics Industries Alliance: CAUTIONS • This camcorder is designed to be used with arrowhead symbol, within an equilateral triangle, is intended to alert the user to environmental considerations. Check with...
...main unit. • The rating information and safety caution of the AC Adapter are possible anywhere. • Use the JVC BN-V10U/V12U/V20U/V400U battery packs and, to recharge them or to supply power to accommodate different designs of its upper and lower sides. At the... contact your local solid waste officials for playback with your local authorities, or the Electronics Industries Alliance: CAUTIONS • This camcorder is designed to be used with arrowhead symbol, within an equilateral triangle, is intended to alert the user to environmental considerations. Check with...
Instructions
Page 4
... the trash or the municipal waste stream, which may be caused.) IMPORTANT SAFETY INSTRUCTIONS 1)Read these instructions. 2)Keep these batteries at the rear). JVC's involvement in this program is voluntarily participating in accordance with the manufacturer's instructions. 8) Do not install near water. 6)...etc.) on top of service in your area. SAFETY PRECAUTIONS The EPA certified RBRC® Battery Recycling Seal on the nickel-cadmium (Ni-Cd) battery indicates JVC is part of our commitment to preserving our environment and conserving our natural resources. Please call 1-800...
... the trash or the municipal waste stream, which may be caused.) IMPORTANT SAFETY INSTRUCTIONS 1)Read these instructions. 2)Keep these batteries at the rear). JVC's involvement in this program is voluntarily participating in accordance with the manufacturer's instructions. 8) Do not install near water. 6)...etc.) on top of service in your area. SAFETY PRECAUTIONS The EPA certified RBRC® Battery Recycling Seal on the nickel-cadmium (Ni-Cd) battery indicates JVC is part of our commitment to preserving our environment and conserving our natural resources. Please call 1-800...
Instructions
Page 6
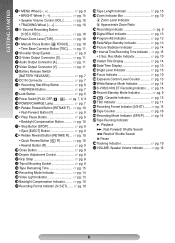
... Corrector Button [TBC]..... ੬ pg. 11 5 Shoulder Strap Eyelets pg. 9 6 S-Video Output Connector [S pg. 11 7 Audio Output Connector [A pg. 11 8 Video Output Connector [V pg. 11 9 Battery Release Switch [BATTERY RELEASE pg. 7 ! Second Recording Button [5 SEC.
... Corrector Button [TBC]..... ੬ pg. 11 5 Shoulder Strap Eyelets pg. 9 6 S-Video Output Connector [S pg. 11 7 Audio Output Connector [A pg. 11 8 Video Output Connector [V pg. 11 9 Battery Release Switch [BATTERY RELEASE pg. 7 ! Second Recording Button [5 SEC.

Instructions
Page 7
...lamp % stops blinking and turns off, charging is turned off. ATTENTION: Before detaching the power source, make sure that the camcorder's power is finished. Battery Pack BN-V10U BN-V12U (optional) BN-V20U (optional) BN-V400U (optional) Charging time approx. 1 hr. 30 min.... do so can cause the camcorder to the camcorder and push the battery in until it for a long period of time, otherwise the battery performance will be reduced. 1) Perform steps 1) through 3) of "Charging the Battery Pack". 2) Press REFRESH " for a fully discharged battery pack. GETTING STARTED GETTING STARTED...
...lamp % stops blinking and turns off, charging is turned off. ATTENTION: Before detaching the power source, make sure that the camcorder's power is finished. Battery Pack BN-V10U BN-V12U (optional) BN-V20U (optional) BN-V400U (optional) Charging time approx. 1 hr. 30 min.... do so can cause the camcorder to the camcorder and push the battery in until it for a long period of time, otherwise the battery performance will be reduced. 1) Perform steps 1) through 3) of "Charging the Battery Pack". 2) Press REFRESH " for a fully discharged battery pack. GETTING STARTED GETTING STARTED...
Instructions
Page 8
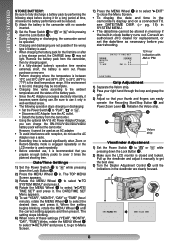
...an authorised JVC dealer for the first time or after a long storage period, the CHARGE lamp % may be operated. • Charging and discharging are clearly focused. 45° , PAU SE 8 When the setting begins blinking, rotate the MENU Wheel 1 until the indications in clock battery runs out....and on a connected TV, see DATE/TIME DISP. (੬ pg. 15) in SYSTEM MENU. • The date/time cannot be reduced. 1) Attach the battery to the camcorder with no cassette inserted. 2) Set the Power Switch $ to " " or " " while pressing down the Lock Button #. 2) Press the MENU Wheel 1 in...
...an authorised JVC dealer for the first time or after a long storage period, the CHARGE lamp % may be operated. • Charging and discharging are clearly focused. 45° , PAU SE 8 When the setting begins blinking, rotate the MENU Wheel 1 until the indications in clock battery runs out....and on a connected TV, see DATE/TIME DISP. (੬ pg. 15) in SYSTEM MENU. • The date/time cannot be reduced. 1) Attach the battery to the camcorder with no cassette inserted. 2) Set the Power Switch $ to " " or " " while pressing down the Lock Button #. 2) Press the MENU Wheel 1 in...
Instructions
Page 13
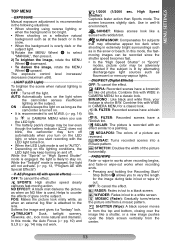
... fast. • In the "High Speed Shutter" or "Sports" modes, picture color may be low even though the battery indicator ( ) does not blink, the camcorder may turn off automatically when you turn on the LED light, or when you start recording with WIDE in well-lit environment... colors of the picture horizontally. MOSAIC (Fader): Gradually turns/returns the picture into a mosaic pattern. AUTO: Automatically turns on the light when the camcorder senses insufficient lighting on the subject. While the "Twilight" mode is engaged, the light will not activate. (੬ pg. 13, ...
... fast. • In the "High Speed Shutter" or "Sports" modes, picture color may be low even though the battery indicator ( ) does not blink, the camcorder may turn off automatically when you turn on the LED light, or when you start recording with WIDE in well-lit environment... colors of the picture horizontally. MOSAIC (Fader): Gradually turns/returns the picture into a mosaic pattern. AUTO: Automatically turns on the light when the camcorder senses insufficient lighting on the subject. While the "Twilight" mode is engaged, the light will not activate. (੬ pg. 13, ...
Instructions
Page 14
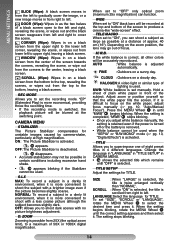
...) can function. \ WIDE When set to "ON", you adjust white balance manually, the setting is retained even if the power is turned off or the battery is possible from right to left. Hold a sheet of a black screen open to the left and right, revealing the scene, or wipes out and the...
...) can function. \ WIDE When set to "ON", you adjust white balance manually, the setting is retained even if the power is turned off or the battery is possible from right to left. Hold a sheet of a black screen open to the left and right, revealing the scene, or wipes out and the...

Instructions
Page 17
... TV's VIDEO/ TV Switch has not been set the camcorder to see if you can resume using the camcorder. Consult your nearest JVC dealer for head cleaning or replacement. and then reconnect it from the camcorder while the power is a good way to clear. When the battery power is great. TROUBLESHOOTING TROUBLESHOOTING Before consulting your...
... TV's VIDEO/ TV Switch has not been set the camcorder to see if you can resume using the camcorder. Consult your nearest JVC dealer for head cleaning or replacement. and then reconnect it from the camcorder while the power is a good way to clear. When the battery power is great. TROUBLESHOOTING TROUBLESHOOTING Before consulting your...

Instructions
Page 18
... recorded video and other than the USA Cassettes The provided AC Adapter features automatic voltage To properly use and store your nearest JVC dealer. Battery Packs The battery packs are within the tolerances shown in dusty places such as those specified. 2) Be sure to strong magnetic &#... from metallic objects when not in use. ... Main Unit 1) For safety, DO NOT... ... Keep it to run at all. leave the battery pack attached when the camcorder is dust or dirt on . ... near a television set. ... in places where humidity is positioned properly when For this AC plug adapter, ...
... recorded video and other than the USA Cassettes The provided AC Adapter features automatic voltage To properly use and store your nearest JVC dealer. Battery Packs The battery packs are within the tolerances shown in dusty places such as those specified. 2) Be sure to strong magnetic &#... from metallic objects when not in use. ... Main Unit 1) For safety, DO NOT... ... Keep it to run at all. leave the battery pack attached when the camcorder is dust or dirt on . ... near a television set. ... in places where humidity is positioned properly when For this AC plug adapter, ...
Instructions
Page 19
...try to correct the interference by pressing the Close button. 4 Close and lock the LCD monitor. 5 Slide BATTERY RELEASE to remove the battery pack. 6 Attach the provided lens cap to the camcorder's lens. 2) Cleaning The Camcorder 1 Gently wipe the exterior with a soft cloth, with diluted mild soap, wipe off and on a ... complies with the instructions, may form if the lens is left dirty. • When using the unit immediately and consult your local JVC dealer. 3 Blow the lens with a blower brush, then wipe it . CAUTIONS LCD Monitor 1) To prevent damage to radio communications.
...try to correct the interference by pressing the Close button. 4 Close and lock the LCD monitor. 5 Slide BATTERY RELEASE to remove the battery pack. 6 Attach the provided lens cap to the camcorder's lens. 2) Cleaning The Camcorder 1 Gently wipe the exterior with a soft cloth, with diluted mild soap, wipe off and on a ... complies with the instructions, may form if the lens is left dirty. • When using the unit immediately and consult your local JVC dealer. 3 Blow the lens with a blower brush, then wipe it . CAUTIONS LCD Monitor 1) To prevent damage to radio communications.
Instructions
Page 20
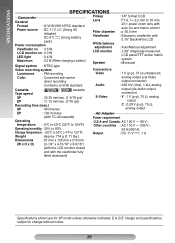
...64257;cations shown are for SP mode unless otherwise indicated. E & O.E. SPECIFICATIONS SPECIFICATIONS Camcorder General Format : S-VHS/VHS NTSC standard Power source : DC 11 V (Using AC Adapter) DC 6 V (Using battery pack) Power consumption Viewfinder on : 3.5 W LCD monitor on : 4.3... W LED light : 0.4 W Maximum : 9.2 W (When charging a battery) Signal system : NTSC-type Pickup Lens Filter diameter Viewfinder White balance...
...64257;cations shown are for SP mode unless otherwise indicated. E & O.E. SPECIFICATIONS SPECIFICATIONS Camcorder General Format : S-VHS/VHS NTSC standard Power source : DC 11 V (Using AC Adapter) DC 6 V (Using battery pack) Power consumption Viewfinder on : 3.5 W LCD monitor on : 4.3... W LED light : 0.4 W Maximum : 9.2 W (When charging a battery) Signal system : NTSC-type Pickup Lens Filter diameter Viewfinder White balance...
Instructions
Page 24
.... 10 R Recording pg. 9 Recording Format (S-VHS/ S-VHS ET).......pg. 16 Recording Mode pg. 14 Retake pg. 10 Rewind The Tape pg. 9 Charging The Battery Pack pg. 7 Clean The Camcorder pg. 19 Connection To a VCR/ TV pg. 11 Counter Memory pg. 16 D S Shoulder Strap Attachment pg. 9 Specifications pg. 20 Super LoLux... pg. 15 Program AE with Special Effects pg. 13 Auto/Manual Focus pg. 10 Provided Accessories pg. 2 Auto Shut Off pg. 9 B Backlight Compensation pg. 10 Battery Pack pg. 7, 18 Brighten/Darken The Image pg. 13 Brighten/Darken The LCD Monitor..........
.... 10 R Recording pg. 9 Recording Format (S-VHS/ S-VHS ET).......pg. 16 Recording Mode pg. 14 Retake pg. 10 Rewind The Tape pg. 9 Charging The Battery Pack pg. 7 Clean The Camcorder pg. 19 Connection To a VCR/ TV pg. 11 Counter Memory pg. 16 D S Shoulder Strap Attachment pg. 9 Specifications pg. 20 Super LoLux... pg. 15 Program AE with Special Effects pg. 13 Auto/Manual Focus pg. 10 Provided Accessories pg. 2 Auto Shut Off pg. 9 B Backlight Compensation pg. 10 Battery Pack pg. 7, 18 Brighten/Darken The Image pg. 13 Brighten/Darken The LCD Monitor..........


