Instructions
Page 6
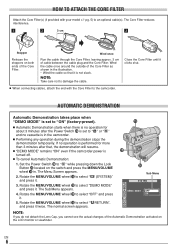
.... 1 2 3 cm 3 Stopper Release the stoppers on the LCD monitor or viewfinder. Close the Core Filter until it is in the illustration. • Wind the cable so that , the demonstration will resume. Ⅲ "DEMO MODE" remains "ON" even if the camcorder power is turned off. Ⅲ To cancel Automatic Demonstration: 1. Set the Power... select "OFF" and press it twice. HOW TO ATTACH THE CORE FILTER Attach the Core Filter(s) (if provided with the Core Filter to the camcorder. Wind once Run the cable through the Core Filter, leaving approx. 3 cm of the Core Filter as shown in the...
.... 1 2 3 cm 3 Stopper Release the stoppers on the LCD monitor or viewfinder. Close the Core Filter until it is in the illustration. • Wind the cable so that , the demonstration will resume. Ⅲ "DEMO MODE" remains "ON" even if the camcorder power is turned off. Ⅲ To cancel Automatic Demonstration: 1. Set the Power... select "OFF" and press it twice. HOW TO ATTACH THE CORE FILTER Attach the Core Filter(s) (if provided with the Core Filter to the camcorder. Wind once Run the cable through the Core Filter, leaving approx. 3 cm of the Core Filter as shown in the...
Instructions
Page 7
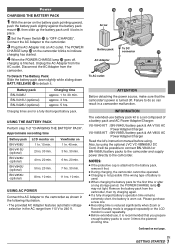
... purchase a new one. ● Recording time is reduced significantly when Zoom or Record-Standby mode is engaged repeatedly or the LCD monitor is used . ● When charging the battery pack for a fully discharged battery pack. INFORMATION The extended-use battery pack kit is a set ... Detach The Battery Pack: Slide the battery pack down slightly while sliding down BATT. Also, by using the optional JVC VC-VBN856U DC Cord, it is recommended that the camcorder's power is turned off , charging is not possible if the wrong type of a battery pack and AC Power Adapter/Charger: VU-...
... purchase a new one. ● Recording time is reduced significantly when Zoom or Record-Standby mode is engaged repeatedly or the LCD monitor is used . ● When charging the battery pack for a fully discharged battery pack. INFORMATION The extended-use battery pack kit is a set ... Detach The Battery Pack: Slide the battery pack down slightly while sliding down BATT. Also, by using the optional JVC VC-VBN856U DC Cord, it is recommended that the camcorder's power is turned off , charging is not possible if the wrong type of a battery pack and AC Power Adapter/Charger: VU-...
Instructions
Page 8
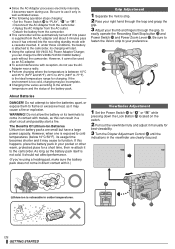
...becomes warm during use it only in well-ventilated areas. ● The following operation stops charging: • Set the Power Switch y to the camcorder. Be sure to fasten the Velcro strip to 77°F) is vulnerable in the viewfinder are small but have a large power capacity. The Benefits ... (below 10°C/50°F), its usage time becomes shorter and it may be automatically turned off if its power is not cold, it to "PLAY", " " or " ". • Disconnect the AC Adapter from the camcorder. • Unplug the AC Adapter from the AC outlet. • Detach the battery ...
...becomes warm during use it only in well-ventilated areas. ● The following operation stops charging: • Set the Power Switch y to the camcorder. Be sure to fasten the Velcro strip to 77°F) is vulnerable in the viewfinder are small but have a large power capacity. The Benefits ... (below 10°C/50°F), its usage time becomes shorter and it may be automatically turned off if its power is not cold, it to "PLAY", " " or " ". • Disconnect the AC Adapter from the camcorder. • Unplug the AC Adapter from the AC outlet. • Detach the battery ...

Instructions
Page 10
...the MENU/VOLUME wheel % to select " (CAMERA DISPLAY)" and press it. 4 Rotate the MENU/VOLUME wheel % to turn the camcorder off , however, it and "month" is turned on another camcorder, blocks of noise may appear or there may be momentary pauses in the sound. The Menu Screen closes. See page 14... parameter (month), the clock stops. Do not apply force. ● There may be a delay after you move the highlight bar to open the LCD monitor fully or pull out the viewfinder fully. AUTO T I SPLAY CLOCK ADJ . ● It takes a few seconds for information about recording from...
...the MENU/VOLUME wheel % to select " (CAMERA DISPLAY)" and press it. 4 Rotate the MENU/VOLUME wheel % to turn the camcorder off , however, it and "month" is turned on another camcorder, blocks of noise may appear or there may be momentary pauses in the sound. The Menu Screen closes. See page 14... parameter (month), the clock stops. Do not apply force. ● There may be a delay after you move the highlight bar to open the LCD monitor fully or pull out the viewfinder fully. AUTO T I SPLAY CLOCK ADJ . ● It takes a few seconds for information about recording from...
Instructions
Page 11
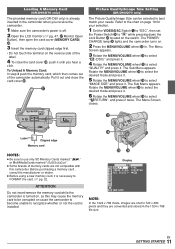
...turned on, as this camcorder. EN GETTING STARTED 11 Refer to the chart on page 18 for your needs. The Sub Menu appears. Before purchasing a memory card , consult its manufacturer or dealer. ● Before using a new memory card, it until you receive the camcorder. 1 Make sure the camcorder's power is off. 2 Open the LCD... ty Display DSC QUAL I ZE - 1024X768 REC SELECT- u Picture Quality/Image Size Setting (GR-D90/D70 only) The Picture Quality/Image Size can be corrupted or cause the camcorder to become unable to recognize whether or not the card is necessary to FORMAT the card. &#...
...turned on, as this camcorder. EN GETTING STARTED 11 Refer to the chart on page 18 for your needs. The Sub Menu appears. Before purchasing a memory card , consult its manufacturer or dealer. ● Before using a new memory card, it until you receive the camcorder. 1 Make sure the camcorder's power is off. 2 Open the LCD... ty Display DSC QUAL I ZE - 1024X768 REC SELECT- u Picture Quality/Image Size Setting (GR-D90/D70 only) The Picture Quality/Image Size can be corrupted or cause the camcorder to become unable to recognize whether or not the card is necessary to FORMAT the card. &#...
Instructions
Page 12
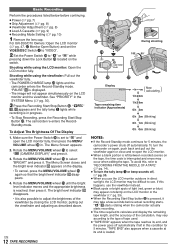
...6 appears and the tally lamp 3 lights while recording is also possible to "RECORDING FROM THE MIDDLE OF A TAPE" (੬ pg. 14). ● To turn the camcorder on the tape, the time code is loaded. The bright level indicator t disappears. • It is in . Rotate the MENU/VOLUME wheel % to " "...pg. 30). 3 Press the Recording Start/Stop Button w. The Menu Screen closes and the bright level indicator t appears on the switch. For GR-D90/D70 Owners: Open the LCD monitor (੬ pg. 47, u Monitor Open Button) and set to select " (CAMERA DISPLAY)" and press it . EN 12 TAPE ...
...6 appears and the tally lamp 3 lights while recording is also possible to "RECORDING FROM THE MIDDLE OF A TAPE" (੬ pg. 14). ● To turn the camcorder on the tape, the time code is loaded. The bright level indicator t disappears. • It is in . Rotate the MENU/VOLUME wheel % to " "...pg. 30). 3 Press the Recording Start/Stop Button w. The Menu Screen closes and the bright level indicator t appears on the switch. For GR-D90/D70 Owners: Open the LCD monitor (੬ pg. 47, u Monitor Open Button) and set to select " (CAMERA DISPLAY)" and press it . EN 12 TAPE ...
Instructions
Page 13
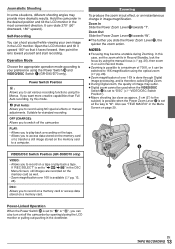
...different shooting angles may become unstable during Zooming. It can shoot yourself while viewing your preference using the Power Switch y and VIDEO/DSC Switch 4 (GR-D90/D70 only). Operation Mode Choose the appropriate operation mode according to your own image in the Menu Screen on page 29. & 4 y Power... / " in the DSC Menu Screen, still images are recorded on /off the camcorder. If "REC SELECT" is available (੬ pg. 13, 28). Open the LCD monitor and tilt it upward 180° so that it can also turn on the memory card as approx. 5 cm (2") to the subject) is possible ...
...different shooting angles may become unstable during Zooming. It can shoot yourself while viewing your preference using the Power Switch y and VIDEO/DSC Switch 4 (GR-D90/D70 only). Operation Mode Choose the appropriate operation mode according to your own image in the Menu Screen on page 29. & 4 y Power... / " in the DSC Menu Screen, still images are recorded on /off the camcorder. If "REC SELECT" is available (੬ pg. 13, 28). Open the LCD monitor and tilt it upward 180° so that it can also turn on the memory card as approx. 5 cm (2") to the subject) is possible ...
Instructions
Page 15
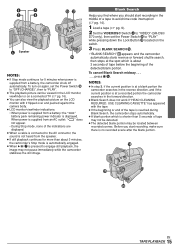
...VIDEO/DSC Switch 4 to "VIDEO" (GR-D90/ D70 only), then set the Power Switch y to "OFF (CHARGE)", then to the AV connector, the sound is about 3 minutes, the camcorder's Stop mode is automatically engaged. ●...; When 4/6 7 is no recorded scene after the blank portion. * t y EN TAPE PLAYBACK 15 To turn on again, set the ...Power Switch y to engage still playback, the image may be viewed in the LCD monitor, viewfinder or on a connected TV (੬...
...VIDEO/DSC Switch 4 to "VIDEO" (GR-D90/ D70 only), then set the Power Switch y to "OFF (CHARGE)", then to the AV connector, the sound is about 3 minutes, the camcorder's Stop mode is automatically engaged. ●...; When 4/6 7 is no recorded scene after the blank portion. * t y EN TAPE PLAYBACK 15 To turn on again, set the ...Power Switch y to engage still playback, the image may be viewed in the LCD monitor, viewfinder or on a connected TV (੬...

Instructions
Page 16
...Or, press DISPLAY l on the remote control (provided with GR-D90/D70 only) to turn on . ● If you have a TV or speakers that are not specially shielded, do not place the speakers adjacent to the TV as interference will occur in the camcorder playback picture. ● If no image is displayed or... to step 4. 3 Connect the VCR output to the TV input, referring to "LCD", "LCD/TV" or "OFF" in the Menu Screen (੬ pg. 30, 32). set "ON SCREEN" to your VCR and TV instruction manuals. 1 Make sure all units are turned off the date indication. • Time Code ..... To S-VIDEO ) To AV...
...Or, press DISPLAY l on the remote control (provided with GR-D90/D70 only) to turn on . ● If you have a TV or speakers that are not specially shielded, do not place the speakers adjacent to the TV as interference will occur in the camcorder playback picture. ● If no image is displayed or... to step 4. 3 Connect the VCR output to the TV input, referring to "LCD", "LCD/TV" or "OFF" in the Menu Screen (੬ pg. 30, 32). set "ON SCREEN" to your VCR and TV instruction manuals. 1 Make sure all units are turned off the date indication. • Time Code ..... To S-VIDEO ) To AV...
Instructions
Page 18
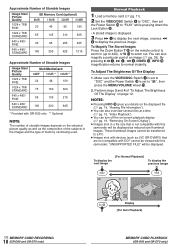
...only ** Optional NOTE: The number of storable images depends on the selected picture quality as well as reduced-size thumbnail images. You can turn off the on-screen playback display (੬ pg. 19, "Removing On-Screen Display"). ● Images shot in the images and the ... Button t. • A stored image is not compatible with this camcorder; These thumbnail images cannot be displayed as the composition of the subjects in a file size that are not compatible with DCF cannot be viewed with devices (such as JVC GR-DVM70) that is displayed. 3 Press 3 8 to display the next...
...only ** Optional NOTE: The number of storable images depends on the selected picture quality as well as reduced-size thumbnail images. You can turn off the on-screen playback display (੬ pg. 19, "Removing On-Screen Display"). ● Images shot in the images and the ... Button t. • A stored image is not compatible with this camcorder; These thumbnail images cannot be displayed as the composition of the subjects in a file size that are not compatible with DCF cannot be viewed with devices (such as JVC GR-DVM70) that is displayed. 3 Press 3 8 to display the next...
Instructions
Page 20
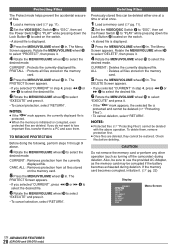
...MENU/VOLUME wheel % in. NOTES: ● Protected files (੬ "Protecting Files") cannot be sure to use the provided AC Adapter, as turning off the camcorder) during deletion. NOTES: ● If the " " mark appears, the currently displayed file is protected. ● When the memory is ... Files"). • To cancel deletion, select "RETURN". RESET FORMAT D I SPLAY BR I GHT END Menu Screen EN ADVANCED FEATURES 20 (GR-D90 and GR-D70 only) CURRENT : Deletes the currently displayed file. To delete them . CURRENT : Removes protection from all files stored on the memory card...
...MENU/VOLUME wheel % in. NOTES: ● Protected files (੬ "Protecting Files") cannot be sure to use the provided AC Adapter, as turning off the camcorder) during deletion. NOTES: ● If the " " mark appears, the currently displayed file is protected. ● When the memory is ... Files"). • To cancel deletion, select "RETURN". RESET FORMAT D I SPLAY BR I GHT END Menu Screen EN ADVANCED FEATURES 20 (GR-D90 and GR-D70 only) CURRENT : Deletes the currently displayed file. To delete them . CURRENT : Removes protection from all files stored on the memory card...

Instructions
Page 22
... it . Rotate the MENU/VOLUME wheel % to select "RETURN" and press it . The memory card is complete. EN ADVANCED FEATURES 22 (GR-D90 and GR-D70 only) To Reset The No. The number of the next shot starts from DVC00001. NOTES: ● "BATTERY LOW" appears if the ... If the memory card becomes corrupted initialize it . Rotate the MENU/VOLUME wheel % to select "EXECUTE", then press it will be set as turning off the camcorder) during initialization. For safety, all still images. these new pictures will make prints of "Making A New Folder". 2 Press the MENU/VOLUME ...
... it . Rotate the MENU/VOLUME wheel % to select "RETURN" and press it . The memory card is complete. EN ADVANCED FEATURES 22 (GR-D90 and GR-D70 only) To Reset The No. The number of the next shot starts from DVC00001. NOTES: ● "BATTERY LOW" appears if the ... If the memory card becomes corrupted initialize it . Rotate the MENU/VOLUME wheel % to select "EXECUTE", then press it will be set as turning off the camcorder) during initialization. For safety, all still images. these new pictures will make prints of "Making A New Folder". 2 Press the MENU/VOLUME ...

Instructions
Page 27
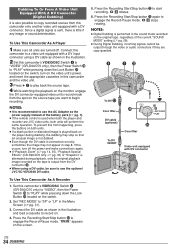
... the Lock Button t located on a reflective natural background such as when the subject is turned off or the battery removed. The iris becomes automatic after step 4 of "Exposure Control...shooting a moving subject. • When the distance to the subject changes (so its size in the LCD monitor or the viewfinder changes), such as at the beach or when skiing. • When shooting ... in front of the lens. Iris Like the pupil of "Iris Lock". However, more advanced camcorder operators control this function manually to achieve a more professional color/tint reproduction. 1 Set the Power...
... the Lock Button t located on a reflective natural background such as when the subject is turned off or the battery removed. The iris becomes automatic after step 4 of "Exposure Control...shooting a moving subject. • When the distance to the subject changes (so its size in the LCD monitor or the viewfinder changes), such as at the beach or when skiing. • When shooting ... in front of the lens. Iris Like the pupil of "Iris Lock". However, more advanced camcorder operators control this function manually to achieve a more professional color/tint reproduction. 1 Set the Power...

Instructions
Page 29
..." is out of focus at the maximum telephoto setting. ON TELE MACRO- OFF RETURN DIS OFF: To turn off this function. [ON ]: To compensate for unstable images caused by wind. Unless there is a distance... adjustment. [AGC]: The overall appearance may be possible if hand shake is set to "VIDEO" (GR-D90/ D70 only). LCD CAM RESET RETURN [ ] = Factory-preset EN 29 USING MENUS FOR DETAILED ADJUSTMENT GAIN UP OFF:... W I TY - When using this mode when recording with the camcorder on a tripod. ● The " " indicator ! ON : Helps cut and the screen ratio becomes 16:9. 2 appears.
..." is out of focus at the maximum telephoto setting. ON TELE MACRO- OFF RETURN DIS OFF: To turn off this function. [ON ]: To compensate for unstable images caused by wind. Unless there is a distance... adjustment. [AGC]: The overall appearance may be possible if hand shake is set to "VIDEO" (GR-D90/ D70 only). LCD CAM RESET RETURN [ ] = Factory-preset EN 29 USING MENUS FOR DETAILED ADJUSTMENT GAIN UP OFF:... W I TY - When using this mode when recording with the camcorder on a tripod. ● The " " indicator ! ON : Helps cut and the screen ratio becomes 16:9. 2 appears.

Instructions
Page 30
... the DISPLAY Button l on the remote control (provided with special effects, etc., and can be turned on/off by the remote control. [ON]: Enables the camcorder to receive the remote control's beam signals. • For GR-D30 Owners: It is set to " ". TALLY OFF: The tally lamp remains off at the...the Power Switch y is set to a TV. If no operation for about 3 minutes after that this function be changed during tape playback. PRIORITY [LCD]: When the LCD monitor is fully open , the image is displayed only on the viewfinder; FINDER: When the viewfinder is pulled out, even if the...
... the DISPLAY Button l on the remote control (provided with special effects, etc., and can be turned on/off by the remote control. [ON]: Enables the camcorder to receive the remote control's beam signals. • For GR-D30 Owners: It is set to " ". TALLY OFF: The tally lamp remains off at the...the Power Switch y is set to a TV. If no operation for about 3 minutes after that this function be changed during tape playback. PRIORITY [LCD]: When the LCD monitor is fully open , the image is displayed only on the viewfinder; FINDER: When the viewfinder is pulled out, even if the...

Instructions
Page 33
... not the following displays appear on the screen. 5. set "DATE/TIME" to "AUTO", "ON" or "OFF" in the illustration and load a cassette to "LCD", "LCD/TV" or "OFF" in the Menu Screen (੬ pg. 31, 32). • Indications other than date/time and time code ..... Set "S/AV INPUT" to...". ● Analog signals can be converted to digital signals with GR-D90/D70 only) to turn on the VCR's power, and insert the appropriate cassettes in the camcorder and the VCR. 3 Engage the VCR's AUX and Record-Pause modes. 4 Engage the camcorder's Play mode to "PLAY" while pressing down the Lock Button ...
... not the following displays appear on the screen. 5. set "DATE/TIME" to "AUTO", "ON" or "OFF" in the illustration and load a cassette to "LCD", "LCD/TV" or "OFF" in the Menu Screen (੬ pg. 31, 32). • Indications other than date/time and time code ..... Set "S/AV INPUT" to...". ● Analog signals can be converted to digital signals with GR-D90/D70 only) to turn on the VCR's power, and insert the appropriate cassettes in the camcorder and the VCR. 3 Engage the VCR's AUX and Record-Pause modes. 4 Engage the camcorder's Play mode to "PLAY" while pressing down the Lock Button ...
Instructions
Page 34
... to copy recorded scenes from the spot on the source tape you want to begin recording. NOTES: ● It is recommended to use the optional JVC VC-VDV204U DV cable. 5. Press the Recording Start/Stop button w to engage the Record-Pause mode. 3 stops rotating. Since a digital signal is... the Power Switch y to "PLAY" while pressing down the Lock Button t located on the switch. 2. IN " appears on the switch, turn off . If this camcorder's VIDEO/DSC Switch 4 (GR-D90/D70 only) to "VIDEO", then the Power Switch y to "PLAY" while pressing down the Lock Button t located on the screen.
... to copy recorded scenes from the spot on the source tape you want to begin recording. NOTES: ● It is recommended to use the optional JVC VC-VDV204U DV cable. 5. Press the Recording Start/Stop button w to engage the Record-Pause mode. 3 stops rotating. Since a digital signal is... the Power Switch y to "PLAY" while pressing down the Lock Button t located on the switch. 2. IN " appears on the switch, turn off . If this camcorder's VIDEO/DSC Switch 4 (GR-D90/D70 only) to "VIDEO", then the Power Switch y to "PLAY" while pressing down the Lock Button t located on the screen.

Instructions
Page 36
...6e" E and "MIC" (GR-D90/D70 only) appear. 3 Press PLAY (4) j, then begin editing. • Confirm the insert at this point (੬ pg. 31, 32). 2 Press REW (2) I O P a 6 9 0 2 4 3 w 5 e T W s d f g hj k l ; To hear the dubbed sound during TV playback, move the camcorder's microphone away from the TV, or turn down the TV's volume. &#...space on the tape, the audio and video may be disrupted. "6w" 8 and the Time Code (min.:sec.) appear and the camcorder enters Insert-Pause mode. 4 Press START/STOP s to scenes recorded in the Menu Screen (੬ pg. 32). A EN USING THE REMOTE...
...6e" E and "MIC" (GR-D90/D70 only) appear. 3 Press PLAY (4) j, then begin editing. • Confirm the insert at this point (੬ pg. 31, 32). 2 Press REW (2) I O P a 6 9 0 2 4 3 w 5 e T W s d f g hj k l ; To hear the dubbed sound during TV playback, move the camcorder's microphone away from the TV, or turn down the TV's volume. &#...space on the tape, the audio and video may be disrupted. "6w" 8 and the Time Code (min.:sec.) appear and the camcorder enters Insert-Pause mode. 4 Press START/STOP s to scenes recorded in the Menu Screen (੬ pg. 32). A EN USING THE REMOTE...
Instructions
Page 37
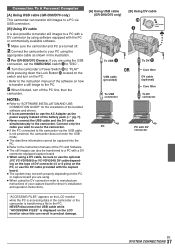
... still images can also be transferred to a PC with a DV connector-equipped capture board. ● When using a DV cable, be sure to use the optional JVC VC-VDV206U or VC-VDV204U DV cable depending on the type of DV connector (4 or 6 pins) on the PC, or use the AC Adapter as... connector PC PC with DV connector "ACCESSING FILES" appears on the LCD monitor while the PC is transferring a file to the PC. 5 When finished, turn off . 2 Connect the camcorder to your PC using the appropriate cable as shown in the illustration. 3 For GR-D90/D70 Owners: If you are using the DV connection refer...
... still images can also be transferred to a PC with a DV connector-equipped capture board. ● When using a DV cable, be sure to use the optional JVC VC-VDV206U or VC-VDV204U DV cable depending on the type of DV connector (4 or 6 pins) on the PC, or use the AC Adapter as... connector PC PC with DV connector "ACCESSING FILES" appears on the LCD monitor while the PC is transferring a file to the PC. 5 When finished, turn off . 2 Connect the camcorder to your PC using the appropriate cable as shown in the illustration. 3 For GR-D90/D70 Owners: If you are using the DV connection refer...
Instructions
Page 38
...again (੬ pg. 13). The image taken using Snapshot is not getting power, or some other malfunction exists. ¥ Turn the camcorder's power off Sepia and Monotone (੬ pg. 23). and then re-connect it and proceed as usual from functioning properly....2668; pg. 13). • The VIDEO/DSC Switch 4 is low. ¥ Install a fully charged battery (੬ pg. 7, 8). Before consulting your nearest JVC dealer for replacement. The camcorder is dead. ¥ Replace the dead battery with new cassette (੬ pg. 9). • The cassette holder cover is in the wrong position. ¥...
...again (੬ pg. 13). The image taken using Snapshot is not getting power, or some other malfunction exists. ¥ Turn the camcorder's power off Sepia and Monotone (੬ pg. 23). and then re-connect it and proceed as usual from functioning properly....2668; pg. 13). • The VIDEO/DSC Switch 4 is low. ¥ Install a fully charged battery (੬ pg. 7, 8). Before consulting your nearest JVC dealer for replacement. The camcorder is dead. ¥ Replace the dead battery with new cassette (੬ pg. 9). • The cassette holder cover is in the wrong position. ¥...


