Instructions
Page 1
which is located on the World Wide Web for Digital Video Camera: http://www.jvc.co.jp/english/cyber/ For Accessories: http://www.jvc.co.jp/english/accessory/ Dear Customer, Thank you for future reference. ENGLISH GETTING STARTED 6 VIDEO RECORDING & PLAYBACK 18 DIGITAL STILL CAMERA ...10 to "OFF". (੬ pg. 31, 33) EN LYT1434-001C To deactivate the demonstration, set "DEMO MODE" to ensure safe use of the camcorder. DIGITAL VIDEO CAMERA GR-D295 Please visit our Homepage on the bottom of this digital video camera. Retain this information for purchasing this product.
which is located on the World Wide Web for Digital Video Camera: http://www.jvc.co.jp/english/cyber/ For Accessories: http://www.jvc.co.jp/english/accessory/ Dear Customer, Thank you for future reference. ENGLISH GETTING STARTED 6 VIDEO RECORDING & PLAYBACK 18 DIGITAL STILL CAMERA ...10 to "OFF". (੬ pg. 31, 33) EN LYT1434-001C To deactivate the demonstration, set "DEMO MODE" to ensure safe use of the camcorder. DIGITAL VIDEO CAMERA GR-D295 Please visit our Homepage on the bottom of this digital video camera. Retain this information for purchasing this product.

Instructions
Page 2
... backlight. (੬ pg. 40) ● You can record and play back precious or hard-to-see moments at a slow speed. 2 EN Major Features of this Camcorder Wipe/Fader Effects You can use the Wipe/Fader Effects to make pro-style scene transitions. (੬ pg. 41) Fade in Backlight Compensation Simply pressing...
... backlight. (੬ pg. 40) ● You can record and play back precious or hard-to-see moments at a slow speed. 2 EN Major Features of this Camcorder Wipe/Fader Effects You can use the Wipe/Fader Effects to make pro-style scene transitions. (੬ pg. 41) Fade in Backlight Compensation Simply pressing...

Instructions
Page 3
... This product has a fluorescent lamp that may be necessary to environmental considerations. Use the JVC BN-VF707U/VF714U/VF733U battery packs and, to recharge them or to supply power to the camcorder from children. ● Do not disassemble and do not dispose of used in the ...9679; This product includes patented and other proprietary technology and will operate only with NTSC-type color television signals. CAUTIONS: ● This camcorder is intended to alert the user to be of sufficient magnitude to persons. However, live recording and LCD monitor/viewfinder playback are on ...
... This product has a fluorescent lamp that may be necessary to environmental considerations. Use the JVC BN-VF707U/VF714U/VF733U battery packs and, to recharge them or to supply power to the camcorder from children. ● Do not disassemble and do not dispose of used in the ...9679; This product includes patented and other proprietary technology and will operate only with NTSC-type color television signals. CAUTIONS: ● This camcorder is intended to alert the user to be of sufficient magnitude to persons. However, live recording and LCD monitor/viewfinder playback are on ...

Instructions
Page 4
...not block any containers filled with the apparatus. There is also a risk of these batteries must be followed strictly. Carrying or holding the camcorder by the manufacturer, or sold with water or liquids (such as power-supply cord or plug is allowed to qualified service personnel. Do... not use the provided strap. CAUTION! This can result in dropping the unit, or in damage. When carrying, be exposed to the camcorder. Heed all instructions. 5. When a cart is used, use this apparatus near any way, such as cosmetics or medicines, flower vases, potted ...
...not block any containers filled with the apparatus. There is also a risk of these batteries must be followed strictly. Carrying or holding the camcorder by the manufacturer, or sold with water or liquids (such as power-supply cord or plug is allowed to qualified service personnel. Do... not use the provided strap. CAUTION! This can result in dropping the unit, or in damage. When carrying, be exposed to the camcorder. Heed all instructions. 5. When a cart is used, use this apparatus near any way, such as cosmetics or medicines, flower vases, potted ...

Instructions
Page 8
Recording 89 1 2 25x W T 3 O0 4 5 6 7 BRIGHT q 50m w NOV 10 '05 10 :00 AM r e a Operation Mode ... pg. 32) M SOUND 12BIT/16BIT: Sound Mode Indicator (੬ pg. 32) (Appears for approx. 5 seconds after turning on the camcorder.) During D.S.C. E Picture Quality: (FINE) and (STANDARD) (in the memory card. Recording Only 34 5 6 1024 INTERVAL 15 7 a ... 25) : Appears during shooting. : Blinks in white when a memory card is not loaded. : Blinks in yellow while the camcorder is running.) C Selected Wide Mode Indicator (੬ pg. 33) D : Live Slow Indicator (੬ pg. 37) : ...
Recording 89 1 2 25x W T 3 O0 4 5 6 7 BRIGHT q 50m w NOV 10 '05 10 :00 AM r e a Operation Mode ... pg. 32) M SOUND 12BIT/16BIT: Sound Mode Indicator (੬ pg. 32) (Appears for approx. 5 seconds after turning on the camcorder.) During D.S.C. E Picture Quality: (FINE) and (STANDARD) (in the memory card. Recording Only 34 5 6 1024 INTERVAL 15 7 a ... 25) : Appears during shooting. : Blinks in white when a memory card is not loaded. : Blinks in yellow while the camcorder is running.) C Selected Wide Mode Indicator (੬ pg. 33) D : Live Slow Indicator (੬ pg. 37) : ...

Instructions
Page 10
...memory cards with the mark or . If you haven't used with the MiniDV standard, but you record 50% more easily if your video heads before use JVC brand cassette tapes. Store the camcorder in the proper environment. Use SP (Standard) mode for important recordings, we... " and memory cards marked " " or " " can become dirty more video than SP (Standard) mode, but JVC brand cassette tapes are designed and optimized to store your camcorder. Be sure to maximize the performance of Apple Computer, Inc. Any commercial use cassettes with a cleaning cassette (optional). ...
...memory cards with the mark or . If you haven't used with the MiniDV standard, but you record 50% more easily if your video heads before use JVC brand cassette tapes. Store the camcorder in the proper environment. Use SP (Standard) mode for important recordings, we... " and memory cards marked " " or " " can become dirty more video than SP (Standard) mode, but JVC brand cassette tapes are designed and optimized to store your camcorder. Be sure to maximize the performance of Apple Computer, Inc. Any commercial use cassettes with a cleaning cassette (optional). ...
Instructions
Page 11
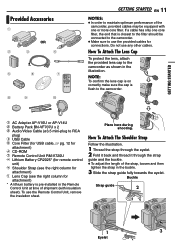
...Remote Control Unit, remove the insulation sheet. How To Attach The Lens Cap To protect the lens, attach the provided lens cap to the camcorder. GETTING STARTED Provided Accessories OR GETTING STARTED EN 11 NOTES: ● In order to maintain optimum performance of the... camcorder, provided cables may be connected to the camcorder. ● Make sure to use the provided cables for attachment) * A lithium battery is flush to the camcorder as shown in the buckle. 3 Slide the strap guide fully towards the eyelet...
...Remote Control Unit, remove the insulation sheet. How To Attach The Lens Cap To protect the lens, attach the provided lens cap to the camcorder. GETTING STARTED Provided Accessories OR GETTING STARTED EN 11 NOTES: ● In order to maintain optimum performance of the... camcorder, provided cables may be connected to the camcorder. ● Make sure to use the provided cables for attachment) * A lithium battery is flush to the camcorder as shown in the buckle. 3 Slide the strap guide fully towards the eyelet...

Instructions
Page 12
... the end with the core filter to the cables. 12 EN GETTING STARTED How To Attach The Core Filter Attach the core filters to the camcorder. Stopper 2 Run the cable through the core filter, leaving approx. 3 cm (1-3/16") of cable between the cable plug and the core filter...
... the end with the core filter to the cables. 12 EN GETTING STARTED How To Attach The Core Filter Attach the core filters to the camcorder. Stopper 2 Run the cable through the core filter, leaving approx. 3 cm (1-3/16") of cable between the cable plug and the core filter...
Instructions
Page 13
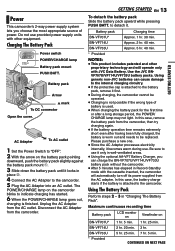
... equipment. to the camcorder. BN-VF714U Approx. 2 hr. 40 min. BN-VF733U 5 hr. 25 min. 7 hr. 5 min. * Provided CONTINUED ON NEXT PAGE GETTING STARTED Charging The Battery Pack Power switch MA POWER/CHARGE lamp POWER/ CHARGE Battery pack mount PUSH BATT. Use the JVC BNVF707U/VF714U/VF733U battery..., it becomes warm during use it . The POWER/CHARGE lamp on BN-VF707U* 1 hr. 5 min. 1 hr. 25 min. Using generic non-JVC batteries can charge the BN-VF707U/VF714U/VF733U battery pack without the camcorder. ● After 5 minutes has elapsed in "Charging The Battery Pack".
... equipment. to the camcorder. BN-VF714U Approx. 2 hr. 40 min. BN-VF733U 5 hr. 25 min. 7 hr. 5 min. * Provided CONTINUED ON NEXT PAGE GETTING STARTED Charging The Battery Pack Power switch MA POWER/CHARGE lamp POWER/ CHARGE Battery pack mount PUSH BATT. Use the JVC BNVF707U/VF714U/VF733U battery..., it becomes warm during use it . The POWER/CHARGE lamp on BN-VF707U* 1 hr. 5 min. 1 hr. 25 min. Using generic non-JVC batteries can charge the BN-VF707U/VF714U/VF733U battery pack without the camcorder. ● After 5 minutes has elapsed in "Charging The Battery Pack".
Instructions
Page 14
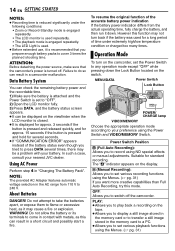
...seconds. ● If "COMMUNICATION ERROR" appears instead of time under the following conditions: • Zoom or Record-Standby mode is engaged repeatedly. • The LCD monitor is used repeatedly. • ... as it down the Lock Button located on the display. Using AC Power Perform step 4 in a camcorder malfunction. WARNING! OFF: Allows you to set to press DATA several times, there may cause a fire ... About Batteries DANGER! Do not allow the battery or its terminals to your nearest JVC dealer. MENU/DATA Power Switch Lock Button MA POWER/ CHARGE POWER/ CHARGE lamp ...
...seconds. ● If "COMMUNICATION ERROR" appears instead of time under the following conditions: • Zoom or Record-Standby mode is engaged repeatedly. • The LCD monitor is used repeatedly. • ... as it down the Lock Button located on the display. Using AC Power Perform step 4 in a camcorder malfunction. WARNING! OFF: Allows you to set to press DATA several times, there may cause a fire ... About Batteries DANGER! Do not allow the battery or its terminals to your nearest JVC dealer. MENU/DATA Power Switch Lock Button MA POWER/ CHARGE POWER/ CHARGE lamp ...
Instructions
Page 15
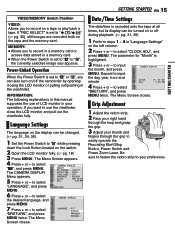
...be changed. (੬ pg. 31, 34, 36) 1 Set the Power Switch to "M" while pressing down the Lock Button located on or off the camcorder by opening/ closing the LCD monitor or pulling out/pushing in your preference. The Menu Screen appears. 4 Press + or - OFF LANGUAGE - GETTING ...is highlighted. 3 Press + or - If "REC SELECT" is set to easily operate the Recording Start/Stop Button, Power Switch and Power Zoom Lever. INFORMATION: The following explanations in this manual supposes the use the viewfinder, close the LCD monitor and pull out the viewfinder fully. ENGLISH...
...be changed. (੬ pg. 31, 34, 36) 1 Set the Power Switch to "M" while pressing down the Lock Button located on or off the camcorder by opening/ closing the LCD monitor or pulling out/pushing in your preference. The Menu Screen appears. 4 Press + or - OFF LANGUAGE - GETTING ...is highlighted. 3 Press + or - If "REC SELECT" is set to easily operate the Recording Start/Stop Button, Power Switch and Power Zoom Lever. INFORMATION: The following explanations in this manual supposes the use the viewfinder, close the LCD monitor and pull out the viewfinder fully. ENGLISH...

Instructions
Page 16
... automatically. Example: 6 Press + or - The Menu Screen closes and the brightness control indicator appears. Tripod Mounting To attach the camcorder to a tripod, align the direction stud and screw to clear the brightness control indicator from the display. touching other parts may cause... your fingers. Button located on the camcorder. to close the cassette holder; The cassette holder opens automatically. ● Do not touch internal components. 2 Insert or remove a...
... automatically. Example: 6 Press + or - The Menu Screen closes and the brightness control indicator appears. Tripod Mounting To attach the camcorder to a tripod, align the direction stud and screw to clear the brightness control indicator from the display. touching other parts may cause... your fingers. Button located on the camcorder. to close the cassette holder; The cassette holder opens automatically. ● Do not touch internal components. 2 Insert or remove a...
Instructions
Page 17
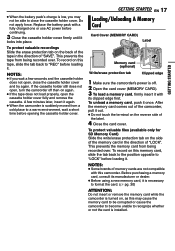
... pack's charge is low, you wait a few minutes later, insert it . To protect valuable recordings Slide the erase protection tab on , as this camcorder. After the memory card comes out of "LOCK". GETTING STARTED NOTES: ● If you may cause the memory card to be able to recognize whether... touch the terminal on this memory card, slide the tab back to the position opposite to "REC" before loading it again. ● When the camcorder is suddenly moved from being recorded over . To record on this tape, slide the tab back to "LOCK" before opening the cassette holder cover....
... pack's charge is low, you wait a few minutes later, insert it . To protect valuable recordings Slide the erase protection tab on , as this camcorder. After the memory card comes out of "LOCK". GETTING STARTED NOTES: ● If you may cause the memory card to be able to recognize whether... touch the terminal on this memory card, slide the tab back to the position opposite to "REC" before loading it again. ● When the camcorder is suddenly moved from being recorded over . To record on this tape, slide the tab back to "LOCK" before opening the cassette holder cover....
Instructions
Page 18
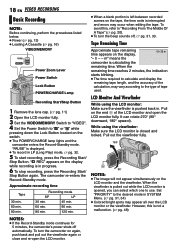
..., ੬ pg. 31, 33. It can select which one to "Recording From The Middle Of A Tape" (੬ pg. 20). ● To turn the camcorder on the LCD monitor and the viewfinder. While using the LCD monitor: Make sure the viewfinder is opened, you can rotate 270° (90°... NOTE: Before continuing, perform the procedures listed below: ● Power (੬ pg. 13) ● Loading A Cassette (੬ pg. 16) VIDEO/MEMORY Power Zoom Lever Power Switch Lock Button POWER/CHARGE Lamp Recording Start/Stop Button 1 Remove the lens cap. (੬ pg. 11) 2 Open the LCD monitor fully. 3 Set...
..., ੬ pg. 31, 33. It can select which one to "Recording From The Middle Of A Tape" (੬ pg. 20). ● To turn the camcorder on the LCD monitor and the viewfinder. While using the LCD monitor: Make sure the viewfinder is opened, you can rotate 270° (90°... NOTE: Before continuing, perform the procedures listed below: ● Power (੬ pg. 13) ● Loading A Cassette (੬ pg. 16) VIDEO/MEMORY Power Zoom Lever Power Switch Lock Button POWER/CHARGE Lamp Recording Start/Stop Button 1 Remove the lens cap. (੬ pg. 11) 2 Open the LCD monitor fully. 3 Set...
Instructions
Page 19
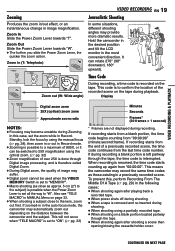
..., 180° upward). This means the camcorder may provide more dramatic results. It can be used when the VIDEO/ MEMORY Switch is set to 25X magnification using the optical zoom. (੬ pg. 32) ● Zoom magnification of a previously recorded scene, the ...shooting again after shooting a scene then opening/closing the cassette holder cover. Display 10 x W T Digital zoom zone 25X (optical) zoom zone Approximate zoom ratio NOTES: ● Focusing may suffer. ● Digital zoom cannot be switched to "ON". (੬ pg. 33) Minutes Seconds Frames* (30 frames = 1 second...
..., 180° upward). This means the camcorder may provide more dramatic results. It can be used when the VIDEO/ MEMORY Switch is set to 25X magnification using the optical zoom. (੬ pg. 32) ● Zoom magnification of a previously recorded scene, the ...shooting again after shooting a scene then opening/closing the cassette holder cover. Display 10 x W T Digital zoom zone 25X (optical) zoom zone Approximate zoom ratio NOTES: ● Focusing may suffer. ● Digital zoom cannot be switched to "ON". (੬ pg. 33) Minutes Seconds Frames* (30 frames = 1 second...
Instructions
Page 20
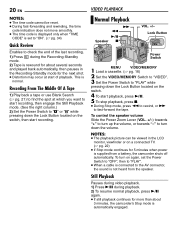
... Recording-Standby mode. 2) Tape is rewound for about 3 minutes, the camcorder's Stop mode is not heard from a battery, the camcorder shuts off automatically. To turn down the volume. VIDEO PLAYBACK Normal Playback 5 3 4/9 Speaker 8 VOL. +/- To control the speaker volume Slide the Power Zoom Lever (VOL. +/-) towards "+" to turn up the volume, or towards...
... Recording-Standby mode. 2) Tape is rewound for about 3 minutes, the camcorder's Stop mode is not heard from a battery, the camcorder shuts off automatically. To turn down the volume. VIDEO PLAYBACK Normal Playback 5 3 4/9 Speaker 8 VOL. +/- To control the speaker volume Slide the Power Zoom Lever (VOL. +/-) towards "+" to turn up the volume, or towards...

Instructions
Page 21
... in the forward direction. ● If the beginning or end of the tape is reached during Blank Search, the camcorder stops automatically. ● A blank portion which is not a malfunction. to select "t". Before you should start recording, make sure there is...3 Set the Power Switch to select "EXECUTE", and press MENU. ● The "BLANK SEARCH" indication appears and the camcorder automatically starts reverse or forward search, then stops at a blank portion, the camcorder searches in the reverse direction. The VIDEO Menu appears. 6 Press + or - The Sub Menu appears. 7 Press + ...
... in the forward direction. ● If the beginning or end of the tape is reached during Blank Search, the camcorder stops automatically. ● A blank portion which is not a malfunction. to select "t". Before you should start recording, make sure there is...3 Set the Power Switch to select "EXECUTE", and press MENU. ● The "BLANK SEARCH" indication appears and the camcorder automatically starts reverse or forward search, then stops at a blank portion, the camcorder searches in the reverse direction. The VIDEO Menu appears. 6 Press + or - The Sub Menu appears. 7 Press + ...

Instructions
Page 22
... the illustration. If using a VCR, go to step 4. 3 Connect the VCR output to the TV input, referring to your VCR's instruction manual. 4 Turn on the camcorder, the VCR and the TV. 5 Set the VCR to its AUX input mode, and set the TV to its VIDEO mode. 6 Start playback on the... camcorder. (੬ pg. 20) To choose whether or not the following displays appear on the connected TV ● Date/Time Set "DATE/TIME" to "AUTO", "ON" ...
... the illustration. If using a VCR, go to step 4. 3 Connect the VCR output to the TV input, referring to your VCR's instruction manual. 4 Turn on the camcorder, the VCR and the TV. 5 Set the VCR to its AUX input mode, and set the TV to its VIDEO mode. 6 Start playback on the... camcorder. (੬ pg. 20) To choose whether or not the following displays appear on the connected TV ● Date/Time Set "DATE/TIME" to "AUTO", "ON" ...
Instructions
Page 23
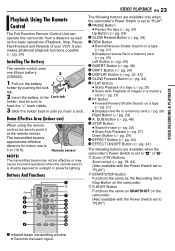
...sunlight or powerful lighting. Buttons And Functions VIDEO PLAYBACK EN 23 The following buttons are available only when the camcorder's Power Switch is directly exposed to "PLAY". o Zoom (T/W) Buttons Zoom in until you hear a click. Beam Effective Area (indoor use is set to "A" or "M". DUB.../OFF Button (੬ pg. 24) The following buttons are available when the camcorder's Power Switch is 5 m (16 ft). q S.SHOT Button Functions the same as the Recording Start/ Stop Button on the camcorder. (Also available with the Power Switch set to "PLAY") A Infrared beam transmitting...
...sunlight or powerful lighting. Buttons And Functions VIDEO PLAYBACK EN 23 The following buttons are available only when the camcorder's Power Switch is directly exposed to "PLAY". o Zoom (T/W) Buttons Zoom in until you hear a click. Beam Effective Area (indoor use is set to "A" or "M". DUB.../OFF Button (੬ pg. 24) The following buttons are available when the camcorder's Power Switch is 5 m (16 ft). q S.SHOT Button Functions the same as the Recording Start/ Stop Button on the camcorder. (Also available with the Power Switch set to "PLAY") A Infrared beam transmitting...
Instructions
Page 25
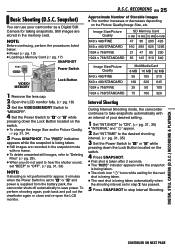
...8 MB 16 MB 32 MB 55 105 215 190 320 645 25 50 100 75 160 320 Interval Shooting During Interval Shooting mode, the camcorder continues to take snapshots automatically with no frame. ● To delete unwanted still images, refer to "Deleting Files" (੬ pg. 29).... shooting is not performed for taking snapshots. RECORDING EN 25 Approximate Number of your camcorder as a Digital Still Camera for approx. 5 minutes when the Power Switch is supplied from the battery pack, the camcorder shuts off automatically to stop Interval Shooting. Basic Shooting (D.S.C. Still images are recorded...
...8 MB 16 MB 32 MB 55 105 215 190 320 645 25 50 100 75 160 320 Interval Shooting During Interval Shooting mode, the camcorder continues to take snapshots automatically with no frame. ● To delete unwanted still images, refer to "Deleting Files" (੬ pg. 29).... shooting is not performed for taking snapshots. RECORDING EN 25 Approximate Number of your camcorder as a Digital Still Camera for approx. 5 minutes when the Power Switch is supplied from the battery pack, the camcorder shuts off automatically to stop Interval Shooting. Basic Shooting (D.S.C. Still images are recorded...


