
Instructions
Page 2
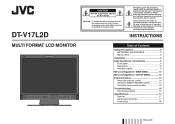
... presence of electric shock to qualified service personnel. Refer servicing to persons. INSTRUCTIONS Table of electric shock. DT-V17L2D MULTI FORMAT LCD MONITOR CAUTION RISK OF ELECTRICAL SHOCK DO NOT OPEN CAUTION: To reduce the risk of Contents Safety Precautions 2 IMPORTANT SAFEGUARDS ... Configuration-MAIN MENU 10 Menu Configuration-SET-UP MENU 12 External Control 14 About the external control 14 Using the MAKE/TRIGGER system 14 Using the serial communication 15 Troubleshooting 16 Self-check program 16 Specifications 17 General 17 Input/output terminals 17 ...
... presence of electric shock to qualified service personnel. Refer servicing to persons. INSTRUCTIONS Table of electric shock. DT-V17L2D MULTI FORMAT LCD MONITOR CAUTION RISK OF ELECTRICAL SHOCK DO NOT OPEN CAUTION: To reduce the risk of Contents Safety Precautions 2 IMPORTANT SAFEGUARDS ... Configuration-MAIN MENU 10 Menu Configuration-SET-UP MENU 12 External Control 14 About the external control 14 Using the MAKE/TRIGGER system 14 Using the serial communication 15 Troubleshooting 16 Self-check program 16 Specifications 17 General 17 Input/output terminals 17 ...
Instructions
Page 3
... technician to perform safety checks to defeat the safeguards incorporated into this product for ventilation. This product becomes hot during its installation, use . These openings must not be read these "IMPORTANT SAFEGUARDS" carefully before the product is AC 120 V (For U.S.A. IMPORTANT SAFEGUARDS...are kept (☞ "Operating conditions" on the product. (Placing liquids, naked flames, cloths, paper, etc. Warning: • Do not use . • All the safety and operating instructions should turn on the rear panel. Fuse • Before connecting other hazards. Under the ...
... technician to perform safety checks to defeat the safeguards incorporated into this product for ventilation. This product becomes hot during its installation, use . These openings must not be read these "IMPORTANT SAFEGUARDS" carefully before the product is AC 120 V (For U.S.A. IMPORTANT SAFEGUARDS...are kept (☞ "Operating conditions" on the product. (Placing liquids, naked flames, cloths, paper, etc. Warning: • Do not use . • All the safety and operating instructions should turn on the rear panel. Fuse • Before connecting other hazards. Under the ...
Instructions
Page 4
This equipment generates, uses, and can be caused by JVC could otherwise be used in your community due to environmental considerations. European Union only EMC Supplement This equipment is in waterdiluted ... LAN cable) Length 2.0 m 2.0 m 1.5 m 1.5 m 2.0 m 2.0 m 2.0 m The inrush current of this product from the sources of the corresponding European Directives. Ventilation openings Use a vacuum cleaner to cause harmful interference in contact for proper treatment, recovery and recycling in your national legislation. ENGLISH 3 These limits are near the audio...
This equipment generates, uses, and can be caused by JVC could otherwise be used in your community due to environmental considerations. European Union only EMC Supplement This equipment is in waterdiluted ... LAN cable) Length 2.0 m 2.0 m 1.5 m 1.5 m 2.0 m 2.0 m 2.0 m The inrush current of this product from the sources of the corresponding European Directives. Ventilation openings Use a vacuum cleaner to cause harmful interference in contact for proper treatment, recovery and recycling in your national legislation. ENGLISH 3 These limits are near the audio...
Instructions
Page 5
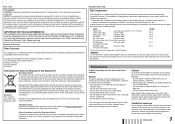
... (about 6° downward. • When the monitor is attached to the higher position of the stand into the guide holes on the monitor to pinch your fingers in the following two ways when using the monitor on page 5), you cannot tilt the monitor downward. Screw (silver) About 148° To ...detach the stand CAUTION Lay the monitor on a cloth with the attachment screws.
... (about 6° downward. • When the monitor is attached to the higher position of the stand into the guide holes on the monitor to pinch your fingers in the following two ways when using the monitor on page 5), you cannot tilt the monitor downward. Screw (silver) About 148° To ...detach the stand CAUTION Lay the monitor on a cloth with the attachment screws.
Instructions
Page 6
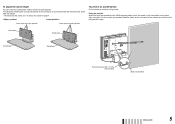
... plate Stand body Stand body Hook and screws (M4 x 10 mm) (not provided) Hook (not provided) ENGLISH 5 Fixing the monitor Attach the hook (not provided) to a wall by using M4 x 10 mm screws (not provided). To adjust the stand height You can select the stand height-higher position or lower... on the rear panel of the stand plate as illustrated below after detaching the stand from the monitor. • For detaching the stand, see "To detach the stand" on the upper side) using strings. Screw holes for higher position Screw holes for lower position To prevent an accidental fall Fix...
... plate Stand body Stand body Hook and screws (M4 x 10 mm) (not provided) Hook (not provided) ENGLISH 5 Fixing the monitor Attach the hook (not provided) to a wall by using M4 x 10 mm screws (not provided). To adjust the stand height You can select the stand height-higher position or lower... on the rear panel of the stand plate as illustrated below after detaching the stand from the monitor. • For detaching the stand, see "To detach the stand" on the upper side) using strings. Screw holes for higher position Screw holes for lower position To prevent an accidental fall Fix...
Instructions
Page 9
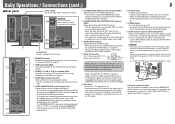
...(pin jack) Input terminals for the analog audio signals. • Use this slot. 1 REMOTE terminal Terminal for controlling the monitor by using DC 12 V power (maximum DC 17 V), check the DC IN 12V terminal pin signal, and use the external battery for example, when unplugging the AC power cord), the... power supply automatically switches to turn on the monitor after turning on page 11). When using 2 screw holes. To save ) mode. • The EMBEDDED AUDIO signals are decoded into an analog signals, then emitted. •...
...(pin jack) Input terminals for the analog audio signals. • Use this slot. 1 REMOTE terminal Terminal for controlling the monitor by using DC 12 V power (maximum DC 17 V), check the DC IN 12V terminal pin signal, and use the external battery for example, when unplugging the AC power cord), the... power supply automatically switches to turn on the monitor after turning on page 11). When using 2 screw holes. To save ) mode. • The EMBEDDED AUDIO signals are decoded into an analog signals, then emitted. •...
Instructions
Page 10
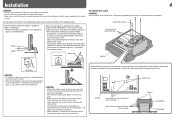
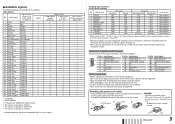
...NC 21 NC 22 T.M.D.S Clock shield 23 T.M.D.S Clock+ 24 T.M.D.S Clock- Signal name Signal format shown in , the signal format is shown on this monitor. Signal name Resolution Horizontal Vertical 1 VGA60 2 WVGA60 3 SVGA60 4 XGA60 5 WXGA (1280) 6 WXGA+60 7 SXGA60*5 8 UXGA60*5 9 WUXGA60... *5 When signals of the DVI-D (HDCP) terminal Connect it out. • DO NOT connect the power cord until all the equipment. • Use a cord whose plugs correctly match the terminals on the status display. Pin No. Input terminal COMPONENT (Analog component) E. Input signal 1 T.M.D.S Data 2-...
...NC 21 NC 22 T.M.D.S Clock shield 23 T.M.D.S Clock+ 24 T.M.D.S Clock- Signal name Signal format shown in , the signal format is shown on this monitor. Signal name Resolution Horizontal Vertical 1 VGA60 2 WVGA60 3 SVGA60 4 XGA60 5 WXGA (1280) 6 WXGA+60 7 SXGA60*5 8 UXGA60*5 9 WUXGA60... *5 When signals of the DVI-D (HDCP) terminal Connect it out. • DO NOT connect the power cord until all the equipment. • Use a cord whose plugs correctly match the terminals on the status display. Pin No. Input terminal COMPONENT (Analog component) E. Input signal 1 T.M.D.S Data 2-...

Instructions
Page 11
... on the menu depending on the input or the input signal. • The items controlled by using external control (☞ "External Control" on the menu. OFF: "MARKER SELECT" and "R-MARKER ... signal. NOTE Setting of the luminance signal compensated in "PICTURE IMPROVEMENT." OFF, LOW, HIGH APERTURE LEVEL*1 Compensate the frequency response of the luminance signal of the video signal. 01...Item To do not function. HALF: The area outside the specified aspect ratio of the monitor is displayed as 50% transparency. BLK.: The area outside the specified aspect ratio of "...
... on the menu depending on the input or the input signal. • The items controlled by using external control (☞ "External Control" on the menu. OFF: "MARKER SELECT" and "R-MARKER ... signal. NOTE Setting of the luminance signal compensated in "PICTURE IMPROVEMENT." OFF, LOW, HIGH APERTURE LEVEL*1 Compensate the frequency response of the luminance signal of the video signal. 01...Item To do not function. HALF: The area outside the specified aspect ratio of the monitor is displayed as 50% transparency. BLK.: The area outside the specified aspect ratio of "...

Instructions
Page 12
... the audio channels are as selected in "NO SYNC ACTION" after the previous operation. • Some items may become unstable when an operation using buttons on the input or the input signal. • The items controlled by turning off the back light. *1 Memorized for each input....after signals stop coming in input levels), W.100 (white) REFERENCE LEVEL Select the standard input level indicated on page 13). BRIGHTNESS LOW, HIGH SYNC FUNCTION Setting for the synchronization with no signal is set to "3COLORS." Select the period until the screen status changes as follows. ...
... the audio channels are as selected in "NO SYNC ACTION" after the previous operation. • Some items may become unstable when an operation using buttons on the input or the input signal. • The items controlled by turning off the back light. *1 Memorized for each input....after signals stop coming in input levels), W.100 (white) REFERENCE LEVEL Select the standard input level indicated on page 13). BRIGHTNESS LOW, HIGH SYNC FUNCTION Setting for the synchronization with no signal is set to "3COLORS." Select the period until the screen status changes as follows. ...

Instructions
Page 14
... screen (☞ "About the Information Display" on page 7). appears on !" is used for maintenance of use (unit: hour). Display the hours of the monitor. Display the model name of the monitor. You cannot reset this item. Turning on/off (on standby) then turned on ...pressing button while pressing button) and turning "CONTROL LOCK" to reverse the order. Displaying the SET-UP MENU (by using the RS-232C system. Operating the monitor by serial communication. "PIN8" and you try other operations, " Control lock on the screen. REMOTE SETTING (☞...
... screen (☞ "About the Information Display" on page 7). appears on !" is used for maintenance of use (unit: hour). Display the hours of the monitor. Display the model name of the monitor. You cannot reset this item. Turning on/off (on standby) then turned on ...pressing button while pressing button) and turning "CONTROL LOCK" to reverse the order. Displaying the SET-UP MENU (by using the RS-232C system. Operating the monitor by serial communication. "PIN8" and you try other operations, " Control lock on the screen. REMOTE SETTING (☞...
Instructions
Page 15
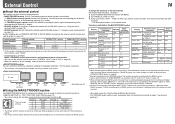
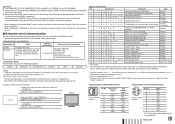
...Serial communication RS-485 RS-232C "SERIAL TYPE" setting - - MAKE > TRIGGER, serial communication, and buttons and menu on the monitor • You can use the external control even when "CONTROL LOCK" is set to "OFF," the level meter is a female terminal. PC, etc. Functions... pulse signal instantaneously to the corresponding pin terminal (☞ below). • RS-232C terminal (D-sub 9-pin): Controls the monitor with the RS-232C system. (☞ "Using the serial communication" on page 15) Set the following external control systems are activated, non-"R-" items or "R-" items (☞...
...Serial communication RS-485 RS-232C "SERIAL TYPE" setting - - MAKE > TRIGGER, serial communication, and buttons and menu on the monitor • You can use the external control even when "CONTROL LOCK" is set to "OFF," the level meter is a female terminal. PC, etc. Functions... pulse signal instantaneously to the corresponding pin terminal (☞ below). • RS-232C terminal (D-sub 9-pin): Controls the monitor with the RS-232C system. (☞ "Using the serial communication" on page 15) Set the following external control systems are activated, non-"R-" items or "R-" items (☞...
Instructions
Page 16
...pin terminals must be opened.) • When selecting the "TRIGGER" system, you can operate only one . 7 Using the serial communication You can be used while the monitor is off the monitor (on standby) Selects "SDI 1" input Selects "SDI 2" input Selects "DVI" input Selects "COMPO." "@": ...Status returns from the monitor • To start communication, send the connection command from the personal computer etc. ...
...pin terminals must be opened.) • When selecting the "TRIGGER" system, you can operate only one . 7 Using the serial communication You can be used while the monitor is off the monitor (on standby) Selects "SDI 1" input Selects "SDI 2" input Selects "DVI" input Selects "COMPO." "@": ...Status returns from the monitor • To start communication, send the connection command from the personal computer etc. ...
Instructions
Page 17
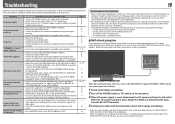
...is due to resolve the problem. This is no sure method to detect malfunctions and alert you can use the monitor as normal. Some items do not appear on the monitor do not work. in the SET-UP MENU. Wrong picture position, wrong picture size. Probable cause and... . Troubleshooting 16 Solutions to common problems related to "OFF." in the SET-UP MENU. Symptom No power supply No picture with very high precision technology; Though the remaining picture will flash. A slight electric shock occurs when you turn off (or after a short-term power failure...
...is due to resolve the problem. This is no sure method to detect malfunctions and alert you can use the monitor as normal. Some items do not appear on the monitor do not work. in the SET-UP MENU. Wrong picture position, wrong picture size. Probable cause and... . Troubleshooting 16 Solutions to common problems related to "OFF." in the SET-UP MENU. Symptom No power supply No picture with very high precision technology; Though the remaining picture will flash. A slight electric shock occurs when you turn off (or after a short-term power failure...
Instructions
Page 18
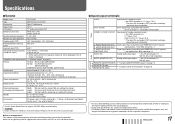
... emphasized, omitted or composed, and may be slightly different from sources other than JVC or JVC-authorized dealers. 7 Input/output terminals Video VIDEO DVI-D (HDCP) COMPO. (Y,...requirements Rated current External dimensions (excluding protruding parts) Weight Accessories DT-V17L2D Multi format LCD monitor Type 17 wide format 16:10 17˝ wide, ...high impedance Analog audio signal output: 1 line, RCA connector x 2, 500 mV (rms) ☞ "Using the MAKE/TRIGGER system" on page 14 ☞ "Using the serial communication" on transportation This monitor is incorrectly replaced. Never use...
... emphasized, omitted or composed, and may be slightly different from sources other than JVC or JVC-authorized dealers. 7 Input/output terminals Video VIDEO DVI-D (HDCP) COMPO. (Y,...requirements Rated current External dimensions (excluding protruding parts) Weight Accessories DT-V17L2D Multi format LCD monitor Type 17 wide format 16:10 17˝ wide, ...high impedance Analog audio signal output: 1 line, RCA connector x 2, 500 mV (rms) ☞ "Using the MAKE/TRIGGER system" on page 14 ☞ "Using the serial communication" on transportation This monitor is incorrectly replaced. Never use...