
Instruction Manual
Page 2
... power cord from the mains outlet prior to re-record pre-recorded tapes, DVDs, or discs without the consent of the owner of copyright in the sound or video recording, broadcast or cable programme and in the following countries: Australia, China, Hong Kong, Japan, South Korea, New Zealand, and Taiwan. However, for the G-CODE system. ● This product incorporates copyright protection technology that is protected...
... power cord from the mains outlet prior to re-record pre-recorded tapes, DVDs, or discs without the consent of the owner of copyright in the sound or video recording, broadcast or cable programme and in the following countries: Australia, China, Hong Kong, Japan, South Korea, New Zealand, and Taiwan. However, for the G-CODE system. ● This product incorporates copyright protection technology that is protected...
Instruction Manual
Page 4
... Video Connection 18 INITIAL SETTINGS 19 Auto Set Up 19 Monitor Set 21 Language 22 PLAYBACK OPERATIONS 25 Basic Playback 25 Playback Features 26 Live Memory Playback 31 Using Play Set Up Menu 36 Parental Lock 43 RECORDING 47 Basic Recording 47 Recording Features 48 TIMER RECORDING 51 G-CODETM/SHOWVIEWTM System Setup 51 G-CODETM/SHOWVIEWTM Timer Programming ... 52 Manual Timer Programming 54 On-Disc Timer Programming 56 Automatic Satellite Programme Recording ......... 61 NAVIGATION 62 Library Database DVD Navi 62 Modify Original Information 65 Modify Play List...
... Video Connection 18 INITIAL SETTINGS 19 Auto Set Up 19 Monitor Set 21 Language 22 PLAYBACK OPERATIONS 25 Basic Playback 25 Playback Features 26 Live Memory Playback 31 Using Play Set Up Menu 36 Parental Lock 43 RECORDING 47 Basic Recording 47 Recording Features 48 TIMER RECORDING 51 G-CODETM/SHOWVIEWTM System Setup 51 G-CODETM/SHOWVIEWTM Timer Programming ... 52 Manual Timer Programming 54 On-Disc Timer Programming 56 Automatic Satellite Programme Recording ......... 61 NAVIGATION 62 Library Database DVD Navi 62 Modify Original Information 65 Modify Play List...

Instruction Manual
Page 9
... another without cartridges REC MODE PULL - Never use . Since disc size changes depending on the disc tray with water. DVD-RAM discs contained in their protective cases, they may be careful that discs are kept in cartridges Double-sided discs: Remove the disc from the cartridge. Also be scratched or otherwise damaged. REC MODE LIVE CHECK OPEN/ SET UP DISPLAY ON SCREEN CLOSE REC LINK REC MODE F1 S-VIDEO VIDEO L(MONO)-AUDIO-R DV DV IN PULL - Discs without their cases...
... another without cartridges REC MODE PULL - Never use . Since disc size changes depending on the disc tray with water. DVD-RAM discs contained in their protective cases, they may be careful that discs are kept in cartridges Double-sided discs: Remove the disc from the cartridge. Also be scratched or otherwise damaged. REC MODE LIVE CHECK OPEN/ SET UP DISPLAY ON SCREEN CLOSE REC LINK REC MODE F1 S-VIDEO VIDEO L(MONO)-AUDIO-R DV DV IN PULL - Discs without their cases...

Instruction Manual
Page 12
..., 56, 59 : Lights when a disc set up for On-Disc Timer Programming is loaded. : Lights when timer recording other than On-Disc Timer Programming is on stand-by or being executed. : Lights when On-Disc Timer Programming is on the Multi Display. "GRP": Total number of titles or title number being played back are displayed on a disc loaded while the 3rd and 4th digits from "60" to "480". F Track/Chapter Indicator (TRK/CHAP) ੬...
..., 56, 59 : Lights when a disc set up for On-Disc Timer Programming is loaded. : Lights when timer recording other than On-Disc Timer Programming is on stand-by or being executed. : Lights when On-Disc Timer Programming is on the Multi Display. "GRP": Total number of titles or title number being played back are displayed on a disc loaded while the 3rd and 4th digits from "60" to "480". F Track/Chapter Indicator (TRK/CHAP) ੬...

Instruction Manual
Page 14
... selected station name. N Audio Display Displays audio that is displayed. J Title Name Display Displays title name newly registered to "AUTO" and ON SCREEN on the remote control is pressed, various operational indicators appear on the TV screen. 14 EN INDEX (cont.) ON-SCREEN DISPLAY When "SUPERIMPOSE" is set to the title recorded on DVD-RAM/RW/R discs, or file name of JPEG and MP3 files. A Disc Display Displays the type of the disc loaded on the disc tray. F Title Number Displays playback title number during playback, and recording title number during play list playback...
... selected station name. N Audio Display Displays audio that is displayed. J Title Name Display Displays title name newly registered to "AUTO" and ON SCREEN on the remote control is pressed, various operational indicators appear on the TV screen. 14 EN INDEX (cont.) ON-SCREEN DISPLAY When "SUPERIMPOSE" is set to the title recorded on DVD-RAM/RW/R discs, or file name of JPEG and MP3 files. A Disc Display Displays the type of the disc loaded on the disc tray. F Title Number Displays playback title number during playback, and recording title number during play list playback...

Instruction Manual
Page 15
... D X E Y F CANCEL AUX MEMO/MARK Z G H I G-CODE PROG/CHECK REC LINK TIMER SHOW VIEW TOP MENU NAVIGATION a b c ENTER d J MENU RETURN e K PREVIOUS NEXT f L M SLOW PLAY/SELECT SLOW REC STOP/CLEAR PAUSE g h i N REC MODE LIVE CHECK j O P OPEN/ SET UP DISPLAY ON SCREEN CLOSE k l Q m n R S PROGRESSIVE AUDIO SUBTITLE ANGLE SCAN o p Buttons with a small dot on the left side of the name can operate most of the remote control is about 8 m. NOTES: ● When inserting the batteries, be used to operate your TV. (੬ pg. 84...
... D X E Y F CANCEL AUX MEMO/MARK Z G H I G-CODE PROG/CHECK REC LINK TIMER SHOW VIEW TOP MENU NAVIGATION a b c ENTER d J MENU RETURN e K PREVIOUS NEXT f L M SLOW PLAY/SELECT SLOW REC STOP/CLEAR PAUSE g h i N REC MODE LIVE CHECK j O P OPEN/ SET UP DISPLAY ON SCREEN CLOSE k l Q m n R S PROGRESSIVE AUDIO SUBTITLE ANGLE SCAN o p Buttons with a small dot on the left side of the name can operate most of the remote control is about 8 m. NOTES: ● When inserting the batteries, be used to operate your TV. (੬ pg. 84...

Instruction Manual
Page 18
...'s AUDIO input connectors. C Connect the unit's AUDIO OUT connectors to the TV's component video input connectors. After the connection is not stereo-capable, use the unit's AUDIO OUT connectors to connect to an audio amplifier for Hi-Fi stereo sound reproduction. ● For switching the TV's video input mode, refer to the instruction manual of the mains power cord into a mains outlet. AUDIO input connectors RF cable (provided) Back of unit Mains outlet Audio cable (not provided) Component Video cable...
...'s AUDIO input connectors. C Connect the unit's AUDIO OUT connectors to the TV's component video input connectors. After the connection is not stereo-capable, use the unit's AUDIO OUT connectors to connect to an audio amplifier for Hi-Fi stereo sound reproduction. ● For switching the TV's video input mode, refer to the instruction manual of the mains power cord into a mains outlet. AUDIO input connectors RF cable (provided) Back of unit Mains outlet Audio cable (not provided) Component Video cable...

Instruction Manual
Page 25
...89 TV DVD 4 SELECT 8 CANCEL AUX MEMO/MARK G-CODE PROG/CHECK REC LINK TIMER SHOW VIEW TOP MENU NAVIGATION ENTER MENU RETURN PREVIOUS NEXT SLOW PLAY/SELECT SLOW REC STOP/CLEAR PAUSE REC MODE LIVE CHECK OPEN/ SET UP DISPLAY ON SCREEN CLOSE rtwe ENTER 9 x PROGRESSIVE AUDIO SUBTITLE ANGLE SCAN EN 25 To play back from the menu. D Stop playback. Press 8. ● When a recordable disc is multi-disc compatible (DVD-RAM, DVD-RW, DVD-R). Press 9. ● To resume normal playback, press 4. B Start playback. Refer to start playback. In this unit is played, playback stops and...
...89 TV DVD 4 SELECT 8 CANCEL AUX MEMO/MARK G-CODE PROG/CHECK REC LINK TIMER SHOW VIEW TOP MENU NAVIGATION ENTER MENU RETURN PREVIOUS NEXT SLOW PLAY/SELECT SLOW REC STOP/CLEAR PAUSE REC MODE LIVE CHECK OPEN/ SET UP DISPLAY ON SCREEN CLOSE rtwe ENTER 9 x PROGRESSIVE AUDIO SUBTITLE ANGLE SCAN EN 25 To play back from the menu. D Stop playback. Press 8. ● When a recordable disc is multi-disc compatible (DVD-RAM, DVD-RW, DVD-R). Press 9. ● To resume normal playback, press 4. B Start playback. Refer to start playback. In this unit is played, playback stops and...

Instruction Manual
Page 30
... AUX MEMO/MARK G-CODE PROG/CHECK REC LINK TIMER SHOW VIEW TOP MENU NAVIGATION ENTER MENU RETURN PREVIOUS NEXT SLOW PLAY/SELECT SLOW REC STOP/CLEAR PAUSE REC MODE LIVE CHECK OPEN/ SET UP DISPLAY ON SCREEN CLOSE ENTER RETURN NEXT 4 AUDIO PROGRESSIVE AUDIO SUBTITLE ANGLE SCAN Audio Channel Selection PLAYBACK OPERATIONS (cont.) NOTE: It is set in stop mode Press 4. 2 Start playback. B Press w e to select "AUDIO OUTPUT", then press ENTER. Playback Control (PBC) Function - A Video CD/SVCD disc recorded with PBC When watching bilingual programmes or playing discs on which you...
... AUX MEMO/MARK G-CODE PROG/CHECK REC LINK TIMER SHOW VIEW TOP MENU NAVIGATION ENTER MENU RETURN PREVIOUS NEXT SLOW PLAY/SELECT SLOW REC STOP/CLEAR PAUSE REC MODE LIVE CHECK OPEN/ SET UP DISPLAY ON SCREEN CLOSE ENTER RETURN NEXT 4 AUDIO PROGRESSIVE AUDIO SUBTITLE ANGLE SCAN Audio Channel Selection PLAYBACK OPERATIONS (cont.) NOTE: It is set in stop mode Press 4. 2 Start playback. B Press w e to select "AUDIO OUTPUT", then press ENTER. Playback Control (PBC) Function - A Video CD/SVCD disc recorded with PBC When watching bilingual programmes or playing discs on which you...

Instruction Manual
Page 37
... selecting Picture Control function of DVD During playback or while stopped 1 Access Play Set Up Menu. To clear Play Set Up Menu Press ON SCREEN. TV TV/ MUTING VIDEO TV DVD STANDBY/ON TV DVD ABC DEF TV VOLUME GHI JKL MNO PQRS TUV WXYZ CH TV DVD CANCEL AUX MEMO/MARK G-CODE PROG/CHECK REC LINK TIMER SHOW VIEW TOP MENU NAVIGATION ENTER MENU RETURN PREVIOUS NEXT SLOW PLAY/SELECT SLOW REC STOP/CLEAR PAUSE REC MODE LIVE CHECK OPEN/ SET UP DISPLAY...
... selecting Picture Control function of DVD During playback or while stopped 1 Access Play Set Up Menu. To clear Play Set Up Menu Press ON SCREEN. TV TV/ MUTING VIDEO TV DVD STANDBY/ON TV DVD ABC DEF TV VOLUME GHI JKL MNO PQRS TUV WXYZ CH TV DVD CANCEL AUX MEMO/MARK G-CODE PROG/CHECK REC LINK TIMER SHOW VIEW TOP MENU NAVIGATION ENTER MENU RETURN PREVIOUS NEXT SLOW PLAY/SELECT SLOW REC STOP/CLEAR PAUSE REC MODE LIVE CHECK OPEN/ SET UP DISPLAY...
Instruction Manual
Page 43
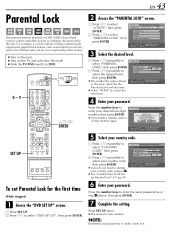
.../MARK G-CODE PROG/CHECK REC LINK TIMER SHOW VIEW TOP MENU NAVIGATION ENTER MENU RETURN PREVIOUS NEXT SLOW PLAY/SELECT SLOW REC STOP/CLEAR PAUSE REC MODE LIVE CHECK OPEN/ SET UP DISPLAY ON SCREEN CLOSE rtwe ENTER PROGRESSIVE AUDIO SUBTITLE ANGLE SCAN To set Parental Lock for Parental Lock" (੬ pg. 45). Press the number keys to select "UTILITY", then press ENTER. A Press w e to enter the same password as in step D above, then press ENTER. Parental Lock This function restricts playback of DVD VIDEO discs which...
.../MARK G-CODE PROG/CHECK REC LINK TIMER SHOW VIEW TOP MENU NAVIGATION ENTER MENU RETURN PREVIOUS NEXT SLOW PLAY/SELECT SLOW REC STOP/CLEAR PAUSE REC MODE LIVE CHECK OPEN/ SET UP DISPLAY ON SCREEN CLOSE rtwe ENTER PROGRESSIVE AUDIO SUBTITLE ANGLE SCAN To set Parental Lock for Parental Lock" (੬ pg. 45). Press the number keys to select "UTILITY", then press ENTER. A Press w e to enter the same password as in step D above, then press ENTER. Parental Lock This function restricts playback of DVD VIDEO discs which...

Instruction Manual
Page 47
... disc. B Choose a programme. or the number keys to record. D Start recording. To record a satellite programmes, refer to "Placing a Disc" (੬ pg. 9). CANCEL AUX MEMO/MARK G-CODE PROG/CHECK REC LINK TIMER SHOW VIEW TOP MENU NAVIGATION ENTER MENU RETURN we PREVIOUS NEXT SLOW PLAY/SELECT SLOW 4 7 REC MODE REC STOP/CLEAR PAUSE REC MODE LIVE CHECK OPEN/ SET UP DISPLAY ON SCREEN CLOSE 9 8 x A Load a disc. B Place a recordable disc on the disc tray. ● For details, refer to page 61. C Press x to open the disc tray. To change...
... disc. B Choose a programme. or the number keys to record. D Start recording. To record a satellite programmes, refer to "Placing a Disc" (੬ pg. 9). CANCEL AUX MEMO/MARK G-CODE PROG/CHECK REC LINK TIMER SHOW VIEW TOP MENU NAVIGATION ENTER MENU RETURN we PREVIOUS NEXT SLOW PLAY/SELECT SLOW 4 7 REC MODE REC STOP/CLEAR PAUSE REC MODE LIVE CHECK OPEN/ SET UP DISPLAY ON SCREEN CLOSE 9 8 x A Load a disc. B Place a recordable disc on the disc tray. ● For details, refer to page 61. C Press x to open the disc tray. To change...

Instruction Manual
Page 48
... selected time. NOTE: You can be recorded per second. with relatively less movement. As a guide for talk shows, etc. PROGRESSIVE AUDIO SUBTITLE ANGLE SCAN RECORDING (cont.) Recording Speed MPEG2 format is used as sports programmes, and LP or EP for picture quality, the "bps" unit is used to 6 hours (selectable in 30-min. On the front display panel, "0:30" appears. 3 Set the recording duration. 48 EN Recording Features 1 STANDBY/ON 7 REC LINK REC MODE F1 S-VIDEO VIDEO...
... selected time. NOTE: You can be recorded per second. with relatively less movement. As a guide for talk shows, etc. PROGRESSIVE AUDIO SUBTITLE ANGLE SCAN RECORDING (cont.) Recording Speed MPEG2 format is used as sports programmes, and LP or EP for picture quality, the "bps" unit is used to 6 hours (selectable in 30-min. On the front display panel, "0:30" appears. 3 Set the recording duration. 48 EN Recording Features 1 STANDBY/ON 7 REC LINK REC MODE F1 S-VIDEO VIDEO...

Instruction Manual
Page 52
... DVD CANCEL AUX MEMO/MARK G-CODE PROG/CHECK REC LINK TIMER SHOW VIEW TOP MENU NAVIGATION ENTER MENU RETURN PREVIOUS NEXT SLOW PLAY/SELECT SLOW REC STOP/CLEAR PAUSE REC MODE LIVE CHECK OPEN/ SET UP DISPLAY ON SCREEN CLOSE # rtwe ENTER RETURN x PROGRESSIVE AUDIO SUBTITLE ANGLE SCAN TIMER RECORDING (cont.) Before performing the G-CODE Timer Programming: ● Turn on the unit. ● Turn on the TV and select the AV mode. ● Slide the TV/DVD switch to DVD. ● Make sure that the unit's built-in the instructions...
... DVD CANCEL AUX MEMO/MARK G-CODE PROG/CHECK REC LINK TIMER SHOW VIEW TOP MENU NAVIGATION ENTER MENU RETURN PREVIOUS NEXT SLOW PLAY/SELECT SLOW REC STOP/CLEAR PAUSE REC MODE LIVE CHECK OPEN/ SET UP DISPLAY ON SCREEN CLOSE # rtwe ENTER RETURN x PROGRESSIVE AUDIO SUBTITLE ANGLE SCAN TIMER RECORDING (cont.) Before performing the G-CODE Timer Programming: ● Turn on the unit. ● Turn on the TV and select the AV mode. ● Slide the TV/DVD switch to DVD. ● Make sure that the unit's built-in the instructions...
Instruction Manual
Page 61
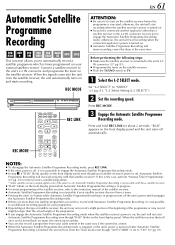
When the signals come into the unit from your external satellite receiver. OPEN CANCEL AUX MEMO/MARK G-CODE PROG/CHECK REC LINK TIMER SHOW VIEW TOP MENU NAVIGATION ENTER MENU RETURN PREVIOUS NEXT SLOW PLAY/SELECT SLOW REC STOP/CLEAR PAUSE REC MODE LIVE CHECK OPEN/ SET UP DISPLAY ON SCREEN CLOSE REC LINK EN 61 ATTENTION: ● Be sure not to turn on and starts recording. "R-LK" appears on the front display panel. Automatic Satellite Programme Recording is not...
When the signals come into the unit from your external satellite receiver. OPEN CANCEL AUX MEMO/MARK G-CODE PROG/CHECK REC LINK TIMER SHOW VIEW TOP MENU NAVIGATION ENTER MENU RETURN PREVIOUS NEXT SLOW PLAY/SELECT SLOW REC STOP/CLEAR PAUSE REC MODE LIVE CHECK OPEN/ SET UP DISPLAY ON SCREEN CLOSE REC LINK EN 61 ATTENTION: ● Be sure not to turn on and starts recording. "R-LK" appears on the front display panel. Automatic Satellite Programme Recording is not...
Instruction Manual
Page 78
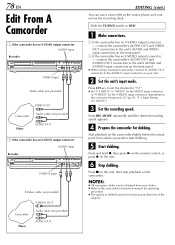
... unit as the source player and your dealer. ● Refer to the AUDIO L input connector on the connector being used. (੬ pg. 81, "F-1 Input Setting (F-1 INPUT)") C Set the recording speed. 78 EN Edit From A Camcorder A If the camcorder has no S-VIDEO output connector: - Press CH +/- E Start dubbing. connect the camcorder's AUDIO OUT and VIDEO OUT connectors to DVD. Press REC MODE repeatedly until the desired recording speed appears. Press 8 on the unit, then stop playback on the front panel...
... unit as the source player and your dealer. ● Refer to the AUDIO L input connector on the connector being used. (੬ pg. 81, "F-1 Input Setting (F-1 INPUT)") C Set the recording speed. 78 EN Edit From A Camcorder A If the camcorder has no S-VIDEO output connector: - Press CH +/- E Start dubbing. connect the camcorder's AUDIO OUT and VIDEO OUT connectors to DVD. Press REC MODE repeatedly until the desired recording speed appears. Press 8 on the unit, then stop playback on the front panel...
Instruction Manual
Page 79
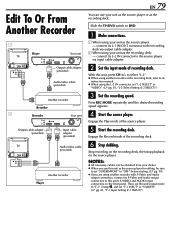
... recorder with S-Video and Audio output connectors, connect its instruction manual. ● When using your unit as the source player or as the recording deck. connect its L-2 IN connector to "VIDEO". (੬ pg. 81, "L-2 Select Setting (L-2 SELECT)") C Set the recording speed. Then, set the unit's input mode to "F-1" in step B, and set "L-2 SELECT" to the source player via output cable adapter. D Start the source player. B When using your dealer. ● When you use your unit as the source player: - F Stop dubbing. Engage the Play mode of the source player. Edit...
... recorder with S-Video and Audio output connectors, connect its instruction manual. ● When using your unit as the source player or as the recording deck. connect its L-2 IN connector to "VIDEO". (੬ pg. 81, "L-2 Select Setting (L-2 SELECT)") C Set the recording speed. Then, set the unit's input mode to "F-1" in step B, and set "L-2 SELECT" to the source player via output cable adapter. D Start the source player. B When using your dealer. ● When you use your unit as the source player: - F Stop dubbing. Engage the Play mode of the source player. Edit...

Instruction Manual
Page 99
.... 80, "L-1 Output and L-1 Input Setting (L-1 OUTPUT and L-1 INPUT)") Progressive scan is output only from COMPONENT VIDEO OUT connector. ● Interlaced scan mode is the setting at your purchase. ● When Progressive scan mode is engaged, no video signal is output from two modes: Interlaced scan mode which is used in the conventional TV system, and Progressive scan mode which enables reproduction of PROGRESSIVE SCAN for 3 or more seconds switches the scan mode. A Lock the disc tray. EN 99 Tray Lock You can select the scan mode from S-VIDEO OUT...
.... 80, "L-1 Output and L-1 Input Setting (L-1 OUTPUT and L-1 INPUT)") Progressive scan is output only from COMPONENT VIDEO OUT connector. ● Interlaced scan mode is the setting at your purchase. ● When Progressive scan mode is engaged, no video signal is output from two modes: Interlaced scan mode which is used in the conventional TV system, and Progressive scan mode which enables reproduction of PROGRESSIVE SCAN for 3 or more seconds switches the scan mode. A Lock the disc tray. EN 99 Tray Lock You can select the scan mode from S-VIDEO OUT...
Instruction Manual
Page 100
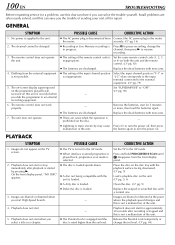
... pause recording, change the set to the AV mode. ● When interlace scanned programme is played back, progressive scan mode is selected. ● The disc is loaded upside down. ● A disc not being compatible with the unit is loaded. ● A dirty disc is loaded. ● Defective disc is not possible. 5. Set the same remote control code (1, 2, 3, or 4) on . Press 1 to the AV mode. Playback dose not start . - 5. Playback does not start or stop immediately after recording is stopped...
... pause recording, change the set to the AV mode. ● When interlace scanned programme is played back, progressive scan mode is selected. ● The disc is loaded upside down. ● A disc not being compatible with the unit is loaded. ● A dirty disc is loaded. ● Defective disc is not possible. 5. Set the same remote control code (1, 2, 3, or 4) on . Press 1 to the AV mode. Playback dose not start . - 5. Playback does not start or stop immediately after recording is stopped...

Instruction Manual
Page 104
... select view angles. By using menu screens recorded on this system to automatically determine whether or not to reproduce particular DVD software by comparing its high compression ratio. 8 Letter box A method of displaying wide images like a letter box. 8 Linear PCM (PCM: Pulse Code Modulation) A system for converting analog sound signal to digital signal for later processing, with no part of the image deleted, by a specified Region Code (or region number). from DVD into six regions...
... select view angles. By using menu screens recorded on this system to automatically determine whether or not to reproduce particular DVD software by comparing its high compression ratio. 8 Letter box A method of displaying wide images like a letter box. 8 Linear PCM (PCM: Pulse Code Modulation) A system for converting analog sound signal to digital signal for later processing, with no part of the image deleted, by a specified Region Code (or region number). from DVD into six regions...


