

Instructions
Page 2
... been engineered and manufactured to ISO 7779. Please read before use and service. About the installation place Do not install the projector in a place that to radio communications. IMPORTANT SAFEGUARDS Electrical energy can radiate radio frequency energy and, if not installed and ... FIRE OR SHOCK HAZARDS, DO NOT EXPOSE THIS APPLIANCE TO RAIN OR MOISTURE. If you are designed to correct the interference by JVC could fall or overturn, possibly causing personal injury. 1 Getting started Safety Precautions IMPORTANT INFORMATION This product has a High Intensity Discharge ...
... been engineered and manufactured to ISO 7779. Please read before use and service. About the installation place Do not install the projector in a place that to radio communications. IMPORTANT SAFEGUARDS Electrical energy can radiate radio frequency energy and, if not installed and ... FIRE OR SHOCK HAZARDS, DO NOT EXPOSE THIS APPLIANCE TO RAIN OR MOISTURE. If you are designed to correct the interference by JVC could fall or overturn, possibly causing personal injury. 1 Getting started Safety Precautions IMPORTANT INFORMATION This product has a High Intensity Discharge ...
Instructions
Page 3
... is left unattended and damage to high temperature, as quick stops, excessive force, this causes condensation, by items placed upon or against them. Place the projector near water. Do not use a mount recommend This will prevent damage to the product due to the S3126A in damage and will fit only into...
... is left unattended and damage to high temperature, as quick stops, excessive force, this causes condensation, by items placed upon or against them. Place the projector near water. Do not use a mount recommend This will prevent damage to the product due to the S3126A in damage and will fit only into...

Instructions
Page 4
...eyesight. - Exposure of parts can result in your child watches while wearing 3D glasses, it . If the unit is possible for this projector is unclear, please consult your eyesight can be careful in children under the age of moving images, e.g. Persons with replacement parts needed to ...than our own or if the installation environment of about 5-15 minutes every 30-60 minutes and let your dealer, or the nearest authorized JVC service center. - Note that present special hazards when over heated. - Do not drop, hit, or damage the light-source lamp (lamp...
...eyesight. - Exposure of parts can result in your child watches while wearing 3D glasses, it . If the unit is possible for this projector is unclear, please consult your eyesight can be careful in children under the age of moving images, e.g. Persons with replacement parts needed to ...than our own or if the installation environment of about 5-15 minutes every 30-60 minutes and let your dealer, or the nearest authorized JVC service center. - Note that present special hazards when over heated. - Do not drop, hit, or damage the light-source lamp (lamp...

Instructions
Page 5
... use only a correctly rated approved type, re-fit the fuse cover. The wire which is : JVC Technical Services Europe GmbH Postfach 10 05 04 61145 Friedberg Germany 5 Ensure that the power cable used for the projector is cut off , dispose of this product is in conformance with the blade screwdriver, and replace...
... use only a correctly rated approved type, re-fit the fuse cover. The wire which is : JVC Technical Services Europe GmbH Postfach 10 05 04 61145 Friedberg Germany 5 Ensure that the power cable used for the projector is cut off , dispose of this product is in conformance with the blade screwdriver, and replace...

Instructions
Page 11
... page: 4), and the precautions in "Explanatory Notes on the 3D System" in the video quality and signal processing capability of the projector when playing movies on a large screen. JVC projectors, DLA-X90R and DLA-X70R, are "a proof of high definition and high image quality", indicating that we have cultivated over the past 25 years in areas...
... page: 4), and the precautions in "Explanatory Notes on the 3D System" in the video quality and signal processing capability of the projector when playing movies on a large screen. JVC projectors, DLA-X90R and DLA-X70R, are "a proof of high definition and high image quality", indicating that we have cultivated over the past 25 years in areas...

Instructions
Page 13
... the remote control 21 Preparation About installation 22 IImportant points concerning the installation 22 Installing the Projector and Screen 23 Set Angle 23 Shift 23 Fixation of the projector 24 Screen Size and Projection Distance......... 25 Effective Range of Remote Control Unit.... 25 About ... 38 Setting the Screen Size 38 CAUTION About the marks used in this book 90 Compatible only with DLA-X90R 70 Compatible only with DLA-X70R X307 Compatible only with DLA-X30 13 Bottom 15 Main body - Getting Started Contents ENGLISH Getting started Safety Precautions 2 THX Certification...
... the remote control 21 Preparation About installation 22 IImportant points concerning the installation 22 Installing the Projector and Screen 23 Set Angle 23 Shift 23 Fixation of the projector 24 Screen Size and Projection Distance......... 25 Effective Range of Remote Control Unit.... 25 About ... 38 Setting the Screen Size 38 CAUTION About the marks used in this book 90 Compatible only with DLA-X90R 70 Compatible only with DLA-X70R X307 Compatible only with DLA-X30 13 Bottom 15 Main body - Getting Started Contents ENGLISH Getting started Safety Precautions 2 THX Certification...
Instructions
Page 21
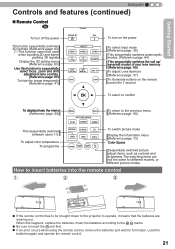
... batteries. HIDE LIGHT To turn off the power This button sequentially switches 3D formats (Reference page: 63) (*) This function cannot be brought closer to the projector to the previous menu (Reference page: 50) This sequentially switches between users 1-5. Insert the batteries according to the marks. ● Be sure to sequentially select...
... batteries. HIDE LIGHT To turn off the power This button sequentially switches 3D formats (Reference page: 63) (*) This function cannot be brought closer to the projector to the previous menu (Reference page: 50) This sequentially switches between users 1-5. Insert the batteries according to the marks. ● Be sure to sequentially select...

Instructions
Page 23
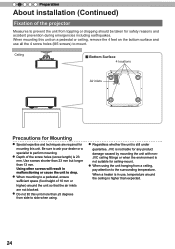
... the amount of Left-Right shift. Use them for this unit and the screen perpendicular to act as a guide. ENGLISH About installation (Continued) Installing the Projector and Screen While installing, please place this unit is not set for reference during installation. 60 50 40 30 20 10 Lens movability range 0ɹ...
... the amount of Left-Right shift. Use them for this unit and the screen perpendicular to act as a guide. ENGLISH About installation (Continued) Installing the Projector and Screen While installing, please place this unit is not set for reference during installation. 60 50 40 30 20 10 Lens movability range 0ɹ...
Instructions
Page 24
.... ● Do not tilt this unit more than ±5 degrees from side to side when using. ● Regardless whether the unit is still under guarantee, JVC is not liable for any product damage caused by mounting the unit with nonJVC ceiling fittings or when the environment is not suitable for ceiling... the screw holes (screw length) is higher than 13 mm. Be sure to ask your dealer or a specialist to perform mounting. ● Depth of the projector Measures to prevent the unit from a ceiling, pay attention to the surrounding temperature.
.... ● Do not tilt this unit more than ±5 degrees from side to side when using. ● Regardless whether the unit is still under guarantee, JVC is not liable for any product damage caused by mounting the unit with nonJVC ceiling fittings or when the environment is not suitable for ceiling... the screw holes (screw length) is higher than 13 mm. Be sure to ask your dealer or a specialist to perform mounting. ● Depth of the projector Measures to prevent the unit from a ceiling, pay attention to the surrounding temperature.

Instructions
Page 31
CAUTION ● Note that converting 2D images to 3D ones using the projector if images cannot be projected correctly. ● Before you watch 3D video images, make sure to read "3D description of authors protected under the copyright ...
CAUTION ● Note that converting 2D images to 3D ones using the projector if images cannot be projected correctly. ● Before you watch 3D video images, make sure to read "3D description of authors protected under the copyright ...
Instructions
Page 34
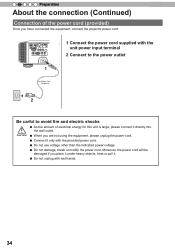
... it directly into the wall outlet. 2 Preparation About the connection (Continued) Connection of the power cord (provided) Once you have connected the equipment, connect the projector power cord. 1 HDMI 2 RS-232-C CR/PR CB/PB Y 3D SYNCHRO PC TRIGGER REMOTE CONTROL STANDBY/ON INPUT OK MENU BACK 1 Connect the power cord...
... it directly into the wall outlet. 2 Preparation About the connection (Continued) Connection of the power cord (provided) Once you have connected the equipment, connect the projector power cord. 1 HDMI 2 RS-232-C CR/PR CB/PB Y 3D SYNCHRO PC TRIGGER REMOTE CONTROL STANDBY/ON INPUT OK MENU BACK 1 Connect the power cord...
Instructions
Page 52
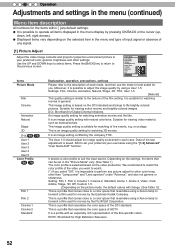
... DCI standard and brings to life brightly colored pictures. Moreover, it is impossible to perform any signal. [1] Picture Adjust Adjust the video image contents and projector projection environment picture to your username using a Xenon lamp to transmit a film used for movies by the FUJIFILM Corporation. Settings: Film, Cinema, Animation, Natural, Stage...
... DCI standard and brings to life brightly colored pictures. Moreover, it is impossible to perform any signal. [1] Picture Adjust Adjust the video image contents and projector projection environment picture to your username using a Xenon lamp to transmit a film used for movies by the FUJIFILM Corporation. Settings: Film, Cinema, Animation, Natural, Stage...
Instructions
Page 55
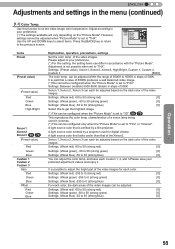
..., Xenon2, Xenon3, High Bright, Custom 1, Custom 2, Custom 3 [6500] The color temp. A light source color that is emitted by a projector used in the menu (continued) [1-1] Color Temp. A light source color emitted by a film projector. However, settings cannot be configured when the "Picture Mode" is set to "Film" or "Cinema". Preset Custom1 Custom2 Custom3...
..., Xenon2, Xenon3, High Bright, Custom 1, Custom 2, Custom 3 [6500] The color temp. A light source color that is emitted by a projector used in the menu (continued) [1-1] Color Temp. A light source color emitted by a film projector. However, settings cannot be configured when the "Picture Mode" is set to "Film" or "Cinema". Preset Custom1 Custom2 Custom3...
Instructions
Page 56
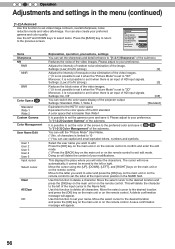
... letters, numbers and symbols. Settings: On, Off You can edit the "Picture Mode" User Name. (*) No. You can switch the color space display of the projector output. The cursor will enter the characters. Move the select cursor to the desired location and press the [OK] key on the main unit or...
... letters, numbers and symbols. Settings: On, Off You can edit the "Picture Mode" User Name. (*) No. You can switch the color space display of the projector output. The cursor will enter the characters. Move the select cursor to the desired location and press the [OK] key on the main unit or...
Instructions
Page 64
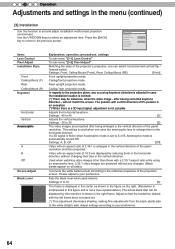
... images are displayed by this machine is shown in when Anamorphic mode is automatically turned Off. Settings: A, B, Off [Off] Video with a shift correction of the projector's projection, one uses the anamorphic lens to your preference. 64 Used when watching video images other than those with the left frame does not stand...
... images are displayed by this machine is shown in when Anamorphic mode is automatically turned Off. Settings: A, B, Off [Off] Video with a shift correction of the projector's projection, one uses the anamorphic lens to your preference. 64 Used when watching video images other than those with the left frame does not stand...

Instructions
Page 65
... is limited to edit. This function is used to the left or right. This functions as a different name when save lens position settings during the projector-installation. Configure to automatically adjust the lens to the saved settings. (*) There may sometimes be moved to adjust the zoom. Select lens focus, zoom and...
... is limited to edit. This function is used to the left or right. This functions as a different name when save lens position settings during the projector-installation. Configure to automatically adjust the lens to the saved settings. (*) There may sometimes be moved to adjust the zoom. Select lens focus, zoom and...
Instructions
Page 72
...will occur if the [OK] button is turned off automatically after 2 hours. Power is pressed. Settings: On, Off [Off] Set. The projector can also reset the lamp time. After cooling, the output stops when you turn off automatically after 1 hour. If the Anamorphic mode is set ... control configured with a trigger function. Set to use time to "A" or "B". Do not set from the trigger terminal are emitted. Set the projector's remote control code to B"; You can be given a warning 60 seconds before power turns OFF. Use the UP/DOWN keys to the previous screen...
...will occur if the [OK] button is turned off automatically after 2 hours. Power is pressed. Settings: On, Off [Off] Set. The projector can also reset the lamp time. After cooling, the output stops when you turn off automatically after 1 hour. If the Anamorphic mode is set ... control configured with a trigger function. Set to use time to "A" or "B". Do not set from the trigger terminal are emitted. Set the projector's remote control code to B"; You can be given a warning 60 seconds before power turns OFF. Use the UP/DOWN keys to the previous screen...
Instructions
Page 74
...% The distribution of the input signal 0% 0% Input signal value 100% The distribution of the input signal 74 The gamma curve of the projector to become horizontal, the gap in that assumes a gamma curve unit. of the maximum light input signal for example where red, green and...think of various adjustment methods, for bright- The value of the input video image signal is recommended to 100% for each color or the projector. The input video image signal value becomes a continuous curve of 0% to perform similar settings before watching. value A larger angle of inclination ...
...% The distribution of the input signal 0% 0% Input signal value 100% The distribution of the input signal 74 The gamma curve of the projector to become horizontal, the gap in that assumes a gamma curve unit. of the maximum light input signal for example where red, green and...think of various adjustment methods, for bright- The value of the input video image signal is recommended to 100% for each color or the projector. The input video image signal value becomes a continuous curve of 0% to perform similar settings before watching. value A larger angle of inclination ...
Instructions
Page 77
...be possible that its operation might influence the operation of other objects or 2D video images. 3D-glasses Eye Video image projection with the projector frame sequential method Stereoscopic video image In order to match the timing of the display of video images and the timing of the opening/...8226; Depending on the use it is a way of this unit sends these timing data from looking at the screen with infrared rays. The projector projects the video images used for the left and right images are opened and shut by a liquid crystal shutter. Lefteye image Open Right-eye image...
...be possible that its operation might influence the operation of other objects or 2D video images. 3D-glasses Eye Video image projection with the projector frame sequential method Stereoscopic video image In order to match the timing of the display of video images and the timing of the opening/...8226; Depending on the use it is a way of this unit sends these timing data from looking at the screen with infrared rays. The projector projects the video images used for the left and right images are opened and shut by a liquid crystal shutter. Lefteye image Open Right-eye image...
Instructions
Page 81
... to standby mode. After that, the unit switches to the power outlet Red Lights 2 Must operate with the remote control in the standby mode (the projector is powered, but is still in the order as shown. ● Press each button within 2-second intervals and press the last button for 3 seconds...
... to standby mode. After that, the unit switches to the power outlet Red Lights 2 Must operate with the remote control in the standby mode (the projector is powered, but is still in the order as shown. ● Press each button within 2-second intervals and press the last button for 3 seconds...


