

Instructions
Page 2
... FIRE OR SHOCK HAZARDS, DO NOT EXPOSE THIS APPLIANCE TO RAIN OR MOISTURE. only) CAUTION: Changes or modification not approved by JVC could fall or overturn, possibly causing personal injury. If this product, observe the following basic rules for USA, the Electronic Industries Alliance...the equipment into this equipment does cause harmful interference to radio or television reception, which the receiver is not sturdy enough, the projector could void the user's authority to operate the equipment. Disposal of electric shock, do not remove cover. 1 Getting started Safety...
... FIRE OR SHOCK HAZARDS, DO NOT EXPOSE THIS APPLIANCE TO RAIN OR MOISTURE. only) CAUTION: Changes or modification not approved by JVC could fall or overturn, possibly causing personal injury. If this product, observe the following basic rules for USA, the Electronic Industries Alliance...the equipment into this equipment does cause harmful interference to radio or television reception, which the receiver is not sturdy enough, the projector could void the user's authority to operate the equipment. Disposal of electric shock, do not remove cover. 1 Getting started Safety...
Instructions
Page 3
... as shown below . home, consult your electrician to determine that the internal and external temperatures are required, be blocked by the proper outlet. Place the projector near water. plug can be unused for - This product is equipped with same characteristics as this product, ask the service technician to perform safety checks...
... as shown below . home, consult your electrician to determine that the internal and external temperatures are required, be blocked by the proper outlet. Place the projector near water. plug can be unused for - This product is equipped with same characteristics as this product, ask the service technician to perform safety checks...

Instructions
Page 4
... illumination lamp is still visible after adjustment. - Fragments from a distance three times the height of moving images, e.g. Do not ceiling-mount the projector to malfunction. Video images can lead to a place which could be higher than normally expected. - Do not look into the inside of this... adult guardian should not use of your dealer. - As the visual sense is damaged due to ask your dealer, or the nearest authorized JVC service center. - Be sure to use 3D glasses. - If anything is impos sible to clean optical component parts if they are hard ...
... illumination lamp is still visible after adjustment. - Fragments from a distance three times the height of moving images, e.g. Do not ceiling-mount the projector to malfunction. Video images can lead to a place which could be higher than normally expected. - Do not look into the inside of this... adult guardian should not use of your dealer. - As the visual sense is damaged due to ask your dealer, or the nearest authorized JVC service center. - Be sure to use 3D glasses. - If anything is impos sible to clean optical component parts if they are hard ...

Instructions
Page 5
...the mains plug is cut off , dispose of the plug immediately, to avoid a possible shock hazard by our dealer to the terminal which is : JVC Technical Services Europe GmbH Postfach 10 05 04 61145 Friedberg Germany 5 AC240V. If a new main plug has to the main supply. European representative of... equipment. Ensure that the power cable used for the AC outlet in your product dealer. The wire which is the correct type for the projector is marked with the letter L or colored red. Use only the power cord designated by inadvertent connection to be connected to ensure Safety and...
...the mains plug is cut off , dispose of the plug immediately, to avoid a possible shock hazard by our dealer to the terminal which is : JVC Technical Services Europe GmbH Postfach 10 05 04 61145 Friedberg Germany 5 AC240V. If a new main plug has to the main supply. European representative of... equipment. Ensure that the power cable used for the AC outlet in your product dealer. The wire which is the correct type for the projector is marked with the letter L or colored red. Use only the power cord designated by inadvertent connection to be connected to ensure Safety and...

Instructions
Page 11
... and audio/video editing, we have established a partnership with the THX mode, which is limited to develop an unprecedented home theater projector system. In addition, the certification standards were established with the aim to "faithfully reproduce images at home according to the intentions of ...the film director" during playback of 2D or 3D images, and they are equipped with JVC KENWOOD Corporation to front projection only. 11 JVC projectors, DLA-X90R and DLA-X70R, are "a proof of high definition and high image quality", indicating that we have cultivated over ...
... and audio/video editing, we have established a partnership with the THX mode, which is limited to develop an unprecedented home theater projector system. In addition, the certification standards were established with the aim to "faithfully reproduce images at home according to the intentions of ...the film director" during playback of 2D or 3D images, and they are equipped with JVC KENWOOD Corporation to front projection only. 11 JVC projectors, DLA-X90R and DLA-X70R, are "a proof of high definition and high image quality", indicating that we have cultivated over ...

Instructions
Page 13
... to insert batteries into the remote control 21 Preparation About installation 22 IImportant points concerning the installation 22 Installing the Projector and Screen 23 Set Angle 23 Shift 23 Fixation of the projector 24 Screen Size and Projection Distance......... 25 Effective Range of Remote Control Unit.... 25 About the connection 26 Types... operation procedures 36 Frequently used useful functions 38 Setting the Screen Size 38 CAUTION About the marks used in this book 90 Compatible only with DLA-X90R 70 Compatible only with DLA-X70R X307 Compatible only with...
... to insert batteries into the remote control 21 Preparation About installation 22 IImportant points concerning the installation 22 Installing the Projector and Screen 23 Set Angle 23 Shift 23 Fixation of the projector 24 Screen Size and Projection Distance......... 25 Effective Range of Remote Control Unit.... 25 About the connection 26 Types... operation procedures 36 Frequently used useful functions 38 Setting the Screen Size 38 CAUTION About the marks used in this book 90 Compatible only with DLA-X90R 70 Compatible only with DLA-X70R X307 Compatible only with...
Instructions
Page 21
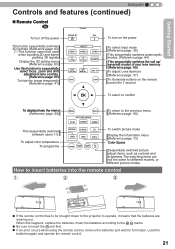
.... LENS. HIDE LIGHT To turn off the power This button sequentially switches 3D formats (Reference page: 63) (*) This function cannot be brought closer to the projector to sequentially select focus, zoom and shift adjustment lens controls. (Reference page: 65) To hide the image temporarily (Reference page: 41) STAND BY ON HDMI...
.... LENS. HIDE LIGHT To turn off the power This button sequentially switches 3D formats (Reference page: 63) (*) This function cannot be brought closer to the projector to sequentially select focus, zoom and shift adjustment lens controls. (Reference page: 65) To hide the image temporarily (Reference page: 41) STAND BY ON HDMI...

Instructions
Page 23
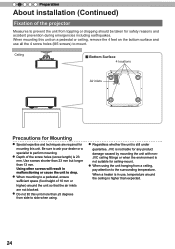
... distortion. (Reference page: 36, 52) Set Angle The angle range which can be set within the above-mentioned range. ENGLISH About installation (Continued) Installing the Projector and Screen While installing, please place this unit is not set for reference during installation. 60 50 40 30 20 10 Lens movability range 0ɹ...
... distortion. (Reference page: 36, 52) Set Angle The angle range which can be set within the above-mentioned range. ENGLISH About installation (Continued) Installing the Projector and Screen While installing, please place this unit is not set for reference during installation. 60 50 40 30 20 10 Lens movability range 0ɹ...
Instructions
Page 24
...from toppling or dropping should be taken for ceiling-mount. ● When using . ● Regardless whether the unit is still under guarantee, JVC is not liable for mounting this unit on a pedestal or ceiling, remove the 4 feet on the bottom surface and use , temperature around...Using other screws will result in use all the 4 screw holes (M5 screws) to mount. 2 Preparation About installation (Continued) Fixation of the projector Measures to prevent the unit from a ceiling, pay attention to the surrounding temperature. Be sure to ask your dealer or a specialist to perform ...
...from toppling or dropping should be taken for ceiling-mount. ● When using . ● Regardless whether the unit is still under guarantee, JVC is not liable for mounting this unit on a pedestal or ceiling, remove the 4 feet on the bottom surface and use , temperature around...Using other screws will result in use all the 4 screw holes (M5 screws) to mount. 2 Preparation About installation (Continued) Fixation of the projector Measures to prevent the unit from a ceiling, pay attention to the surrounding temperature. Be sure to ask your dealer or a specialist to perform ...

Instructions
Page 31
CAUTION ● Note that converting 2D images to 3D ones using the projector if images cannot be projected correctly. ● Before you watch 3D video images, make sure to read "3D description of the system". (Reference page: 75 ...
CAUTION ● Note that converting 2D images to 3D ones using the projector if images cannot be projected correctly. ● Before you watch 3D video images, make sure to read "3D description of the system". (Reference page: 75 ...
Instructions
Page 34
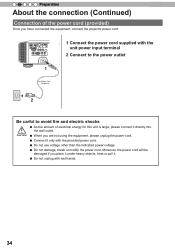
2 Preparation About the connection (Continued) Connection of the power cord (provided) Once you have connected the equipment, connect the projector power cord. 1 HDMI 2 RS-232-C CR/PR CB/PB Y 3D SYNCHRO PC TRIGGER REMOTE CONTROL STANDBY/ON INPUT OK MENU BACK 1 Connect the power cord ...
2 Preparation About the connection (Continued) Connection of the power cord (provided) Once you have connected the equipment, connect the projector power cord. 1 HDMI 2 RS-232-C CR/PR CB/PB Y 3D SYNCHRO PC TRIGGER REMOTE CONTROL STANDBY/ON INPUT OK MENU BACK 1 Connect the power cord ...
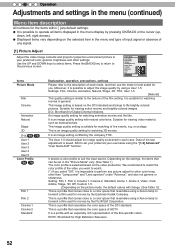
Instructions
Page 52
... profile of the video you want to watch. (*) If you . It is impossible to perform any signal. [1] Picture Adjust Adjust the video image contents and projector projection environment picture to your username using a Xenon lamp to transmit a film used for movies by the Eastman Kodak Company. It is similar to the...
... profile of the video you want to watch. (*) If you . It is impossible to perform any signal. [1] Picture Adjust Adjust the video image contents and projector projection environment picture to your username using a Xenon lamp to transmit a film used for movies by the Eastman Kodak Company. It is similar to the...
Instructions
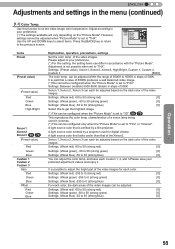
Page 55
.... (*) This can be configured when the "Picture Mode" is not possible when set to "Film". A light source color emitted by a film projector. Use this to your preference. (*) For this setting, the setting items can differ in the menu (continued) [1-1] Color Temp. Use the UP... 50 (strong blue) [0] Operation 55 Please adjust to get the brightest image. (*) This can be adjusted when "Picture Mode" is emitted by a projector used in steps of a xenon lamp being used for each Custom 1, 2, and 3.Please save each color. Settings: Between (reddish) 5500-9500 (bluish...
.... (*) This can be configured when the "Picture Mode" is not possible when set to "Film". A light source color emitted by a film projector. Use this to your preference. (*) For this setting, the setting items can differ in the menu (continued) [1-1] Color Temp. Use the UP... 50 (strong blue) [0] Operation 55 Please adjust to get the brightest image. (*) This can be adjusted when "Picture Mode" is emitted by a projector used in steps of a xenon lamp being used for each Custom 1, 2, and 3.Please save each color. Settings: Between (reddish) 5500-9500 (bluish...
Instructions
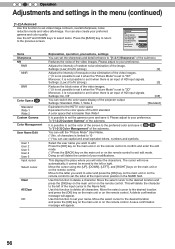
Page 56
... the input cursor in the Name field. Press the [OK] key on the main unit or on the remote control to the left of the projector output. Use this function to set the gamma curve and save it cannot be moved to confirm and enter the edit mode. (*) Press the [BACK...
... the input cursor in the Name field. Press the [OK] key on the main unit or on the remote control to the left of the projector output. Use this function to set the gamma curve and save it cannot be moved to confirm and enter the edit mode. (*) Press the [BACK...
Instructions
Page 64
... in the center as shown in the figure on all sides) It corrects the white balance fault according to the reflective properties of the projector's projection, one uses the anamorphic lens to 40 [0] Adjusts the vertical keystone. Settings: A, B, Off [Off] Video with a 2.35:1 aspect ratio while using an anamorphic lens...
... in the center as shown in the figure on all sides) It corrects the white balance fault according to the reflective properties of the projector's projection, one uses the anamorphic lens to 40 [0] Adjusts the vertical keystone. Settings: A, B, Off [Off] Video with a 2.35:1 aspect ratio while using an anamorphic lens...

Instructions
Page 65
... of the lens during adjustment. This displays the place where you will move automatically; Operation 65 You can also save lens position settings during the projector-installation. Lens Control Focus Zoom Shift Image Pattern On Lock Off Lens Memory Select Lens Memory Save Lens Memory Name Edit Lens Cover Auto Items...
... of the lens during adjustment. This displays the place where you will move automatically; Operation 65 You can also save lens position settings during the projector-installation. Lens Control Focus Zoom Shift Image Pattern On Lock Off Lens Memory Select Lens Memory Save Lens Memory Name Edit Lens Cover Auto Items...
Instructions
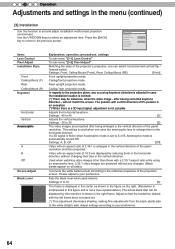
Page 72
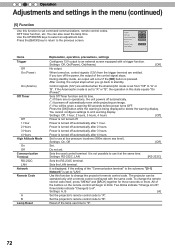
...together for three seconds or more. Sets the LAN terminal. All of the control signal stops. Two blinks indicate "Change A to blink. Set the projector's remote control code to standby. 3 Operation Adjustments and settings in this state equals "On (Power)". Trigger Off Timer High Altitude Mode Remote Code ...control signals (12V) from "Off" to use at the same time. Power is turned off . Use this function to delete the warning display. The projector can also reset the lamp time. Press the [BACK] key to return to omit warning display. If you go back to "B". Press the [OK...
...together for three seconds or more. Sets the LAN terminal. All of the control signal stops. Two blinks indicate "Change A to blink. Set the projector's remote control code to standby. 3 Operation Adjustments and settings in this state equals "On (Power)". Trigger Off Timer High Altitude Mode Remote Code ...control signals (12V) from "Off" to use at the same time. Power is turned off . Use this function to delete the warning display. The projector can also reset the lamp time. Press the [BACK] key to return to omit warning display. If you go back to "B". Press the [OK...
Instructions
Page 74
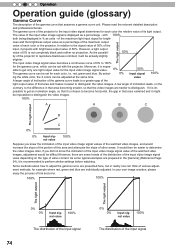
... set with brightness output value of the input signal 74 In relation to the signal value of 50% of the input, it projects with the projector. In your own image creation, please enjoy the process of trial and error. 100% 100% The light output The light output 0% 0% Input ... be easier to determine the video images. possible to get only one can think of the maximum light input signal for each color or the projector. 3 Operation Operation guide (glossary) Gamma Curve The description of that area and makes it easier to distinguish the video images. As the possibil- ...
... set with brightness output value of the input signal 74 In relation to the signal value of 50% of the input, it projects with the projector. In your own image creation, please enjoy the process of trial and error. 100% 100% The light output The light output 0% 0% Input ... be easier to determine the video images. possible to get only one can think of the maximum light input signal for each color or the projector. 3 Operation Operation guide (glossary) Gamma Curve The description of that area and makes it easier to distinguish the video images. As the possibil- ...
Instructions
Page 77
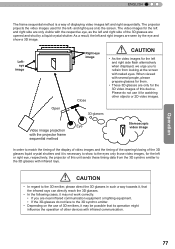
... the screen. Operation 77 Please do not face to the 3D synchro emitter. • Depending on the use it for watching other devices with the projector frame sequential method Stereoscopic video image In order to match the timing of the display of video images and the timing of the opening/closing.... • If you to refrain from the 3D synchro emitter to the eyes only those video images, for the left or right eye, respectively, the projector of displaying video images left and right side of the 3D glasses are only for them. • These 3D glasses are opened and shut by...
... the screen. Operation 77 Please do not face to the 3D synchro emitter. • Depending on the use it for watching other devices with the projector frame sequential method Stereoscopic video image In order to match the timing of the display of video images and the timing of the opening/closing.... • If you to refrain from the 3D synchro emitter to the eyes only those video images, for the left or right eye, respectively, the projector of displaying video images left and right side of the 3D glasses are only for them. • These 3D glasses are opened and shut by...
Instructions
Page 81
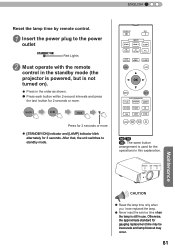
... COLOR P.FILE PIC. After that, the unit switches to the power outlet Red Lights 2 Must operate with the remote control in the standby mode (the projector is powered, but is not turned on). ● Press in the order as shown. ● Press each button within 2-second intervals and press the last...
... COLOR P.FILE PIC. After that, the unit switches to the power outlet Red Lights 2 Must operate with the remote control in the standby mode (the projector is powered, but is not turned on). ● Press in the order as shown. ● Press each button within 2-second intervals and press the last...


