Instructions
Page 2
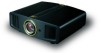
...rules for future reference. - only) CAUTION: Changes or modification not approved by one or more of the FCC Rules. This equipment generates, uses, and can be determined by turning the equipment off and on, the user is encourage to try to correct the interference by JVC could fall ..., causing serious injury to a child or adult, and serious damage to assure your local authorities or for cleaning. - Place the projector near water. Do not use attachments not recommended by the manufacturer. -...
...rules for future reference. - only) CAUTION: Changes or modification not approved by one or more of the FCC Rules. This equipment generates, uses, and can be determined by turning the equipment off and on, the user is encourage to try to correct the interference by JVC could fall ..., causing serious injury to a child or adult, and serious damage to assure your local authorities or for cleaning. - Place the projector near water. Do not use attachments not recommended by the manufacturer. -...

Instructions
Page 3
... turn off the power of any unqualified person to qualified service personnel under the following the operating instructions. This will fit only into this projector is so powerful that are covered by items placed upon or against electric shock. - Do not drop, hit, or damage the light-...plug. When replacement parts are required, be placed more than one foot away from the wall outlet and refer service to install the unit. Exposure of power supply to your home, consult your eyes to cords at the illumination lamp directly by an unqualified person, it from the ...
... turn off the power of any unqualified person to qualified service personnel under the following the operating instructions. This will fit only into this projector is so powerful that are covered by items placed upon or against electric shock. - Do not drop, hit, or damage the light-...plug. When replacement parts are required, be placed more than one foot away from the wall outlet and refer service to install the unit. Exposure of power supply to your home, consult your eyes to cords at the illumination lamp directly by an unqualified person, it from the ...
Instructions
Page 8
... via HDMI Cable 16 Connecting via HDMI-DVI Conversion Cable 16 Connecting via SCART-RCA Cable 17 Connecting via RGB Video Cable 17 Installing the Projector and Screen 18 Screen Size and Projection Distance 19 Troubleshooting Troubleshooting 36 What to Do When These Messages Are Displayed 38 About Warning Indicators 39...
... via HDMI Cable 16 Connecting via HDMI-DVI Conversion Cable 16 Connecting via SCART-RCA Cable 17 Connecting via RGB Video Cable 17 Installing the Projector and Screen 18 Screen Size and Projection Distance 19 Troubleshooting Troubleshooting 36 What to Do When These Messages Are Displayed 38 About Warning Indicators 39...
Instructions
Page 12
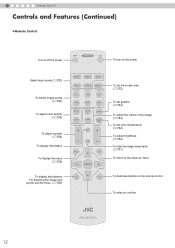
OPERATE ........ SHARP - VIDEO CINEMA C S-VIDEO NATURAL ASPECT DYNAMIC N D USER 1 USER 2 USER 3 COLOR + SHARP + GAMMA COLOR - CONTRAST COLOR TEMP BRIGHT INFO HIDE MENU EXIT ENTER To set the screen size (... To turn off the power OFF ........ 1 Getting Started Controls and Features (Continued) „ Remote Control To turn on the remote control To select or confirm PROJECTOR 12
OPERATE ........ SHARP - VIDEO CINEMA C S-VIDEO NATURAL ASPECT DYNAMIC N D USER 1 USER 2 USER 3 COLOR + SHARP + GAMMA COLOR - CONTRAST COLOR TEMP BRIGHT INFO HIDE MENU EXIT ENTER To set the screen size (... To turn off the power OFF ........ 1 Getting Started Controls and Features (Continued) „ Remote Control To turn on the remote control To select or confirm PROJECTOR 12
Instructions
Page 13
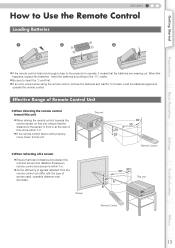
...the remote control. Screen This unit 20° 20° 30° 30° OFF........ ........ OPERATE ........ ON COMP HDMI 2 HDMI 1 VIDEO CINEMA S-VIDEO NATURAL ASPEDCYTNAMIC D N C USE3R USE2R USE1R GAMMA SHAR+P COLO+R COL-OR SHA-RP COTLEOMRP BRIGHT CONTRAST INFO HIDE MENU EXIT ENTER TEST LIGHT...Basic Operation ENGLISH How to Use the Remote Control Loading Batteries 1 2 3 z If the remote control has to be brought closer to the projector to operate, it means that the distance to the sensor in front or at the rear of this unit is within 7 m. z As the...
...the remote control. Screen This unit 20° 20° 30° 30° OFF........ ........ OPERATE ........ ON COMP HDMI 2 HDMI 1 VIDEO CINEMA S-VIDEO NATURAL ASPEDCYTNAMIC D N C USE3R USE2R USE1R GAMMA SHAR+P COLO+R COL-OR SHA-RP COTLEOMRP BRIGHT CONTRAST INFO HIDE MENU EXIT ENTER TEST LIGHT...Basic Operation ENGLISH How to Use the Remote Control Loading Batteries 1 2 3 z If the remote control has to be brought closer to the projector to operate, it means that the distance to the sensor in front or at the rear of this unit is within 7 m. z As the...

Instructions
Page 18
A Install the projector and screen „ Left/Right position *0 % up/down position (center) Approximately 34 % (maximum) of the projected image (Turn the dial to the right for maximum) ...; Up/Down position *0 % left/right position (center) Approximately 80 % (maximum) of the projected image (Turn the dial to the left for maximum) 2 Preparation Installing the Projector and Screen Install this unit and the screen perpendicular to the right for maximum) „ Shifting range of projected image 34% 80% MDMI 2 MDMI 1 RS...
A Install the projector and screen „ Left/Right position *0 % up/down position (center) Approximately 34 % (maximum) of the projected image (Turn the dial to the right for maximum) ...; Up/Down position *0 % left/right position (center) Approximately 80 % (maximum) of the projected image (Turn the dial to the left for maximum) 2 Preparation Installing the Projector and Screen Install this unit and the screen perpendicular to the right for maximum) „ Shifting range of projected image 34% 80% MDMI 2 MDMI 1 RS...
Instructions
Page 20
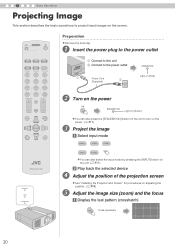
...button on the unit. (pP11) b Play back the selected device D Adjust the position of the projection screen E z See "Installing the Projector and Screen" for procedures on adjusting the position. (pP18) Adjust the image size (zoom) and the focus a Display the test pattern (...the image a Select input mode HDMI 1 HDMI 2 COMP. VIDEO CINEMA C S-VIDEO NATURAL ASPECT DYNAMIC N D USER 1 USER 2 USER 3 COLOR + SHARP + GAMMA COLOR - CONTRAST COLOR TEMP BRIGHT INFO HIDE MENU EXIT ENTER TEST LIGHT PROJECTOR WARNING LAMP STANDBY/ON A Connect to this unit B Connect to turn...
...button on the unit. (pP11) b Play back the selected device D Adjust the position of the projection screen E z See "Installing the Projector and Screen" for procedures on adjusting the position. (pP18) Adjust the image size (zoom) and the focus a Display the test pattern (...the image a Select input mode HDMI 1 HDMI 2 COMP. VIDEO CINEMA C S-VIDEO NATURAL ASPECT DYNAMIC N D USER 1 USER 2 USER 3 COLOR + SHARP + GAMMA COLOR - CONTRAST COLOR TEMP BRIGHT INFO HIDE MENU EXIT ENTER TEST LIGHT PROJECTOR WARNING LAMP STANDBY/ON A Connect to this unit B Connect to turn...
Instructions
Page 22
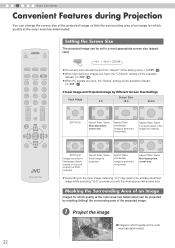
CONTRAST COLOR TEMP BRIGHT INFO HIDE MENU EXIT ENTER TEST LIGHT PROJECTOR Setting the Screen Size The projected image can be set from "Aspect" of an Image Images for which quality at the outer area has deteriorated. ... on the input image, selecting "4:3" may result in a vertically stretched image while selecting "16:9" provides you with the most appropriate screen size (aspect ratio). VIDEO CINEMA C S-VIDEO NATURAL ASPECT DYNAMIC N D USER 1 USER 2 USER 3 COLOR + SHARP + GAMMA COLOR - ASPECT 4:3 16:9 ZOOM z The screen size can also be set to a most ...
CONTRAST COLOR TEMP BRIGHT INFO HIDE MENU EXIT ENTER TEST LIGHT PROJECTOR Setting the Screen Size The projected image can be set from "Aspect" of an Image Images for which quality at the outer area has deteriorated. ... on the input image, selecting "4:3" may result in a vertically stretched image while selecting "16:9" provides you with the most appropriate screen size (aspect ratio). VIDEO CINEMA C S-VIDEO NATURAL ASPECT DYNAMIC N D USER 1 USER 2 USER 3 COLOR + SHARP + GAMMA COLOR - ASPECT 4:3 16:9 ZOOM z The screen size can also be set to a most ...

Instructions
Page 24
... CINEMA C S-VIDEO NATURAL ASPECT DYNAMIC N D USER 1 USER 2 USER 3 COLOR + SHARP + GAMMA COLOR - Func. Info. Info. OPERATE ........ Image Adjust Color Temp. Info. 4 Settings Setting Menu Projected images can be adjusted to "16:9" A Display the setting menu MENU Image Setup Source Install. CONTRAST COLOR TEMP BRIGHT INFO HIDE MENU EXIT ENTER TEST LIGHT PROJECTOR...
... CINEMA C S-VIDEO NATURAL ASPECT DYNAMIC N D USER 1 USER 2 USER 3 COLOR + SHARP + GAMMA COLOR - Func. Info. Info. OPERATE ........ Image Adjust Color Temp. Info. 4 Settings Setting Menu Projected images can be adjusted to "16:9" A Display the setting menu MENU Image Setup Source Install. CONTRAST COLOR TEMP BRIGHT INFO HIDE MENU EXIT ENTER TEST LIGHT PROJECTOR...
Instructions
Page 31
...after 30 minutes. 60 Switch to the left or right. Install. > Flip H b Flip H Select this when using the projector in a location of the screen or when the projector is hung from the ceiling. Off Do not flip image up or down . On Flips image up or down . Black ...Sets screen color to standby mode. On Activate. Install. > Flip V c Flip V Select this when the projector is hung from the ceiling. On Flips image to standby mode after 60 minutes. Off Do not activate. Off Do not display. Off Do not...
...after 30 minutes. 60 Switch to the left or right. Install. > Flip H b Flip H Select this when using the projector in a location of the screen or when the projector is hung from the ceiling. Off Do not flip image up or down . On Flips image up or down . Black ...Sets screen color to standby mode. On Activate. Install. > Flip V c Flip V Select this when the projector is hung from the ceiling. On Flips image to standby mode after 60 minutes. Off Do not activate. Off Do not display. Off Do not...
Instructions
Page 34
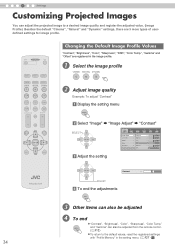
... "Offset" are 3 more types of userdefined settings for image profile. ON HDMI 1 HDMI 2 COMP. Func. SHARP - A Select the image profile CINEMA NATURAL DYNAMIC C N D B Adjust image quality Example: To adjust "Contrast" a Display the setting menu MENU b Select "Image" g "Image Adjust... ........ Gamma Offset Pixel Adjust Contrast 0 Brightness 0 Color 0 Tint 4 Sharpness 0 DNR 0 c Adjust the setting ENTER Contrast 0 PROJECTOR ADJUST d To end the adjustments EXIT C Other items can also be adjusted from the remote control. (pP12) z To return to...
... "Offset" are 3 more types of userdefined settings for image profile. ON HDMI 1 HDMI 2 COMP. Func. SHARP - A Select the image profile CINEMA NATURAL DYNAMIC C N D B Adjust image quality Example: To adjust "Contrast" a Display the setting menu MENU b Select "Image" g "Image Adjust... ........ Gamma Offset Pixel Adjust Contrast 0 Brightness 0 Color 0 Tint 4 Sharpness 0 DNR 0 c Adjust the setting ENTER Contrast 0 PROJECTOR ADJUST d To end the adjustments EXIT C Other items can also be adjusted from the remote control. (pP12) z To return to...

Instructions
Page 42
...1 HDMI 2 COMP. z Press each button within 2-second intervals and press the last button for 2 seconds or more WARNING LAMP STANDBY/ON PROJECTOR z The [LAMP] indicator and [STANDBY/ON] indicator blink alternately for gauging replacement time may be inaccurate and lamp blowout may occur. 42 CAUTION... z Reset the lamp time only when you have replaced the lamp. VIDEO CINEMA C S-VIDEO NATURAL ASPECT DYNAMIC N D USER 1 USER 2 USER 3 COLOR + SHARP + GAMMA COLOR - A Insert the power plug to ...
...1 HDMI 2 COMP. z Press each button within 2-second intervals and press the last button for 2 seconds or more WARNING LAMP STANDBY/ON PROJECTOR z The [LAMP] indicator and [STANDBY/ON] indicator blink alternately for gauging replacement time may be inaccurate and lamp blowout may occur. 42 CAUTION... z Reset the lamp time only when you have replaced the lamp. VIDEO CINEMA C S-VIDEO NATURAL ASPECT DYNAMIC N D USER 1 USER 2 USER 3 COLOR + SHARP + GAMMA COLOR - A Insert the power plug to ...
Instructions
Page 52
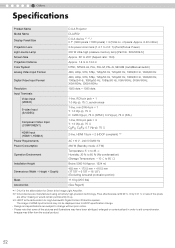
... Input (S-VIDEO) Component Video Input (COMPONENT) HDMI Input (HDMI 1, HDMI 2) Power Requirements Power Consumption Operation Environment Installation Height Dimensions (Width c Height c Depth) Mass Accessories D-ILA Projector DLA-RS2 D-ILA device 1 2 / 0.7" (1920 pixels c1080 pixels) c 3 (Total no. The image of HDMI input terminal may not be displayed due to HDCP specification change. •...
... Input (S-VIDEO) Component Video Input (COMPONENT) HDMI Input (HDMI 1, HDMI 2) Power Requirements Power Consumption Operation Environment Installation Height Dimensions (Width c Height c Depth) Mass Accessories D-ILA Projector DLA-RS2 D-ILA device 1 2 / 0.7" (1920 pixels c1080 pixels) c 3 (Total no. The image of HDMI input terminal may not be displayed due to HDCP specification change. •...

Instructions
Page 162
DLA-RS2 FOR SERVICING (Only in U.S.A.) D-ILA PROJECTOR PROJECTEUR D-ILA PROYECTOR D-ILA © 2008 Victor Company of Japan, Limited Printed in Japan 0208TTH-SW-VP
DLA-RS2 FOR SERVICING (Only in U.S.A.) D-ILA PROJECTOR PROJECTEUR D-ILA PROYECTOR D-ILA © 2008 Victor Company of Japan, Limited Printed in Japan 0208TTH-SW-VP


