
Operation Manual 1
Page 1
... información como referencia para uso ulterior. Getting Started D-ILA PROJECTOR DLA-NX9 DLA-NX7 DLA-NX5 INSTRUCTIONS Set up Operate Adjust/Set Maintenance Troubleshooting Mobile User Guide http://manual3.jvckenwood.com/projector/mobile/global/ The Mobile User Guide can be viewed on the ...side of the cabinet. Retain this information for household room illumination. DLA-NX9 K, DLA-NX7 K, Model No. For Customer use : Enter ...
... información como referencia para uso ulterior. Getting Started D-ILA PROJECTOR DLA-NX9 DLA-NX7 DLA-NX5 INSTRUCTIONS Set up Operate Adjust/Set Maintenance Troubleshooting Mobile User Guide http://manual3.jvckenwood.com/projector/mobile/global/ The Mobile User Guide can be viewed on the ...side of the cabinet. Retain this information for household room illumination. DLA-NX9 K, DLA-NX7 K, Model No. For Customer use : Enter ...

Operation Manual 1
Page 2
... to radio communications. Increase the separation between the equipment and receiver. If the installation place is not sturdy enough, the projector could void the user's authority to provide reasonable protection against harmful interference in a residential installation. Manage in accordance with the...charge (HID) lamp that cannot support its weight securely. CAUTION: To reduce the risk of Conformity Model Number: DLA-NX9BK, DLA-NX7BK, DLA-NX5BK Trade Name: JVC Responsible party: JVCKENWOOD USA Corporation Address: 500 Valley Road, Suite 203 Wayne, NJ 07470 Telephone Number: 973-317...
... to radio communications. Increase the separation between the equipment and receiver. If the installation place is not sturdy enough, the projector could void the user's authority to provide reasonable protection against harmful interference in a residential installation. Manage in accordance with the...charge (HID) lamp that cannot support its weight securely. CAUTION: To reduce the risk of Conformity Model Number: DLA-NX9BK, DLA-NX7BK, DLA-NX5BK Trade Name: JVC Responsible party: JVCKENWOOD USA Corporation Address: 500 Valley Road, Suite 203 Wayne, NJ 07470 Telephone Number: 973-317...
Operation Manual 1
Page 3
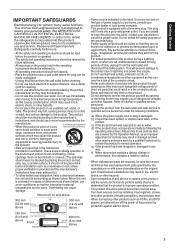
... instructions should be sure the service technician has used on the product. In order not to .) - All operating instructions should use and service. Place the projector near water. The product may be placed more than one foot away from a low temperature to avoid quick stops, excessive force, and uneven surfaces which...
... instructions should be sure the service technician has used on the product. In order not to .) - All operating instructions should use and service. Place the projector near water. The product may be placed more than one foot away from a low temperature to avoid quick stops, excessive force, and uneven surfaces which...
Operation Manual 1
Page 4
... - Video images can be broken by an unqualified person, it to your dealer, or the nearest authorized JVC service center. - Attempting to disassemble, repair or modify the projector yourself may cause the light-source lamp to break and lead to image conversion on and let it to ...for installation. Once every three years, please perform an internal test. For replacement, please consult your own condition. - Please avoid using the projector immediately and send it may appear different from a broken light-source lamp may pose an eye hazard. - This might stick to maintain ...
... - Video images can be broken by an unqualified person, it to your dealer, or the nearest authorized JVC service center. - Attempting to disassemble, repair or modify the projector yourself may cause the light-source lamp to break and lead to image conversion on and let it to ...for installation. Once every three years, please perform an internal test. For replacement, please consult your own condition. - Please avoid using the projector immediately and send it may appear different from a broken light-source lamp may pose an eye hazard. - This might stick to maintain ...

Operation Manual 1
Page 5
... IN DOUBT -- European representative of this product is shown in conformance with the letter N or colored black. Ensure that the power cable used for the projector is the correct type for the power points in your home or the cable is in the illustration below.) WARNING: THIS APPARATUS MUST BE EARTHED... cut off the main plug from this product are colored in accordance with the following power cord. Power cord The power supply voltage rating of JVC KENWOOD Corporation is marked M with the letter E or the safety earth or colored green or green-and-yellow. AC240V.
... IN DOUBT -- European representative of this product is shown in conformance with the letter N or colored black. Ensure that the power cable used for the projector is the correct type for the power points in your home or the cable is in the illustration below.) WARNING: THIS APPARATUS MUST BE EARTHED... cut off the main plug from this product are colored in accordance with the following power cord. Power cord The power supply voltage rating of JVC KENWOOD Corporation is marked M with the letter E or the safety earth or colored green or green-and-yellow. AC240V.

Operation Manual 1
Page 8
...to your Preferred Color (Color Management 32 Viewing HDR Contents 33 Original HDR Technology of JVC 33 Collaboration with any of other models may differ slightly. The appearance of the projector of the above symbols are those of Menu Items 47 Picture Adjust 49 Input Signal 54...in this manual k indicates a function that is supported by DLA-NX7. Rear 11 Main Unit - Side 11 Main Unit - l indicates a function that is supported by DLA-NX9. The illustrations of the projector unit used in the Menu 47 List of DLA-NX9. Front 10 Main Unit - Input Terminals 12 Remote ...
...to your Preferred Color (Color Management 32 Viewing HDR Contents 33 Original HDR Technology of JVC 33 Collaboration with any of other models may differ slightly. The appearance of the projector of the above symbols are those of Menu Items 47 Picture Adjust 49 Input Signal 54...in this manual k indicates a function that is supported by DLA-NX7. Rear 11 Main Unit - Side 11 Main Unit - l indicates a function that is supported by DLA-NX9. The illustrations of the projector unit used in the Menu 47 List of DLA-NX9. Front 10 Main Unit - Input Terminals 12 Remote ...
Operation Manual 1
Page 9
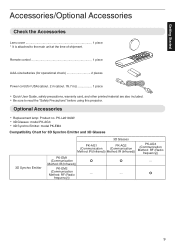
... Method: RF (Radio - - Getting Started Accessories/Optional Accessories Check the Accessories Lens cover 1 piece * It is attached to read the "Safety Precautions" before using this projector. X frequency)) 9 Remote control 1 piece AAA-size batteries (for operational check 2 pieces Power cord (for 3D Synchro Emitter and 3D Glasses 3D Synchro Emitter 3D Glasses...
... Method: RF (Radio - - Getting Started Accessories/Optional Accessories Check the Accessories Lens cover 1 piece * It is attached to read the "Safety Precautions" before using this projector. X frequency)) 9 Remote control 1 piece AAA-size batteries (for operational check 2 pieces Power cord (for 3D Synchro Emitter and 3D Glasses 3D Synchro Emitter 3D Glasses...
Operation Manual 1
Page 10
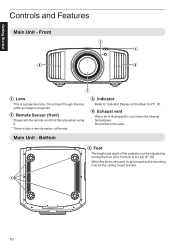
... hole for the ceiling mount bracket. B Remote Sensor (front) Please aim the remote control at the rear. Bottom E Feet The height and angle of the projector can be adjusted by turning the foot. (0 to 5 mm (0 to "Indicator Display on the Main Unit"P. 87.
... hole for the ceiling mount bracket. B Remote Sensor (front) Please aim the remote control at the rear. Bottom E Feet The height and angle of the projector can be adjusted by turning the foot. (0 to 5 mm (0 to "Indicator Display on the Main Unit"P. 87.

Operation Manual 1
Page 12
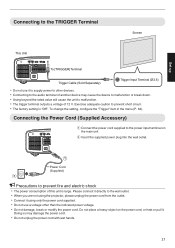
.... Note that is equipped with a trigger function. G [TRIGGER] terminal Output terminal for control commands to be controlled by connecting it to the projector. F [LAN] terminal (RJ-45) The projector can be controlled by connecting a PC to this terminal, you can be sent to a PC through the computer network for DC 12 V, 100... to this terminal. The depth of the screw hole is fitted to control devices such as an elevating screen that improper connection may damage the projector. (Tip=DC +12 V, Sleeve=GND) 12 It is used for sending output signals to the M3 lock hole.
.... Note that is equipped with a trigger function. G [TRIGGER] terminal Output terminal for control commands to be controlled by connecting it to the projector. F [LAN] terminal (RJ-45) The projector can be controlled by connecting a PC to this terminal, you can be sent to a PC through the computer network for DC 12 V, 100... to this terminal. The depth of the screw hole is fitted to control devices such as an elevating screen that improper connection may damage the projector. (Tip=DC +12 V, Sleeve=GND) 12 It is used for sending output signals to the M3 lock hole.
Operation Manual 1
Page 16
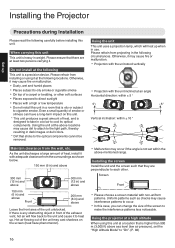
... or malfunction. 0 Projection with the unit stood vertically 0 Projection with non-uniform patterns. Please refrain from the wall, etc. Installing the Projector Set up Precautions during Installation Please read the following carefully before installing this unit This unit is heavy in a room that is higher than... 900 m (3,000 ft) above locations may cause dirt to attach to the light path, thereby resulting in use. Using the projector at a high altitude When using it with a high or low temperature 0 Do not install this unit at the above sea level (low air...
... or malfunction. 0 Projection with the unit stood vertically 0 Projection with non-uniform patterns. Please refrain from the wall, etc. Installing the Projector Set up Precautions during Installation Please read the following carefully before installing this unit This unit is heavy in a room that is higher than... 900 m (3,000 ft) above locations may cause dirt to attach to the light path, thereby resulting in use. Using the projector at a high altitude When using it with a high or low temperature 0 Do not install this unit at the above sea level (low air...
Operation Manual 1
Page 17
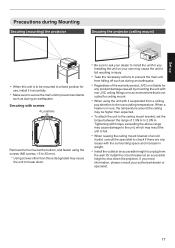
...0 Take the necessary actions to prevent the main unit from falling off such as during an earthquake. 0 Regardless of the warranty period, JVC is not liable for any issues with it horizontally. 0 Make sure to secure the main unit to prevent accidents such as during an ...at an accessible height to unplug from a ceiling, pay attention to the surrounding temperature. Set up Precautions during Mounting Securing (mounting) the projector Securing the projector (ceiling mount) 0 When this unit is to be higher than those designated may be mounted to a fixed position for use, install...
...0 Take the necessary actions to prevent the main unit from falling off such as during an earthquake. 0 Regardless of the warranty period, JVC is not liable for any issues with it horizontally. 0 Make sure to secure the main unit to prevent accidents such as during an ...at an accessible height to unplug from a ceiling, pay attention to the surrounding temperature. Set up Precautions during Mounting Securing (mounting) the projector Securing the projector (ceiling mount) 0 When this unit is to be higher than those designated may be mounted to a fixed position for use, install...

Operation Manual 1
Page 18
... during installation. 18 Similarly, the maximum horizontal shift also changes with the amount of horizontal shift. Adjusting the Position Adjusting the elevation angle of the projector The height and inclination of the unit (0 to 5 mm (0 to 0.2 in)) can shift the image upward/downward or to about 100% k and 80% l m of the...
... during installation. 18 Similarly, the maximum horizontal shift also changes with the amount of horizontal shift. Adjusting the Position Adjusting the elevation angle of the projector The height and inclination of the unit (0 to 5 mm (0 to 0.2 in)) can shift the image upward/downward or to about 100% k and 80% l m of the...
Operation Manual 1
Page 19
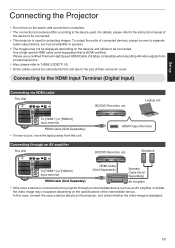
... Separately) AV Amplifier 0 If the source device is connected to the instruction manual of the intermediate device. For details, please refer to the projector through an AV amplifier This Unit HDMI Output Terminal BD/DVD Recorder, etc. Connecting to "HDMI 2 EDID"P. 55. 0 Some cables cannot be connected.... Connecting through an intermediate device such as an amplifier or speaker. 0 The images may not appear depending on the devices and cables to the projector, and check whether the video image is used . To output the audio of their connector cover. To [HDMI 1] or [HDMI 2] input ...
... Separately) AV Amplifier 0 If the source device is connected to the instruction manual of the intermediate device. For details, please refer to the projector through an AV amplifier This Unit HDMI Output Terminal BD/DVD Recorder, etc. Connecting to "HDMI 2 EDID"P. 55. 0 Some cables cannot be connected.... Connecting through an intermediate device such as an amplifier or speaker. 0 The images may not appear depending on the devices and cables to the projector, and check whether the video image is used . To output the audio of their connector cover. To [HDMI 1] or [HDMI 2] input ...
Operation Manual 1
Page 21
... to prevent fire and electric shock 0 The power consumption of 12 V. Please connect it directly to the wall outlet. 0 When you are not using the projector, please unplug the power cord from the outlet. 0 Connect it using only the power cord supplied. 0 Do not use it . Connecting to the TRIGGER Terminal...
... to prevent fire and electric shock 0 The power consumption of 12 V. Please connect it directly to the wall outlet. 0 When you are not using the projector, please unplug the power cord from the outlet. 0 Connect it using only the power cord supplied. 0 Do not use it . Connecting to the TRIGGER Terminal...
Operation Manual 1
Page 22
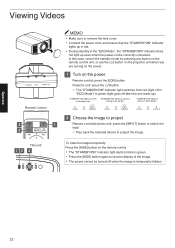
... power cord is temporarily hidden. To hide the image temporarily Press the [HIDE] button on the power Remote control: press the C [ON] button Projector unit: press the A button 0 The "STANDBY/ON" indicator light switches from red (light off in "ECO Mode") to green (light goes off... When in "ECO Mode" WARNING LIGHT STANDBY/ON WARNING LIGHT STANDBY/ON WARNING LIGHT STANDBY/ON 2 Choose the image to project Remote control/projector unit: press the [INPUT] button to switch the input 0 Play back the selected device to project the image. Operate 22 Viewing Videos Remote ...
... power cord is temporarily hidden. To hide the image temporarily Press the [HIDE] button on the power Remote control: press the C [ON] button Projector unit: press the A button 0 The "STANDBY/ON" indicator light switches from red (light off in "ECO Mode") to green (light goes off... When in "ECO Mode" WARNING LIGHT STANDBY/ON WARNING LIGHT STANDBY/ON WARNING LIGHT STANDBY/ON 2 Choose the image to project Remote control/projector unit: press the [INPUT] button to switch the input 0 Play back the selected device to project the image. Operate 22 Viewing Videos Remote ...
Operation Manual 1
Page 23
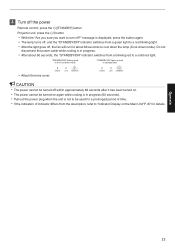
... cooling is not to be turned on the Main Unit"P. 87 for details. Operate 23 3 Turn off the power Remote control: press the B [STANDBY] button Projector unit: press the A button 0 While the "Are you sure you want to "Indicator Display on again while cooling is in progress (60 seconds). 0 Pull out...
... cooling is not to be turned on the Main Unit"P. 87 for details. Operate 23 3 Turn off the power Remote control: press the B [STANDBY] button Projector unit: press the A button 0 While the "Are you sure you want to "Indicator Display on again while cooling is in progress (60 seconds). 0 Pull out...
Operation Manual 1
Page 24
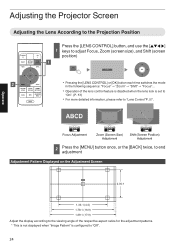
Operate Adjusting the Projector Screen Adjusting the Lens According to the Projection Position Press the [LENS CONTROL] button, and use the [JKH I] 1 keys to adjust Focus, Zoom (screen size), ...
Operate Adjusting the Projector Screen Adjusting the Lens According to the Projection Position Press the [LENS CONTROL] button, and use the [JKH I] 1 keys to adjust Focus, Zoom (screen size), ...
Operation Manual 1
Page 25
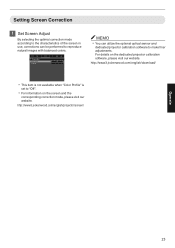
For details on the screen and the corresponding correction mode, please visit our website. http://www3.jvckenwood.com/english/projector/screen/ Operate 25 Screen Adjust Screen Adjust Screen No. Setting Screen Correction 1 Set Screen Adjust By selecting the optimal ...correction mode according to the characteristics of the screen in use, corrections can utilize the optional optical sensor and dedicated projector calibration software to reproduce natural images with balanced colors. Off 0 1 8 MEMO 0 You can be performed to make finer adjustments. http...
For details on the screen and the corresponding correction mode, please visit our website. http://www3.jvckenwood.com/english/projector/screen/ Operate 25 Screen Adjust Screen Adjust Screen No. Setting Screen Correction 1 Set Screen Adjust By selecting the optimal ...correction mode according to the characteristics of the screen in use, corrections can utilize the optional optical sensor and dedicated projector calibration software to reproduce natural images with balanced colors. Off 0 1 8 MEMO 0 You can be performed to make finer adjustments. http...
Operation Manual 1
Page 30
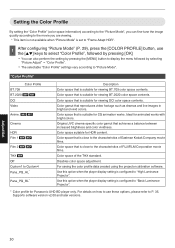
k l Cinema HDR Film 1 k l Film 2 k l THX k Off Custom1 to "Basic Luminance Projector". * Color profile for Panasonic UHD BD player only. Original JVC cinema-specific color gamut that reproduces video footage such as dramas and live images in bright and vivid colors. ...button to display the menu followed by selecting "Picture Adjust" " "Color Profile". 0 The selectable "Color Profile" settings vary according to "High Luminance Projector". Setting the Color Profile By setting the "Color Profile" (color space information) according to the "Picture Mode", you can fine-tune the image ...
k l Cinema HDR Film 1 k l Film 2 k l THX k Off Custom1 to "Basic Luminance Projector". * Color profile for Panasonic UHD BD player only. Original JVC cinema-specific color gamut that reproduces video footage such as dramas and live images in bright and vivid colors. ...button to display the menu followed by selecting "Picture Adjust" " "Color Profile". 0 The selectable "Color Profile" settings vary according to "High Luminance Projector". Setting the Color Profile By setting the "Color Profile" (color space information) according to the "Picture Mode", you can fine-tune the image ...
Operation Manual 1
Page 35
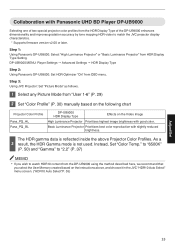
...and improves gradation accuracy by tone mapping HDR video to match the JVC projector display characteristics. * Supports firmware version v2.00 or later. Step 1: Using Panasonic DP-UB9000: Select "High Luminance Projector" or "Basic Luminance Projector" from OSD menu. DP-UB9000 MENU: Player Settings " Advanced ...Settings " HDR Display Type Step 2: Using Panasonic DP-UB9000: Set HDR Optimizer "On" from HDR Display Type Setting. Step 3: Using JVC Projector: Set "Picture Mode" as follows. 1 Select any Picture Mode from the DP-UB9000 using the method described here, we recommend that you...
...and improves gradation accuracy by tone mapping HDR video to match the JVC projector display characteristics. * Supports firmware version v2.00 or later. Step 1: Using Panasonic DP-UB9000: Select "High Luminance Projector" or "Basic Luminance Projector" from OSD menu. DP-UB9000 MENU: Player Settings " Advanced ...Settings " HDR Display Type Step 2: Using Panasonic DP-UB9000: Set HDR Optimizer "On" from HDR Display Type Setting. Step 3: Using JVC Projector: Set "Picture Mode" as follows. 1 Select any Picture Mode from the DP-UB9000 using the method described here, we recommend that you...


