
Instruction Manual
Page 2
..., contact your personal safety. Slots and openings in a place that cannot support its installation, use attachments not recommended by JVC could be burned in to the D-ILA device. In order not to the operator. - Do not use this product near water. Do not place this product .... - These ensure reliable operation of the product and protect it , read and follow all instructions carefully to take full advantage of this projector. If you for a long time or an abnormally bright video picture to the manufacturer's instructions, and should never be adhered to qualified ...
..., contact your personal safety. Slots and openings in a place that cannot support its installation, use attachments not recommended by JVC could be burned in to the D-ILA device. In order not to the operator. - Do not use this product near water. Do not place this product .... - These ensure reliable operation of the product and protect it , read and follow all instructions carefully to take full advantage of this projector. If you for a long time or an abnormally bright video picture to the manufacturer's instructions, and should never be adhered to qualified ...
Instruction Manual
Page 3
... foot away from the product. - The illumination lamp also contains ultraviolet rays and the light is the possibility of this unit through openings as this projector. Be sure to cords at the illumination lamp directly by items placed upon or against electric shock. - Pay particular attention to ask your product dealer...
... foot away from the product. - The illumination lamp also contains ultraviolet rays and the light is the possibility of this unit through openings as this projector. Be sure to cords at the illumination lamp directly by items placed upon or against electric shock. - Pay particular attention to ask your product dealer...

Instruction Manual
Page 4
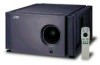
...Control Panel 7 Connector Panel 9 Remote Control Unit 10 MENU/ENTER (Menu Operation) Button 12 Installing Batteries 12 Installing the Projector 13 Precautions for Installation 13 Lens Shift Function 15 Projection Distances and Screen Sizes 17 Connecting to Various Devices.... 18 Signals that... 63 Outside dimensions 65 Pin assignment (Specifications for terminals) ...... 66 Accessories The following accessories are included with this projector. Adjust focus 26 For Operating Other Functions 26 Operating the Setting Menu.......... 29 Making Basic Settings 29 Operating the ...
...Control Panel 7 Connector Panel 9 Remote Control Unit 10 MENU/ENTER (Menu Operation) Button 12 Installing Batteries 12 Installing the Projector 13 Precautions for Installation 13 Lens Shift Function 15 Projection Distances and Screen Sizes 17 Connecting to Various Devices.... 18 Signals that... 63 Outside dimensions 65 Pin assignment (Specifications for terminals) ...... 66 Accessories The following accessories are included with this projector. Adjust focus 26 For Operating Other Functions 26 Operating the Setting Menu.......... 29 Making Basic Settings 29 Operating the ...

Instruction Manual
Page 5
... on page 58. ON [ ❘ ]: The main power turns on the filter works to reduce the cooling effect, causing heat to make the projector level. The effective operating distance of the remote control is 50° left and right, and 15° up inside , which could cause a ... adjustments of angles is 10 m from the horizontal. 2 Connector panel For details, refer to cool the light-source lamp. The effective operating range of your projector. 5 GL-M4023SZ 3 : 1~7 : 1 zoom lens GL-M4015S 1.5 : 1 fixed-focus lens For information on page 13. Deposition of ±4° from the ...
... on page 58. ON [ ❘ ]: The main power turns on the filter works to reduce the cooling effect, causing heat to make the projector level. The effective operating distance of the remote control is 50° left and right, and 15° up inside , which could cause a ... adjustments of angles is 10 m from the horizontal. 2 Connector panel For details, refer to cool the light-source lamp. The effective operating range of your projector. 5 GL-M4023SZ 3 : 1~7 : 1 zoom lens GL-M4015S 1.5 : 1 fixed-focus lens For information on page 13. Deposition of ±4° from the ...

Instruction Manual
Page 6
... comes out of angles is on page 7 and 8. p Remote sensor When operating with the remote control, aim it toward this vent from each of the projector. Controls and Features Left-hand side / Back Side 8 Exhaust vents Vents for cooling fans through which warm air comes out. 9 Control panel For details, refer...
... comes out of angles is on page 7 and 8. p Remote sensor When operating with the remote control, aim it toward this vent from each of the projector. Controls and Features Left-hand side / Back Side 8 Exhaust vents Vents for cooling fans through which warm air comes out. 9 Control panel For details, refer...

Instruction Manual
Page 7
... light-source lamp power supply) have stopped, turn off . • When the fans have stopped. • When the temperature inside the projector has abnormally risen. After the cooling-down mode: If you purchased your dealer for repair. 7 Memo While in the stand-by mode, but...outlet. In the emergency mode, projection is shown (with the EMERGENCY indicator blinking). 6 EMERGENCY indicator Blinking:Something abnormal has occurred with the projector (the EMERGENCY indicator blinks). Blinking: When in the cool-down mode is to prevent inner parts from being deformed or broken by mode...
... light-source lamp power supply) have stopped, turn off . • When the fans have stopped. • When the temperature inside the projector has abnormally risen. After the cooling-down mode: If you purchased your dealer for repair. 7 Memo While in the stand-by mode, but...outlet. In the emergency mode, projection is shown (with the EMERGENCY indicator blinking). 6 EMERGENCY indicator Blinking:Something abnormal has occurred with the projector (the EMERGENCY indicator blinks). Blinking: When in the cool-down mode is to prevent inner parts from being deformed or broken by mode...
Instruction Manual
Page 8
... on the screen and the quick alignment function works (TRACKING, PHASE, H. POS. This function may not work for the item selected. IN terminal of the projector. POS. When no menu is displayed on a dark screen or motion-picture screen. When the adjustment is finished, the display goes off automatically. are automatically...
... on the screen and the quick alignment function works (TRACKING, PHASE, H. POS. This function may not work for the item selected. IN terminal of the projector. POS. When no menu is displayed on a dark screen or motion-picture screen. When the adjustment is finished, the display goes off automatically. are automatically...

Instruction Manual
Page 9
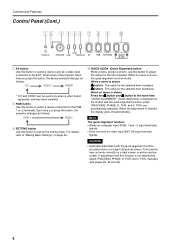
... Panel Controls and Features ESPAÑOL ITALIANO FRANÇAIS DEUTSH ENGLISH RGB RGB IN-1 Y/C VIDEO R RGB IN-2 EXT. This projector can be used if a video board (PK-G1101D) sold separately has been installed. Use the remote control cable supplied. Devices which have...signals for vertical sync (V) and horizontal sync (H). 8 RGB IN (RGB input) -1 terminal (D-sub 3- The terminal was not provided when the projector was shipped from the factory. 2 VIDEO (composite video) input terminal (BNC) Connect this terminal. Detection of the computer to the S video ...
... Panel Controls and Features ESPAÑOL ITALIANO FRANÇAIS DEUTSH ENGLISH RGB RGB IN-1 Y/C VIDEO R RGB IN-2 EXT. This projector can be used if a video board (PK-G1101D) sold separately has been installed. Use the remote control cable supplied. Devices which have...signals for vertical sync (V) and horizontal sync (H). 8 RGB IN (RGB input) -1 terminal (D-sub 3- The terminal was not provided when the projector was shipped from the factory. 2 VIDEO (composite video) input terminal (BNC) Connect this terminal. Detection of the computer to the S video ...

Instruction Manual
Page 10
...press the button, the selection changes as follows: RGB 1 RGB 2 6 FOCUS (+/-) button Use these buttons to adjust the focus of the projection screen when projectors are used .) T: The screen size decreases. OPERATE AV HIDE PRESET PAGE BACK MENU/ AV RGB/COMPUTER U SHIFT D T ZOOM W LENS + FOCUS - ... to select the devices connected to adjust or make adjustment. U: Moves the screen upwards. Each time you to switch between the projector and the remote control. For details, refer to "Connecting to adjust the height of the projected picture. +: The focus point ...
...press the button, the selection changes as follows: RGB 1 RGB 2 6 FOCUS (+/-) button Use these buttons to adjust the focus of the projection screen when projectors are used .) T: The screen size decreases. OPERATE AV HIDE PRESET PAGE BACK MENU/ AV RGB/COMPUTER U SHIFT D T ZOOM W LENS + FOCUS - ... to select the devices connected to adjust or make adjustment. U: Moves the screen upwards. Each time you to switch between the projector and the remote control. For details, refer to "Connecting to adjust the height of the projected picture. +: The focus point ...

Instruction Manual
Page 11
... video image temporarily. This function may not work correctly on the main or setting menu, use this projector 11 This button works only for numerical settings and does not work for switching ON to the projector's AV IN (EXT. During the automatic adjustment, "QUICK-ALIGNMENT" (Quick-Alignment) appears on a bright still-picture...
... video image temporarily. This function may not work correctly on the main or setting menu, use this projector 11 This button works only for numerical settings and does not work for switching ON to the projector's AV IN (EXT. During the automatic adjustment, "QUICK-ALIGNMENT" (Quick-Alignment) appears on a bright still-picture...

Instruction Manual
Page 12
... Install batteries in the direction of the arrow. 2 Install the batteries. If the remote control has started to work properly, replace the batteries with this projector has only one year in normal use the button to select an item to adjust or make yourself familiar with a cloth, otherwise the skin could...
... Install batteries in the direction of the arrow. 2 Install the batteries. If the remote control has started to work properly, replace the batteries with this projector has only one year in normal use the button to select an item to adjust or make yourself familiar with a cloth, otherwise the skin could...

Instruction Manual
Page 13
...used by being placed on its side or upside down . When the projector is enclosed in the following dimensions, use a cover which encloses the projector air-tight or blocks the exhaust vents. Avoid using the projector inclined ±5° or more people when lifting or moving it ...600 mm (23-5/8") 600 mm (23-5/8") 305 mm (12") RGB RGB IN-1 Y/C VIDEO R RGB IN-2 EXT. Installing the Projector Precautions for Installation CAUTION • Since the projector weighs approx. 70 kg (154 lbs.), be subjected to direct sunlight. • Temperature is high or humidity is low. Allow ...
...used by being placed on its side or upside down . When the projector is enclosed in the following dimensions, use a cover which encloses the projector air-tight or blocks the exhaust vents. Avoid using the projector inclined ±5° or more people when lifting or moving it ...600 mm (23-5/8") 600 mm (23-5/8") 305 mm (12") RGB RGB IN-1 Y/C VIDEO R RGB IN-2 EXT. Installing the Projector Precautions for Installation CAUTION • Since the projector weighs approx. 70 kg (154 lbs.), be subjected to direct sunlight. • Temperature is high or humidity is low. Allow ...

Instruction Manual
Page 14
Installing the Projector Precautions for Installation (Cont.) I Observe the following points when installing the projector by hanging it from the shelf for maintenance access. 305 mm (12") or more 14 For safety and maintenance purposes, a suitable facility is recommended that the projector be fixed to its stand with bolts. • When mounting the projector to the ceiling, first install a special shelf and then set the projector on it is necessary to easily lift and lower the projector from the ceiling • To prevent falling or overturning, it securely.
Installing the Projector Precautions for Installation (Cont.) I Observe the following points when installing the projector by hanging it from the shelf for maintenance access. 305 mm (12") or more 14 For safety and maintenance purposes, a suitable facility is recommended that the projector be fixed to its stand with bolts. • When mounting the projector to the ceiling, first install a special shelf and then set the projector on it is necessary to easily lift and lower the projector from the ceiling • To prevent falling or overturning, it securely.
Instruction Manual
Page 15
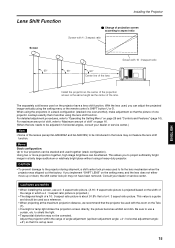
...; Trapezoidal distortion may not have a lens shift function. With the lens used together (stack configuration). Lens Shift Function Installing the Projector I Change of projection screen according to aspect ratio Screen with 4 : 3 aspect ratio Screen Screen with the zoom on the ...width of the range in a fairly large auditorium or relatively bright place without using a heavy-duty projector. For detailed adjustment procedures, refer to project sufficiently bright image in which a 4 : 3 aspect ratio picture is projected.) • The...
...; Trapezoidal distortion may not have a lens shift function. With the lens used together (stack configuration). Lens Shift Function Installing the Projector I Change of projection screen according to aspect ratio Screen with 4 : 3 aspect ratio Screen Screen with the zoom on the ...width of the range in a fairly large auditorium or relatively bright place without using a heavy-duty projector. For detailed adjustment procedures, refer to project sufficiently bright image in which a 4 : 3 aspect ratio picture is projected.) • The...

Instruction Manual
Page 16
... of shift is defined as follows: With the screen width taken as 1, horizontal shift is restricted by the amount of horizontal shift made. Installing the Projector Lens Shift Function (Cont.) Maximum amount of shift The maximum amount of vertical shift is defined as a ratio (%) of the screen width, while with zero...
... of shift is defined as follows: With the screen width taken as 1, horizontal shift is restricted by the amount of horizontal shift made. Installing the Projector Lens Shift Function (Cont.) Maximum amount of shift The maximum amount of vertical shift is defined as a ratio (%) of the screen width, while with zero...

Instruction Manual
Page 17
... Distances and Screen Sizes Lenses that can be partially distorted or missed out depending on the distance between the projector and the screen. ESPAÑOL ITALIANO FRANÇAIS DEUTSH ENGLISH 17 Remarks 3 : 1 wide 7 : 1 tele -------- Adjustable range of ...) The numbers in the above graph, the projected image may be used , you to install the lens, consult the dealer who installed and adjusted your projector or service center. projection distance Screen Size (inch) WIDE 3 : 1 600 500 400 300 Fixed-Focus Lens 1.5 : 1 200 TELE 7 : 1 Zoom Lens 100 Projection...
... Distances and Screen Sizes Lenses that can be partially distorted or missed out depending on the distance between the projector and the screen. ESPAÑOL ITALIANO FRANÇAIS DEUTSH ENGLISH 17 Remarks 3 : 1 wide 7 : 1 tele -------- Adjustable range of ...) The numbers in the above graph, the projected image may be used , you to install the lens, consult the dealer who installed and adjusted your projector or service center. projection distance Screen Size (inch) WIDE 3 : 1 600 500 400 300 Fixed-Focus Lens 1.5 : 1 200 TELE 7 : 1 Zoom Lens 100 Projection...

Instruction Manual
Page 18
...‡ ‡ ‡*2 ‡*2 SECAM ‡ ----- ‡*2 ‡*2 *1: Responds if Y/C output is available. *2: Signifies that Can Be Input to the Projector The following signals are preset.) Screen resolution (standard name) 640 × 400 (PC-9801) 640 × 350 (VGA1) 640 × 480 (VGA3) 640 ×...Notes • Interlace signals are used . • When a signal other than listed above can be sure to turn off the projector and connected devices. * Read the manual which comes with each color system. Connecting to Various Devices * Before connection, be made twice...
...‡ ‡ ‡*2 ‡*2 SECAM ‡ ----- ‡*2 ‡*2 *1: Responds if Y/C output is available. *2: Signifies that Can Be Input to the Projector The following signals are preset.) Screen resolution (standard name) 640 × 400 (PC-9801) 640 × 350 (VGA1) 640 × 480 (VGA3) 640 ×...Notes • Interlace signals are used . • When a signal other than listed above can be sure to turn off the projector and connected devices. * Read the manual which comes with each color system. Connecting to Various Devices * Before connection, be made twice...

Instruction Manual
Page 19
...such as RGB signals. Example of a basic system • By connecting an RGB switcher, a variety of input sources can occur when the projectors is not yet adjusted at the time of installation, or when a new device is equipped with the equipment. Connecting to Various Devices Examples of... System Configuration Before connection, be sure to turn off both the projector and the equipment to the source. Using the remote control supplied, you purchased the projector or a local service center to the projector as a video deck, may be disturbed. (This can be input to adjust...
...such as RGB signals. Example of a basic system • By connecting an RGB switcher, a variety of input sources can occur when the projectors is not yet adjusted at the time of installation, or when a new device is equipped with the equipment. Connecting to Various Devices Examples of... System Configuration Before connection, be sure to turn off both the projector and the equipment to the source. Using the remote control supplied, you purchased the projector or a local service center to the projector as a video deck, may be disturbed. (This can be input to adjust...

Instruction Manual
Page 20
... monitor * When a monitor is connected. With such a note type, the LCD display and external display output need to be sure to turn off both the projector and computer devices. • Read the manual which do not allow the computer's LCD to work if an external display is connected to Computer Devices...
... monitor * When a monitor is connected. With such a note type, the LCD display and external display output need to be sure to turn off both the projector and computer devices. • Read the manual which do not allow the computer's LCD to work if an external display is connected to Computer Devices...
Instruction Manual
Page 21
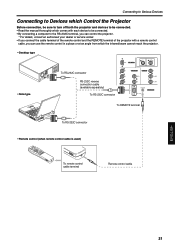
...Read the manual thoroughly which comes with each device to be connected. • By connecting a computer to the RS-232C terminal, you can control the projector. * For details, consult an authorized your dealer or service center. • If you connect the cable terminal of the remote control and the REMOTE terminal... of the projector with a remote control cable, you can use the remote control in a place or at an angle from which the infrared beam cannot reach the...
...Read the manual thoroughly which comes with each device to be connected. • By connecting a computer to the RS-232C terminal, you can control the projector. * For details, consult an authorized your dealer or service center. • If you connect the cable terminal of the remote control and the REMOTE terminal... of the projector with a remote control cable, you can use the remote control in a place or at an angle from which the infrared beam cannot reach the...


