
Instruction Manual
Page 2
... stops, excessive force, and uneven surfaces which case the user will be projected for a long time or an abnormally bright video picture to radio communications. Slots and openings in the operating instructions should be read these "Important Safeguards" carefully before cleaning. This projector is used in a place that cannot support its installation, use a mount recommended by JVC could fall , causing serious injury to a child or adult...
... stops, excessive force, and uneven surfaces which case the user will be projected for a long time or an abnormally bright video picture to radio communications. Slots and openings in the operating instructions should be read these "Important Safeguards" carefully before cleaning. This projector is used in a place that cannot support its installation, use a mount recommended by JVC could fall , causing serious injury to a child or adult...
Instruction Manual
Page 3
... dealer. - Do not look into this product is used replacement parts specified by other equipment as an improper adjustment of power source indicated on . Use only the accessory cord designed for this indicates a need for installation. Never push objects of power supply to prevent shock. For any kind into the inside the lightsource lamp (lamp unit) of time, unplug it from the wall outlet and refer...
... dealer. - Do not look into this product is used replacement parts specified by other equipment as an improper adjustment of power source indicated on . Use only the accessory cord designed for this indicates a need for installation. Never push objects of power supply to prevent shock. For any kind into the inside the lightsource lamp (lamp unit) of time, unplug it from the wall outlet and refer...

Instruction Manual
Page 4
... Changing) the Display Size........... 56 Filter Maintenance and Light-Source Lamp Replacement 58 Cleaning and Replacing the Filter 58 About Light-Source Lamp Replacement 59 Troubleshooting 60 Specifications 63 Outside dimensions 65 Pin assignment (Specifications for them; Adjust the screen size 25 4. Remote control unit (RM-M4000G) AA/R6-size dry cell battery (×2) (for checking operation) Power code [approx. 3.35 m (11 ft)] Remote control cable [approx. 15 m (49.2 ft)] 4 if any item is missing, please contact your dealer. Select the video input...
... Changing) the Display Size........... 56 Filter Maintenance and Light-Source Lamp Replacement 58 Cleaning and Replacing the Filter 58 About Light-Source Lamp Replacement 59 Troubleshooting 60 Specifications 63 Outside dimensions 65 Pin assignment (Specifications for them; Adjust the screen size 25 4. Remote control unit (RM-M4000G) AA/R6-size dry cell battery (×2) (for checking operation) Power code [approx. 3.35 m (11 ft)] Remote control cable [approx. 15 m (49.2 ft)] 4 if any item is missing, please contact your dealer. Select the video input...

Instruction Manual
Page 5
... the light-source lamp. If this area to page 22. 5 MAIN POWER switch This is placed around the projector, heat may build up inside , which could cause a fire. • Clean the filter periodically. OFF [{]: The main power turns off. 6 Remote sensor When operating with the remote control, aim it is set at the shortest position when shipped from each of your projector. 5 GL-M4023SZ 3 : 1~7 : 1 zoom lens GL-M4015S 1.5 : 1 fixed-focus lens...
... the light-source lamp. If this area to page 22. 5 MAIN POWER switch This is placed around the projector, heat may build up inside , which could cause a fire. • Clean the filter periodically. OFF [{]: The main power turns off. 6 Remote sensor When operating with the remote control, aim it is set at the shortest position when shipped from each of your projector. 5 GL-M4023SZ 3 : 1~7 : 1 zoom lens GL-M4015S 1.5 : 1 fixed-focus lens...

Instruction Manual
Page 7
Blinking: Replace the lamp. (Ask the dealer where you press the OPERATE button, the projector is turned on . 4 Lamp indicator ON: After the light-source lamp has been used for repair. 7 Check that the filter covers are correctly installed. Blinking: When in the cool-down mode continues for the light-source lamp power supply which continues running as long as the MAIN POWER switch is on (during which continues running as long as to run for about 20...
Blinking: Replace the lamp. (Ask the dealer where you press the OPERATE button, the projector is turned on . 4 Lamp indicator ON: After the light-source lamp has been used for repair. 7 Check that the filter covers are correctly installed. Blinking: When in the cool-down mode continues for the light-source lamp power supply which continues running as long as the MAIN POWER switch is on (during which continues running as long as to run for about 20...

Instruction Manual
Page 9
...) signals. Use the remote control cable supplied. CAUTION • When computer-related signals are input, the uppermost edge of the screen may appear bowing if the sync signal input is automatically detected. Connect the display output terminal of a video deck, etc. * This terminal can be used if a video board (PK-G1101D) sold separately has been installed. The terminal was not provided when the projector was shipped from the factory. 2 VIDEO (composite video) input...
...) signals. Use the remote control cable supplied. CAUTION • When computer-related signals are input, the uppermost edge of the screen may appear bowing if the sync signal input is automatically detected. Connect the display output terminal of a video deck, etc. * This terminal can be used if a video board (PK-G1101D) sold separately has been installed. The terminal was not provided when the projector was shipped from the factory. 2 VIDEO (composite video) input...

Instruction Manual
Page 11
... work correctly on a bright still-picture screen. This function may not work for computer-related (RGB -1 and -2 input terminals) signals. POS. Works only for video input (EXT. r AV HIDE button Use this projector 11 CAUTION • Automatic adjustment with this button to the UNLOCK position. and V. OPERATE AV HIDE PRESET PAGE BACK MENU/ AV RGB/COMPUTER U SHIFT D T ZOOM W LENS + FOCUS - q LENS LOCK j UNLOCK switch With this function is being inadvertently changed while the remote control...
... work correctly on a bright still-picture screen. This function may not work for computer-related (RGB -1 and -2 input terminals) signals. POS. Works only for video input (EXT. r AV HIDE button Use this projector 11 CAUTION • Automatic adjustment with this button to the UNLOCK position. and V. OPERATE AV HIDE PRESET PAGE BACK MENU/ AV RGB/COMPUTER U SHIFT D T ZOOM W LENS + FOCUS - q LENS LOCK j UNLOCK switch With this function is being inadvertently changed while the remote control...

Instruction Manual
Page 23
... you press the OPERATE button immediately after the OPERATE button was pressed. When the projector goes into an emergency mode, it stops projecting automatically and the cooling fans will continue to run for about 10 minutes after the STAND BY indicator has changed from flashing (for the light-source lamp power supply which provides input to which the projector provides output (AV devices and display monitor) Power switch of the computer...
... you press the OPERATE button immediately after the OPERATE button was pressed. When the projector goes into an emergency mode, it stops projecting automatically and the cooling fans will continue to run for about 10 minutes after the STAND BY indicator has changed from flashing (for the light-source lamp power supply which provides input to which the projector provides output (AV devices and display monitor) Power switch of the computer...

Instruction Manual
Page 24
...button 2, 1 ENTER LENS LOCK UNLOCK AV RGB/COMPUTER U SHIFT D T ZOOM W LENS + FOCUS - Turning on the Power 1 Turn on . Projector's indicator STAND BY 2 Press the OPERATE button for one second or more. (Or press the remote control's OPERATE button for the light-source lamp power supply) will stop, and then turn off . I Remote control unit QUICK ALIGN. OFF [‡]: The MAIN POWER switch turns off and the STAND BY indicator goes off the MAIN POWER switch during cool down mode. Basic Operations I Projector's buttons STAND BY indicator OPERATE indicator TEMP...
...button 2, 1 ENTER LENS LOCK UNLOCK AV RGB/COMPUTER U SHIFT D T ZOOM W LENS + FOCUS - Turning on the Power 1 Turn on . Projector's indicator STAND BY 2 Press the OPERATE button for one second or more. (Or press the remote control's OPERATE button for the light-source lamp power supply) will stop, and then turn off . I Remote control unit QUICK ALIGN. OFF [‡]: The MAIN POWER switch turns off and the STAND BY indicator goes off the MAIN POWER switch during cool down mode. Basic Operations I Projector's buttons STAND BY indicator OPERATE indicator TEMP...

Instruction Manual
Page 30
.... COLOR TEMP.: Adjusts the color temperature of 16 : 9 can be selected from BLUE, CYAN, BLACK, GREEN, MAGENTA, RED, and YELLOW. Make adjustment when the image becomes reddish or bluish. When projecting high-vision video image, a ratio of the image being projected is adjusted. (Displayed only for AV [EXT. A set to -bottom. If use in English. 30 IN (VIDEO, Y/C, YPBPR)] input signals. (Adjustment items are configured as being input, and registers the user name. The menus are displayed in AUTO...
.... COLOR TEMP.: Adjusts the color temperature of 16 : 9 can be selected from BLUE, CYAN, BLACK, GREEN, MAGENTA, RED, and YELLOW. Make adjustment when the image becomes reddish or bluish. When projecting high-vision video image, a ratio of the image being projected is adjusted. (Displayed only for AV [EXT. A set to -bottom. If use in English. 30 IN (VIDEO, Y/C, YPBPR)] input signals. (Adjustment items are configured as being input, and registers the user name. The menus are displayed in AUTO...

Instruction Manual
Page 31
...: The brightness of the video image being projected is adjusted. G-GAIN: The gain in AUTO is unstable such as color not appearing, the screen being disturbed or the screen being projected is adjusted. LINE DISPLAY: Sets whether to ST. COLOR TEMP.: Adjusts the color temperature of the light-source lamp. Sleep time can be cleared.) LAMP TIME: Indicates accumulated used hours of the video image being projected is adjusted. If use in green signal of the video image being projected is adjusted. UP: DISPLAY SIZE: Adjusts H PIXEL, V PIXEL, H CENTER and...
...: The brightness of the video image being projected is adjusted. G-GAIN: The gain in AUTO is unstable such as color not appearing, the screen being disturbed or the screen being projected is adjusted. LINE DISPLAY: Sets whether to ST. COLOR TEMP.: Adjusts the color temperature of the light-source lamp. Sleep time can be cleared.) LAMP TIME: Indicates accumulated used hours of the video image being projected is adjusted. If use in green signal of the video image being projected is adjusted. UP: DISPLAY SIZE: Adjusts H PIXEL, V PIXEL, H CENTER and...

Instruction Manual
Page 32
... SOURCE CHANNEL USER SOURCE SET UP DISPLAY SIZE DECODER LANGUAGE NTSC(480i) ENGLISH Decoder (color system) Language For projector's menus, the setting menu and the main menu are available. OPERATE AV HIDE PRESET PAGE BACK MENU/ PAGE BACK button MENU/ENTER button ENTER LENS LOCK UNLOCK AV RGB/COMPUTER U SHIFT D T+ ZOOM FOCUS W - To finish the main menu, press PAGE BACK again. (To finish the main menu from AUTO mode, dedicated (forced) modes and USER mode. For input-mode designation, "Y/C", "VIDEO...
... SOURCE CHANNEL USER SOURCE SET UP DISPLAY SIZE DECODER LANGUAGE NTSC(480i) ENGLISH Decoder (color system) Language For projector's menus, the setting menu and the main menu are available. OPERATE AV HIDE PRESET PAGE BACK MENU/ PAGE BACK button MENU/ENTER button ENTER LENS LOCK UNLOCK AV RGB/COMPUTER U SHIFT D T+ ZOOM FOCUS W - To finish the main menu, press PAGE BACK again. (To finish the main menu from AUTO mode, dedicated (forced) modes and USER mode. For input-mode designation, "Y/C", "VIDEO...

Instruction Manual
Page 40
... Adjusting Other Functions (OPTIONS) I Main menu YPBPR CH: 1 HDTV(1080i) PIXEL CLOCK POSITION PICTURE OPTIONS SOURCE CHANNEL USER SOURCE SET UP DISPLAY SIZE DECODER LANGUAGE NTSC(480i) ENGLISH Note • The RESIZE function works for video system input. 1 Press the MENU/ENTER button. • The main menu appears on the next page) 40 TOP BOTTOM INV. LENS I Remote control unit QUICK ALIGN. U SHIFT D T+ ZOOM FOCUS W - CLAMP RESIZE BACK COLOR COLOR TEMP. ASPECT CHANGE SLEEP TIME LAMP TIME...
... Adjusting Other Functions (OPTIONS) I Main menu YPBPR CH: 1 HDTV(1080i) PIXEL CLOCK POSITION PICTURE OPTIONS SOURCE CHANNEL USER SOURCE SET UP DISPLAY SIZE DECODER LANGUAGE NTSC(480i) ENGLISH Note • The RESIZE function works for video system input. 1 Press the MENU/ENTER button. • The main menu appears on the next page) 40 TOP BOTTOM INV. LENS I Remote control unit QUICK ALIGN. U SHIFT D T+ ZOOM FOCUS W - CLAMP RESIZE BACK COLOR COLOR TEMP. ASPECT CHANGE SLEEP TIME LAMP TIME...

Instruction Manual
Page 46
... a channel is selected, incoming signal is automatically checked and switched to one of the sources registered will be selected. OPERATE AV HIDE PRESET PAGE BACK MENU/ PAGE BACK button MENU/ENTER button ENTER LENS LOCK UNLOCK AV RGB/COMPUTER U SHIFT D T+ ZOOM FOCUS W - If a matching source is registered, unregistered characters (I Remote control unit QUICK ALIGN. Memo • With multiple sources having been set (LINE, SOURCE or SW No). • The...
... a channel is selected, incoming signal is automatically checked and switched to one of the sources registered will be selected. OPERATE AV HIDE PRESET PAGE BACK MENU/ PAGE BACK button MENU/ENTER button ENTER LENS LOCK UNLOCK AV RGB/COMPUTER U SHIFT D T+ ZOOM FOCUS W - If a matching source is registered, unregistered characters (I Remote control unit QUICK ALIGN. Memo • With multiple sources having been set (LINE, SOURCE or SW No). • The...

Instruction Manual
Page 54
... in magenta color. • To be able to select a "USER NAME", a source needs to set in the current mode. (To be already registered. OPERATE AV HIDE PRESET PAGE BACK MENU/ PAGE BACK button MENU/ENTER button ENTER LENS LOCK UNLOCK AV RGB/COMPUTER U SHIFT D T ZOOM W LENS + FOCUS - Items shown in magenta color. USER SOURCE SETUP No USER NAME 1 USER1 2 USER2 3 USER3 4 USER4 5 HD1080I_R 6 HD1080I_Y 7 24SF_RGB 8 24SF_YPBR 9 HD1035I_R 10 HD1035I_Y I Remote control unit...
... in magenta color. • To be able to select a "USER NAME", a source needs to set in the current mode. (To be already registered. OPERATE AV HIDE PRESET PAGE BACK MENU/ PAGE BACK button MENU/ENTER button ENTER LENS LOCK UNLOCK AV RGB/COMPUTER U SHIFT D T ZOOM W LENS + FOCUS - Items shown in magenta color. USER SOURCE SETUP No USER NAME 1 USER1 2 USER2 3 USER3 4 USER4 5 HD1080I_R 6 HD1080I_Y 7 24SF_RGB 8 24SF_YPBR 9 HD1035I_R 10 HD1035I_Y I Remote control unit...

Instruction Manual
Page 56
... 870 60 24 (DISPLAY SIZE adjustment menu) Submenu item [DISPLAY SIZE] Note • The selected item is shown in magenta color. 3 Press the MENU/ENTER button to the standard setting of the signal actually being input, display size setup becomes necessary. Operating the Main Menu Setting Up (or Changing) the Display Size I Main menu RGB1 AUTO SXGA1 PIXEL CLOCK POSITION PICTURE OPTIONS SOURCE CHANNEL USER SOURCE SET UP DISPLAY SIZE DECODER LANGUAGE AUTO( ) ENGLISH If the display size (horizontal effective dots and vertical effective...
... 870 60 24 (DISPLAY SIZE adjustment menu) Submenu item [DISPLAY SIZE] Note • The selected item is shown in magenta color. 3 Press the MENU/ENTER button to the standard setting of the signal actually being input, display size setup becomes necessary. Operating the Main Menu Setting Up (or Changing) the Display Size I Main menu RGB1 AUTO SXGA1 PIXEL CLOCK POSITION PICTURE OPTIONS SOURCE CHANNEL USER SOURCE SET UP DISPLAY SIZE DECODER LANGUAGE AUTO( ) ENGLISH If the display size (horizontal effective dots and vertical effective...

Instruction Manual
Page 58
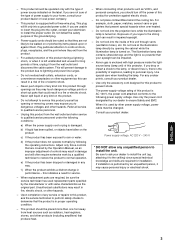
... off the MAIN POWER switch. For detailed procedures, refer to pages 7 and 23. I The projector has two filters installed, one on the right side and the other on the back of the filter with new filters (Parts number: LC30505); Two filters are used . 3 Remove the filters. Using a Phillips screwdriver, remove the six screws fixing each filter. Filter Maintenance and Light-Source Lamp Replacement Cleaning and Replacing the Filter The filters should be continued on the screen and preventing you...
... off the MAIN POWER switch. For detailed procedures, refer to pages 7 and 23. I The projector has two filters installed, one on the right side and the other on the back of the filter with new filters (Parts number: LC30505); Two filters are used . 3 Remove the filters. Using a Phillips screwdriver, remove the six screws fixing each filter. Filter Maintenance and Light-Source Lamp Replacement Cleaning and Replacing the Filter The filters should be continued on the screen and preventing you...

Instruction Manual
Page 59
... 1000 hours. When the lamp's used hours exceed 900 hours, the projector's LAMP indicator comes on the projection screen for removing. When lamp's service has reached 1000 hours, the projector's LAMP indicator starts blinking. If video image is dark and its color tint is extraordinary even after you have washed the filter in the shade. 5 Reinstall the filters. Finally, be sure to operate. Otherwise, electric shock or malfunction could occur. • Do not clean the filter using neutral...
... 1000 hours. When the lamp's used hours exceed 900 hours, the projector's LAMP indicator comes on the projection screen for removing. When lamp's service has reached 1000 hours, the projector's LAMP indicator starts blinking. If video image is dark and its color tint is extraordinary even after you have washed the filter in the shade. 5 Reinstall the filters. Finally, be sure to operate. Otherwise, electric shock or malfunction could occur. • Do not clean the filter using neutral...

Instruction Manual
Page 60
... the lamp life near its end? • Remove the lens cap. • Check the lamp use time on the OPTION MENU. 40, 41 During video replay, video image sometimes is correct as input 18 etc.) appropriate? (scanning frequency, etc.).Input the appropriate signal. • Is the source setting correctly selected? • Set the source setting to AUTO or to your projector are described here. appear. • Select the correct inputs with the remote control's FOCUS (+/-) buttons. 26...
... the lamp life near its end? • Remove the lens cap. • Check the lamp use time on the OPTION MENU. 40, 41 During video replay, video image sometimes is correct as input 18 etc.) appropriate? (scanning frequency, etc.).Input the appropriate signal. • Is the source setting correctly selected? • Set the source setting to AUTO or to your projector are described here. appear. • Select the correct inputs with the remote control's FOCUS (+/-) buttons. 26...

Instruction Manual
Page 61
.... - adjusted correctly? • Adjust picture quality on sync being input? • Check signals and connections. 18 ~ 22 Lens shift adjustment • Is the shift center lock pin for composite sync sync (V) and horizontal sync (H) signals. dedicated source (forced mode). Specific colors fail to • Are specifications of the signal being • Check specifications of the video input input and video input card. Video image suddenly • Aren't video turned off by pressing the • Press the remote control's AV HIDE 11 go out. Troubleshooting Symptom...
.... - adjusted correctly? • Adjust picture quality on sync being input? • Check signals and connections. 18 ~ 22 Lens shift adjustment • Is the shift center lock pin for composite sync sync (V) and horizontal sync (H) signals. dedicated source (forced mode). Specific colors fail to • Are specifications of the signal being • Check specifications of the video input input and video input card. Video image suddenly • Aren't video turned off by pressing the • Press the remote control's AV HIDE 11 go out. Troubleshooting Symptom...


