

45 pg user manual for BR-DV600U/E VTR (1130KB)
Page 4
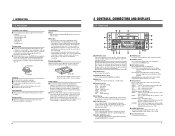
...recording and playback function properly before using the unit for any device equipped with IEEE 1394 input/output 5 Composite, Y/C and component inputs/outputs 5 Sync lock function for audio and video signals There is necessary to prevent malfunctions and maintain the performance level required for professional use. • Maintenance: Just as a recorder/player... is no lip link shift even during extended recording 5 JVC bus and RS-422 serial remote interfaces 5 ...recorded programs without maintenance may be unlawful to use any material recorded from any important operations. ogy 5 DV...
...recording and playback function properly before using the unit for any device equipped with IEEE 1394 input/output 5 Composite, Y/C and component inputs/outputs 5 Sync lock function for audio and video signals There is necessary to prevent malfunctions and maintain the performance level required for professional use. • Maintenance: Just as a recorder/player... is no lip link shift even during extended recording 5 JVC bus and RS-422 serial remote interfaces 5 ...recorded programs without maintenance may be unlawful to use any material recorded from any important operations. ogy 5 DV...
45 pg user manual for BR-DV600U/E VTR (1130KB)
Page 5
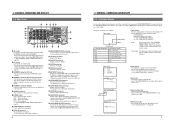
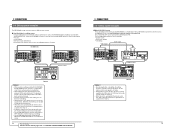
...that you use when plugging or unplugging the power supply. 6 2 CONTROLS, CONNECTORS AND DISPLAYS 2-1 Front Panel #$ % OPERATE CH-1/3 VIDEO CASSETTE RECORDER BR-DV600U ON/OFF 1 @ REC LEVEL EJECT 2 MENU ADVANCE PRESET CH-2/4 REC PLAY PAUSE ! 0 SHIFT SHIFT HOLD SHIFT A. This can be ... sure to prevent accidental erasure. Remove the battery when not in normal recording. REC: Recording PLAY: Playback PAUSE: Temporary stop REW: Rewinding STOP: Stop FF: Fast-forwarding 6 LCD Display Use to adjust the audio recording level. For details, refer to "LCD display" on page 10. ...
...that you use when plugging or unplugging the power supply. 6 2 CONTROLS, CONNECTORS AND DISPLAYS 2-1 Front Panel #$ % OPERATE CH-1/3 VIDEO CASSETTE RECORDER BR-DV600U ON/OFF 1 @ REC LEVEL EJECT 2 MENU ADVANCE PRESET CH-2/4 REC PLAY PAUSE ! 0 SHIFT SHIFT HOLD SHIFT A. This can be ... sure to prevent accidental erasure. Remove the battery when not in normal recording. REC: Recording PLAY: Playback PAUSE: Temporary stop REW: Rewinding STOP: Stop FF: Fast-forwarding 6 LCD Display Use to adjust the audio recording level. For details, refer to "LCD display" on page 10. ...
45 pg user manual for BR-DV600U/E VTR (1130KB)
Page 6
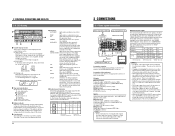
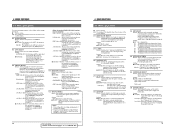
...HM : HOUR METER 2. Tape remaining time Shows the tape remaining time. 2 CONTROLS, CONNECTORS AND DISPLAYS 2-2 Rear Panel ^ & * ( ) % $ # DV IN/OUT Y/C VIDEO LINE IN COMPONENT R-Y B-Y Y AUDIO CH 1/3 CH 2/4 IN IN OUT @ ! Pressing the [MENU] button will bring up the ...SWITCHES" on the left are available. For details, contact your local JVC service center. 5 [REMOTE] connector (SERIAL) Connect a wired ... video monitor to select the timer operation. REC : Timer recording OFF : Timer function OFF PLAY : Timer playback ੬ See "EXTERNAL TIMER-START FUNCTION" on page 26....
...HM : HOUR METER 2. Tape remaining time Shows the tape remaining time. 2 CONTROLS, CONNECTORS AND DISPLAYS 2-2 Rear Panel ^ & * ( ) % $ # DV IN/OUT Y/C VIDEO LINE IN COMPONENT R-Y B-Y Y AUDIO CH 1/3 CH 2/4 IN IN OUT @ ! Pressing the [MENU] button will bring up the ...SWITCHES" on the left are available. For details, contact your local JVC service center. 5 [REMOTE] connector (SERIAL) Connect a wired ... video monitor to select the timer operation. REC : Timer recording OFF : Timer function OFF PLAY : Timer playback ੬ See "EXTERNAL TIMER-START FUNCTION" on page 26....
45 pg user manual for BR-DV600U/E VTR (1130KB)
Page 7
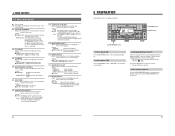
.... DEW: Lights when a condensation occurs. AUD LOCK: Lights when the video and audio sampling clocks (at a time. Input External sync signal Composite Y/C DV Component DV IN/OUT VIDEO LINE COMPONENT Y/C IN R-Y B-Y Y AUDIO CH 1/3 CH 2/4 IN IN OUT PGZ01945 OUT OUT MONITOR OUT 1 REMOTE 2 MONITOR OUT ... below the specified value, this indicator blinks ("off" in the Play mode. SYNC IN No VIDEO IN No EXTERNAL Playback INT Recording INT AUTO Playback INT Recording INT Yes No No Yes EXT INT INT VIDEO EXT VIDEO INT VIDEO Yes Yes EXT VIDEO EXT VIDEO INT: Internal...
.... DEW: Lights when a condensation occurs. AUD LOCK: Lights when the video and audio sampling clocks (at a time. Input External sync signal Composite Y/C DV Component DV IN/OUT VIDEO LINE COMPONENT Y/C IN R-Y B-Y Y AUDIO CH 1/3 CH 2/4 IN IN OUT PGZ01945 OUT OUT MONITOR OUT 1 REMOTE 2 MONITOR OUT ... below the specified value, this indicator blinks ("off" in the Play mode. SYNC IN No VIDEO IN No EXTERNAL Playback INT Recording INT AUTO Playback INT Recording INT Yes No No Yes EXT INT INT VIDEO EXT VIDEO INT VIDEO Yes Yes EXT VIDEO EXT VIDEO INT: Internal...
45 pg user manual for BR-DV600U/E VTR (1130KB)
Page 8
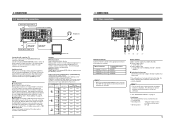
...] connector, some noise will occur at the point where recording ends. The same audio is displayed. Relationship between [AUDIO OUTPUT] / [AUDIO MONITOR] switch and audio output channel (During playback with 32 kHz sampling, audio dubbing, and DV input with this switch, CH1/2 is shown in the... MONITOR OUT SYNC IN TIME CODE SPARE TIMER SERIAL REC PLAY DC 12V OFF Headphones Mic DV Analog audio (2 channels) Audio input to the [DV IN/OUT] connector. In this noise during playback, set to monitor. Analog audio (monaural) Connection with the No. 245 menu switch set...
...] connector, some noise will occur at the point where recording ends. The same audio is displayed. Relationship between [AUDIO OUTPUT] / [AUDIO MONITOR] switch and audio output channel (During playback with 32 kHz sampling, audio dubbing, and DV input with this switch, CH1/2 is shown in the... MONITOR OUT SYNC IN TIME CODE SPARE TIMER SERIAL REC PLAY DC 12V OFF Headphones Mic DV Analog audio (2 channels) Audio input to the [DV IN/OUT] connector. In this noise during playback, set to monitor. Analog audio (monaural) Connection with the No. 245 menu switch set...
45 pg user manual for BR-DV600U/E VTR (1130KB)
Page 9
...this case, the BR-DV600U cannot be used as the RM-G800, digital cut editing system Using an editing remote controller with JVC bus specifications such as a recorder VCR. Otherwise,... is an editing system which uses the BR-DV600U as a feeder/player with an RS-422A serial remote controller such as a recorder, the following editing operations are trademarks. DV (IEEE1394) DV IN/OUT VIDEO LINE COMPONENT Y/C IN ...MIN SEC FRAME LAP RESET BUMP ON OFF PREROLL 7 5 3 EVENT No. The playback picture of Dolby Laboratories Licensing Corporation. The S-VHS/VHS VCR can be replaced with ...
...this case, the BR-DV600U cannot be used as the RM-G800, digital cut editing system Using an editing remote controller with JVC bus specifications such as a recorder VCR. Otherwise,... is an editing system which uses the BR-DV600U as a feeder/player with an RS-422A serial remote controller such as a recorder, the following editing operations are trademarks. DV (IEEE1394) DV IN/OUT VIDEO LINE COMPONENT Y/C IN ...MIN SEC FRAME LAP RESET BUMP ON OFF PREROLL 7 5 3 EVENT No. The playback picture of Dolby Laboratories Licensing Corporation. The S-VHS/VHS VCR can be replaced with ...
45 pg user manual for BR-DV600U/E VTR (1130KB)
Page 11
...unit with the controller connected to the beginning. RS232C (02): Allows control of this unit with the controller connected to the [REMOTE 1] connector. JVC BUS + RS232C (10): Allows control of this unit with the controller connected to the [REMOTE 2] connector. Y/C (01): Selects video signals ...'s NP-L46. 19 In this unit with the controllers connected to the [DV IN/OUT] and [REMOTE 1] connectors. Setting: OFF (00): Does not apply the setup. Notes: • This setting affects recording and playback of remote control unit connected via the RS422A interface. qON (01): Audio...
...unit with the controller connected to the beginning. RS232C (02): Allows control of this unit with the controller connected to the [REMOTE 1] connector. JVC BUS + RS232C (10): Allows control of this unit with the controller connected to the [REMOTE 2] connector. Y/C (01): Selects video signals ...'s NP-L46. 19 In this unit with the controllers connected to the [DV IN/OUT] and [REMOTE 1] connectors. Setting: OFF (00): Does not apply the setup. Notes: • This setting affects recording and playback of remote control unit connected via the RS422A interface. qON (01): Audio...
45 pg user manual for BR-DV600U/E VTR (1130KB)
Page 12
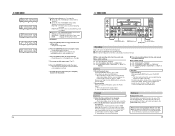
...: Selects the type of the tape counter on -screen display. CLOCK (01): Shows the date and time. CH-1/3 REC LEVEL VIDEO CASSETTE RECORDER BR-DV600U OPERATE ON/OFF EJECT CH-2/4 MENU ADVANCE PRESET SHIFT SHIFT HOLD SHIFT A. Press the [OPERATE] switch. Press the [EJECT] button to...(08) "0" (the display position at the far right). * The tape remaining time indication position cannot be changed up and down with this unit for recording or playback. 4 MENU SWITCHES 4-2 Menu switch details q: Factory setting (00): The number in the bracket shows the set to "MODE + TIME>, setting to "0"...
...: Selects the type of the tape counter on -screen display. CLOCK (01): Shows the date and time. CH-1/3 REC LEVEL VIDEO CASSETTE RECORDER BR-DV600U OPERATE ON/OFF EJECT CH-2/4 MENU ADVANCE PRESET SHIFT SHIFT HOLD SHIFT A. Press the [OPERATE] switch. Press the [EJECT] button to...(08) "0" (the display position at the far right). * The tape remaining time indication position cannot be changed up and down with this unit for recording or playback. 4 MENU SWITCHES 4-2 Menu switch details q: Factory setting (00): The number in the bracket shows the set to "MODE + TIME>, setting to "0"...
45 pg user manual for BR-DV600U/E VTR (1130KB)
Page 14
... the tape In the MiniDV format, one video frame consists of BR-DV600. Set the No. 108 menu switch to use a tape recorded with this unit. First engage the Stop mode. If another BR-DV600), sound and picture may be recorded on the playback picture. As shown in the Pause mode - In the Audio Dubbing.... 5 If audio dubbing is played back on CH3 and CH4. Sub code area Video area Audio area 48k CH1 CH2 32k CH1/CH2 CH3/CH4 7 PLAYBACK CH-1/3 REC LEVEL VIDEO CASSETTE RECORDER BR-DV600U OPERATE ON/OFF EJECT CH-2/4 MENU ADVANCE PRESET SHIFT SHIFT HOLD SHIFT A. Other data...
... the tape In the MiniDV format, one video frame consists of BR-DV600. Set the No. 108 menu switch to use a tape recorded with this unit. First engage the Stop mode. If another BR-DV600), sound and picture may be recorded on the playback picture. As shown in the Pause mode - In the Audio Dubbing.... 5 If audio dubbing is played back on CH3 and CH4. Sub code area Video area Audio area 48k CH1 CH2 32k CH1/CH2 CH3/CH4 7 PLAYBACK CH-1/3 REC LEVEL VIDEO CASSETTE RECORDER BR-DV600U OPERATE ON/OFF EJECT CH-2/4 MENU ADVANCE PRESET SHIFT SHIFT HOLD SHIFT A. Other data...
45 pg user manual for BR-DV600U/E VTR (1130KB)
Page 15
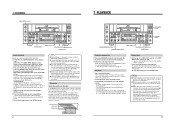
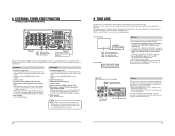
...SUPPLY) DV IN/OUT VIDEO LINE COMPONENT Y/C IN R-Y B-Y Y AUDIO CH 1/3 CH 2/4 IN IN OUT PGZ01945 OUT OUT MONITOR OUT 1 REMOTE 2 MONITOR OUT SYNC IN TIME CODE SPARE TIMER SERIAL REC PLAY DC 12V OFF REC: Timer recording OFF: Timer function OFF PLAY: Timer playback Commercially available timer, etc. Playback 1 ...could damage this time code, the position of 0 frame may not be shown on the counter display and on the on-screen display during playback and recording. 1 To display time code data on the on-screen display, set the No. 514 menu switch to "TC". ੬ See No...
...SUPPLY) DV IN/OUT VIDEO LINE COMPONENT Y/C IN R-Y B-Y Y AUDIO CH 1/3 CH 2/4 IN IN OUT PGZ01945 OUT OUT MONITOR OUT 1 REMOTE 2 MONITOR OUT SYNC IN TIME CODE SPARE TIMER SERIAL REC PLAY DC 12V OFF REC: Timer recording OFF: Timer function OFF PLAY: Timer playback Commercially available timer, etc. Playback 1 ...could damage this time code, the position of 0 frame may not be shown on the counter display and on the on-screen display during playback and recording. 1 To display time code data on the on-screen display, set the No. 514 menu switch to "TC". ੬ See No...
45 pg user manual for BR-DV600U/E VTR (1130KB)
Page 16
... is complete. 5 Set the No. 416 menu switch. VITC time code is recorded in the Stop mode. 28 9 TIME CODE CH-1/3 REC LEVEL VIDEO CASSETTE RECORDER BR-DV600U OPERATE ON/OFF EJECT CH-2/4 MENU ADVANCE PRESET SHIFT SHIFT HOLD SHIFT A. Reference Playback time code Time code data is not output. While pressing the [REC...
... is complete. 5 Set the No. 416 menu switch. VITC time code is recorded in the Stop mode. 28 9 TIME CODE CH-1/3 REC LEVEL VIDEO CASSETTE RECORDER BR-DV600U OPERATE ON/OFF EJECT CH-2/4 MENU ADVANCE PRESET SHIFT SHIFT HOLD SHIFT A. Reference Playback time code Time code data is not output. While pressing the [REC...

45 pg user manual for BR-DV600U/E VTR (1130KB)
Page 18
...Note: PC means a controller such as a personal computer. When the tape is cued, COMPLETION is returned and the Play mode is transmitted during playback, playback speed changes to cue up a specified point on the tape. Speed code table (corresponding speed) Speed code 30h 31h 33h 34h 35h 36h ... VCR operation commands Preparation To control the VCR via the RS-232C interface enables the PC to "RS232C", "IEEE 1394 + RS232C", "JVC BUS + RS232C" or "JVC BUS + RS232C + 1394". When this command is specified by sending the speed code data after this command. B5 F-SHUTTLE Shuttle play ...
...Note: PC means a controller such as a personal computer. When the tape is cued, COMPLETION is returned and the Play mode is transmitted during playback, playback speed changes to cue up a specified point on the tape. Speed code table (corresponding speed) Speed code 30h 31h 33h 34h 35h 36h ... VCR operation commands Preparation To control the VCR via the RS-232C interface enables the PC to "RS232C", "IEEE 1394 + RS232C", "JVC BUS + RS232C" or "JVC BUS + RS232C + 1394". When this command is specified by sending the speed code data after this command. B5 F-SHUTTLE Shuttle play ...

45 pg user manual for BR-DV600U/E VTR (1130KB)
Page 19
... the hour (ones place) and minutes (tens place and ones place). Use to 46h. Following this command, send data (1 byte) corresponding to JVC STATUS SENSE for one place. The search speed is returned showing the seconds (tens place and ones place). Use to check the VCR's time data... mode. Specify this by sending the speed code data after this command during playback after transmitting REC DUB REQUEST. Use to check the RS-232C interface-related ROM version. 3-byte data is expressed with the recording-related command). Use to preset the time code data. Commands E0 TC DATA...
... the hour (ones place) and minutes (tens place and ones place). Use to 46h. Following this command, send data (1 byte) corresponding to JVC STATUS SENSE for one place. The search speed is returned showing the seconds (tens place and ones place). Use to check the VCR's time data... mode. Specify this by sending the speed code data after this command during playback after transmitting REC DUB REQUEST. Use to check the RS-232C interface-related ROM version. 3-byte data is expressed with the recording-related command). Use to preset the time code data. Commands E0 TC DATA...
45 pg user manual for BR-DV600U/E VTR (1130KB)
Page 23
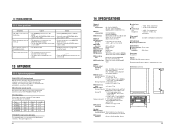
...are dirty. • Read the instructions on a nonrecorded section of the playback picture. • The heads are used to change without notice. DUB...computer, you to "ON". Dimensions (unit: mm) 325 88 CH-1/3 REC LEVEL VIDEO CASSETTE RECORDER BR-DV600U OPERATE ON/OFF EJECT CH-2/4 MENU ADVANCE PRESET SHIFT SHIFT HOLD SHIFT A. Tape counter does...[Time code] 5 Output : 0 ± 3 dBs, low impedance, unbalanced [DV interface] 5 Input/output: IEEE 1394 [Connectors] 5 RS-422 interface : D-sub 9-pin 5 JVC bus connector : DIN 12-pin Accessory AC cable x 1 Option SA-K46U RS-232C...
...are dirty. • Read the instructions on a nonrecorded section of the playback picture. • The heads are used to change without notice. DUB...computer, you to "ON". Dimensions (unit: mm) 325 88 CH-1/3 REC LEVEL VIDEO CASSETTE RECORDER BR-DV600U OPERATE ON/OFF EJECT CH-2/4 MENU ADVANCE PRESET SHIFT SHIFT HOLD SHIFT A. Tape counter does...[Time code] 5 Output : 0 ± 3 dBs, low impedance, unbalanced [DV interface] 5 Input/output: IEEE 1394 [Connectors] 5 RS-422 interface : D-sub 9-pin 5 JVC bus connector : DIN 12-pin Accessory AC cable x 1 Option SA-K46U RS-232C...

45 pg user manual for BR-DV600U/E VTR (1130KB)
Page 24
PRX47531 Precautions for Use of Head Cleaning Tape English Adhere to the following chart as the indicator will not be provided to DV output and analog output. One time: One tape transport from the contents of cleaning tape 1 to 2 times every 5 hours 1 to 2 times every 20 to 30 ...% RH), head cleaning should be used immediately after the cleaning tape is set to on . If you would like to provide set up signals when playback, set up signals will turn off after the tape has run as a guide for use des Reinigungsbandes enthält Anweisungen für die Verwendung des...
PRX47531 Precautions for Use of Head Cleaning Tape English Adhere to the following chart as the indicator will not be provided to DV output and analog output. One time: One tape transport from the contents of cleaning tape 1 to 2 times every 5 hours 1 to 2 times every 20 to 30 ...% RH), head cleaning should be used immediately after the cleaning tape is set to on . If you would like to provide set up signals when playback, set up signals will turn off after the tape has run as a guide for use des Reinigungsbandes enthält Anweisungen für die Verwendung des...
