User Manual
Page 5
...to editing system 32 Connecting with serial remote terminals ..... 34 Connecting the AC adapter 35 PREPARATION Turning on/off the power 36 Operation method (main unit/remote controller) and operation lock mode 37 ...Dubbing with another machine using the SERIAL REMOTE OUT/DV terminals ......... 57 TIME CODE Displaying the time code 58 Presetting the time code 59 Recording the time code 60 Playing back the time ...code 63 EDIT Editing with an RS-422A/JVC bus edit remote controller 64 Using a non-...
...to editing system 32 Connecting with serial remote terminals ..... 34 Connecting the AC adapter 35 PREPARATION Turning on/off the power 36 Operation method (main unit/remote controller) and operation lock mode 37 ...Dubbing with another machine using the SERIAL REMOTE OUT/DV terminals ......... 57 TIME CODE Displaying the time code 58 Presetting the time code 59 Recording the time code 60 Playing back the time ...code 63 EDIT Editing with an RS-422A/JVC bus edit remote controller 64 Using a non-...

User Manual
Page 6
... surface. Minute black dots may appear or bright (red, blue and white) dots are not recorded. 6 Do not wipe it with thinner or benzene as it dry. Ⅵ Use the supplied AC adapter to connect the unit to condensation. ● Places that generate strong magnetic fields, e.g., near ...Mind your fingers clamped when loading the cassette to prevent injury. ● Place this VCR in use. Ⅵ Maintaining the unit (Turn off the power before performing maintenance work.) Wipe the unit with a soft cloth. This phenomenon is not a product defect and the dots are permanently lit. Using ...
... surface. Minute black dots may appear or bright (red, blue and white) dots are not recorded. 6 Do not wipe it with thinner or benzene as it dry. Ⅵ Use the supplied AC adapter to connect the unit to condensation. ● Places that generate strong magnetic fields, e.g., near ...Mind your fingers clamped when loading the cassette to prevent injury. ● Place this VCR in use. Ⅵ Maintaining the unit (Turn off the power before performing maintenance work.) Wipe the unit with a soft cloth. This phenomenon is not a product defect and the dots are permanently lit. Using ...
User Manual
Page 10
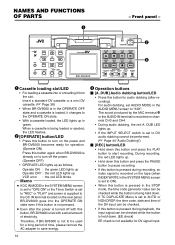
... CUE UP PHONES REC LEVEL CH-1/3 CH-2/4 PROFESSIONAL BR-DV6000 OPERATE A.DUB REC PLAY PAUSE EJECT REW STOP FF AUDIO INPUT COUNTER MONITOR OUTPUT SELECT CTL L CH-1/2 DV TC MIX MIX LINE UB R CH-3/4 Y/C...power and BR-DV6000 becomes ready for operation. (Operate ON) Press this button, BR-DV6000 is live with a small amount of time, please remove the AC adapter to the DC IN terminal located on the rear panel, BR... "REC" or "PLAY" and power is pressed in the AUDIO MENU screen to start recording. For audio dubbing, set to pause recording. • If this button is...
... CUE UP PHONES REC LEVEL CH-1/3 CH-2/4 PROFESSIONAL BR-DV6000 OPERATE A.DUB REC PLAY PAUSE EJECT REW STOP FF AUDIO INPUT COUNTER MONITOR OUTPUT SELECT CTL L CH-1/2 DV TC MIX MIX LINE UB R CH-3/4 Y/C...power and BR-DV6000 becomes ready for operation. (Operate ON) Press this button, BR-DV6000 is live with a small amount of time, please remove the AC adapter to the DC IN terminal located on the rear panel, BR... "REC" or "PLAY" and power is pressed in the AUDIO MENU screen to start recording. For audio dubbing, set to pause recording. • If this button is...
User Manual
Page 18
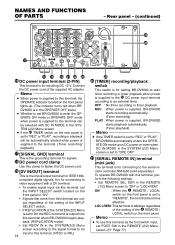
... from this terminal when BR-DV6000 begins playback. (REPLICATION mode) • Set PB/DV IN in the REMOTE (1/2) Menu screen to the terminal can be selected with this terminal, per- REC : When power is supplied, BR-DV6000 starts recording automatically. (Timer recording) PLAY : When power is supplied, BR-DV6000 starts playback automatically...BRDV6000 is in the OPERATE OFF state) ● Whether to set BR-DV6000 to enter the OPERATE ON mode or OPERATE OFF mode when power is effective regardless of the setting of the supplied AC adapter. LOC+REM: This terminal is supplied to "ON" or "LOC...
... from this terminal when BR-DV6000 begins playback. (REPLICATION mode) • Set PB/DV IN in the REMOTE (1/2) Menu screen to the terminal can be selected with this terminal, per- REC : When power is supplied, BR-DV6000 starts recording automatically. (Timer recording) PLAY : When power is supplied, BR-DV6000 starts playback automatically...BRDV6000 is in the OPERATE OFF state) ● Whether to set BR-DV6000 to enter the OPERATE ON mode or OPERATE OFF mode when power is effective regardless of the setting of the supplied AC adapter. LOC+REM: This terminal is supplied to "ON" or "LOC...

User Manual
Page 35
... REMOTE1 OPERATE indicator ONAL DV6000 OPERATE A.DUB REC PLAY PAUSE OPERATE button EJECT REW STOP FF AUDIO INPUT COUNTER MONITOR OUTPUT SELECT CTL L CH-1/2 DV TC MIX MIX LINE UB R CH-3/4 Y/C (CPN) REMOTE LOCAL Memo ● Even in the OPERATE OFF mode, a small amount of ...the TIMER switch is set to BR-DV6000 using the supplied AC adapter. Connect the power cord to the power outlet. • BR-DV6000 is not set to "Notes" below.) 1. Do not use other power sources. • Do not unplug the DC cord and/or the power cord during recording or playback. • If...
... REMOTE1 OPERATE indicator ONAL DV6000 OPERATE A.DUB REC PLAY PAUSE OPERATE button EJECT REW STOP FF AUDIO INPUT COUNTER MONITOR OUTPUT SELECT CTL L CH-1/2 DV TC MIX MIX LINE UB R CH-3/4 Y/C (CPN) REMOTE LOCAL Memo ● Even in the OPERATE OFF mode, a small amount of ...the TIMER switch is set to BR-DV6000 using the supplied AC adapter. Connect the power cord to the power outlet. • BR-DV6000 is not set to "Notes" below.) 1. Do not use other power sources. • Do not unplug the DC cord and/or the power cord during recording or playback. • If...

User Manual
Page 36
...up in red. 2. Turning on the power DISP RESET SET SEARCH+ BLANK CUE UP REC LEVEL CH-1/3 CH-2/4 PROFESSIONAL BR-DV6000 OPERATE indicator OPERATE A.DUB REC PLAY PAUSE OPERATE button EJECT REW STOP FF AUDIO INPUT COUNTER MONITOR OUTPUT SELECT CTL L CH-1/2 DV TC MIX MIX LINE UB R CH...If TIMER REC or TIMER PLAY is selected, BR-DV6000 starts up in green. If a cassette tape is turned on /off BR-DV6000 1. Turning off the power Ⅵ Turn off the power - To unplug the AC adapter, remove the power cord from the power outlet, leave it for a long period of...
...up in red. 2. Turning on the power DISP RESET SET SEARCH+ BLANK CUE UP REC LEVEL CH-1/3 CH-2/4 PROFESSIONAL BR-DV6000 OPERATE indicator OPERATE A.DUB REC PLAY PAUSE OPERATE button EJECT REW STOP FF AUDIO INPUT COUNTER MONITOR OUTPUT SELECT CTL L CH-1/2 DV TC MIX MIX LINE UB R CH...If TIMER REC or TIMER PLAY is selected, BR-DV6000 starts up in green. If a cassette tape is turned on /off BR-DV6000 1. Turning off the power Ⅵ Turn off the power - To unplug the AC adapter, remove the power cord from the power outlet, leave it for a long period of...
User Manual
Page 47
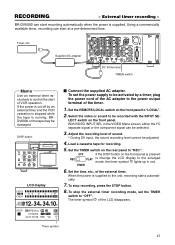
... to the power output terminal of the timer. 1. If the power is cut off by a timer, plug the power cord of the AC adapter to control the start at a pre-determined time. SET SEARCH+ MIC HOLD BLANK CUE UP PHONES REC LEVEL CH-1/3 CH-2/4 PROFESSIONAL BR-DV6000 LCD ...sound. ❈ During DV input, the sound recording level cannot be recorded with the INPUT SE- Load a cassette tape for recording. 5. To stop recording, press the STOP button. 8. TIMER 6. Set the TIMER switch on the front panel is supplied to "OFF". Timer symbol 47 RECORDING - To set the ...
... to the power output terminal of the timer. 1. If the power is cut off by a timer, plug the power cord of the AC adapter to control the start at a pre-determined time. SET SEARCH+ MIC HOLD BLANK CUE UP PHONES REC LEVEL CH-1/3 CH-2/4 PROFESSIONAL BR-DV6000 LCD ...sound. ❈ During DV input, the sound recording level cannot be recorded with the INPUT SE- Load a cassette tape for recording. 5. To stop recording, press the STOP button. 8. TIMER 6. Set the TIMER switch on the front panel is supplied to "OFF". Timer symbol 47 RECORDING - To set the ...

User Manual
Page 56
...adapter VIDEO LINE Y/C COMPONENT IN R-Y B-Y Y OUT REMOTE2 IN OUT AUDIO CH 1/3 CH 2/4 IN MONITOR OUT SIGNAL GND DC12V IN SYNC IN DV IN/OUT OUT TIME CODE IN OUT OFF REC PLAY SERIAL REMOTE TIMER OUT MONITOR OUT DC IN terminal TIMER switch REMOTE1 Memo Use an external timer exclusively to the power... the power supply power to be damaged. Timer symbol 56 If the power is supplied to enable/disable repeat playback, and the type of the external timer. PLAYBACK - SET SEARCH+ MIC HOLD BLANK CUE UP PHONES REC LEVEL CH-1/3 CH-2/4 PROFESSIONAL BR-DV6000 LCD...
...adapter VIDEO LINE Y/C COMPONENT IN R-Y B-Y Y OUT REMOTE2 IN OUT AUDIO CH 1/3 CH 2/4 IN MONITOR OUT SIGNAL GND DC12V IN SYNC IN DV IN/OUT OUT TIME CODE IN OUT OFF REC PLAY SERIAL REMOTE TIMER OUT MONITOR OUT DC IN terminal TIMER switch REMOTE1 Memo Use an external timer exclusively to the power... the power supply power to be damaged. Timer symbol 56 If the power is supplied to enable/disable repeat playback, and the type of the external timer. PLAYBACK - SET SEARCH+ MIC HOLD BLANK CUE UP PHONES REC LEVEL CH-1/3 CH-2/4 PROFESSIONAL BR-DV6000 LCD...

User Manual
Page 99
... control does not function. Is the slide of BRDV6000 do not work. CAL FUNCTION in the TC/UB/CLOCK (1/2) Menu screen recorded during DV signal input. To operate with the JVC bus, set to ON or LOC+REM. the OPERATE button. Isn't REMOTE SEL SER in the REMOTE (1/2) Menu screen set... tape. (Page 8) Time codes are to "ON". Unable to REMOTE when LO- Unable to "REC"? Symptom No power. Action Is the AC adapter correctly connected? The operation buttons of the cassette tape turned to operate BR-DV6000 with the LOCAL FUNCTION Menu. Clean it to ON? The TIMER switch on the...
... control does not function. Is the slide of BRDV6000 do not work. CAL FUNCTION in the TC/UB/CLOCK (1/2) Menu screen recorded during DV signal input. To operate with the JVC bus, set to ON or LOC+REM. the OPERATE button. Isn't REMOTE SEL SER in the REMOTE (1/2) Menu screen set... tape. (Page 8) Time codes are to "ON". Unable to REMOTE when LO- Unable to "REC"? Symptom No power. Action Is the AC adapter correctly connected? The operation buttons of the cassette tape turned to operate BR-DV6000 with the LOCAL FUNCTION Menu. Clean it to ON? The TIMER switch on the...

User Manual
Page 103
... for playback and DV input only) Cassette tape : Standard/ mini DV cassette tape Tape width : 6.35mm Tape speed : 18.812mm/s (NTSC) 18.831mm/s (PAL) Recording/ playback time : 276 minutes (LA-DV276) 60 minutes (M-DV60) Fast forward/ rewind time : About 3 minutes (LA-DV276) About 1 minute (M-DV60) Power : DC12 V } (By the supplied AC adapter) Power consumption : 24 W External...
... for playback and DV input only) Cassette tape : Standard/ mini DV cassette tape Tape width : 6.35mm Tape speed : 18.812mm/s (NTSC) 18.831mm/s (PAL) Recording/ playback time : 276 minutes (LA-DV276) 60 minutes (M-DV60) Fast forward/ rewind time : About 3 minutes (LA-DV276) About 1 minute (M-DV60) Power : DC12 V } (By the supplied AC adapter) Power consumption : 24 W External...
User Manual
Page 105
Supplement - Ⅵ AC adapter section IMPORTANT SAFETY INSTRUCTIONS 1) Read these instructions. 2) Keep these instructions. 3) Heed ... The wide blade or the third prong are provided for long periods of the obsolete outlet. 10) Protect the power cord from tip-over. OTHERS - Servicing is used, use by the manufacturer, or sold with the manufacturer's instructions...personnel only. A polarized plug has two blades with dry cloth. 7) Do not block any way, such as power-supply cord or plug is damaged, liquid has been spilled or objects have fallen into your safety. CAUTION - A...
Supplement - Ⅵ AC adapter section IMPORTANT SAFETY INSTRUCTIONS 1) Read these instructions. 2) Keep these instructions. 3) Heed ... The wide blade or the third prong are provided for long periods of the obsolete outlet. 10) Protect the power cord from tip-over. OTHERS - Servicing is used, use by the manufacturer, or sold with the manufacturer's instructions...personnel only. A polarized plug has two blades with dry cloth. 7) Do not block any way, such as power-supply cord or plug is damaged, liquid has been spilled or objects have fallen into your safety. CAUTION - A...
