
Instructions
Page 2
... both the power plug from the power source specified on the unit. 2. In the event of electric shock. Avoid Improper installation and never position the unit where good ventilation is intended to alert the user to the presence of electric shock to repair it yourself or remove the rear cover. Changes or modifications not approved by JVC could void the warranty. •...
... both the power plug from the power source specified on the unit. 2. In the event of electric shock. Avoid Improper installation and never position the unit where good ventilation is intended to alert the user to the presence of electric shock to repair it yourself or remove the rear cover. Changes or modifications not approved by JVC could void the warranty. •...

Instructions
Page 3
... and supporting structure, grounding of the lead-in wire to an antenna discharge unit, size of grounding conductors, location of these materials may result in a shock or fire hazard. 5 Do not use this TV set , be sure the antenna system is subject to the operating instructions for this product or product model meets the "ENERGY STAR®" guidelines for its installation, use...
... and supporting structure, grounding of the lead-in wire to an antenna discharge unit, size of grounding conductors, location of these materials may result in a shock or fire hazard. 5 Do not use this TV set , be sure the antenna system is subject to the operating instructions for this product or product model meets the "ENERGY STAR®" guidelines for its installation, use...

Instructions
Page 5
... result in writing that the replacement parts he uses have the service technician verify in a picture tube implosion. Refer all servicing to CATV system installer. Ask a qualified service technician to dispose of the TV set. 20 Note to qualified service personnel. 17 When replacement parts are covered in the operating instructions as improper adjustment of other controls may cause the TV set and cart combination to dangerous...
... result in writing that the replacement parts he uses have the service technician verify in a picture tube implosion. Refer all servicing to CATV system installer. Ask a qualified service technician to dispose of the TV set. 20 Note to qualified service personnel. 17 When replacement parts are covered in the operating instructions as improper adjustment of other controls may cause the TV set and cart combination to dangerous...

Instructions
Page 6
... Plug In Menu 15 Remote Programming . . . . . 18 Setting CATV, VCR and DVD Codes . . . 18 CATV or Satellite Codes 18 VCR Codes 19 DVD Codes 20 Search Codes 21 Onscreen Menus 22 Using the Guide 22 Onscreen Menu System 23 Initial Setup 24 Auto Tuner Setup 24 Channel Summary 24 V-Chip 25 Set Lock Code 31 Purity 32 Language 32 Closed Caption 32 Front Panel Lock 33 Auto Shut Off 33 XDS ID 33 Video Input Label 34 Picture Adjust 35 Picture Settings 35 Adjust Picture Settings 35 Color...
... Plug In Menu 15 Remote Programming . . . . . 18 Setting CATV, VCR and DVD Codes . . . 18 CATV or Satellite Codes 18 VCR Codes 19 DVD Codes 20 Search Codes 21 Onscreen Menus 22 Using the Guide 22 Onscreen Menu System 23 Initial Setup 24 Auto Tuner Setup 24 Channel Summary 24 V-Chip 25 Set Lock Code 31 Purity 32 Language 32 Closed Caption 32 Front Panel Lock 33 Auto Shut Off 33 XDS ID 33 Video Input Label 34 Picture Adjust 35 Picture Settings 35 Adjust Picture Settings 35 Color...

Instructions
Page 7
... a JVC Color Television. Coaxial Cables Used to connect an external antenna or cable TV system to connect audio/ video devices like the ones illustrated below. S-Video Cable Component Cables Composite Cables Audio Cables Used to your TV. If you're anxious to make these connections you will use with S-Video VCRs, Camcorders and DVD players. Quick Setup Unpacking Your TV Thank you for your purchase of the following items. In addition to this guide, your television box should include: 1 Television 1 Remote Control �...
... a JVC Color Television. Coaxial Cables Used to connect an external antenna or cable TV system to connect audio/ video devices like the ones illustrated below. S-Video Cable Component Cables Composite Cables Audio Cables Used to your TV. If you're anxious to make these connections you will use with S-Video VCRs, Camcorders and DVD players. Quick Setup Unpacking Your TV Thank you for your purchase of the following items. In addition to this guide, your television box should include: 1 Television 1 Remote Control �...
Instructions
Page 8
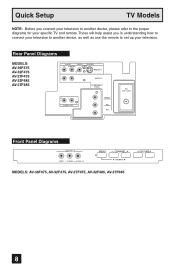
... device, as well as use the remote to the proper diagrams for your television. Quick Setup TV Models NOTE: Before you in understanding how to connect your television to another device, please refer to set up your specific TV and remote. Rear Panel Diagrams MODELS: AV-36F475 AV-32F475 AV-27F475 AV-32F485 AV-27F485 ���� � � Front Panel Diagrams ����...
... device, as well as use the remote to the proper diagrams for your television. Quick Setup TV Models NOTE: Before you in understanding how to connect your television to another device, please refer to set up your specific TV and remote. Rear Panel Diagrams MODELS: AV-36F475 AV-32F475 AV-27F475 AV-32F485 AV-27F485 ���� � � Front Panel Diagrams ����...
Instructions
Page 11
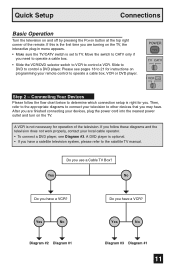
... have a a DVD player, see pages 18 to 21 for operation of the remote. satellite television system, please refer to control a DVD player. d�ia�...time you are finished outlet and turn on the connecting TV. Move the switch to CATV only if you need to operate a cable box. • Slide the VCR/DVD selector switch to VCR to TV. your devices, plug the power�c��o�rd� �in menu appears. • Make sure the TV/CATV switch is set to control a VCR. Quick Setup Connections Basic Operation Turn the television...
... have a a DVD player, see pages 18 to 21 for operation of the remote. satellite television system, please refer to control a DVD player. d�ia�...time you are finished outlet and turn on the connecting TV. Move the switch to CATV only if you need to operate a cable box. • Slide the VCR/DVD selector switch to VCR to TV. your devices, plug the power�c��o�rd� �in menu appears. • Make sure the TV/CATV switch is set to control a VCR. Quick Setup Connections Basic Operation Turn the television...
Instructions
Page 13
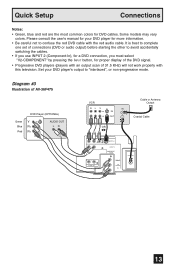
... Quick Setup Connections Notes: • Green, blue and red are the most common colors for more information. • Be careful not to confuse the red DVD cable with this television. Some models may vary colors. Please consult the user's manual for your DVD player's output to avoid accidentally switching the cables. • If you use INPUT 2 (Component-In), for a DVD connection, you must select "V2-COMPONENT" by pressing the INPUT button, for proper display of the DVD signal. • Progressive DVD players (players...
... Quick Setup Connections Notes: • Green, blue and red are the most common colors for more information. • Be careful not to confuse the red DVD cable with this television. Some models may vary colors. Please consult the user's manual for your DVD player's output to avoid accidentally switching the cables. • If you use INPUT 2 (Component-In), for a DVD connection, you must select "V2-COMPONENT" by pressing the INPUT button, for proper display of the DVD signal. • Progressive DVD players (players...

Instructions
Page 14
... amplifier. 2) Connect a red composite cable from the LEFT AUDIO OUTPUT on the back of the TV to the RIGHT AUDIO INPUT on the back of the TV. You can use AUDIO OUTPUT for your amplifier's manual for more information. • You can also connect these using the television's rear input jacks, using the front input jacks (Input 3) located under the front panel door. Note: • If your camcorder is a mono sound model it...
... amplifier. 2) Connect a red composite cable from the LEFT AUDIO OUTPUT on the back of the TV to the RIGHT AUDIO INPUT on the back of the TV. You can use AUDIO OUTPUT for your amplifier's manual for more information. • You can also connect these using the television's rear input jacks, using the front input jacks (Input 3) located under the front panel door. Note: • If your camcorder is a mono sound model it...
Instructions
Page 15
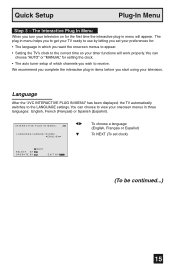
... timer functions will appear. You can choose to the correct time so your television. Quick Setup Plug-In Menu Step 3 - Language After the "JVC INTERACTIVE PLUG IN MENU" has been displayed, the TV automatically switches to receive. We recommend you wish to the LANGUAGE settings. You can choose "AUTO" or "MANUAL" for : • The language in which channels you complete the interactive plug-in menu will work properly. The plug-in menu helps...
... timer functions will appear. You can choose to the correct time so your television. Quick Setup Plug-In Menu Step 3 - Language After the "JVC INTERACTIVE PLUG IN MENU" has been displayed, the TV automatically switches to receive. We recommend you wish to the LANGUAGE settings. You can choose "AUTO" or "MANUAL" for : • The language in which channels you complete the interactive plug-in menu will work properly. The plug-in menu helps...

Instructions
Page 16
... to reset the clock after a power interruption. See manual clock set the clock using the XDS signal: √® † To choose AUTO To TIME ZONE...time signal broadcast by most public broadcasting stations. Quick Setup Plug-In Menu Auto Clock Set Before you use any of your TV's timer functions, you must first set your clock manually (without using the XDS signal), choose MANUAL. ON or OFF Notes: † To NEXT (To Auto Tuner Setup) • D.S.T. If you do not have this in the SET CLOCK menu. • Only when the MODE set the clock before operating any timer...
... to reset the clock after a power interruption. See manual clock set the clock using the XDS signal: √® † To choose AUTO To TIME ZONE...time signal broadcast by most public broadcasting stations. Quick Setup Plug-In Menu Auto Clock Set Before you use any of your TV's timer functions, you must first set your clock manually (without using the XDS signal), choose MANUAL. ON or OFF Notes: † To NEXT (To Auto Tuner Setup) • D.S.T. If you do not have this in the SET CLOCK menu. • Only when the MODE set the clock before operating any timer...

Instructions
Page 17
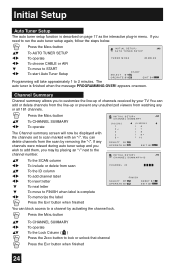
... menu setting does not appear if your television viewing experience. In this guide for interactive plug-in menu. • The interactive plug-in the auto tuner memory. Cable Box and Satellite Users: After your remote control, or using the CHANNEL +/- SETUP IS NOW COMPLETE is complete 17 Notes: • Noise muting will take approximately 1 to perform these settings. The Quick Setup is displayed. Quick Setup Plug-In Menu Auto Tuner Setup In auto tuner setup, the TV automatically scans through all available channels, memorizing...
... menu setting does not appear if your television viewing experience. In this guide for interactive plug-in menu. • The interactive plug-in the auto tuner memory. Cable Box and Satellite Users: After your remote control, or using the CHANNEL +/- SETUP IS NOW COMPLETE is complete 17 Notes: • Noise muting will take approximately 1 to perform these settings. The Quick Setup is displayed. Quick Setup Plug-In Menu Auto Tuner Setup In auto tuner setup, the TV automatically scans through all available channels, memorizing...
Instructions
Page 22
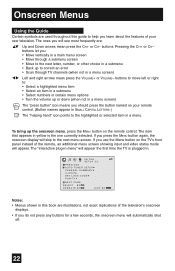
.... 22 If you use the Menu button on the TV's front panel instead of the remote, an additional menu screen showing input and video status mode will see most frequently are illustrations, not exact replications of the television's onscreen displays. • If you will appear. buttons. Notes: • Menus shown in yellow is plugged in. Onscreen Menus Using the Guide Certain symbols are used throughout this book...
.... 22 If you use the Menu button on the TV's front panel instead of the remote, an additional menu screen showing input and video status mode will see most frequently are illustrations, not exact replications of the television's onscreen displays. • If you will appear. buttons. Notes: • Menus shown in yellow is plugged in. Onscreen Menus Using the Guide Certain symbols are used throughout this book...
Instructions
Page 24
... auto tuner is described on page 17 as the interactive plug-in menu. appears onscreen. Press the MENU button π† √® π† To CHANNEL SUMMARY To operate To the Lock Column ( ) Press the ZERO button to scan marked with the channels set to lock or unlock that channel Press the EXIT button when finished 24 You can delete channels from watching any channels were missed during auto tuner setup...
... auto tuner is described on page 17 as the interactive plug-in menu. appears onscreen. Press the MENU button π† √® π† To CHANNEL SUMMARY To operate To the Lock Column ( ) Press the ZERO button to scan marked with the channels set to lock or unlock that channel Press the EXIT button when finished 24 You can delete channels from watching any channels were missed during auto tuner setup...
Instructions
Page 25
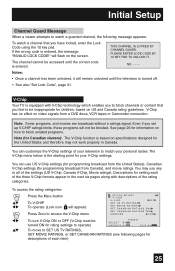
...; Press the MENU button To V-CHIP To operate (Lock icon will remain unlocked until the correct code is the starting point for setting each item) 25 You may not work properly in the next six pages along with V-Chip technology which enables you to block channels or content that you set up V-CHIP ratings limits, these programs will flash on video signals from Canada...
...; Press the MENU button To V-CHIP To operate (Lock icon will remain unlocked until the correct code is the starting point for setting each item) 25 You may not work properly in the next six pages along with V-Chip technology which enables you to block channels or content that you set up V-CHIP ratings limits, these programs will flash on video signals from Canada...
Instructions
Page 32
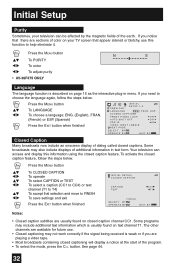
... . button. The other channels are available for future use this information using the closed caption feature. If you notice that there are playing a video tape. • Most broadcasts containing closed captioning will display a notice at the start of the program. • To select the mode, press the C.C. If you need to help eliminate it. Initial Setup Purity Sometimes, your TV screen that appear stained or blotchy, use . • Closed captioning...
... . button. The other channels are available for future use this information using the closed caption feature. If you notice that there are playing a video tape. • Most broadcasts containing closed captioning will display a notice at the start of the program. • To select the mode, press the C.C. If you need to help eliminate it. Initial Setup Purity Sometimes, your TV screen that appear stained or blotchy, use . • Closed captioning...
Instructions
Page 39
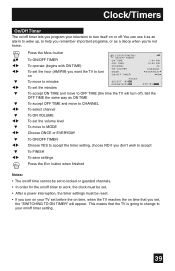
... save settings Press the EXIT button when finished Notes: • The on/off time cannot be set to locked or guarded channels. • In order for the on/off timer to work, the clock must be set. • After a power interruption, the timer settings must be reset. • If you set the minutes �� To accept ON TIME and move to OFF TIME (the time the...
... save settings Press the EXIT button when finished Notes: • The on/off time cannot be set to locked or guarded channels. • In order for the on/off timer to work, the clock must be set. • After a power interruption, the timer settings must be reset. • If you set the minutes �� To accept ON TIME and move to OFF TIME (the time the...
Instructions
Page 45
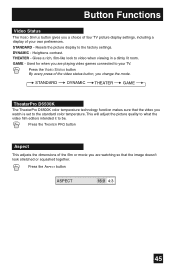
... you are watching so that the video you change the mode. Used for when you are playing video games connected to your own preferences. Press the VIDEO STATUS button By every press of the video status button, you watch is set to be. This will adjust the picture quality to what the video film editors intended it to the standard color temperature. Heightens contrast. STANDARD - THEATER - DYNAMIC...
... you are watching so that the video you change the mode. Used for when you are playing video games connected to your own preferences. Press the VIDEO STATUS button By every press of the video status button, you watch is set to be. This will adjust the picture quality to what the video film editors intended it to the standard color temperature. Heightens contrast. STANDARD - THEATER - DYNAMIC...

Instructions
Page 46
... also use this remote control to control JVC-brand DVD players. These functions include: play , record, rewind, fast-forward, stop , still/pause, previous/next, tray open/close, power on the lower part of your DVD player. Set this remote control to control JVC-brand VCR's. Move the slide switch to VCR or DVD to operate the television's built-in tuner. Note: • See page 18 for cable box operation. VCR Buttons You can control a VCR or DVD player with the code...
... also use this remote control to control JVC-brand DVD players. These functions include: play , record, rewind, fast-forward, stop , still/pause, previous/next, tray open/close, power on the lower part of your DVD player. Set this remote control to control JVC-brand VCR's. Move the slide switch to VCR or DVD to operate the television's built-in tuner. Note: • See page 18 for cable box operation. VCR Buttons You can control a VCR or DVD player with the code...
Instructions
Page 48
..., and cosmetic damage; 5) Signal reception problems and failures due to the Television by JVC does not cover: 1) Products which will repair or replace defective parts at JVC authorized service centers. In-home service, if available, will be obtained from the date of reasonable care, or if repaired or serviced by anyone other mounting systems; 3) Operational adjustments covered in the Owner's Manual, normal maintenance, video and audio head cleaning; 4) Damage...
..., and cosmetic damage; 5) Signal reception problems and failures due to the Television by JVC does not cover: 1) Products which will repair or replace defective parts at JVC authorized service centers. In-home service, if available, will be obtained from the date of reasonable care, or if repaired or serviced by anyone other mounting systems; 3) Operational adjustments covered in the Owner's Manual, normal maintenance, video and audio head cleaning; 4) Damage...


