Product Guide
Page 6
Intel Desktop Board DG965OT Product Guide Installing and Removing a Processor 29 Installing a Processor 29 Installing ...Connecting the Serial ATA (SATA) Cable 41 Connecting to Internal Headers 42 Installing a Front Panel Audio Solution for Intel® High Definition Audio 43 Connecting to the USB 2.0 Headers 44 Connecting to the Front Panel Header 44... 48 Other Connectors and Headers 49 Setting the BIOS Configuration Jumper 50 Clearing Passwords 51 Back Panel Connectors 52 3 Updating the BIOS Updating the BIOS with the Intel® Express BIOS Update Utility 59 Updating the BIOS with...
Intel Desktop Board DG965OT Product Guide Installing and Removing a Processor 29 Installing a Processor 29 Installing ...Connecting the Serial ATA (SATA) Cable 41 Connecting to Internal Headers 42 Installing a Front Panel Audio Solution for Intel® High Definition Audio 43 Connecting to the USB 2.0 Headers 44 Connecting to the Front Panel Header 44... 48 Other Connectors and Headers 49 Setting the BIOS Configuration Jumper 50 Clearing Passwords 51 Back Panel Connectors 52 3 Updating the BIOS Updating the BIOS with the Intel® Express BIOS Update Utility 59 Updating the BIOS with...
Product Guide
Page 7
...the I/O Shield 27 5. Installing a DIMM 36 18. Connecting the Serial ATA Cable 41 22. Back Panel Connectors 52 29. Desktop Board DG965OT Mounting Screw Hole Locations 28 6. Connecting the Processor Fan Heat Sink Cable to the Processor Fan Header.......... 32 13. Dual Channel Memory... 48 26. Location of the BIOS Configuration Jumper Block 50 28. Internal Headers 42 23. Location of Other Connectors and Headers 49 27. Contents 5 Intel® Quick Resume Technology Driver (Intel® QRTD) Overview...67 Intel Quick Resume Technology Power Modes 67 Installation and...
...the I/O Shield 27 5. Installing a DIMM 36 18. Connecting the Serial ATA Cable 41 22. Back Panel Connectors 52 29. Desktop Board DG965OT Mounting Screw Hole Locations 28 6. Connecting the Processor Fan Heat Sink Cable to the Processor Fan Header.......... 32 13. Dual Channel Memory... 48 26. Location of the BIOS Configuration Jumper Block 50 28. Internal Headers 42 23. Location of Other Connectors and Headers 49 27. Contents 5 Intel® Quick Resume Technology Driver (Intel® QRTD) Overview...67 Intel Quick Resume Technology Power Modes 67 Installation and...
Product Guide
Page 8
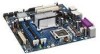
Feature Summary 9 2. Front Panel Header 44 8. Jumper Settings for Intel High Definition Audio 43 5. Desktop Board DG965OT Components 12 3. AC '97 Audio Header Signal Names 43 6. USB 2.0 Header Signal Names 44 7. Safety Regulations 73 16. HD Audio Link Header Signal Names 46 ...
Feature Summary 9 2. Front Panel Header 44 8. Jumper Settings for Intel High Definition Audio 43 5. Desktop Board DG965OT Components 12 3. AC '97 Audio Header Signal Names 43 6. USB 2.0 Header Signal Names 44 7. Safety Regulations 73 16. HD Audio Link Header Signal Names 46 ...
Product Guide
Page 12
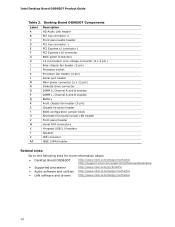
... to the following links for more information about: • Desktop Board DG965OT • Supported processors • Audio software and utilities • LAN software and drivers http://www.intel.com/design/motherbd http://support.intel.com/support/motherboards/desktop http://www.intel.com/go/findCPU http://www.intel.com/design/motherbd http://www.intel.com/design/motherbd 12 Intel Desktop Board DG965OT Product Guide Table 2.
... to the following links for more information about: • Desktop Board DG965OT • Supported processors • Audio software and utilities • LAN software and drivers http://www.intel.com/design/motherbd http://support.intel.com/support/motherboards/desktop http://www.intel.com/go/findCPU http://www.intel.com/design/motherbd http://www.intel.com/design/motherbd 12 Intel Desktop Board DG965OT Product Guide Table 2.

Product Guide
Page 25
...internal headers • Connect the flexible audio system • Connect the chassis fan and power cables • Set the BIOS configuration jumper • Clear passwords • Replace the battery Before You Begin CAUTIONS The procedures in this chapter. Disconnect the computer from its ...station is off. Follow these guidelines before performing any procedures can result in personal injury or equipment damage. 2 Installing and Replacing Desktop Board Components This chapter tells you can provide some ESD protection by wearing an antistatic wrist strap and attaching it to a metal part ...
...internal headers • Connect the flexible audio system • Connect the chassis fan and power cables • Set the BIOS configuration jumper • Clear passwords • Replace the battery Before You Begin CAUTIONS The procedures in this chapter. Disconnect the computer from its ...station is off. Follow these guidelines before performing any procedures can result in personal injury or equipment damage. 2 Installing and Replacing Desktop Board Components This chapter tells you can provide some ESD protection by wearing an antistatic wrist strap and attaching it to a metal part ...
Product Guide
Page 50
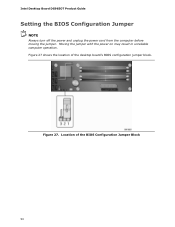
Moving the jumper with the power on may result in unreliable computer operation. Figure 27. Location of the desktop board's BIOS configuration jumper block. Figure 27 shows the location of the BIOS Configuration Jumper Block 50 Intel Desktop Board DG965OT Product Guide Setting the BIOS Configuration Jumper NOTE Always turn off the power and unplug the power cord from the computer before moving the jumper.
Moving the jumper with the power on may result in unreliable computer operation. Figure 27. Location of the desktop board's BIOS configuration jumper block. Figure 27 shows the location of the BIOS Configuration Jumper Block 50 Intel Desktop Board DG965OT Product Guide Setting the BIOS Configuration Jumper NOTE Always turn off the power and unplug the power cord from the computer before moving the jumper.

Product Guide
Page 51
... and passwords for the BIOS Setup program modes. Remove the computer cover. 12. Installing and Replacing Desktop Board Components The three-pin BIOS jumper block enables all peripheral devices connected to the computer. Table 12 shows the jumper settings for booting. Table 12. Disconnect the computer's power cord from the AC power source. 11...
... and passwords for the BIOS Setup program modes. Remove the computer cover. 12. Installing and Replacing Desktop Board Components The three-pin BIOS jumper block enables all peripheral devices connected to the computer. Table 12 shows the jumper settings for booting. Table 12. Disconnect the computer's power cord from the AC power source. 11...
Product Guide
Page 60
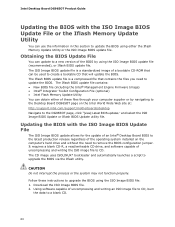
...File The ISO Image BIOS update allows for the update of an Intel® Desktop Board BIOS to the latest production release regardless of the BIOS by navigating to the Desktop Board DG965OT page on the computer's hard drive and without the need to...intel.com/support/motherboards/desktop Navigate to the DG965OT page, click "[view] Latest BIOS updates," and select the ISO Image BIOS Update or Iflash BIOS Update utility file. The Iflash BIOS update file is a standardized image of uncompressing and writing an ISO image file to CD, burn the data to remove the BIOS configuration jumper...
...File The ISO Image BIOS update allows for the update of an Intel® Desktop Board BIOS to the latest production release regardless of the BIOS by navigating to the Desktop Board DG965OT page on the computer's hard drive and without the need to...intel.com/support/motherboards/desktop Navigate to the DG965OT page, click "[view] Latest BIOS updates," and select the ISO Image BIOS Update or Iflash BIOS Update utility file. The Iflash BIOS update file is a standardized image of uncompressing and writing an ISO image file to CD, burn the data to remove the BIOS configuration jumper...


