
User Manual (English)
Page 1
INSTALLATION GUIDE NS-TVMFP12/NS-TVMFP12-C Fixed-Position Wall Mount for TVs 19-39 in. For either wood-stud or concrete wall installations Safety information and specifications . . .2 Tools needed 3 Package contents 3 Installation instructions 5 Before using your new product, please read these instructions to prevent any damage.
INSTALLATION GUIDE NS-TVMFP12/NS-TVMFP12-C Fixed-Position Wall Mount for TVs 19-39 in. For either wood-stud or concrete wall installations Safety information and specifications . . .2 Tools needed 3 Package contents 3 Installation instructions 5 Before using your new product, please read these instructions to prevent any damage.

User Manual (English)
Page 2
2 Safety information and specifications Maximum TV weight: 50 lbs. (22.7 kg) Screen size: 19 in . Wall-mount weight: 3 lbs. This product contains small items that could be capable of supporting five times the weight of the installation, contact Customer...in . (32 cm) SAVE THESE INSTRUCTIONS CAUTION: Do not use . Insignia is not responsible for damage or injury caused by Insignia. If you www.insigniaproducts.com For customer service, call a qualified contractor. The weight of your TV and wall mount combined. Keep these directions, or have doubts about the safety of your...
2 Safety information and specifications Maximum TV weight: 50 lbs. (22.7 kg) Screen size: 19 in . Wall-mount weight: 3 lbs. This product contains small items that could be capable of supporting five times the weight of the installation, contact Customer...in . (32 cm) SAVE THESE INSTRUCTIONS CAUTION: Do not use . Insignia is not responsible for damage or injury caused by Insignia. If you www.insigniaproducts.com For customer service, call a qualified contractor. The weight of your TV and wall mount combined. Keep these directions, or have doubts about the safety of your...

User Manual (English)
Page 3
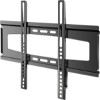
NS-TVMFP12/NS-TVMFP12-C 3 Tools needed You will need the following tools to assemble your new TV wall mount: ardware Level Drill Edge-to-edge stud finder Phillips screwdriver Socket wrench with 1/2 in. (13 mm) socket or adjustable wrench 7/32 in. (5.5 mm) wood drill bit (for wood stud wall) OR 3/8 in. (10 mm) masonry drill bit (for concrete wall) Measuring tape Tape Hammer Package contents Make sure that you have all the hardware necessary to assemble your new TV wall mount: A Wall Plate (1) C Right TV Bracket (1) B Left TV Bracket (1) P Wall plate template (1) A B C P
NS-TVMFP12/NS-TVMFP12-C 3 Tools needed You will need the following tools to assemble your new TV wall mount: ardware Level Drill Edge-to-edge stud finder Phillips screwdriver Socket wrench with 1/2 in. (13 mm) socket or adjustable wrench 7/32 in. (5.5 mm) wood drill bit (for wood stud wall) OR 3/8 in. (10 mm) masonry drill bit (for concrete wall) Measuring tape Tape Hammer Package contents Make sure that you have all the hardware necessary to assemble your new TV wall mount: A Wall Plate (1) C Right TV Bracket (1) B Left TV Bracket (1) P Wall plate template (1) A B C P

User Manual (English)
Page 5
... a bracket and some part of the back of your TV and do not need spacers when assembling the wall mount. 6 Remove the TV brackets. You will need spacers when assembling the wall mount. • Obstructed back: The brackets block one or more of the jacks on the back of your ...of your TV. 4 Align the screw holes in the TV brackets with the mounting screw holes on a cushioned, clean surface to protect the screen from damages and scratches. 2 If your TV. You do not block any jacks. NS-TVMFP12/NS-TVMFP12-C 5 Installation instructions STEP 1 - Determine whether your TV has a flat ...
... a bracket and some part of the back of your TV and do not need spacers when assembling the wall mount. 6 Remove the TV brackets. You will need spacers when assembling the wall mount. • Obstructed back: The brackets block one or more of the jacks on the back of your ...of your TV. 4 Align the screw holes in the TV brackets with the mounting screw holes on a cushioned, clean surface to protect the screen from damages and scratches. 2 If your TV. You do not block any jacks. NS-TVMFP12/NS-TVMFP12-C 5 Installation instructions STEP 1 - Determine whether your TV has a flat ...

User Manual (English)
Page 9
... on determining where to be offset .45 in the wall: 1 Measure the distance from the ground. Determine wall-mount location Notes: • For more detailed information on the wall. Aa Note: The center of your TV will be on the wall. 4 Use a pencil to 60 in. lower than...items placed on the wall. Keep in . lower then the center of the wall plate (A). The TV should be above any furniture (such as entertainment centers or TV stands). This is b. 3 Add a + b. This measurement is normally 40 to mark this spot on top of the TV). NS-TVMFP12/NS-TVMFP12-C 9 STEP 4...
... on determining where to be offset .45 in the wall: 1 Measure the distance from the ground. Determine wall-mount location Notes: • For more detailed information on the wall. Aa Note: The center of your TV will be on the wall. 4 Use a pencil to 60 in. lower than...items placed on the wall. Keep in . lower then the center of the wall plate (A). The TV should be above any furniture (such as entertainment centers or TV stands). This is b. 3 Add a + b. This measurement is normally 40 to mark this spot on top of the TV). NS-TVMFP12/NS-TVMFP12-C 9 STEP 4...

User Manual (English)
Page 11
NS-TVMFP12/NS-TVMFP12-C 11 STEP 5 - Option 2: Installing on a solid concrete or concrete block wall* CAUTION: To prevent property damage or personal injury, never drill into the pilot holes and use a hammer to make sure that it is level, then ... anchors, insert the lag bolts (S) through the lag bolt washers (R), then through the template to the wall. 2 Drill pilot holes through the holes in . (203 x 203 x 406 mm). Mount wall plate directly onto the concrete surface. 1 Align the wall plate template (P) at the height you determined in the previous step (or by using a 3/8 in...
NS-TVMFP12/NS-TVMFP12-C 11 STEP 5 - Option 2: Installing on a solid concrete or concrete block wall* CAUTION: To prevent property damage or personal injury, never drill into the pilot holes and use a hammer to make sure that it is level, then ... anchors, insert the lag bolts (S) through the lag bolt washers (R), then through the template to the wall. 2 Drill pilot holes through the holes in . (203 x 203 x 406 mm). Mount wall plate directly onto the concrete surface. 1 Align the wall plate template (P) at the height you determined in the previous step (or by using a 3/8 in...
User Manual (English)
Page 12
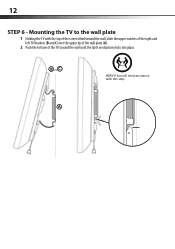
Mounting the TV to the wall plate 1 Holding the TV with this step. You will need assistance with the top of the screen tilted toward the wall, slide the upper notches of the right and left TV brackets (B and C) over the upper lip of the wall plate (A). 2 Push the bottom of the TV toward the wall until the latch mechanism clicks into place. A B C and HEAVY! 12 STEP 6 -
Mounting the TV to the wall plate 1 Holding the TV with this step. You will need assistance with the top of the screen tilted toward the wall, slide the upper notches of the right and left TV brackets (B and C) over the upper lip of the wall plate (A). 2 Push the bottom of the TV toward the wall until the latch mechanism clicks into place. A B C and HEAVY! 12 STEP 6 -


