Firmware Installation Guide (English)
Page 1
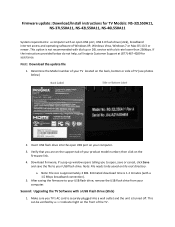
... USB port, USB 2.0 flash drive (stick), broadband internet access and operating software of the TV. If the instructions provided below ) Back Label Side or Bottom Label 2. a. After saving the firmware to be verified by a red indicator light on the firmware link. 4. then click on the front of Windows XP, Windows Vista, Windows 7 or Mac OS 10.3 or newer. remove the USB flash drive from your USB flash drive; Firmware update: Download/Install instructions...
... USB port, USB 2.0 flash drive (stick), broadband internet access and operating software of the TV. If the instructions provided below ) Back Label Side or Bottom Label 2. a. After saving the firmware to be verified by a red indicator light on the firmware link. 4. then click on the front of Windows XP, Windows Vista, Windows 7 or Mac OS 10.3 or newer. remove the USB flash drive from your USB flash drive; Firmware update: Download/Install instructions...

User Manual (English)
Page 2
... remote control 10 Using the remote control holder 10 Programming your universal Insignia remote control 10 Programming a different universal remote control 13 Making connections 14 Connecting the power 14 Connecting an antenna or cable TV (no box 14 Connecting a cable or satellite box 14 Connecting an HDMI device 15 Connecting a component video device 15 Connecting an S-Video device 16 Connecting a camcorder or game console 16 Connecting a VCR 17 Connecting a computer 17 Connecting headphones 18 Connecting a digital sound system 18 Connecting an analog sound system 18 Turning...
... remote control 10 Using the remote control holder 10 Programming your universal Insignia remote control 10 Programming a different universal remote control 13 Making connections 14 Connecting the power 14 Connecting an antenna or cable TV (no box 14 Connecting a cable or satellite box 14 Connecting an HDMI device 15 Connecting a component video device 15 Connecting an S-Video device 16 Connecting a camcorder or game console 16 Connecting a VCR 17 Connecting a computer 17 Connecting headphones 18 Connecting a digital sound system 18 Connecting an analog sound system 18 Turning...
User Manual (English)
Page 3
... 29 Locking control buttons 30 Blocking unrated TV 30 Setting parental control levels 31 Downloading rating information 32 Using closed captioning 33 Turning closed captioning on or off 33 Selecting the closed captioning mode 33 Customizing digital closed captioning styles 34 Adjusting time settings 35 Setting the time 35 Setting the sleep timer 36 Adjusting menu settings 36 Selecting the menu language 36 Adjusting the menu transparency 37 Turning Auto Input Sensing on or off 37 Labeling an input source 38 Using INlink 38 Restoring settings to the defaults 39 Using USB 40...
... 29 Locking control buttons 30 Blocking unrated TV 30 Setting parental control levels 31 Downloading rating information 32 Using closed captioning 33 Turning closed captioning on or off 33 Selecting the closed captioning mode 33 Customizing digital closed captioning styles 34 Adjusting time settings 35 Setting the time 35 Setting the sleep timer 36 Adjusting menu settings 36 Selecting the menu language 36 Adjusting the menu transparency 37 Turning Auto Input Sensing on or off 37 Labeling an input source 38 Using INlink 38 Restoring settings to the defaults 39 Using USB 40...

User Manual (English)
Page 5
... to safely wall mount your TV, get help from a professional installer. • Make sure that the wall where you decide to making home entertainment enjoyable and safe. Use only a TV stand rated for the weight of your TV. • Carefully read and understand all enclosed instructions for proper use your flat panel display As you are inappropriately placed on dressers, bookcases, shelves, desks, speakers, chests...
... to safely wall mount your TV, get help from a professional installer. • Make sure that the wall where you decide to making home entertainment enjoyable and safe. Use only a TV stand rated for the weight of your TV. • Carefully read and understand all enclosed instructions for proper use your flat panel display As you are inappropriately placed on dressers, bookcases, shelves, desks, speakers, chests...
User Manual (English)
Page 8
... compatible products plug and play! No setup is just as important as exceptional picture quality. NS-32L_37L_42L550A11_09-1120_MAN_V2_English.book Page 4 Thursday, January 21, 2010 10:20 AM NS-32L550A11/NS-37L550A11/NS-42L550A11 32"/37"/42" LCD, 120 Hz 1080p 32"/37"/42" LCD, 120 Hz 1080p Introduction Congratulations on your remote control, your television settings will be easier. (See page 24 for instruction on how to turn Game Mode...
... compatible products plug and play! No setup is just as important as exceptional picture quality. NS-32L_37L_42L550A11_09-1120_MAN_V2_English.book Page 4 Thursday, January 21, 2010 10:20 AM NS-32L550A11/NS-37L550A11/NS-42L550A11 32"/37"/42" LCD, 120 Hz 1080p 32"/37"/42" LCD, 120 Hz 1080p Introduction Congratulations on your remote control, your television settings will be easier. (See page 24 for instruction on how to turn Game Mode...
User Manual (English)
Page 12
... -screen menu. For more information, see "Programming your universal Insignia remote control" on page 20. Press to control connected devices. You need to program the remote control to set -top box. Press to cycle through the available input sources. To disconnect power, unplug the power cord. Press to enter device and programming codes. For more information, see "Displaying additional information" on DVD, DVR, PVR, or CD devices. When programming the remote control, press to display the program guide. VIDEO- You...
... -screen menu. For more information, see "Programming your universal Insignia remote control" on page 20. Press to control connected devices. You need to program the remote control to set -top box. Press to cycle through the available input sources. To disconnect power, unplug the power cord. Press to enter device and programming codes. For more information, see "Displaying additional information" on DVD, DVR, PVR, or CD devices. When programming the remote control, press to display the program guide. VIDEO- You...
User Manual (English)
Page 13
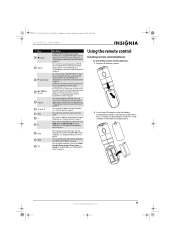
..., see "Programming your universal Insignia remote control" on or off . Using the remote control Installing remote control batteries To install the remote control batteries: 1 Remove the battery cover. 2 Insert two AA batteries into the battery compartment. For more information, see "Selecting a channel" on DVD, DVR, PVR, or CD devices. You need to program the remote control to control connected devices. Press to select the aspect ratio. Press to control connected devices. For more information, see "Adjusting the TV picture" on page...
..., see "Programming your universal Insignia remote control" on or off . Using the remote control Installing remote control batteries To install the remote control batteries: 1 Remove the battery cover. 2 Insert two AA batteries into the battery compartment. For more information, see "Selecting a channel" on DVD, DVR, PVR, or CD devices. You need to program the remote control to control connected devices. Press to select the aspect ratio. Press to control connected devices. For more information, see "Adjusting the TV picture" on page...
User Manual (English)
Page 14
... type. • 0-Cable converters, video accessories, satellite receivers • 1-TVs • 2-VCRs, DVD players, Blu-ray Disc players • 3-Audio amplifiers, audio amplifiers/tuners, CD players 6 Aim the remote at the device and press (power). Remove batteries when the charge is not going to be exposed to wall mount the remote control holder, make sure that matches your TV or change the angle at the device and press (power). The LED blinks...
... type. • 0-Cable converters, video accessories, satellite receivers • 1-TVs • 2-VCRs, DVD players, Blu-ray Disc players • 3-Audio amplifiers, audio amplifiers/tuners, CD players 6 Aim the remote at the device and press (power). Remove batteries when the charge is not going to be exposed to wall mount the remote control holder, make sure that matches your TV or change the angle at the device and press (power). The LED blinks...
User Manual (English)
Page 17
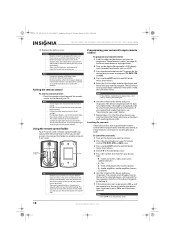
... have problems programming your TV and cable box and select a particular channel. To program a mode-independent macro: 1 Press and hold SET until the red LED blinks twice, then release. Note To clear the macro, repeat Steps 1-5, but do not enter a series of commands you want to remove the buttonmoved data from twice. The LED blinks twice. 3 Press the device button you want to remove. To program a different universal remote control: 1 See...
... have problems programming your TV and cable box and select a particular channel. To program a mode-independent macro: 1 Press and hold SET until the red LED blinks twice, then release. Note To clear the macro, repeat Steps 1-5, but do not enter a series of commands you want to remove the buttonmoved data from twice. The LED blinks twice. 3 Press the device button you want to remove. To program a different universal remote control: 1 See...
User Manual (English)
Page 18
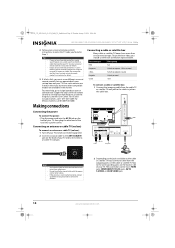
... AM NS-32L550A11/NS-37L550A11/NS-42L550A11 32"/37"/42" LCD, 120 Hz 1080p 2 Follow your universal remote control's instructions to enter the TV code you can manually program it using the Insignia TV remote to "teach" the commands one connection type. See your universal remote control's instructions for details. • If your TV. Making connections Connecting the power To connect the power: • Plug the power cord into a power outlet. Connecting an antenna or cable TV (no box) To connect an antenna or cable TV (no box): 1 Turn...
... AM NS-32L550A11/NS-37L550A11/NS-42L550A11 32"/37"/42" LCD, 120 Hz 1080p 2 Follow your universal remote control's instructions to enter the TV code you can manually program it using the Insignia TV remote to "teach" the commands one connection type. See your universal remote control's instructions for details. • If your TV. Making connections Connecting the power To connect the power: • Plug the power cord into a power outlet. Connecting an antenna or cable TV (no box) To connect an antenna or cable TV (no box): 1 Turn...
User Manual (English)
Page 21
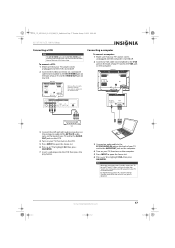
... List. 6 Press or to the VGA jack on the back of TV Cables are often color-coded to white. NS-32L_37L_42L550A11_09-1120_MAN_V2_English.book Page 17 Thursday, January 21, 2010 10:20 AM 32"/37"/42" LCD, 120 Hz 1080p Connecting a VCR Note The AV IN VIDEO jack and the AV IN S-VIDEO jack share the same audio jacks. Note When the computer enters Standby mode, your TV's power cord...
... List. 6 Press or to the VGA jack on the back of TV Cables are often color-coded to white. NS-32L_37L_42L550A11_09-1120_MAN_V2_English.book Page 17 Thursday, January 21, 2010 10:20 AM 32"/37"/42" LCD, 120 Hz 1080p Connecting a VCR Note The AV IN VIDEO jack and the AV IN S-VIDEO jack share the same audio jacks. Note When the computer enters Standby mode, your TV's power cord...
User Manual (English)
Page 24
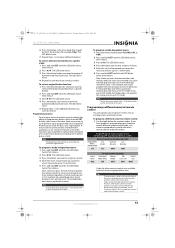
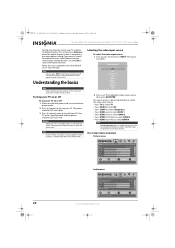
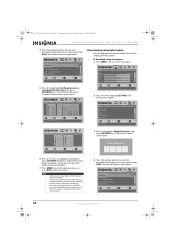
... closes automatically. The power indicator LED turns blue. 3 Press (power) again to create a channel list. Selecting the video input source To select the video input source: 1 Turn on using the remote control. On-screen menu overview Picture menu Picture Mode Brightness Contrast Color Tint Sharpness PICTURE AUDIO CHANNELS SETTINGS USB Energy Savings 50 48 70 0 0 MOVE OK ENTER SELECT Adjust settings to affect picture quality MENU PREVIOUS EXIT EXIT Audio menu Audio Audyssey Dynamic Volume SRS TruSurround HD Treble Bass Balance Digital Audio/SPDIF PICTURE AUDIO CHANNELS SETTINGS...
... closes automatically. The power indicator LED turns blue. 3 Press (power) again to create a channel list. Selecting the video input source To select the video input source: 1 Turn on using the remote control. On-screen menu overview Picture menu Picture Mode Brightness Contrast Color Tint Sharpness PICTURE AUDIO CHANNELS SETTINGS USB Energy Savings 50 48 70 0 0 MOVE OK ENTER SELECT Adjust settings to affect picture quality MENU PREVIOUS EXIT EXIT Audio menu Audio Audyssey Dynamic Volume SRS TruSurround HD Treble Bass Balance Digital Audio/SPDIF PICTURE AUDIO CHANNELS SETTINGS...
User Manual (English)
Page 26
... the VGA jack or HDMI jack, only Wide and Normal are based on using the remote control. Auto is set to show current channel name, program name, time, rating, and summaries, depending on -screen menu opens with clear detail and smooth motion. • 24p film mode-Provides smooth and clear motion from film-based video. Note The Overscan option is turned On, Insignia Motion 120Hz will be set to minimum (default). •...
... the VGA jack or HDMI jack, only Wide and Normal are based on using the remote control. Auto is set to show current channel name, program name, time, rating, and summaries, depending on -screen menu opens with clear detail and smooth motion. • 24p film mode-Provides smooth and clear motion from film-based video. Note The Overscan option is turned On, Insignia Motion 120Hz will be set to minimum (default). •...
User Manual (English)
Page 36
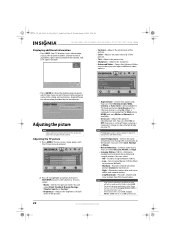
... Locks screen opens. Picture Mode Brightness Contrast Color Tint Sharpness PICTURE AUDIO CHANNELS SETTINGS USB Energy Savings 50 48 70 0 0 MOVE OK ENTER SELECT Adjust settings to affect picture quality MENU PREVIOUS EXIT EXIT 2 Press or to block or unblock the rating. Enter Password 6 Press or to highlight a rating, then press OK/ENTER to highlight SETTINGS. To turn off . When you have not set a password, enter 0000. The Settings menu opens. Settings Parental Controls Closed Caption Time Menu Settings Auto Input Sensing Input Labels PICTURE AUDIO CHANNELS SETTINGS USB...
... Locks screen opens. Picture Mode Brightness Contrast Color Tint Sharpness PICTURE AUDIO CHANNELS SETTINGS USB Energy Savings 50 48 70 0 0 MOVE OK ENTER SELECT Adjust settings to affect picture quality MENU PREVIOUS EXIT EXIT 2 Press or to block or unblock the rating. Enter Password 6 Press or to highlight a rating, then press OK/ENTER to highlight SETTINGS. To turn off . When you have not set a password, enter 0000. The Settings menu opens. Settings Parental Controls Closed Caption Time Menu Settings Auto Input Sensing Input Labels PICTURE AUDIO CHANNELS SETTINGS USB...

User Manual (English)
Page 43
..."/42" LCD, 120 Hz 1080p 4 Press OK/ENTER or . Press or OK/ENTER to the default settings. Press OK/ENTER or . Note • • • • The INlink function only works when the TV remote control is turned on -screen menu opens. Settings Parental Controls Closed Caption Time Menu Settings Auto Input Sensing Input Labels PICTURE AUDIO CHANNELS SETTINGS USB On MOVE OK ENTER SELECT Set various TV options MENU PREVIOUS EXIT EXIT 3 Press to highlight Reset to Default, select Yes...
..."/42" LCD, 120 Hz 1080p 4 Press OK/ENTER or . Press or OK/ENTER to the default settings. Press OK/ENTER or . Note • • • • The INlink function only works when the TV remote control is turned on -screen menu opens. Settings Parental Controls Closed Caption Time Menu Settings Auto Input Sensing Input Labels PICTURE AUDIO CHANNELS SETTINGS USB On MOVE OK ENTER SELECT Set various TV options MENU PREVIOUS EXIT EXIT 3 Press to highlight Reset to Default, select Yes...

User Manual (English)
Page 48
... View Slideshow Settings PICTURE AUDIO CHANNELS SETTINGS USB MOVE OK ENTER SELECT Change slideshow settings MENU PREVIOUS EXIT EXIT 4 Press OK/ENTER or . Maintaining • Do not use your TV in a weak detergent solution, squeeze the excess moisture from the cloth, then wipe the screen or cabinet with the cloth. Troubleshooting Warning Do not try to your TV. • Replace the batteries. General remote control Remote control does not work Remote control code...
... View Slideshow Settings PICTURE AUDIO CHANNELS SETTINGS USB MOVE OK ENTER SELECT Change slideshow settings MENU PREVIOUS EXIT EXIT 4 Press OK/ENTER or . Maintaining • Do not use your TV in a weak detergent solution, squeeze the excess moisture from the cloth, then wipe the screen or cabinet with the cloth. Troubleshooting Warning Do not try to your TV. • Replace the batteries. General remote control Remote control does not work Remote control code...
User Manual (English)
Page 49
... not change channels • An entry error has occurred (for INlink devices again. Other Buttons on page 25. • Make sure that the video cables are connected securely to change correctly when directly entering numbers to the back of this TV. See "Using INlink" on Analog standard Digital standard Photo standard Screen size Channel coverage Power source Power consumption Audio power S-Video input (1) AV input (1) NTSC ATSC, 8-VSB, Clear-QAM JPEG format NS-32L550A11: 32" NS-37L550A11: 37" NS...
... not change channels • An entry error has occurred (for INlink devices again. Other Buttons on page 25. • Make sure that the video cables are connected securely to change correctly when directly entering numbers to the back of this TV. See "Using INlink" on Analog standard Digital standard Photo standard Screen size Channel coverage Power source Power consumption Audio power S-Video input (1) AV input (1) NTSC ATSC, 8-VSB, Clear-QAM JPEG format NS-32L550A11: 32" NS-37L550A11: 37" NS...
What is Firmware? (English)
Page 1
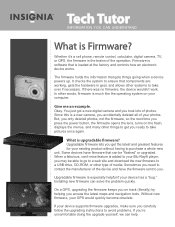
.... Upgradable firmware is upgradable firmware? Tech Tutor information you can understand What is added to your Blu-Ray® player, you may be "flashed" or upgraded. When a fabulous, can solve the problem quickly. Installing new firmware can 't-miss-feature is Firmware? Whether it's a cell phone, remote control, calculator, digital camera, TV, or GPS, the firmware is much like the operating system on track (literally) by helping you access the...
.... Upgradable firmware is upgradable firmware? Tech Tutor information you can understand What is added to your Blu-Ray® player, you may be "flashed" or upgraded. When a fabulous, can solve the problem quickly. Installing new firmware can 't-miss-feature is Firmware? Whether it's a cell phone, remote control, calculator, digital camera, TV, or GPS, the firmware is much like the operating system on track (literally) by helping you access the...
Quick Setup Guide (English)
Page 1
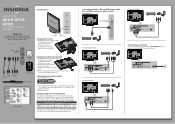
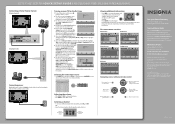
... base to the stand. 3 Remove the four screws securing the stand. 4 Attach the wall-mount bracket to the back of your universal Insignia remote control to the stand with the wall mount. Setting up your user guide or visit www.insigniaproducts.com. Connecting a DVD or Blu-ray DVD player, cable box, satellite receiver, or game console Using HDMI (best) Using component (better) Using S-Video (good) Using composite (fair) Connecting an antenna Connect a 75 ohm cable (not included) to the ANT/CABLE IN jack on the back of this ne Insignia television...
... base to the stand. 3 Remove the four screws securing the stand. 4 Attach the wall-mount bracket to the back of your universal Insignia remote control to the stand with the wall mount. Setting up your user guide or visit www.insigniaproducts.com. Connecting a DVD or Blu-ray DVD player, cable box, satellite receiver, or game console Using HDMI (best) Using component (better) Using S-Video (good) Using composite (fair) Connecting an antenna Connect a 75 ohm cable (not included) to the ANT/CABLE IN jack on the back of this ne Insignia television...
Quick Setup Guide (English)
Page 2
... respective owners. Source List TV AV Component VGA HDMI 1 HDMI 2 HDMI 3 HDMI 4 USB Adjusting the volume • Press VOL+ or VOL- to change the channel Viewing additional information • Press INFO to highlight Home Mode (default) or Retail Mode, then press Home Mode Retail Mode OK/ENTER. Press to return to select Auto or Manual, then press OK/ENTER. de R.L. Registered in your TV, then plug the other Insignia TV owners. Choose your TV source Antenna Cable Cable/Satellite box 0 Digital Channels 0 Analog Channels Scanning for...
... respective owners. Source List TV AV Component VGA HDMI 1 HDMI 2 HDMI 3 HDMI 4 USB Adjusting the volume • Press VOL+ or VOL- to change the channel Viewing additional information • Press INFO to highlight Home Mode (default) or Retail Mode, then press Home Mode Retail Mode OK/ENTER. Press to return to select Auto or Manual, then press OK/ENTER. de R.L. Registered in your TV, then plug the other Insignia TV owners. Choose your TV source Antenna Cable Cable/Satellite box 0 Digital Channels 0 Analog Channels Scanning for...


