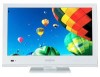
Firmware Installation Guide (English)
Page 1
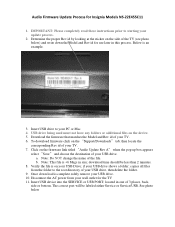
... additional files on the firmware link titled "Audio Update Rev A" when the pop up box appears select "Save" and choose the destination of your USB drive. Note: This file is an example. 3. Insert USB drive to starting your TV. 6. Download the firmware that matches the Model and Rev id of the file. Note: Do NOT change the name of your update process. 2. Audio Firmware Update Process for use later...
... additional files on the firmware link titled "Audio Update Rev A" when the pop up box appears select "Save" and choose the destination of your USB drive. Note: This file is an example. 3. Insert USB drive to starting your TV. 6. Download the firmware that matches the Model and Rev id of the file. Note: Do NOT change the name of your update process. 2. Audio Firmware Update Process for use later...

User Manual (English)
Page 2
... control 8 Using the remote control holder 8 Programming your existing universal remote control to work with your TV 8 Making connections 9 Connecting power 9 Connecting an antenna or cable TV without a cable box 9 Connecting a cable or satellite box 10 Connecting an HDMI device 10 Connecting a component video device 11 Connecting a VCR 11 Connecting a computer 12 Connecting a USB device 12 Connecting headphones 13 Connecting a digital sound system 13 Turning on your TV for the first time 13 Understanding the basics 14 Turning your TV on or off 14 Selecting the video input...
... control 8 Using the remote control holder 8 Programming your existing universal remote control to work with your TV 8 Making connections 9 Connecting power 9 Connecting an antenna or cable TV without a cable box 9 Connecting a cable or satellite box 10 Connecting an HDMI device 10 Connecting a component video device 11 Connecting a VCR 11 Connecting a computer 12 Connecting a USB device 12 Connecting headphones 13 Connecting a digital sound system 13 Turning on your TV for the first time 13 Understanding the basics 14 Turning your TV on or off 14 Selecting the video input...
User Manual (English)
Page 3
... Locking control buttons 23 Blocking unrated TV 24 Setting parental control levels 25 Downloading rating information 26 Using closed captioning 27 Turning closed captioning on or off 27 Selecting the analog closed captioning mode 27 Customizing digital closed captioning styles 28 Adjusting time settings 28 Setting the clock 28 Setting the sleep timer 29 Adjusting menu settings 30 Selecting the menu language and transparency 30 Labeling an input source 30 Turning Input Sensor on or off 31 Using INlink 31 Restoring settings to the defaults 33 Using USB 34 Switching to USB mode...
... Locking control buttons 23 Blocking unrated TV 24 Setting parental control levels 25 Downloading rating information 26 Using closed captioning 27 Turning closed captioning on or off 27 Selecting the analog closed captioning mode 27 Customizing digital closed captioning styles 28 Adjusting time settings 28 Setting the clock 28 Setting the sleep timer 29 Adjusting menu settings 30 Selecting the menu language and transparency 30 Labeling an input source 30 Turning Input Sensor on or off 31 Using INlink 31 Restoring settings to the defaults 33 Using USB 34 Switching to USB mode...

User Manual (English)
Page 5
...; One size of wall mount does not fit all. Use only a TV stand rated for the weight of your TV. • Carefully read and understand all instructions supplied by curious children. Some wall mounts are inappropriately placed on the proper stands or installed according to wall mount your TV. • Follow all enclosed instructions for proper use your flat panel display As you enjoy your TV, get help from a professional installer...
...; One size of wall mount does not fit all. Use only a TV stand rated for the weight of your TV. • Carefully read and understand all instructions supplied by curious children. Some wall mounts are inappropriately placed on the proper stands or installed according to wall mount your TV. • Follow all enclosed instructions for proper use your flat panel display As you enjoy your TV, get help from a professional installer...
User Manual (English)
Page 10
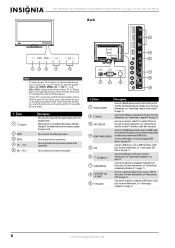
.... # Item 1 (power) 2 INPUT 3 MENU 4 CH /CH 5 VOL -/VOL + Description Press to light the button labels. Press to these jacks. To completely disconnect power, unplug the power cord. Press to decrease or increase the volume. # Item Description 1 DIGITAL OUTPUT Connect a digital optical sound system to this jack. For more information, see "Connecting an antenna or cable TV without a cable box" on page 9. If your TV is in the channel list. For more information, see "Connecting a VCR" on...
.... # Item 1 (power) 2 INPUT 3 MENU 4 CH /CH 5 VOL -/VOL + Description Press to light the button labels. Press to these jacks. To completely disconnect power, unplug the power cord. Press to decrease or increase the volume. # Item Description 1 DIGITAL OUTPUT Connect a digital optical sound system to this jack. For more information, see "Connecting an antenna or cable TV without a cable box" on page 9. If your TV is in the channel list. For more information, see "Connecting a VCR" on...

User Manual (English)
Page 11
... device connected to select the aspect ratio. Press to enter channel numbers or the parental control password. For more information, see "Adjusting the TV picture" on the back of the remote, lift the cover off " on the batteries align with the + and - Insignia 19"/22" LED-LCD HD TV Remote control # Button 1 (power) 2 COMP/AV 3 Numbers 4 5 MUTE 6 VOL+/VOL- 7 CH-LIST 8 INPUT 9 MENU 10 ENTER Description Press to turn on your TV in standby mode...
... device connected to select the aspect ratio. Press to enter channel numbers or the parental control password. For more information, see "Adjusting the TV picture" on the back of the remote, lift the cover off " on the batteries align with the + and - Insignia 19"/22" LED-LCD HD TV Remote control # Button 1 (power) 2 COMP/AV 3 Numbers 4 5 MUTE 6 VOL+/VOL- 7 CH-LIST 8 INPUT 9 MENU 10 ENTER Description Press to turn on your TV in standby mode...
User Manual (English)
Page 12
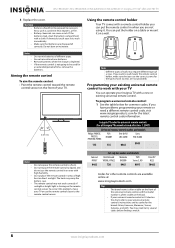
... of wall. (Screws are not using it on the remote control sensor. Note Different types of different types. If you are not provided.) Programming your remote or need to work correctly if sunlight or bright light is depleted. Do not place the remote control in when you have problems programming your existing universal remote control to try codes for the latest remote control code information. NS-19E450A11/NS-19E450WA11/NS-22E450A11/NS-22E455C11 Insignia 19"/22" LED-LCD HD TV 3 Replace the...
... of wall. (Screws are not using it on the remote control sensor. Note Different types of different types. If you are not provided.) Programming your remote or need to work correctly if sunlight or bright light is depleted. Do not place the remote control in when you have problems programming your existing universal remote control to try codes for the latest remote control code information. NS-19E450A11/NS-19E450WA11/NS-22E450A11/NS-22E455C11 Insignia 19"/22" LED-LCD HD TV 3 Replace the...

User Manual (English)
Page 13
... of TV Antenna or cable TV wall jack. www.insigniaproducts.com 9 Back of your equipment. • Always unplug the power cord when connecting external equipment. Connecting power To connect the power: • Plug the AC power cord into a power outlet. For more help, go to the documentation that can operate both your set -top box manufacturer, or call technical support for position and type before making any connections. • Loose connections can manually program it using your...
... of TV Antenna or cable TV wall jack. www.insigniaproducts.com 9 Back of your equipment. • Always unplug the power cord when connecting external equipment. Connecting power To connect the power: • Plug the AC power cord into a power outlet. For more help, go to the documentation that can operate both your set -top box manufacturer, or call technical support for position and type before making any connections. • Loose connections can manually program it using your...
User Manual (English)
Page 14
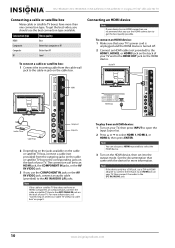
... be to an HDMI jack, the COMPONENT IN jacks, or the AV IN VIDEO jack. 3 If you use the COMPONENT IN jacks or the AV IN VIDEO jack, connect an audio cable (provided) to the AV IN AUDIO L/R jacks. The connection can also press HDMI repeatedly to select the HDMI device. 3 Turn on the HDMI device, then set it to the output mode. To play from the outgoing jacks on the cable or satellite TV box to the corresponding...
... be to an HDMI jack, the COMPONENT IN jacks, or the AV IN VIDEO jack. 3 If you use the COMPONENT IN jacks or the AV IN VIDEO jack, connect an audio cable (provided) to the AV IN AUDIO L/R jacks. The connection can also press HDMI repeatedly to select the HDMI device. 3 Turn on the HDMI device, then set it to the output mode. To play from the outgoing jacks on the cable or satellite TV box to the corresponding...
User Manual (English)
Page 16
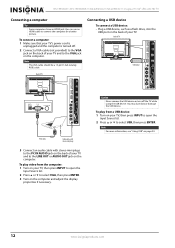
... of your TV's power cord is unplugged and the computer is turned off. 2 Connect a VGA cable (not provided) to the VGA jack on the computer and adjust the display properties if necessary. (PC IN) AUDIO AV IN VIDE O PB PR COMPONENT IN Caution Never remove the USB device or turn off the TV while using the USB device. NS-19E450A11/NS-19E450WA11/NS-22E450A11/NS-22E455C11 Insignia 19"/22" LED-LCD HD TV Connecting a computer Tip...
... of your TV's power cord is unplugged and the computer is turned off. 2 Connect a VGA cable (not provided) to the VGA jack on the computer and adjust the display properties if necessary. (PC IN) AUDIO AV IN VIDE O PB PR COMPONENT IN Caution Never remove the USB device or turn off the TV while using the USB device. NS-19E450A11/NS-19E450WA11/NS-22E450A11/NS-22E455C11 Insignia 19"/22" LED-LCD HD TV Connecting a computer Tip...
User Manual (English)
Page 17
... connect headphones: • Connect headphones to select your time zone. Back of your hearing. The Choose your headphones that your TV's power cord is unplugged and the sound system is turned off. 2 Connect a digital optical audio cable to DIGITAL OUTPUT jack on the back of TV (headphone) jack Turning on your TV for the first time The first time you turn on your TV. Insignia 19"/22" LED-LCD HD TV Connecting headphones The TV speakers are muted when headphones are automatically set...
... connect headphones: • Connect headphones to select your time zone. Back of your hearing. The Choose your headphones that your TV's power cord is unplugged and the sound system is turned off. 2 Connect a digital optical audio cable to DIGITAL OUTPUT jack on the back of TV (headphone) jack Turning on your TV for the first time The first time you turn on your TV. Insignia 19"/22" LED-LCD HD TV Connecting headphones The TV speakers are muted when headphones are automatically set...
User Manual (English)
Page 18
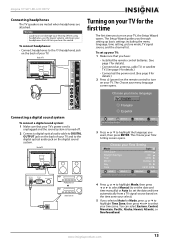
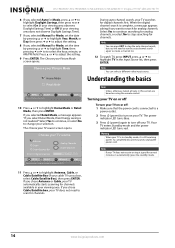
... SELECT MENU PREVIOUS Select Antenna if using the remote control. Turning your TV on or off To turn on your TV. Note You can select a different video input source. Choose your TV source Antenna Cable Cable/Satellite Box 0 Analog Channels 0 Digital Channels Scan for channels available in standby mode, it automatically goes into standby mode. 11 Press or to adjust the setting. 8 If you select Retail Mode, then Energy saving is connected to a power outlet. 2 Press (power) to turn your TV on using an antenna...
... SELECT MENU PREVIOUS Select Antenna if using the remote control. Turning your TV on or off To turn on your TV. Note You can select a different video input source. Choose your TV source Antenna Cable Cable/Satellite Box 0 Analog Channels 0 Digital Channels Scan for channels available in standby mode, it automatically goes into standby mode. 11 Press or to adjust the setting. 8 If you select Retail Mode, then Energy saving is connected to a power outlet. 2 Press (power) to turn your TV on using an antenna...

User Manual (English)
Page 19
... SELECT Adjust settings to highlight a video input source, then press ENTER. Input Source TV Component/AV HDMI 1 HDMI 2 HDMI 3 VGA USB 2 Press or to affect sound quality MENU PREVIOUS EXIT EXIT CHANNELS menu (TV mode) CHANNELS Auto Channel Search Add/Skip Channels Favorites Channel Labels Channel Strength Audio Only PICTURE AUDIO CHANNELS SETTINGS USB Off MOVE OK ENTER Adjust channel options SELECT MENU PREVIOUS EXIT EXIT SETTINGS menu (TV mode) SETTINGS Parental Controls Closed Caption Time Menu Settings Input Labels Computer Settings PICTURE AUDIO CHANNELS SETTINGS USB...
... SELECT Adjust settings to highlight a video input source, then press ENTER. Input Source TV Component/AV HDMI 1 HDMI 2 HDMI 3 VGA USB 2 Press or to affect sound quality MENU PREVIOUS EXIT EXIT CHANNELS menu (TV mode) CHANNELS Auto Channel Search Add/Skip Channels Favorites Channel Labels Channel Strength Audio Only PICTURE AUDIO CHANNELS SETTINGS USB Off MOVE OK ENTER Adjust channel options SELECT MENU PREVIOUS EXIT EXIT SETTINGS menu (TV mode) SETTINGS Parental Controls Closed Caption Time Menu Settings Input Labels Computer Settings PICTURE AUDIO CHANNELS SETTINGS USB...
User Manual (English)
Page 23
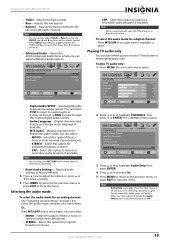
... reset to pass through the original digital audio sound). • Audio Language-(Digital channels only) Selects an alternate audio language, if available. • MTS Audio-(Analog channels only) Selects the audio mode. To exit audio only mode, press any button. Note Mono is automatically selected if the program is noise or static on the remote control. The CHANNELS menu opens. PICTURE AUDIO Advanced Audio Digital Audio/SPDIF Audio Language MTS Audio AUDIO CHANNELS SETTINGS USB RAW English SAP MOVE OK ENTER SELECT MENU PREVIOUS Send digital audio to an external audio...
... reset to pass through the original digital audio sound). • Audio Language-(Digital channels only) Selects an alternate audio language, if available. • MTS Audio-(Analog channels only) Selects the audio mode. To exit audio only mode, press any button. Note Mono is automatically selected if the program is noise or static on the remote control. The CHANNELS menu opens. PICTURE AUDIO Advanced Audio Digital Audio/SPDIF Audio Language MTS Audio AUDIO CHANNELS SETTINGS USB RAW English SAP MOVE OK ENTER SELECT MENU PREVIOUS Send digital audio to an external audio...
User Manual (English)
Page 27
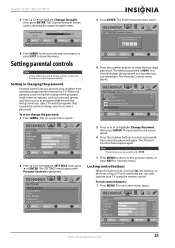
... Parental Controls Closed Caption Time Menu Settings Input Labels Computer Settings PICTURE AUDIO CHANNELS SETTINGS USB MOVE OK ENTER SELECT Set TV parental controls MENU PREVIOUS EXIT EXIT 5 Press or to highlight Channel Strength, then press ENTER. Locking control buttons When the button lock is turned On, the buttons on the front of selected digital channels 100 EXIT EXIT 3 Press ENTER. Channel Strength 0 CH 2 Now 67% Peak 67% MOVE OK ENTER SELECT MENU PREVIOUS Display signal strength of your TV using the remote control. Default is 0000. Insignia 19"/22" LED-LCD...
... Parental Controls Closed Caption Time Menu Settings Input Labels Computer Settings PICTURE AUDIO CHANNELS SETTINGS USB MOVE OK ENTER SELECT Set TV parental controls MENU PREVIOUS EXIT EXIT 5 Press or to highlight Channel Strength, then press ENTER. Locking control buttons When the button lock is turned On, the buttons on the front of selected digital channels 100 EXIT EXIT 3 Press ENTER. Channel Strength 0 CH 2 Now 67% Peak 67% MOVE OK ENTER SELECT MENU PREVIOUS Display signal strength of your TV using the remote control. Default is 0000. Insignia 19"/22" LED-LCD...

User Manual (English)
Page 29
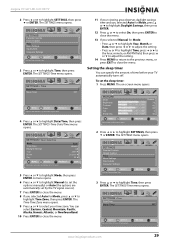
...shows how to select a rating. Setting parental control levels You can set parental control levels: 1 Press MENU. You use similar steps for the U.S. To set parental controls for setting U.S. MENU PREVIOUS EXIT EXIT 4 Press the number buttons to select the rating. Or, Press or to highlight TV Ratings (or Canadian French), then press or to enter the four-digit password. SETTINGS Parental Controls Closed Caption Time Menu Settings Input Labels Computer Settings PICTURE AUDIO CHANNELS SETTINGS USB MOVE OK ENTER SELECT Set TV parental controls MENU PREVIOUS EXIT EXIT...
...shows how to select a rating. Setting parental control levels You can set parental control levels: 1 Press MENU. You use similar steps for the U.S. To set parental controls for setting U.S. MENU PREVIOUS EXIT EXIT 4 Press the number buttons to select the rating. Or, Press or to highlight TV Ratings (or Canadian French), then press or to enter the four-digit password. SETTINGS Parental Controls Closed Caption Time Menu Settings Input Labels Computer Settings PICTURE AUDIO CHANNELS SETTINGS USB MOVE OK ENTER SELECT Set TV parental controls MENU PREVIOUS EXIT EXIT...
User Manual (English)
Page 33
... PICTURE AUDIO CHANNELS SETTINGS USB Custom 70 40 60 0 40 MOVE OK ENTER SELECT Adjust settings to affect picture quality MENU PREVIOUS EXIT EXIT 2 Press or to select your viewing area observes daylight savings time and you selected Auto for Mode, press or to highlight Time, then press ENTER. The Time-Time Zone menu opens. 9 Press or to highlight SETTINGS, then press or ENTER. SETTINGS Parental Controls Closed Caption Time Menu Settings Input Labels Computer Settings PICTURE AUDIO CHANNELS SETTINGS USB MOVE OK ENTER SELECT Set Date/Time and Sleep Timer MENU...
... PICTURE AUDIO CHANNELS SETTINGS USB Custom 70 40 60 0 40 MOVE OK ENTER SELECT Adjust settings to affect picture quality MENU PREVIOUS EXIT EXIT 2 Press or to select your viewing area observes daylight savings time and you selected Auto for Mode, press or to highlight Time, then press ENTER. The Time-Time Zone menu opens. 9 Press or to highlight SETTINGS, then press or ENTER. SETTINGS Parental Controls Closed Caption Time Menu Settings Input Labels Computer Settings PICTURE AUDIO CHANNELS SETTINGS USB MOVE OK ENTER SELECT Set Date/Time and Sleep Timer MENU...
User Manual (English)
Page 41
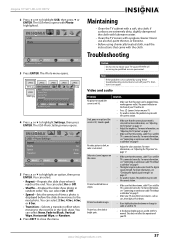
... (power) to close the menu. The USB-Photo Settings menu opens. For more information, see "Connecting an antenna or cable TV without a cable box" on page 17. • Make sure that came with eyeglass cleaner. Never use alcohol, paint thinner, or benzine. • Before using these troubleshooting instructions, turn off your TV, then turn on an LED-LCD TV is displayed before the slide show . Dark, poor, or no picture (the screen...
... (power) to close the menu. The USB-Photo Settings menu opens. For more information, see "Connecting an antenna or cable TV without a cable box" on page 17. • Make sure that came with eyeglass cleaner. Never use alcohol, paint thinner, or benzine. • Before using these troubleshooting instructions, turn off your TV, then turn on an LED-LCD TV is displayed before the slide show . Dark, poor, or no picture (the screen...
User Manual (English)
Page 42
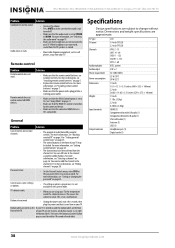
... the power cord is plugged into a working power outlet. • Make sure that the connected HDMI device is not a malfunction. This causes the cabinet to the channel using your TV. For more information, see "Locking control buttons" on your TV, the temperature inside the cabinet increases. You can still tune to creak. TV type TV panel Channels Audio multiplex Audio output Power requirement Power consumption Dimensions Weight Input terminals Output terminals LCD 19-inch TFT LCD 22-inch TFT LCD...
... the power cord is plugged into a working power outlet. • Make sure that the connected HDMI device is not a malfunction. This causes the cabinet to the channel using your TV. For more information, see "Locking control buttons" on your TV, the temperature inside the cabinet increases. You can still tune to creak. TV type TV panel Channels Audio multiplex Audio output Power requirement Power consumption Dimensions Weight Input terminals Output terminals LCD 19-inch TFT LCD 22-inch TFT LCD...
What is Firmware? (English)
Page 1
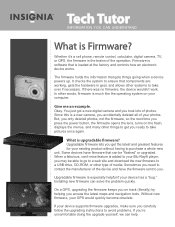
..., not the firmware, so the next time you press the power button, the firmware opens the lens, turns on your computer. Whether it's a cell phone, remote control, calculator, digital camera, TV, or GPS, the firmware is upgradable firmware? The firmware holds the information that components are working, gets the hardware in gear, and allows other words, firmware is especially helpful if your GPS would quickly become obsolete. It...
..., not the firmware, so the next time you press the power button, the firmware opens the lens, turns on your computer. Whether it's a cell phone, remote control, calculator, digital camera, TV, or GPS, the firmware is upgradable firmware? The firmware holds the information that components are working, gets the hardware in gear, and allows other words, firmware is especially helpful if your GPS would quickly become obsolete. It...


