User Manual (English)
Page 2
... periods of important operating and maintenance (servicing) instructions in any ventilation openings. Care and safety information Avoid high temperatures, moisture, water and dust. The lightning flash with the manufacturer instructions. 8) Do not install near water. 6) Clean only with liquids, such as powersupply cord or plug is intended to constitute a risk of the obsolete outlet. 10) Protect the power cord from being walked...
... periods of important operating and maintenance (servicing) instructions in any ventilation openings. Care and safety information Avoid high temperatures, moisture, water and dust. The lightning flash with the manufacturer instructions. 8) Do not install near water. 6) Clean only with liquids, such as powersupply cord or plug is intended to constitute a risk of the obsolete outlet. 10) Protect the power cord from being walked...
User Manual (English)
Page 3
... with a soft felt-tipped pen. IN CASE OF 525 OR 625 PROGRESSIVE SCAN PICTURE PROBLEMS, IT IS RECOMMENDED THAT THE USER SWITCH THE CONNECTION TO THE 'STANDARD DEFINITION' OUTPUT. IF THERE ARE QUESTIONS REGARDING OUR TV SET COMPATIBILITY WITH THIS MODEL 525p AND 625p DVD PLAYER, PLEASE CONTACT OUR CUSTOMER SERVICE CENTER.' This product incorporates copyright protection technology that is not being used . Use of certain U.S.
... with a soft felt-tipped pen. IN CASE OF 525 OR 625 PROGRESSIVE SCAN PICTURE PROBLEMS, IT IS RECOMMENDED THAT THE USER SWITCH THE CONNECTION TO THE 'STANDARD DEFINITION' OUTPUT. IF THERE ARE QUESTIONS REGARDING OUR TV SET COMPATIBILITY WITH THIS MODEL 525p AND 625p DVD PLAYER, PLEASE CONTACT OUR CUSTOMER SERVICE CENTER.' This product incorporates copyright protection technology that is not being used . Use of certain U.S.
User Manual (English)
Page 4
... Setup Menu 20 General Operation 20 Setting the General Setup 21 TV Display Setting TV Type Setting Video Out Setting Angle Mark Setting OSD Language Setting Screen Saver Setting Progressive Setting Setting the Speaker Setup 22 Center Delay Setting Rear Delay Setting Test Tone Setting (disc mode only) Setting the Audio Setup 22 D.R.C Setting Setting the Preferences Setup 23 Parental Setting Password Setting Defaults Setting Tuner Operations Tuning to Radio Stations 25 Presetting Radio Stations 25 Auto presetting Radio Stations 25 Listening to Preset Radio Stations 25 Sound and Volume...
... Setup Menu 20 General Operation 20 Setting the General Setup 21 TV Display Setting TV Type Setting Video Out Setting Angle Mark Setting OSD Language Setting Screen Saver Setting Progressive Setting Setting the Speaker Setup 22 Center Delay Setting Rear Delay Setting Test Tone Setting (disc mode only) Setting the Audio Setup 22 D.R.C Setting Setting the Preferences Setup 23 Parental Setting Password Setting Defaults Setting Tuner Operations Tuning to Radio Stations 25 Presetting Radio Stations 25 Auto presetting Radio Stations 25 Listening to Preset Radio Stations 25 Sound and Volume...

User Manual (English)
Page 5
... DVD video discs may have one . Discs for a movie theater surround sound experience. Copyright 1996, 2003 Digital Theater Systems, Inc. Let you set. Sleep Timer Enables the system to switch to standby mode automatically at the end of Digital Theater Systems, Inc. Full function remote control. Supplied Accessories - One RCA cable with red/white/yelow colorcoded connectors. - One remote control unit - Depending on the conditions of Dolby Laboratories. Audio CDs contain only Tracks. US Pat. Operating instruction...
... DVD video discs may have one . Discs for a movie theater surround sound experience. Copyright 1996, 2003 Digital Theater Systems, Inc. Let you set. Sleep Timer Enables the system to switch to standby mode automatically at the end of Digital Theater Systems, Inc. Full function remote control. Supplied Accessories - One RCA cable with red/white/yelow colorcoded connectors. - One remote control unit - Depending on the conditions of Dolby Laboratories. Audio CDs contain only Tracks. US Pat. Operating instruction...
User Manual (English)
Page 6
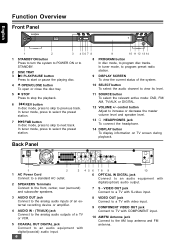
... tuner mode, to program preset radio station. 9 DISPLAY SCREEN To view the current status of a TV or VCR. 5 COAXIAL OUT DIGITAL jack Connect to an audio equipment with digital(coaxial) audio input. 6 6 OPTICAL IN DIGTAL jack Connect to previous track. control button Adjust to increase or decrease the master volume level and speaker level. 13 HEADPHONES jack To connect the headphone. 14 DISPLAY button To display information on TV screen during playback. 1 AC Power Cord Connect to a standard AC outlet. 2 SPEAKERS Terminals Connect to the front, center, rear (surround) and subwoofer speakers...
... tuner mode, to program preset radio station. 9 DISPLAY SCREEN To view the current status of a TV or VCR. 5 COAXIAL OUT DIGITAL jack Connect to an audio equipment with digital(coaxial) audio input. 6 6 OPTICAL IN DIGTAL jack Connect to previous track. control button Adjust to increase or decrease the master volume level and speaker level. 13 HEADPHONES jack To connect the headphone. 14 DISPLAY button To display information on TV screen during playback. 1 AC Power Cord Connect to a standard AC outlet. 2 SPEAKERS Terminals Connect to the front, center, rear (surround) and subwoofer speakers...
User Manual (English)
Page 7
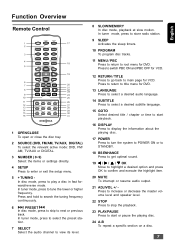
... RETURN / TITLE Press to go back to select the preset sta- In tuner mode, press to play a disc in fast forward/reverse mode. Function Overview Remote Control 1 OPEN/CLOSE To open or close the disc tray. 2 SOURCE (DVD, FM/AM, TV/AUX, DIGITAL) To select the relevant active mode: DVD, FM/ AM, TV/AUX or DIGITAL. 3 NUMBER ( 0~9) Select the items or settings directly. 4 SETUP Press to enter or exit the setup menu. 5 + TUNING In disc mode, press to tune the lower or higher frequency.
... RETURN / TITLE Press to go back to select the preset sta- In tuner mode, press to play a disc in fast forward/reverse mode. Function Overview Remote Control 1 OPEN/CLOSE To open or close the disc tray. 2 SOURCE (DVD, FM/AM, TV/AUX, DIGITAL) To select the relevant active mode: DVD, FM/ AM, TV/AUX or DIGITAL. 3 NUMBER ( 0~9) Select the items or settings directly. 4 SETUP Press to enter or exit the setup menu. 5 + TUNING In disc mode, press to tune the lower or higher frequency.
User Manual (English)
Page 8
... used for the VFD. 31 NIGHT Press to change the angles. 29 ZOOM Enlarge the picture. 30 DIM To select different brightness for a long time. Do not mix old and new or different types of the EQ effect for enhanced tones. 27 SURROUND To select multichannel surround (Dolby Digital, DTS or stereo) sound effect. 28 ANGLE Press to activate or deactivate night function...
... used for the VFD. 31 NIGHT Press to change the angles. 29 ZOOM Enlarge the picture. 30 DIM To select different brightness for a long time. Do not mix old and new or different types of the EQ effect for enhanced tones. 27 SURROUND To select multichannel surround (Dolby Digital, DTS or stereo) sound effect. 28 ANGLE Press to activate or deactivate night function...
User Manual (English)
Page 11
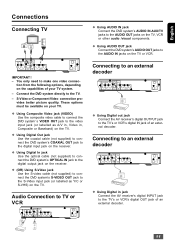
... your TV system. - Connecting to an external decoder Using Digital out jack Connect the AV receiver's digital OUTPUT jack to make one video connec- English Connections Connecting TV IMPORTANT ! - You only need to the TV's or VCR's digital IN jack of an external decoder. 11 Using Composite Video jack (VIDEO) Use the composite video cable to connect the DVD system' s VIDEO OUT jack to the video input jack (or labelled as Y/C or S-VHS) on the TV, VCR or other audio /visual components.
... your TV system. - Connecting to an external decoder Using Digital out jack Connect the AV receiver's digital OUTPUT jack to make one video connec- English Connections Connecting TV IMPORTANT ! - You only need to the TV's or VCR's digital IN jack of an external decoder. 11 Using Composite Video jack (VIDEO) Use the composite video cable to connect the DVD system' s VIDEO OUT jack to the video input jack (or labelled as Y/C or S-VHS) on the TV, VCR or other audio /visual components.
User Manual (English)
Page 12
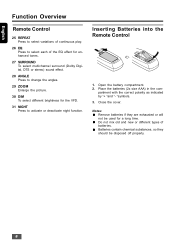
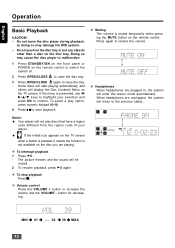
... front panel or POWER on the remote control to switch the system on the disc you are unplugged, the system will return to close the tray. - When headphones are playing. English Operation Basic Playback CAUTION ! - To select a play discs that have a region code different from the region code of your selection and press OK to restore the volume. If the inhibit icon appears on the TV screen when a button...
... front panel or POWER on the remote control to switch the system on the disc you are unplugged, the system will return to close the tray. - When headphones are playing. English Operation Basic Playback CAUTION ! - To select a play discs that have a region code different from the region code of your selection and press OK to restore the volume. If the inhibit icon appears on the TV screen when a button...
User Manual (English)
Page 13
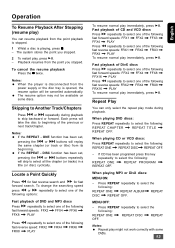
...title) from the point you stopped. 2 To restart play, press ll. - DISC function has been set , pressing the or buttons will skip to select all the chapter (or tracks) in a title (or disc) cyclically. Playback resumes from its beginning. Skipping to ...PROGRAM REPEAT OFF. Notes: Repeat play might not work correctly with some discs. Locate a Point Quickly Press for fast reverse search and for fast forward search. To change the searching speed press or repeatedly to select one of the following options: Fast playback of DVD and MP3 discs Press repeatedly to select...
...title) from the point you stopped. 2 To restart play, press ll. - DISC function has been set , pressing the or buttons will skip to select all the chapter (or tracks) in a title (or disc) cyclically. Playback resumes from its beginning. Skipping to ...PROGRAM REPEAT OFF. Notes: Repeat play might not work correctly with some discs. Locate a Point Quickly Press for fast reverse search and for fast forward search. To change the searching speed press or repeatedly to select one of the following options: Fast playback of DVD and MP3 discs Press repeatedly to select...
User Manual (English)
Page 14
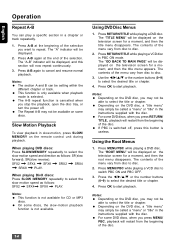
... will be displayed on the remote control unit during playback. For some DVD discs, when you want to select the title or chapter. Using the Root Menus 1. This function is only available when playback mode is selected. SFX2 SFX4 SFX8 SRX2 SRX4 SRX8 PLAY. Depending on the DVD disc, a "title menu" may not be able to repeat. English Operation Repeat A-B You can be setting within the...
... will be displayed on the remote control unit during playback. For some DVD discs, when you want to select the title or chapter. Using the Root Menus 1. This function is only available when playback mode is selected. SFX2 SFX4 SFX8 SRX2 SRX4 SRX8 PLAY. Depending on the DVD disc, a "title menu" may not be able to repeat. English Operation Repeat A-B You can be setting within the...

User Manual (English)
Page 16
... 2. Use the / buttons to go to start playback from that selection. 16 When playing DivX discs 1. Press GOTO, the following menu on the remote control unit. When you enter must be displayed. 4. To cancel the program, press STOP again. English Operation 1. Selecting the Start Time This function allows you press STOP twice, open the disc tray, or turn the power off. Notes: This function is not available when playing DVD...
... 2. Use the / buttons to go to start playback from that selection. 16 When playing DivX discs 1. Press GOTO, the following menu on the remote control unit. When you enter must be displayed. 4. To cancel the program, press STOP again. English Operation 1. Selecting the Start Time This function allows you press STOP twice, open the disc tray, or turn the power off. Notes: This function is not available when playing DVD...
User Manual (English)
Page 17
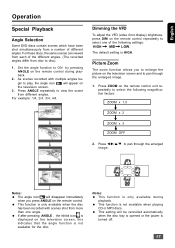
... playback. 2. Notes: This function is displayed on the remote control. This setting will appear on the remote control during playback. Dimming the VFD To adjust the VFD (video front display) brightness, press DIM on the remote control unit repeatedly to select the following settings: HIGH MID LOW. Press ZOOM on the remote control repeatedly to select one angle. The default setting is only available when the disc has been recorded with...
... playback. 2. Notes: This function is displayed on the remote control. This setting will appear on the remote control during playback. Dimming the VFD To adjust the VFD (video front display) brightness, press DIM on the remote control unit repeatedly to select the following settings: HIGH MID LOW. Press ZOOM on the remote control repeatedly to select one angle. The default setting is only available when the disc has been recorded with...
User Manual (English)
Page 18
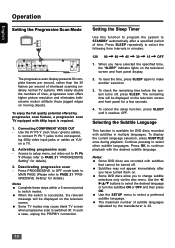
... Setting" for details). When the switch is successful, the relevant message will be displayed on the television screen and front panel display. 2. Some DVD discs allow you have turned them on moving objects. Access to setup menu, set video out to Pr Pb Y (Please refer to PAGE 21 "PROGRESSIVE Setting" for details). 3. Setting the Sleep Timer Use this function to program the system to change subtitle selections only via the disc menu...
... Setting" for details). When the switch is successful, the relevant message will be displayed on the television screen and front panel display. 2. Some DVD discs allow you have turned them on moving objects. Access to setup menu, set video out to Pr Pb Y (Please refer to PAGE 21 "PROGRESSIVE Setting" for details). 3. Setting the Sleep Timer Use this function to program the system to change subtitle selections only via the disc menu...
User Manual (English)
Page 22
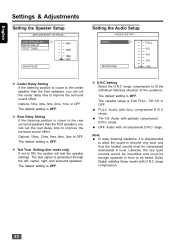
... in level to be compressed downwards in level. Options: 5ms, 4ms, 3ms, 2ms, 1ms, or OFF . English Settings & Adjustments Setting the Speaker Setup Setting the Audio Setup Center Delay Setting If the listening position is closer to the centre speaker than the front speakers, you can set the rear delay time to improve the surround sound effect. The test signal is OFF. The default setting is generated through the left, center, right, and surround speakers. The default setting is...
... in level to be compressed downwards in level. Options: 5ms, 4ms, 3ms, 2ms, 1ms, or OFF . English Settings & Adjustments Setting the Speaker Setup Setting the Audio Setup Center Delay Setting If the listening position is closer to the centre speaker than the front speakers, you can set the rear delay time to improve the surround sound effect. The test signal is OFF. The default setting is generated through the left, center, right, and surround speakers. The default setting is...
User Manual (English)
Page 23
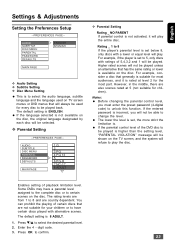
... lower the level is set below 8, only discs with alternative scenes. English Settings & Adjustments Setting the Preferences Setup Audio Setting Subtitle Setting Disc Menu Setting This is to select the audio language, subtitle language and the language used for every disc to be shown on the TV screen, and the system will be selected. Enables setting of the DVD disc to be played is incorrect, you must enter the preset password (4-digital code) to unlock this function. Enter the...
... lower the level is set below 8, only discs with alternative scenes. English Settings & Adjustments Setting the Preferences Setup Audio Setting Subtitle Setting Disc Menu Setting This is to select the audio language, subtitle language and the language used for every disc to be shown on the TV screen, and the system will be selected. Enables setting of the DVD disc to be played is incorrect, you must enter the preset password (4-digital code) to unlock this function. Enter the...

User Manual (English)
Page 24
... control level and the password will be reset. 24 Enter the old password. 5. Select a password you can easily remember. Enter the new 4-digit code. 6. Defaults Setting If RESET is displayed on the screen. Password Setting 1. Press OK to the default settings (1234), press STOP button four times. The default password is used to confirm. 7. Enter its submenu by pressing . 3. English Settings & Adjustments Password Setting This feature is "1234". Enter the new 4-digit code a second time to unlock the parental control level reset function...
... control level and the password will be reset. 24 Enter the old password. 5. Select a password you can easily remember. Enter the new 4-digit code. 6. Defaults Setting If RESET is displayed on the screen. Password Setting 1. Press OK to the default settings (1234), press STOP button four times. The default password is used to confirm. 7. Enter its submenu by pressing . 3. English Settings & Adjustments Password Setting This feature is "1234". Enter the new 4-digit code a second time to unlock the parental control level reset function...

User Manual (English)
Page 25
... number buttons (0~9) to store the station. 5. Press and hold "PROGRAM" button more than 3 seconds, all the available stations are connected. Press SLOW/MEMORY to select the desired radio preset number. 4. In tuner mode, press and hold (TUNING -) or (TUNING +) until you find the desired radio station. The system automatically tunes to stop when all radio stations with strong signal strength will be played when storing completed. 2. Press STOP button to the next strong radio station. Auto presetting radio stations 1. Make...
... number buttons (0~9) to store the station. 5. Press and hold "PROGRAM" button more than 3 seconds, all the available stations are connected. Press SLOW/MEMORY to select the desired radio preset number. 4. In tuner mode, press and hold (TUNING -) or (TUNING +) until you find the desired radio station. The system automatically tunes to stop when all radio stations with strong signal strength will be played when storing completed. 2. Press STOP button to the next strong radio station. Auto presetting radio stations 1. Make...

User Manual (English)
Page 26
... surround sound modes depends on the front panel display and TV screen. Selecting Sound Effect 1. and VOLUME + to select: Playing a DVD disc - Press SURROUND to adjust the selected channel' s level. 3. The display will appear on the number of speakers connected and the sound mode available for a few seconds, the values turn off and are stored in TUNER/TV/AUX mode - If you can select: Stereo DTS - Press EQ button repeatedly to +10dB, 2dB/step. Press VOLUME - Volume Control Changing the Volume Level You can adjust the treble or bass levels...
... surround sound modes depends on the front panel display and TV screen. Selecting Sound Effect 1. and VOLUME + to select: Playing a DVD disc - Press SURROUND to adjust the selected channel' s level. 3. The display will appear on the number of speakers connected and the sound mode available for a few seconds, the values turn off and are stored in TUNER/TV/AUX mode - If you can select: Stereo DTS - Press EQ button repeatedly to +10dB, 2dB/step. Press VOLUME - Volume Control Changing the Volume Level You can adjust the treble or bass levels...
User Manual (English)
Page 27
... on your nearest service center. No picture. Make sure you connect the system appropriately. If video from this troubleshooting guide to help you connect the system with the S-Video cable, connect directly to video input connector on the TV, you may be changed even though you set or fluorescent light. Depending on the TV. Check that the speakers and components are connected correctly. or +) buttons . The plugs and jacks are unbalanced or reversed. Use the remote control near the...
... on your nearest service center. No picture. Make sure you connect the system appropriately. If video from this troubleshooting guide to help you connect the system with the S-Video cable, connect directly to video input connector on the TV, you may be changed even though you set or fluorescent light. Depending on the TV. Check that the speakers and components are connected correctly. or +) buttons . The plugs and jacks are unbalanced or reversed. Use the remote control near the...


