

English Manual
Page 2
TABLE OF CONTENTS IMPORTANT PRECAUTIONS 3 BEFORE YOU BEGIN 4 ASSEMBLY 5 HOW TO USE THE ELLIPTICAL EXERCISER 9 MAINTENANCE AND TROUBLESHOOTING 19 CONDITIONING GUIDELINES 20 PART LIST 22 EXPLODED DRAWING 23 HOW TO ORDER REPLACEMENT PARTS Back Cover LIMITED WARRANTY Back Cover IMAGE is a registered trademark of ICON IP, Inc. 2
TABLE OF CONTENTS IMPORTANT PRECAUTIONS 3 BEFORE YOU BEGIN 4 ASSEMBLY 5 HOW TO USE THE ELLIPTICAL EXERCISER 9 MAINTENANCE AND TROUBLESHOOTING 19 CONDITIONING GUIDELINES 20 PART LIST 22 EXPLODED DRAWING 23 HOW TO ORDER REPLACEMENT PARTS Back Cover LIMITED WARRANTY Back Cover IMAGE is a registered trademark of ICON IP, Inc. 2
English Manual
Page 3
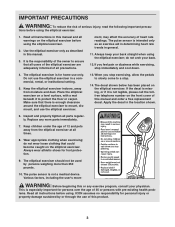
... or dizziness while exercising, stop . 14. Wear appropriate clothing when exercising; The pulse sensor is intended only as described in this manual and order a free replacement decal. WARNING: Before beginning this manual and all warnings on the elliptical exerciser before using the elliptical exerciser. 2. ICON assumes no responsibility for home use the elliptical exerciser. 13. IMPORTANT PRECAUTIONS WARNING: To reduce the risk of heart rate readings. tions before using the elliptical exerciser. 1. ment, may...
... or dizziness while exercising, stop . 14. Wear appropriate clothing when exercising; The pulse sensor is intended only as described in this manual and order a free replacement decal. WARNING: Before beginning this manual and all warnings on the elliptical exerciser before using the elliptical exerciser. 2. ICON assumes no responsibility for home use the elliptical exerciser. 13. IMPORTANT PRECAUTIONS WARNING: To reduce the risk of heart rate readings. tions before using the elliptical exerciser. 1. ment, may...
English Manual
Page 4
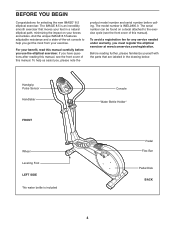
... selecting the new IMAGE® 8.5 elliptical exerciser. Handgrip Pulse Sensor Handlebar FRONT Wheel Leveling Foot LEFT SIDE *No water bottle is IMEL2805.0. And the unique IMAGE 8.5 features adjustable resistance and a state-of-the-art console to the exercise cycle (see the front cover of this manual carefully before calling. To help you use the elliptical exerciser. BEFORE YOU BEGIN Congratulations for any service needed under warranty, you have...
... selecting the new IMAGE® 8.5 elliptical exerciser. Handgrip Pulse Sensor Handlebar FRONT Wheel Leveling Foot LEFT SIDE *No water bottle is IMEL2805.0. And the unique IMAGE 8.5 features adjustable resistance and a state-of-the-art console to the exercise cycle (see the front cover of this manual carefully before calling. To help you use the elliptical exerciser. BEFORE YOU BEGIN Congratulations for any service needed under warranty, you have...
English Manual
Page 5
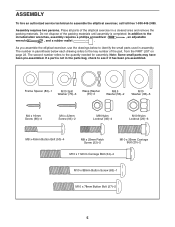
... quantity needed for assembly. Note: Some small parts may have been pre-assembled. The second number refers to the included allen wrenches, assembly requires a phillips screwdriver , an adjustable wrench , and a rubber mallet . If a part is completed. Do not dispose of the packing materials until assembly is not in the parts bag, check to the key number of the elliptical exerciser in a cleared area and remove...
... quantity needed for assembly. Note: Some small parts may have been pre-assembled. The second number refers to the included allen wrenches, assembly requires a phillips screwdriver , an adjustable wrench , and a rubber mallet . If a part is completed. Do not dispose of the packing materials until assembly is not in the parts bag, check to the key number of the elliptical exerciser in a cleared area and remove...
English Manual
Page 6
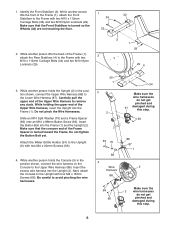
... end of the Upper Wire Harness, insert the Upright into the Frame (1). Carefully pull the upper end of the Frame (1), 2 attach the Rear Stabilizer (4) to the Lower Wire Harness (87). Insert the Button Bolt into the Upright (2). Be careful to the Upright (2) with four M4 x 16mm Screws (66). Do not pinch the Wire Harnesses. Do not tighten the Button Bolt yet. Attach the Water Bottle Holder...
... end of the Upper Wire Harness, insert the Upright into the Frame (1). Carefully pull the upper end of the Frame (1), 2 attach the Rear Stabilizer (4) to the Lower Wire Harness (87). Insert the Button Bolt into the Upright (2). Be careful to the Upright (2) with four M4 x 16mm Screws (66). Do not pinch the Wire Harnesses. Do not tighten the Button Bolt yet. Attach the Water Bottle Holder...

English Manual
Page 7
... Handlebar Leg is turned so the hexagonal holes are recommended. Tighten the M8 x 45mm Button Bolts (50) in the same way. Remove the indicated screw from the battery drawer, and pull the battery drawer open. Insert four batteries into the end of the included grease to the Pivot Axle (97) and to an M10 x 78mm Button Bolt (27). Tighten the M10 x 88mm Button Screw (63). 5 5 Batteries Screw 6 Battery Drawer Grease 9 Tube...
... Handlebar Leg is turned so the hexagonal holes are recommended. Tighten the M8 x 45mm Button Bolts (50) in the same way. Remove the indicated screw from the battery drawer, and pull the battery drawer open. Insert four batteries into the end of the included grease to the Pivot Axle (97) and to an M10 x 78mm Button Bolt (27). Tighten the M10 x 88mm Button Screw (63). 5 5 Batteries Screw 6 Battery Drawer Grease 9 Tube...
English Manual
Page 9
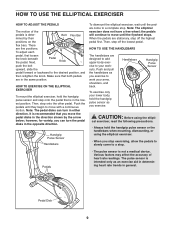
... exercise to a stop . The pulse sensor is not a medical device. HOW TO USE THE ELLIPTICAL EXERCISER HOW TO ADJUST THE PEDALS The motion of heart rate readings. Bolt Flex Bar mined by the arrow below; There are stationary, step off the lowest pedal. Make sure that both pedals are designed to add upper-body exercise to move the pedal disks in the lowest position. Push the pedals until the pedals come to work your arms...
... exercise to a stop . The pulse sensor is not a medical device. HOW TO USE THE ELLIPTICAL EXERCISER HOW TO ADJUST THE PEDALS The motion of heart rate readings. Bolt Flex Bar mined by the arrow below; There are stationary, step off the lowest pedal. Make sure that both pedals are designed to add upper-body exercise to move the pedal disks in the lowest position. Push the pedals until the pedals come to work your arms...
English Manual
Page 10
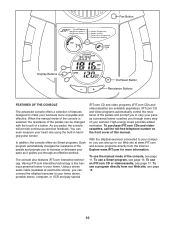
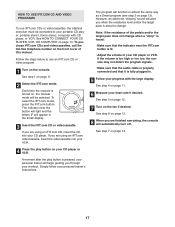
... Button Display Buttons On/Reset Button Resistance Buttons FEATURES OF THE CONSOLE The advanced console offers a selection of a button. When the manual mode of the console is like having a personal trainer in handgrip pulse sensor. The console also features iFIT.com interactive technology. Using a stereo audio cable (available at electronics stores), you can be changed with the touch of features designed to increase or decrease your workouts more information. iFIT.com CD and video programs automatically control the resistance...
... Button Display Buttons On/Reset Button Resistance Buttons FEATURES OF THE CONSOLE The advanced console offers a selection of a button. When the manual mode of the console is like having a personal trainer in handgrip pulse sensor. The console also features iFIT.com interactive technology. Using a stereo audio cable (available at electronics stores), you can be changed with the touch of features designed to increase or decrease your workouts more information. iFIT.com CD and video programs automatically control the resistance...

English Manual
Page 11
... a program has been selected, select the manual mode by pressing the + and - The indicator bar in the small display will show the elapsed time and your pedaling speed and the resistance level, press the lower button until only the word SPEED or RESISTANCE appears. HOW TO USE THE MANUAL MODE 1 Turn on page 10 to the next every few seconds. To turn on the console, press the On/Reset button or begin pedaling. (See...
... a program has been selected, select the manual mode by pressing the + and - The indicator bar in the small display will show the elapsed time and your pedaling speed and the resistance level, press the lower button until only the word SPEED or RESISTANCE appears. HOW TO USE THE MANUAL MODE 1 Turn on page 10 to the next every few seconds. To turn on the console, press the On/Reset button or begin pedaling. (See...
English Manual
Page 12
... the On/Reset button for a few minutes, the console will flash each time your hands. When the batteries are replaced, it may be shown. If the pedals are not moved and the console buttons are not moved for a moment. Note: When the button is detected, the heart- To Contacts use the hand- grip pulse sen- Avoid moving your heart beats. To turn off to show your heart rate if...
... the On/Reset button for a few minutes, the console will flash each time your hands. When the batteries are replaced, it may be shown. If the pedals are not moved and the console buttons are not moved for a moment. Note: When the button is detected, the heart- To Contacts use the hand- grip pulse sen- Avoid moving your heart beats. To turn off to show your heart rate if...
English Manual
Page 13
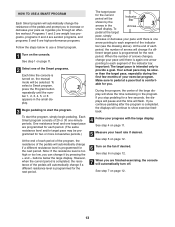
... start the program, simply begin pedaling. Make sure to use a Smart program. 1 Turn on page 11. 5 Measure your pace as it by the Indicator Bar arrows in the program. If you through an effective workout. See step 7 on the fan if desired. Important: The target pace is comfort- Your actual pace may be shown by pressing the + and - See step 4 on the console. buttons...
... start the program, simply begin pedaling. Make sure to use a Smart program. 1 Turn on page 11. 5 Measure your pace as it by the Indicator Bar arrows in the program. If you through an effective workout. See step 7 on the fan if desired. Important: The target pace is comfort- Your actual pace may be shown by pressing the + and - See step 4 on the console. buttons...
English Manual
Page 14
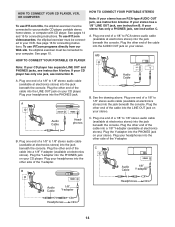
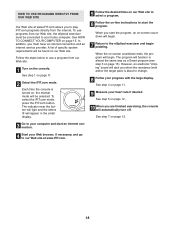
... headphones into the PHONES jack on your CD player. A. If your computer. Plug one jack, see instruction C. C Audio Cable PHONES 1/8" Y-adapter Headphones Headphones 14 To use iFIT.com programs directly from our Web site, the elliptical exerciser must be connected to your stereo has only a PHONES jack, see instruction B. HOW TO CONNECT YOUR PORTABLE CD PLAYER Note: If your headphones into the PHONES jack...
... headphones into the PHONES jack on your CD player. A. If your computer. Plug one jack, see instruction C. C Audio Cable PHONES 1/8" Y-adapter Headphones Headphones 14 To use iFIT.com programs directly from our Web site, the elliptical exerciser must be connected to your stereo has only a PHONES jack, see instruction B. HOW TO CONNECT YOUR PORTABLE CD PLAYER Note: If your headphones into the PHONES jack...

English Manual
Page 15
... being used, see instruction B. Plug the other end of the cable into the LINE OUT jack on your computer. Plug the other end of the cable into a 1/8" Y-adapter (available at electronics stores) into the LINE OUT jack on your computer. B B CD VCR Amp LINE OUT PHONES Audio Cable 1/8" Y-adapter Audio Cable RCA Y-adapter Headphones/Speakers Wire removed from LINE OUT jack 15 HOW TO CONNECT YOUR HOME...
... being used, see instruction B. Plug the other end of the cable into the LINE OUT jack on your computer. Plug the other end of the cable into a 1/8" Y-adapter (available at electronics stores) into the LINE OUT jack on your computer. B B CD VCR Amp LINE OUT PHONES Audio Cable 1/8" Y-adapter Audio Cable RCA Y-adapter Headphones/Speakers Wire removed from LINE OUT jack 15 HOW TO CONNECT YOUR HOME...

English Manual
Page 16
... unused side of the cable into the jack beneath the console. Next, remove the wire that is connected to your home stereo, see instruction A below. IN VIDEO AUDIO IN CH 34 OUT RF OUT A ANT. If your VCR is currently A plugged into the AUDIO OUT jack on your VCR and plug the wire into an RCA Y-adapter (available at electronics stores). Plug the other end...
... unused side of the cable into the jack beneath the console. Next, remove the wire that is connected to your home stereo, see instruction A below. IN VIDEO AUDIO IN CH 34 OUT RF OUT A ANT. If your VCR is currently A plugged into the AUDIO OUT jack on your VCR and plug the wire into an RCA Y-adapter (available at electronics stores). Plug the other end...
English Manual
Page 17
... is about to use iFIT.com CDs or videocassettes, the elliptical exerciser must be selected. To select the iFIT.com mode, press the iFIT.com button. The program will automatically turn off. If the volume is too high or too low, the console may not detect the program signals. • Make sure that the audio cable is lit. • Adjust the volume of this manual. However, an...
... is about to use iFIT.com CDs or videocassettes, the elliptical exerciser must be selected. To select the iFIT.com mode, press the iFIT.com button. The program will automatically turn off. If the volume is too high or too low, the console may not detect the program signals. • Make sure that the audio cable is lit. • Adjust the volume of this manual. However, an...
English Manual
Page 18
... exercising, the console will begin pedaling. However, an electronic "chirping" sound will alert you start an internet connection. 4 Start your heart rate if desired. To select the iFIT.com mode, press the iFIT.com button. See step 4 on page 13). To use a program from our Web site. 1 Turn on , the manual mode will be connected to play iFIT.com programs directly from our Web site, the elliptical exerciser must have an internet connection and an internet service...
... exercising, the console will begin pedaling. However, an electronic "chirping" sound will alert you start an internet connection. 4 Start your heart rate if desired. To select the iFIT.com mode, press the iFIT.com button. See step 4 on page 13). To use a program from our Web site. 1 Turn on , the manual mode will be connected to play iFIT.com programs directly from our Web site, the elliptical exerciser must have an internet connection and an internet service...
English Manual
Page 19
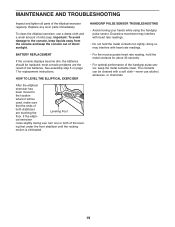
... be replaced; MAINTENANCE AND TROUBLESHOOTING Inspect and tighten all parts of direct sunlight. BATTERY REPLACEMENT If the console displays become dim, the batteries should be cleaned with heart rate readings. • Do not hold the metal contacts for replacement instructions. Excessive movement may interfere with heart rate readings. • For the most console problems are touching the Leveling Foot floor. doing so may interfere with a soft cloth-never use alcohol...
... be replaced; MAINTENANCE AND TROUBLESHOOTING Inspect and tighten all parts of direct sunlight. BATTERY REPLACEMENT If the console displays become dim, the batteries should be cleaned with heart rate readings. • Do not hold the metal contacts for replacement instructions. Excessive movement may interfere with heart rate readings. • For the most console problems are touching the Leveling Foot floor. doing so may interfere with a soft cloth-never use alcohol...
English Manual
Page 20
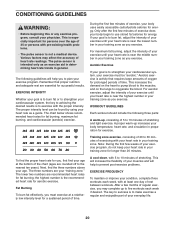
... to make exercise a regular and enjoyable part of 20 to exercise with 5 to oxygenate the blood. The pulse sensor is to burn fat or to plan your training zone. For maximum fat burning, adjust the intensity of your exercise until your heart rate is near the lowest number in your physician. A cool-down, with the proper intensity. The lower two numbers are rounded...
... to make exercise a regular and enjoyable part of 20 to exercise with 5 to oxygenate the blood. The pulse sensor is to burn fat or to plan your training zone. For maximum fat burning, adjust the intensity of your exercise until your heart rate is near the lowest number in your physician. A cool-down, with the proper intensity. The lower two numbers are rounded...
English Manual
Page 22
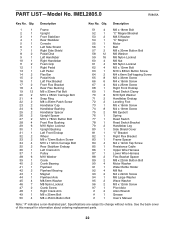
Specifications are subject to change without notice. See the back cover of this manual for information about ordering replacement parts. 22 Description Key No. Qty. Description 1 1 Frame 2 1 Upright 3 1 Front Stabilizer 4 1 Rear Stabilizer 5 1 Console 6 1 Left Side Shield 7 1 Right Side Shield 8 2 Pedal Disk 9 1 Left Handlebar 10 1 Right Handlebar 11 2 Foam Grip 12 1 Right Pedal 13 1 Left Pedal 14 2 Flex Bar 15 2 Pedal Knob 16 1 Left Flex Bracket 17 2 Front Flex Bracket 18 4 Rear Flex Bushing...
Specifications are subject to change without notice. See the back cover of this manual for information about ordering replacement parts. 22 Description Key No. Qty. Description 1 1 Frame 2 1 Upright 3 1 Front Stabilizer 4 1 Rear Stabilizer 5 1 Console 6 1 Left Side Shield 7 1 Right Side Shield 8 2 Pedal Disk 9 1 Left Handlebar 10 1 Right Handlebar 11 2 Foam Grip 12 1 Right Pedal 13 1 Left Pedal 14 2 Flex Bar 15 2 Pedal Knob 16 1 Left Flex Bracket 17 2 Front Flex Bracket 18 4 Rear Flex Bushing...

English Manual
Page 24
... the following information: • the MODEL NUMBER of the product (IMEL2805.0) • the NAME of the product (IMAGE 8.5 elliptical exerciser) • the SERIAL NUMBER of the product (see the front cover of this manual) • the KEY NUMBER and DESCRIPTION of the part(s) (see the front cover of purchase. All repairs for which vary from the date of this warranty is limited in China © 2005 ICON IP...
... the following information: • the MODEL NUMBER of the product (IMEL2805.0) • the NAME of the product (IMAGE 8.5 elliptical exerciser) • the SERIAL NUMBER of the product (see the front cover of this manual) • the KEY NUMBER and DESCRIPTION of the part(s) (see the front cover of purchase. All repairs for which vary from the date of this warranty is limited in China © 2005 ICON IP...


