

User Manual
Page 1
..., fitness tips, and much more ! ictrack.com Keep this manual before using thiswewquwip.mnoenrtd. As a manufacturer, we are damaged or missing, PLEASE CONTACT OUR CUSTOMER SERVICE DEPARTMENVT isit our website at www.weslo.com new products, prizes, fitness tips, and much more ! Visit our website at instructions in this manual for future reference. Model No. Mon.-Fri., 6 a.m.-6 p.m. USER'S MANUAL Serial Number Decal...
..., fitness tips, and much more ! ictrack.com Keep this manual before using thiswewquwip.mnoenrtd. As a manufacturer, we are damaged or missing, PLEASE CONTACT OUR CUSTOMER SERVICE DEPARTMENVT isit our website at www.weslo.com new products, prizes, fitness tips, and much more ! Visit our website at instructions in this manual for future reference. Model No. Mon.-Fri., 6 a.m.-6 p.m. USER'S MANUAL Serial Number Decal...

User Manual
Page 2
TABLE OF CONTENTS IMPORTANT PRECAUTIONS 3 BEFORE YOU BEGIN 4 ASSEMBLY 5 HOW TO USE THE ELLIPTICAL EXERCISER 9 MAINTENANCE AND TROUBLESHOOTING 14 CONDITIONING GUIDELINES 15 PART LIST 18 EXPLODED DRAWING 19 HOW TO ORDER REPLACEMENT PARTS Back Cover LIMITED WARRANTY Back Cover IMAGE is a registered trademark of ICON IP, Inc. 2
TABLE OF CONTENTS IMPORTANT PRECAUTIONS 3 BEFORE YOU BEGIN 4 ASSEMBLY 5 HOW TO USE THE ELLIPTICAL EXERCISER 9 MAINTENANCE AND TROUBLESHOOTING 14 CONDITIONING GUIDELINES 15 PART LIST 18 EXPLODED DRAWING 19 HOW TO ORDER REPLACEMENT PARTS Back Cover LIMITED WARRANTY Back Cover IMAGE is a registered trademark of ICON IP, Inc. 2

User Manual
Page 3
... health problems. Read all instructions before using. Inspect and properly tighten all precautions. 7. Keep children under 12 and pets away from moisture and dust. The pulse sensor is not a medical device. Make sure that all users of the elliptical exerciser are adequately informed of this or any worn parts immediately. 6. Replace any exercise program, consult your physician. do not arch your back straight when using the elliptical exerciser...
... health problems. Read all instructions before using. Inspect and properly tighten all precautions. 7. Keep children under 12 and pets away from moisture and dust. The pulse sensor is not a medical device. Make sure that all users of the elliptical exerciser are adequately informed of this or any worn parts immediately. 6. Replace any exercise program, consult your physician. do not arch your back straight when using the elliptical exerciser...

User Manual
Page 4
... for any service needed under warranty, you , please note the product model number and serial number before you have additional questions, see the front cover of this manual. The IMAGE 8.0 is IMEL2105.1. The serial number can be found on the front cover of natural, elliptical-motion exercise. Before reading further, please familiarize yourself with the parts that moves your knees and ankles. Book Holder Console Handgrip Pulse Sensor Water Bottle...
... for any service needed under warranty, you , please note the product model number and serial number before you have additional questions, see the front cover of this manual. The IMAGE 8.0 is IMEL2105.1. The serial number can be found on the front cover of natural, elliptical-motion exercise. Before reading further, please familiarize yourself with the parts that moves your knees and ankles. Book Holder Console Handgrip Pulse Sensor Water Bottle...

User Manual
Page 5
...)-4 Bolt Set (27)-2 M10 x 58mm Button Screw (19)-4 M10 x 105mm Carriage Bolt (34)-2 5 Do not dispose of the packing materials until assembly is the quantity needed for assembly. ASSEMBLY To hire an authorized service technician to identify the small parts needed for assembly. The number in a cleared area and remove the packing materials. Note: Some small parts may have been pre-assembled. If a part is the key number of the elliptical exerciser...
...)-4 Bolt Set (27)-2 M10 x 58mm Button Screw (19)-4 M10 x 105mm Carriage Bolt (34)-2 5 Do not dispose of the packing materials until assembly is the quantity needed for assembly. ASSEMBLY To hire an authorized service technician to identify the small parts needed for assembly. The number in a cleared area and remove the packing materials. Note: Some small parts may have been pre-assembled. If a part is the key number of the elliptical exerciser...
User Manual
Page 6
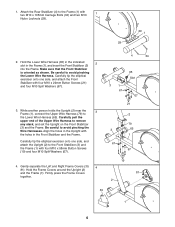
... (1), connect the Upper Wire Harness (79) to avoid pinching the Lower Wire Harness. Firmly press the Frame Covers together. 4 34 65 Slot 3 1 67 67 21 2 79 3 65 1 67 67 19 81 2 30 1 6 Hold the Lower Wire Harness (65) in the indicated 2 slot in the Front Stabilizer and the Frame. Carefully tip the elliptical exerciser onto one side, and attach the Upright (2) to...
... (1), connect the Upper Wire Harness (79) to avoid pinching the Lower Wire Harness. Firmly press the Frame Covers together. 4 34 65 Slot 3 1 67 67 21 2 79 3 65 1 67 67 19 81 2 30 1 6 Hold the Lower Wire Harness (65) in the indicated 2 slot in the Front Stabilizer and the Frame. Carefully tip the elliptical exerciser onto one side, and attach the Upright (2) to...

User Manual
Page 7
... the Console. 7 5 Batteries Battery Cover 7 Next, insert four batteries into the Console; While another person holds the Console (5) near the Console Bracket (26), connect the wires on the battery cover and remove the battery cover. Look under the Console (5) and locate the battery cover. (Note: For clarity, the drawing shows the Console removed from the elliptical exerciser.) Press the tab on the Console to the Upright (2) with an M5 x 15mm Screw (89) as shown. Then, reattach the battery cover...
... the Console. 7 5 Batteries Battery Cover 7 Next, insert four batteries into the Console; While another person holds the Console (5) near the Console Bracket (26), connect the wires on the battery cover and remove the battery cover. Look under the Console (5) and locate the battery cover. (Note: For clarity, the drawing shows the Console removed from the elliptical exerciser.) Press the tab on the Console to the Upright (2) with an M5 x 15mm Screw (89) as shown. Then, reattach the battery cover...
User Manual
Page 8
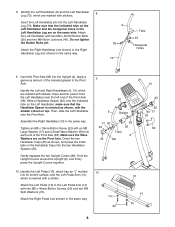
...included grease to the Left Pedal Arm (14) with two M8 x 46mm Button Screws (20) and two M8 Split Washers (74). Assemble the Right Handlebar (10) in the same way. 9 50 73 Tube 46 Hexagonal Holes 9. Gently separate the two Upright Covers ...Tighten an M8 x 19mm Button Screw (22) with a sticker. Attach the Right Pedal (not shown) in the Left Handlebar Leg are marked with stickers. make sure that the indicated tube on top. Make sure the Wave Washers are marked with stickers. Hold the Upright Covers around the Upright (2), and firmly press the Upright Covers together. 9 82 9 Grease...
...included grease to the Left Pedal Arm (14) with two M8 x 46mm Button Screws (20) and two M8 Split Washers (74). Assemble the Right Handlebar (10) in the same way. 9 50 73 Tube 46 Hexagonal Holes 9. Gently separate the two Upright Covers ...Tighten an M8 x 19mm Button Screw (22) with a sticker. Attach the Right Pedal (not shown) in the Left Handlebar Leg are marked with stickers. make sure that the indicated tube on top. Make sure the Wave Washers are marked with stickers. Hold the Upright Covers around the Upright (2), and firmly press the Upright Covers together. 9 82 9 Grease...

User Manual
Page 9
... the elliptical exerciser are properly tightened. Next, tighten an M8 x 19mm Button Screw (22) with the Bolt Set (27). Make sure that is recommended that all parts of a Bolt Set (27) and to move until they begin to the axle on the Left Crank Arm (36). HOW TO USE THE ELLIPTICAL EXERCISER HOW TO EXERCISE ON THE ELLIPTICAL EXERCISER To mount the elliptical exerciser, firmly hold the handlebars and carefully step onto the pedal...
... the elliptical exerciser are properly tightened. Next, tighten an M8 x 19mm Button Screw (22) with the Bolt Set (27). Make sure that is recommended that all parts of a Bolt Set (27) and to move until they begin to the axle on the Left Crank Arm (36). HOW TO USE THE ELLIPTICAL EXERCISER HOW TO EXERCISE ON THE ELLIPTICAL EXERCISER To mount the elliptical exerciser, firmly hold the handlebars and carefully step onto the pedal...

User Manual
Page 10
You can be adjusted with the touch of a button. If there is selected, the resistance of the pedals can even measure your heart rate using the built-in handgrip pulse sensor. To use the manual mode of the console, follow the steps beginning on page 11. To track your workouts more effective. To use the MyTracks™ StepCounter program, see page 13. 10 In addition, the console offers a MyTracks™...
You can be adjusted with the touch of a button. If there is selected, the resistance of the pedals can even measure your heart rate using the built-in handgrip pulse sensor. To use the manual mode of the console, follow the steps beginning on page 11. To track your workouts more effective. To use the MyTracks™ StepCounter program, see page 13. 10 In addition, the console offers a MyTracks™...

User Manual
Page 11
... con- When you pedal, adjust the resistance of the elapsed time. Note: After the buttons are ten resistance levels. Note: When a resistance program is selected, the display will also show which unit of miles or kilometers pedaled. To reset the display, press the On/Reset button. tacts on , the manual mode will be selected. Avoid moving your heart rate will be shown. 11 To use the handgrip pulse sensor. There are pressed, it will...
... con- When you pedal, adjust the resistance of the elapsed time. Note: After the buttons are ten resistance levels. Note: When a resistance program is selected, the display will also show which unit of miles or kilometers pedaled. To reset the display, press the On/Reset button. tacts on , the manual mode will be selected. Avoid moving your heart rate will be shown. 11 To use the handgrip pulse sensor. There are pressed, it will...

User Manual
Page 12
... pedaling. The diagrams numbered 1 through 4 on page 11. 6 When you stop pedaling for a few seconds, the console will pause and the time will automatically turn off to conserve the batteries. 3 Begin pedaling to start the program, simply begin to show how the resistance level will then display your heart rate along with your pedaling pace and your progress with the display. If the pedals are not moved and the console buttons...
... pedaling. The diagrams numbered 1 through 4 on page 11. 6 When you stop pedaling for a few seconds, the console will pause and the time will automatically turn off to conserve the batteries. 3 Begin pedaling to start the program, simply begin to show how the resistance level will then display your heart rate along with your pedaling pace and your progress with the display. If the pedals are not moved and the console buttons...

User Manual
Page 13
... a button is started. The display will change the goal, press the Steps Target increase and decrease buttons. To change by 500 steps every few 3 Begin pedaling to show your workout. Note: The goal can be changed either before or after the program is comfortable for you exercise, adjust the resistance of the elliptical exerciser as desired by pressing the Resistance increase or decrease buttons. however, the display will not show the number of steps...
... a button is started. The display will change the goal, press the Steps Target increase and decrease buttons. To change by 500 steps every few 3 Begin pedaling to show your workout. Note: The goal can be changed either before or after the program is comfortable for you exercise, adjust the resistance of the elliptical exerciser as desired by pressing the Resistance increase or decrease buttons. however, the display will not show the number of steps...
User Manual
Page 14
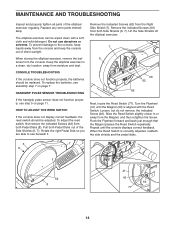
..., the batteries should be wiped clean with the Reed Switch. Remove the indicated Screws (66) from the Right Side Shield (7). MAINTENANCE AND TROUBLESHOOTING Inspect and properly tighten all parts of the Side Shields (6, 7). To replace the batteries, see assembly step 7 on page 11. Pull both Side Shields (6, 7). Replace any worn parts immediately. Keep the elliptical exerciser in a clean, dry location, away from moisture and dust. The elliptical exerciser can be adjusted.
..., the batteries should be wiped clean with the Reed Switch. Remove the indicated Screws (66) from the Right Side Shield (7). MAINTENANCE AND TROUBLESHOOTING Inspect and properly tighten all parts of the Side Shields (6, 7). To replace the batteries, see assembly step 7 on page 11. Pull both Side Shields (6, 7). Replace any worn parts immediately. Keep the elliptical exerciser in a clean, dry location, away from moisture and dust. The elliptical exerciser can be adjusted.
User Manual
Page 15
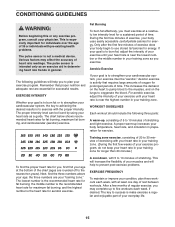
... regular exercise, you to plan your body uses easily accessible carbohydrate calories for prolonged periods of time. For aerobic exercise, adjust the intensity of 35 or individuals with pre-existing health problems. The pulse sensor is near the lowest number or the middle number in your training zone as a guide. Training zone exercise, consisting of 20 to 30 minutes of exercising with your heart rate in your training zone...
... regular exercise, you to plan your body uses easily accessible carbohydrate calories for prolonged periods of time. For aerobic exercise, adjust the intensity of 35 or individuals with pre-existing health problems. The pulse sensor is near the lowest number or the middle number in your training zone as a guide. Training zone exercise, consisting of 20 to 30 minutes of exercising with your heart rate in your training zone...
User Manual
Page 16
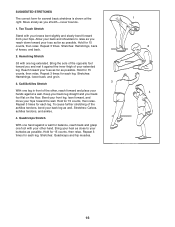
... STRETCHES The correct form for 15 counts, then relax. Hold for several basic stretches is shown at the right. Bring the sole of the opposite foot toward your toes as far as possible. Stretches: Hamstrings, lower back, and groin. 3 3. Hold for each leg. Repeat 3 times... for 15 counts, then relax. To cause further stretching of your heel as close to relax as possible. Bring your extended leg. Stretches: Calves, achilles tendons, and ankles. 4. Move slowly as you reach...
... STRETCHES The correct form for 15 counts, then relax. Hold for several basic stretches is shown at the right. Bring the sole of the opposite foot toward your toes as far as possible. Stretches: Hamstrings, lower back, and groin. 3 3. Hold for each leg. Repeat 3 times... for 15 counts, then relax. To cause further stretching of your heel as close to relax as possible. Bring your extended leg. Stretches: Calves, achilles tendons, and ankles. 4. Move slowly as you reach...

User Manual
Page 18
... Washer Lower Wire Harness M4 x 16mm Screw M10 Split Washer Pulley Spacer Reed Switch Clamp Motor Washer Handgrip Pulse Sensor/Wire Right Handlebar Leg Left Handlebar Leg M8 Split Washer M6 Eyebolt Spring Reed Switch Reed Switch Bracket Upper Wire Harness Pulse Wire Harness Right Frame Cover Upright Cap M5 x 12mm Bolt Small Pulley Spacer Wave Washer M4 x 16mm Screw "T"-bar Endcap Handlebar Endcap M5 x 15mm Screw Small Wave Washer Allen Wrench, Set Grease User's Manual Note: "#" indicates a non-illustrated part.
... Washer Lower Wire Harness M4 x 16mm Screw M10 Split Washer Pulley Spacer Reed Switch Clamp Motor Washer Handgrip Pulse Sensor/Wire Right Handlebar Leg Left Handlebar Leg M8 Split Washer M6 Eyebolt Spring Reed Switch Reed Switch Bracket Upper Wire Harness Pulse Wire Harness Right Frame Cover Upright Cap M5 x 12mm Bolt Small Pulley Spacer Wave Washer M4 x 16mm Screw "T"-bar Endcap Handlebar Endcap M5 x 15mm Screw Small Wave Washer Allen Wrench, Set Grease User's Manual Note: "#" indicates a non-illustrated part.

User Manual
Page 19
... 15 58 29 62 35 62 17 22 85 18 35 4 34 6 62 62 66 62 7 62 66 62 66 66 8 66 19 EXPLODED DRAWING-Model No.
... 15 58 29 62 35 62 17 22 85 18 35 4 34 6 62 62 66 62 7 62 66 62 66 66 8 66 19 EXPLODED DRAWING-Model No.

User Manual
Page 20
... be prepared to give the following information when calling: • the MODEL NUMBER of the product (IMEL2105.1) • the NAME of the product (IMAGE 8.0 elliptical exerciser) • the SERIAL NUMBER of the product (see the front cover of this manual) • the KEY NUMBER and DESCRIPTION of the part(s) (see the front cover of this warranty is limited in its authorized service centers. You may not apply...
... be prepared to give the following information when calling: • the MODEL NUMBER of the product (IMEL2105.1) • the NAME of the product (IMAGE 8.0 elliptical exerciser) • the SERIAL NUMBER of the product (see the front cover of this manual) • the KEY NUMBER and DESCRIPTION of the part(s) (see the front cover of this warranty is limited in its authorized service centers. You may not apply...


