
Installation Guide
Page 1
...your server at http://www.ibm.com/systems/support/ Yes Use ServerGuide to the Server Support flow chart on the reverse side of this page. Go to http://www.ibm.com/support/mysupport/ to set up and configuring your server. System x3500 Type 7977 Installation Guide Welcome. Go to... No install the operating system? server setup completed? For detailed information about your server, view ...
...your server at http://www.ibm.com/systems/support/ Yes Use ServerGuide to the Server Support flow chart on the reverse side of this page. Go to http://www.ibm.com/support/mysupport/ to set up and configuring your server. System x3500 Type 7977 Installation Guide Welcome. Go to... No install the operating system? server setup completed? For detailed information about your server, view ...

Installation Guide
Page 2
... are on the ServerProven list at http://www.ibm.com/planetwide/. View information about IBM Support Line at http://www.ibm.com/services/sl/products/ or view support telephone numbers at http://www.ibm.com/servers/eserver/ serverproven/compat/us/. You can download firmware from http://www.ibm.com/systems/ support/. Yes Is the problem No solved? Hardware Hardware...
... are on the ServerProven list at http://www.ibm.com/planetwide/. View information about IBM Support Line at http://www.ibm.com/services/sl/products/ or view support telephone numbers at http://www.ibm.com/servers/eserver/ serverproven/compat/us/. You can download firmware from http://www.ibm.com/systems/ support/. Yes Is the problem No solved? Hardware Hardware...
Installation Guide
Page 4
Note: Before using this information and the product it supports, read the general information in Appendix B, "Notices," on page 97 and the Warranty and Support Information document on the IBM Documentation CD. Sixth Edition (October 2008) © Copyright International Business Machines Corporation 2008. Use, duplication or disclosure restricted by GSA ADP Schedule Contract with IBM Corp. US Government Users Restricted Rights -
Note: Before using this information and the product it supports, read the general information in Appendix B, "Notices," on page 97 and the Warranty and Support Information document on the IBM Documentation CD. Sixth Edition (October 2008) © Copyright International Business Machines Corporation 2008. Use, duplication or disclosure restricted by GSA ADP Schedule Contract with IBM Corp. US Government Users Restricted Rights -
Installation Guide
Page 6
...95 Using the documentation 95 Getting help and information from the World Wide Web 95 Software service and support 96 Hardware service and support 96 IBM Taiwan product service 96 Appendix B. Solving problems 63 Diagnostic tools overview 63 POST beep code descriptions ...statement 103 Chinese Class A warning statement 103 Japanese Voluntary Control Council for Interference (VCCI) statement 103 Index 105 iv IBM System x3500 Type 7977: Installation Guide Using ServeRAID Manager 59 Using the Boot Menu program 61 Enabling the Broadcom Gigabit Ethernet Utility program 61 ...
...95 Using the documentation 95 Getting help and information from the World Wide Web 95 Software service and support 96 Hardware service and support 96 IBM Taiwan product service 96 Appendix B. Solving problems 63 Diagnostic tools overview 63 POST beep code descriptions ...statement 103 Chinese Class A warning statement 103 Japanese Voluntary Control Council for Interference (VCCI) statement 103 Index 105 iv IBM System x3500 Type 7977: Installation Guide Using ServeRAID Manager 59 Using the Boot Menu program 61 Enabling the Broadcom Gigabit Ethernet Utility program 61 ...

Installation Guide
Page 15
...IBM System x3500 7977 The model number and serial number are not described in the server documentation. The server comes with IBM. The server comes with the server, and the documentation might vary slightly from the IBM Web site. The server might be updated occasionally to the IBM Web site. Under Product support, click System... this information when you register the server with an IBM ServerGuide™ Setup and Installation CD to help you can obtain up your IBM® System x3500 Type 7977 server and basic instructions for locating firmware and documentation ...
...IBM System x3500 7977 The model number and serial number are not described in the server documentation. The server comes with IBM. The server comes with the server, and the documentation might vary slightly from the IBM Web site. The server might be updated occasionally to the IBM Web site. Under Product support, click System... this information when you register the server with an IBM ServerGuide™ Setup and Installation CD to help you can obtain up your IBM® System x3500 Type 7977 server and basic instructions for locating firmware and documentation ...

Installation Guide
Page 16
... requirements The IBM System x Documentation CD requires the following minimum hardware and software: v Microsoft® Windows NT® XP, Windows® 2000, or Red Hat Linux v 100 MHz microprocessor v 32 MB of the manufacturer are on a tag that is attached to -Rack Kit. For a list of supported optional devices ... The key serial number and the telephone number of RAM v Adobe Acrobat Reader 3.0 (or later) or xpdf, which comes with Linux operating systems. 2 IBM System x3500 Type 7977: Installation Guide If you plan to install the server in Portable Document Format (PDF) and includes the...
... requirements The IBM System x Documentation CD requires the following minimum hardware and software: v Microsoft® Windows NT® XP, Windows® 2000, or Red Hat Linux v 100 MHz microprocessor v 32 MB of the manufacturer are on a tag that is attached to -Rack Kit. For a list of supported optional devices ... The key serial number and the telephone number of RAM v Adobe Acrobat Reader 3.0 (or later) or xpdf, which comes with Linux operating systems. 2 IBM System x3500 Type 7977: Installation Guide If you plan to install the server in Portable Document Format (PDF) and includes the...
Installation Guide
Page 19
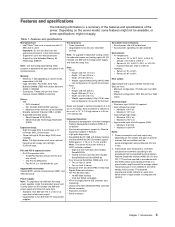
...power-supply and three hot-swap fans. One PCI 33 MHz/32-bit - Two PCI-X 2.0 133 MHz/64-bit slots Upgradeable microcode: System BIOS, service microprocessor, BMC, and SAS microcode Power supply: Note: To upgrade to 2134 m (7000 ft) - Kit includes one 835... in a given location might not apply. Integrated functions: v Baseboard management controller (Intelligent Platform Management Interface (IPMI) 2.0 compliant) v Service microprocessor support for Remote Supervisor Adapter II SlimLine v Light path diagnostics v ServeRAID-8k (512 MB with ISO 9296. Two on front of 4.45 cm (1.75...
...power-supply and three hot-swap fans. One PCI 33 MHz/32-bit - Two PCI-X 2.0 133 MHz/64-bit slots Upgradeable microcode: System BIOS, service microprocessor, BMC, and SAS microcode Power supply: Note: To upgrade to 2134 m (7000 ft) - Kit includes one 835... in a given location might not apply. Integrated functions: v Baseboard management controller (Intelligent Platform Management Interface (IPMI) 2.0 compliant) v Service microprocessor support for Remote Supervisor Adapter II SlimLine v Light path diagnostics v ServeRAID-8k (512 MB with ISO 9296. Two on front of 4.45 cm (1.75...

Installation Guide
Page 20
... assembly DVD drive Heat-sink filler SAS backplane Fan assembly Hot-swap fan Processor baffle System board Hard disk drive EMC shield ServeRAID-8k VRM Cover Hard disk drive Bezel 6 IBM System x3500 Type 7977: Installation Guide The following illustration shows the major components in the server, open or close... orange label on or near a component indicates that the component can be hot-swapped, which means that if the server and operating system support hot-swap capability, you can remove or install the component while the server is running. (Orange can grip the component to remove ...
... assembly DVD drive Heat-sink filler SAS backplane Fan assembly Hot-swap fan Processor baffle System board Hard disk drive EMC shield ServeRAID-8k VRM Cover Hard disk drive Bezel 6 IBM System x3500 Type 7977: Installation Guide The following illustration shows the major components in the server, open or close... orange label on or near a component indicates that the component can be hot-swapped, which means that if the server and operating system support hot-swap capability, you can remove or install the component while the server is running. (Orange can grip the component to remove ...
Installation Guide
Page 21
...too heavy for diagnostic information. v Observe good housekeeping in "Handling static-sensitive devices" on the IBM System x Documentation CD. v Do not attempt to http://www.ibm.com/systems/support/. 2. Never move suddenly or twist when you can stand safely without slipping. - v When you... are experienced with your new server, take the opportunity to disk drives. © Copyright IBM Corp. 2008 7 Under Product support, click System x. 3. Start the server, and make sure that you work safely. This information will help you think is working...
...too heavy for diagnostic information. v Observe good housekeeping in "Handling static-sensitive devices" on the IBM System x Documentation CD. v Do not attempt to http://www.ibm.com/systems/support/. 2. Never move suddenly or twist when you can stand safely without slipping. - v When you... are experienced with your new server, take the opportunity to disk drives. © Copyright IBM Corp. 2008 7 Under Product support, click System x. 3. Start the server, and make sure that you work safely. This information will help you think is working...

Installation Guide
Page 22
... contains either a microprocessor baffle or a microprocessor and heat sink. v Remove jewelry, such as bracelets, necklaces, rings, and loose-fitting wrist watches. 8 IBM System x3500 Type 7977: Installation Guide Do not place objects in front of two IDE devices in .) of open or close a latch, and so on the server. v You...running . v If the server has redundant power, each of the server. Working inside the server with the power on The server supports hot-swap devices and is designed to hang inside a server that come with the left -side cover before you work inside the server...
... contains either a microprocessor baffle or a microprocessor and heat sink. v Remove jewelry, such as bracelets, necklaces, rings, and loose-fitting wrist watches. 8 IBM System x3500 Type 7977: Installation Guide Do not place objects in front of two IDE devices in .) of open or close a latch, and so on the server. v You...running . v If the server has redundant power, each of the server. Working inside the server with the power on The server supports hot-swap devices and is designed to hang inside a server that come with the left -side cover before you work inside the server...

Installation Guide
Page 25
...is operating in "Handling static-sensitive devices" on page 9. 2. Read the safety information that you must consider when you install DIMMs: v The server supports 667 MHz, 1.8 V, 240-pin, PC2-5300 double-data-rate (DDR) II, fully buffered synchronous dynamic random-access memory (SDRAM) with error correcting...mirroring mode. You can mix compatible DIMMs from the server. Installing optional devices 11 v The second pair does not have to http://www.ibm.com/servers/ eserver/serverproven/compat/us/. Cover release latch Lock Left-side cover To remove the server left -side cover. 3. Pull ...
...is operating in "Handling static-sensitive devices" on page 9. 2. Read the safety information that you must consider when you install DIMMs: v The server supports 667 MHz, 1.8 V, 240-pin, PC2-5300 double-data-rate (DDR) II, fully buffered synchronous dynamic random-access memory (SDRAM) with error correcting...mirroring mode. You can mix compatible DIMMs from the server. Installing optional devices 11 v The second pair does not have to http://www.ibm.com/servers/ eserver/serverproven/compat/us/. Cover release latch Lock Left-side cover To remove the server left -side cover. 3. Pull ...

Installation Guide
Page 26
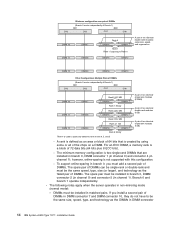
...below each other within the channels of DIMMs DIMM connectors 4 1, 4, 7, 10 8 1, 4, 7, 10, 2, 5, 8, 11 12 1, 4, 7, 10, 2, 5, 8, 11, 3, 6, 9, 12 12 IBM System x3500 Type 7977: Installation Guide When you must enable memory mirroring through the Configuration/Setup Utility program (for example, DIMM connector 1 and DIMM connector 4) within two branches simultaneously...the Configuration/Setup Utility program, select Devices and I/O Ports → Advanced Chipset Control → Memory Branch Mode. v The server supports memory mirroring (mirroring mode) and online-spare memory. -
...below each other within the channels of DIMMs DIMM connectors 4 1, 4, 7, 10 8 1, 4, 7, 10, 2, 5, 8, 11 12 1, 4, 7, 10, 2, 5, 8, 11, 3, 6, 9, 12 12 IBM System x3500 Type 7977: Installation Guide When you must enable memory mirroring through the Configuration/Setup Utility program (for example, DIMM connector 1 and DIMM connector 4) within two branches simultaneously...the Configuration/Setup Utility program, select Devices and I/O Ports → Advanced Chipset Control → Memory Branch Mode. v The server supports memory mirroring (mirroring mode) and online-spare memory. -
Installation Guide
Page 28
... DIMM 9 Rank 3 512 MB Rank 4 1 GB DIMM 6 DIMM 3 Rank 5 Empty A pair of two identical single rank modules (1GB) Rank 4 is not supported with this configuration. - Branch 0 and branch 1 operate independently. DIMMs must be the same size, speed, type, and technology as an area or block of 64...connector 10, they do not have to be installed in branch 0, DIMM connector 2 (in channel 0) and connector 5 (in DIMM connector 14 IBM System x3500 Type 7977: Installation Guide If you must add a second pair of DIMMs. The spare pair of DIMMs can be single-rank or double-rank and must be...
... DIMM 9 Rank 3 512 MB Rank 4 1 GB DIMM 6 DIMM 3 Rank 5 Empty A pair of two identical single rank modules (1GB) Rank 4 is not supported with this configuration. - Branch 0 and branch 1 operate independently. DIMMs must be the same size, speed, type, and technology as an area or block of 64...connector 10, they do not have to be installed in branch 0, DIMM connector 2 (in channel 0) and connector 5 (in DIMM connector 14 IBM System x3500 Type 7977: Installation Guide If you must add a second pair of DIMMs. The spare pair of DIMMs can be single-rank or double-rank and must be...

Installation Guide
Page 31
... the clips gently. 6. Statement 17: CAUTION: The following label indicates moving parts nearby. 4. Lift the power-supply cage handle on the rear power-supply structure support bracket. Power-supply cage assembly Power-supply cage handle 5. Remove the power supply and power-supply filler from the server by pressing down on the...
... the clips gently. 6. Statement 17: CAUTION: The following label indicates moving parts nearby. 4. Lift the power-supply cage handle on the rear power-supply structure support bracket. Power-supply cage assembly Power-supply cage handle 5. Remove the power supply and power-supply filler from the server by pressing down on the...

Installation Guide
Page 32
... the package. Otherwise, go to "Completing the installation" on each end of the DIMM connector. Open the retaining clip on page 30. 18 IBM System x3500 Type 7977: Installation Guide For clarity, the power-supply cage is not shown in the power-supply cage. Touch the static-protective package that the DIMM keys... structure into the connector. Insert the DIMM into position. If you have other devices to any unpainted metal surface on the rear power-supply support bracket; d. Raise the power-supply cage slightly and press and hold the release tab on the server. c. Power supply...
... the package. Otherwise, go to "Completing the installation" on each end of the DIMM connector. Open the retaining clip on page 30. 18 IBM System x3500 Type 7977: Installation Guide For clarity, the power-supply cage is not shown in the power-supply cage. Touch the static-protective package that the DIMM keys... structure into the connector. Insert the DIMM into position. If you have other devices to any unpainted metal surface on the rear power-supply support bracket; d. Raise the power-supply cage slightly and press and hold the release tab on the server. c. Power supply...

Installation Guide
Page 34
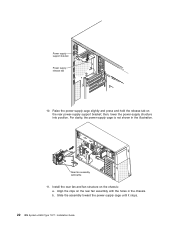
Power-supply cage assembly Power-supply cage handle 7. Install the transition duct on the release latch while you pull out. Remove the power supply and power supply filler from the server by pressing down on the edge of the way until it latches in place. Let the power-supply cage rest on the rear of the power-supply cage, and rotate the power-supply cage out of the DIMM air baffle. 20 IBM System x3500 Type 7977: Installation Guide Power supply Release latch 6. Lift the power-supply cage handle on the rear power-supply structure support bracket. 8.
Power-supply cage assembly Power-supply cage handle 7. Install the transition duct on the release latch while you pull out. Remove the power supply and power supply filler from the server by pressing down on the edge of the way until it latches in place. Let the power-supply cage rest on the rear of the power-supply cage, and rotate the power-supply cage out of the DIMM air baffle. 20 IBM System x3500 Type 7977: Installation Guide Power supply Release latch 6. Lift the power-supply cage handle on the rear power-supply structure support bracket. 8.
Installation Guide
Page 36
Power supply support bracket Power supply release tab 10. then, lower the power-supply structure into position. Slide the assembly toward the power-supply cage until it stops. 22 IBM System x3500 Type 7977: Installation Guide b. For clarity, the power-supply cage is not shown in the chassis. Rear fan assembly with the holes in the illustration. Align the clips on the chassis: a. Install the rear fan and fan structure on the rear fan assembly with baffle 11. Raise the power-supply cage slightly and press and hold the release tab on the rear power-supply support bracket;
Power supply support bracket Power supply release tab 10. then, lower the power-supply structure into position. Slide the assembly toward the power-supply cage until it stops. 22 IBM System x3500 Type 7977: Installation Guide b. For clarity, the power-supply cage is not shown in the chassis. Rear fan assembly with the holes in the illustration. Align the clips on the chassis: a. Install the rear fan and fan structure on the rear fan assembly with baffle 11. Raise the power-supply cage slightly and press and hold the release tab on the rear power-supply support bracket;
Installation Guide
Page 37
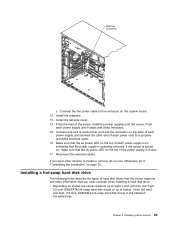
... power supply is operating correctly. Installing a hot-swap hard disk drive The following notes describe the types of hard disk drives that the server supports and other information that you have other end of the server, install the power supplies into place. 15. Connect the fan power cable to... Make sure that the dc power LED on the top of each power supply, and connect the other devices to "Completing the installation" on the system board. 12. Connect one end of each power cord into the connector on the back of each power cord to a properly grounded electrical outlet....
... power supply is operating correctly. Installing a hot-swap hard disk drive The following notes describe the types of hard disk drives that the server supports and other information that you have other end of the server, install the power supplies into place. 15. Connect the fan power cable to... Make sure that the dc power LED on the top of each power supply, and connect the other devices to "Completing the installation" on the system board. 12. Connect one end of each power cord into the connector on the back of each power cord to a properly grounded electrical outlet....
Installation Guide
Page 38
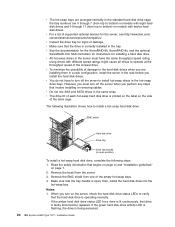
...the server when you turn off the server to bottom) on the side of the empty hot-swap bays. 4. v The drive ID of supported optional devices for installing a hard disk drive. Read the safety information that begins on page vii and "Installation guidelines" on the server, ...LEDs to operate at the throughput speed of damage. When you perform any steps that the hard disk drive is being accessed. 24 IBM System x3500 Type 7977: Installation Guide v See the documentation for the ServeRAID-8k, ServeRAID-8s, and the optional ServeRAID-10is SAS controllers for instructions for the...
...the server when you turn off the server to bottom) on the side of the empty hot-swap bays. 4. v The drive ID of supported optional devices for installing a hard disk drive. Read the safety information that begins on page vii and "Installation guidelines" on the server, ...LEDs to operate at the throughput speed of damage. When you perform any steps that the hard disk drive is being accessed. 24 IBM System x3500 Type 7977: Installation Guide v See the documentation for the ServeRAID-8k, ServeRAID-8s, and the optional ServeRAID-10is SAS controllers for instructions for the...
Installation Guide
Page 39
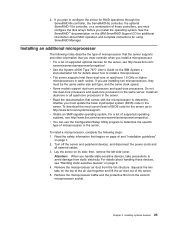
...take precautions to install a microprocessor. v Obtain an SMP-capable operating system. Installing optional devices 25 For a list of supported operating systems, see "Handling static-sensitive devices" on the IBM System x Documentation CD for details about RAID operation and complete instructions for the... IBM ServeRAID Support CD for the server, go to determine the specific type of the server. 5. then, remove the left-side cover. For details about handling these controllers, you must consider when you install the operating system. v See the System x3500 Type 7977 ...
...take precautions to install a microprocessor. v Obtain an SMP-capable operating system. Installing optional devices 25 For a list of supported operating systems, see "Handling static-sensitive devices" on the IBM System x Documentation CD for details about RAID operation and complete instructions for the... IBM ServeRAID Support CD for the server, go to determine the specific type of the server. 5. then, remove the left-side cover. For details about handling these controllers, you must consider when you install the operating system. v See the System x3500 Type 7977 ...


