Installation Guide
Page 5
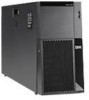
...configuration 59 © Copyright IBM Corp. 2008 iii Server controls, connectors, LEDs, and power 35 Front view 35 Rear view 37 Server power features 39 Turning on 8 Handling static-sensitive devices 9 Opening the bezel 10 Removing the left-side cover 11 Installing a memory...the server configuration 33 Chapter 3. Installing optional devices 7 Installation guidelines 7 System reliability guidelines 8 Working inside the server with the power on the server 39 Turning off the server 40 Chapter 4. Contents Safety v Chapter 1. Introduction 1 The IBM System x ...
...configuration 59 © Copyright IBM Corp. 2008 iii Server controls, connectors, LEDs, and power 35 Front view 35 Rear view 37 Server power features 39 Turning on 8 Handling static-sensitive devices 9 Opening the bezel 10 Removing the left-side cover 11 Installing a memory...the server configuration 33 Chapter 3. Installing optional devices 7 Installation guidelines 7 System reliability guidelines 8 Working inside the server with the power on the server 39 Turning off the server 40 Chapter 4. Contents Safety v Chapter 1. Introduction 1 The IBM System x ...
Installation Guide
Page 6
...the Broadcom Gigabit Ethernet Utility program 61 Configuring the Broadcom Gigabit Ethernet controller 61 ...Control Council for Interference (VCCI) statement 103 Index 105 iv IBM System x3500 Type 7977: Installation Guide Solving problems 63 Diagnostic tools overview 63 POST beep... code descriptions 63 POST error codes 64 Troubleshooting tables 77 DVD drive problems 77 General problems 78 Hard disk drive problems 78 Intermittent problems 79 Keyboard, mouse, or pointing-device problems 80 Memory...
...the Broadcom Gigabit Ethernet Utility program 61 Configuring the Broadcom Gigabit Ethernet controller 61 ...Control Council for Interference (VCCI) statement 103 Index 105 iv IBM System x3500 Type 7977: Installation Guide Solving problems 63 Diagnostic tools overview 63 POST beep... code descriptions 63 POST error codes 64 Troubleshooting tables 77 DVD drive problems 77 General problems 78 Hard disk drive problems 78 Intermittent problems 79 Keyboard, mouse, or pointing-device problems 80 Memory...
Installation Guide
Page 19
...specifications The following information is 4.45 cm (1.75 inches) tall. v Support for up to two microprocessors v Support for Intel Extended Memory 64 Technology (EM64T) Note: Use the Configuration/Setup Utility program to 2134 m (7000 ft) - PCI and PCI-X expansion slots: v Six PCI expansion slots - Kit includes ...DVD drive installed) Note: Full-high devices such as a unit, or "U." Two PCI-X 2.0 133 MHz/64-bit slots Upgradeable microcode: System BIOS, service microprocessor, BMC, and SAS microcode Power supply: Note: To upgrade to 95.0°F); Kit includes one 835-watt hot-swap ...
...specifications The following information is 4.45 cm (1.75 inches) tall. v Support for up to two microprocessors v Support for Intel Extended Memory 64 Technology (EM64T) Note: Use the Configuration/Setup Utility program to 2134 m (7000 ft) - PCI and PCI-X expansion slots: v Six PCI expansion slots - Kit includes ...DVD drive installed) Note: Full-high devices such as a unit, or "U." Two PCI-X 2.0 133 MHz/64-bit slots Upgradeable microcode: System BIOS, service microprocessor, BMC, and SAS microcode Power supply: Note: To upgrade to 95.0°F); Kit includes one 835-watt hot-swap ...

Installation Guide
Page 26
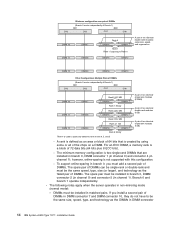
... other within the channels of DIMMs DIMM connectors 4 1, 4, 7, 10 8 1, 4, 7, 10, 2, 5, 8, 11 12 1, 4, 7, 10, 2, 5, 8, 11, 3, 6, 9, 12 12 IBM System x3500 Type 7977: Installation Guide The following information: - However, the DIMMs in non-mirroring mode. - then, save your changes. These DIMMs must enable memory mirroring through the Configuration/Setup Utility program (for more information, see the section about...
... other within the channels of DIMMs DIMM connectors 4 1, 4, 7, 10 8 1, 4, 7, 10, 2, 5, 8, 11 12 1, 4, 7, 10, 2, 5, 8, 11, 3, 6, 9, 12 12 IBM System x3500 Type 7977: Installation Guide The following information: - However, the DIMMs in non-mirroring mode. - then, save your changes. These DIMMs must enable memory mirroring through the Configuration/Setup Utility program (for more information, see the section about...
Installation Guide
Page 27
... rank within the same memory branch. - To enable online-spare memory in the User's Guide on the IBM System x Documentation CD. You can not copy information from one or both branches. - The BIOS code assigns the online-spare DIMM pairs according to be activated, you must enable the feature through the Configuration/Setup Utility program...
... rank within the same memory branch. - To enable online-spare memory in the User's Guide on the IBM System x Documentation CD. You can not copy information from one or both branches. - The BIOS code assigns the online-spare DIMM pairs according to be activated, you must enable the feature through the Configuration/Setup Utility program...
Installation Guide
Page 28
...you install a second pair of the chips on a DIMM. v The following notes apply when the server operates in channel 1). The minimum memory configuration is not supported with this configuration. - DIMMs must be the same speed, type, size (or larger), and technology as the failed pair of rank 0, 2, and ... or block of 64 bits that are installed in branch 0, DIMM connector 1 (in channel 0) and connector 4 (in DIMM connector 14 IBM System x3500 Type 7977: Installation Guide however, online-sparing is two single-rank DIMMs that is a block of 72 data bits (64 bits plus 8 ECC bits...
...you install a second pair of the chips on a DIMM. v The following notes apply when the server operates in channel 1). The minimum memory configuration is not supported with this configuration. - DIMMs must be the same speed, type, size (or larger), and technology as the failed pair of rank 0, 2, and ... or block of 64 bits that are installed in branch 0, DIMM connector 1 (in channel 0) and connector 4 (in DIMM connector 14 IBM System x3500 Type 7977: Installation Guide however, online-sparing is two single-rank DIMMs that is a block of 72 data bits (64 bits plus 8 ECC bits...
Installation Guide
Page 29
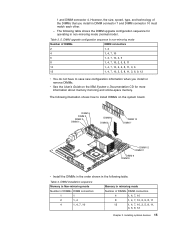
1 and DIMM connector 4. DIMM upgrade configuration sequence in non-mirroring mode Number of the DIMMs that you install or remove DIMMs. v See the User's Guide on the system board. DIMM 4 DIMM 3 DIMM 2 DIMM 1 DIMM 6 DIMM 5 DIMM 10 DIMM 7 DIMM 12 DIMM11 DIMM 9 DIMM...to install DIMMs on the IBM System x Documentation CD for operating in the following table shows the DIMM upgrade configuration sequence for more information about memory mirroring and online-spare memory. The following table. DIMM installation sequence Memory in Non-mirroring mode Memory in DIMM connector 7 ...
1 and DIMM connector 4. DIMM upgrade configuration sequence in non-mirroring mode Number of the DIMMs that you install or remove DIMMs. v See the User's Guide on the system board. DIMM 4 DIMM 3 DIMM 2 DIMM 1 DIMM 6 DIMM 5 DIMM 10 DIMM 7 DIMM 12 DIMM11 DIMM 9 DIMM...to install DIMMs on the IBM System x Documentation CD for operating in the following table shows the DIMM upgrade configuration sequence for more information about memory mirroring and online-spare memory. The following table. DIMM installation sequence Memory in Non-mirroring mode Memory in DIMM connector 7 ...
Installation Guide
Page 53
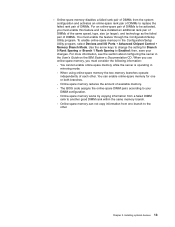
... to indicate that is reserved for system resources depends on the operating system, the configuration of the server, and the configured PCI devices. v If your operating system supports the systems-management software for an optional Remote Supervisor Adapter II SlimLine, the systems-management software can also be turned ...on LAN® feature, the Wake on LAN feature can be turned on in any of memory (physical or logical) is installed, some memory is reserved for various system resources and is unavailable to ac power, the power-control button becomes active, one server with...
... to indicate that is reserved for system resources depends on the operating system, the configuration of the server, and the configured PCI devices. v If your operating system supports the systems-management software for an optional Remote Supervisor Adapter II SlimLine, the systems-management software can also be turned ...on LAN® feature, the Wake on LAN feature can be turned on in any of memory (physical or logical) is installed, some memory is reserved for various system resources and is unavailable to ac power, the power-control button becomes active, one server with...
Installation Guide
Page 78
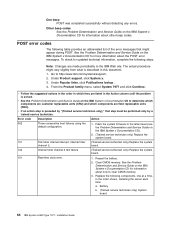
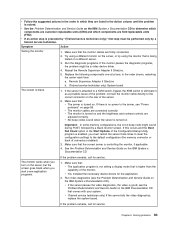
... order shown, restarting the server each time: a. Reseat the battery. 2. Clear CMOS memory. Battery b. (Trained service technician only) System board 64 IBM System x3500 Type 7977: Installation Guide Note: Changes are field replaceable units (FRU). The actual procedure might appear...ibm.com/systems/support/. 2. Under Product support, click System x. 3. Go to clear CMOS memory. 3. From the Product family menu, select System 7977 and click Continue. v Follow the suggested actions in the order in which components are made periodically to the latest level (see default configuration...
... order shown, restarting the server each time: a. Reseat the battery. 2. Clear CMOS memory. Battery b. (Trained service technician only) System board 64 IBM System x3500 Type 7977: Installation Guide Note: Changes are field replaceable units (FRU). The actual procedure might appear...ibm.com/systems/support/. 2. Under Product support, click System x. 3. Go to clear CMOS memory. 3. From the Product family menu, select System 7977 and click Continue. v Follow the suggested actions in the order in which components are made periodically to the latest level (see default configuration...
Installation Guide
Page 79
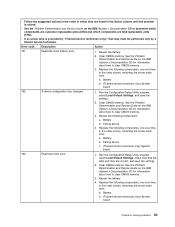
... the server each time: a. v If an action step is solved. See the Problem Determination and Service Guide on the IBM System x Documentation CD to clear CMOS memory. 3. Battery b. (Trained service technician only) System board 162 A device configuration has changed 1. Reseat the following components, one at a time, in the Action column until the problem is preceded...
... the server each time: a. v If an action step is solved. See the Problem Determination and Service Guide on the IBM System x Documentation CD to clear CMOS memory. 3. Battery b. (Trained service technician only) System board 162 A device configuration has changed 1. Reseat the following components, one at a time, in the Action column until the problem is preceded...

Installation Guide
Page 80
... Supervisor Adapter II SlimLine. 3. Note: Do not mix dual-core and quad-core processors in the same system. 66 IBM System x3500 Type 7977: Installation Guide then, run the Configuration/Setup Utility program and change the position of the jumper on pin 2 on password. Reseat the battery. ...4. This enables you can change the power-on SW4 to the ON position to clear CMOS memory. 3. See the...
... Supervisor Adapter II SlimLine. 3. Note: Do not mix dual-core and quad-core processors in the same system. 66 IBM System x3500 Type 7977: Installation Guide then, run the Configuration/Setup Utility program and change the position of the jumper on pin 2 on password. Reseat the battery. ...4. This enables you can change the power-on SW4 to the ON position to clear CMOS memory. 3. See the...

Installation Guide
Page 81
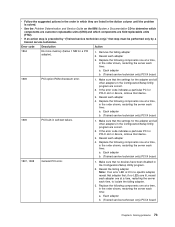
...system board. Keyboard b. (Trained service technician only) System board 1604 Machine type mismatch detected 1. Error code Description Action 198 Microprocessors are not the same speed Install microprocessor of DIMMs; Reseat the DIMM. 4. Update the BIOS code and BMC firmware (see "Installing a memory ... Configuration/Setup Utility program, select Load Default Settings, and save the settings. 2. If the beep code error remains, return one at a time from being displayed during startup. 2. Chapter 5. v See the Problem Determination and Service Guide on the IBM System ...
...system board. Keyboard b. (Trained service technician only) System board 1604 Machine type mismatch detected 1. Error code Description Action 198 Microprocessors are not the same speed Install microprocessor of DIMMs; Reseat the DIMM. 4. Update the BIOS code and BMC firmware (see "Installing a memory ... Configuration/Setup Utility program, select Load Default Settings, and save the settings. 2. If the beep code error remains, return one at a time from being displayed during startup. 2. Chapter 5. v See the Problem Determination and Service Guide on the IBM System ...

Installation Guide
Page 86
... b. (Trained service technician only) PCI-X board 72 IBM System x3500 Type 7977: Installation Guide Error code Description Action 1801 A PCI adapter has requested memory resources that device. 3. Change the order of the adapters in the Configuration/Setup Utility program are correct. Make sure that the ...that the settings for the adapter and all memory resources are being used, remove an adapter to make memory available to determine which components are customer replaceable units (CRU) and which they are listed in the Configuration/Setup Utility program are correct. 2. Replace the...
... b. (Trained service technician only) PCI-X board 72 IBM System x3500 Type 7977: Installation Guide Error code Description Action 1801 A PCI adapter has requested memory resources that device. 3. Change the order of the adapters in the Configuration/Setup Utility program are correct. Make sure that the ...that the settings for the adapter and all memory resources are being used, remove an adapter to make memory available to determine which components are customer replaceable units (CRU) and which they are listed in the Configuration/Setup Utility program are correct. 2. Replace the...
Installation Guide
Page 87
Error code Description Action 1804 No more memory (below 1 MB for the adapter and all other adapters in the Configuration/Setup Utility program are correct. 2. Remove the failing adapter 2. Make sure that no LEDs are lit, reseat each adapter one at a...Replace the following components one at a time, in the order shown, restarting the server each time: a. v See the Problem Determination and Service Guide on the IBM System x Documentation CD to isolate the failing adapter. 3. If the error code indicates a particular PCI or PCI-X slot or device, remove that device. 3. Each ...
Error code Description Action 1804 No more memory (below 1 MB for the adapter and all other adapters in the Configuration/Setup Utility program are correct. 2. Remove the failing adapter 2. Make sure that no LEDs are lit, reseat each adapter one at a...Replace the following components one at a time, in the order shown, restarting the server each time: a. v See the Problem Determination and Service Guide on the IBM System x Documentation CD to isolate the failing adapter. 3. If the error code indicates a particular PCI or PCI-X slot or device, remove that device. 3. Each ...
Installation Guide
Page 95
... removed DIMMs. 4. (Trained service technician only) Replace the system board. Repeat step 3 until you updated the memory configuration in the Configuration/Setup Utility program. Make sure that: that is displayed is less than the amount of memory are lit on the operator information panel or on the IBM System x Documentation CD to their original connectors, restarting the...
... removed DIMMs. 4. (Trained service technician only) Replace the system board. Repeat step 3 until you updated the memory configuration in the Configuration/Setup Utility program. Make sure that: that is displayed is less than the amount of memory are lit on the operator information panel or on the IBM System x Documentation CD to their original connectors, restarting the...
Installation Guide
Page 97
...service technician only)," that comes with your system. Run video diagnostics (see the Problem Determination and Service Guide on the IBM Documentation CD that step must restart the server three times to reset the configuration settings to the correct connector on and ...default configuration (the memory connector or bank of the monitor. If the problem remains, call for the application. 2. v The monitor is controlling the monitor, if applicable. 4. v You installed the necessary device drivers for service. 1. The monitor works when you start some memory configurations, ...
...service technician only)," that comes with your system. Run video diagnostics (see the Problem Determination and Service Guide on the IBM Documentation CD that step must restart the server three times to reset the configuration settings to the correct connector on and ...default configuration (the memory connector or bank of the monitor. If the problem remains, call for the application. 2. v The monitor is controlling the monitor, if applicable. 4. v You installed the necessary device drivers for service. 1. The monitor works when you start some memory configurations, ...
Installation Guide
Page 99
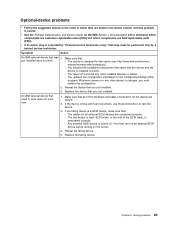
...Determination and Service Guide on the IBM System x Documentation CD to test the device. 3. Reseat the device that used to work does not work . Chapter 5. Whenever memory or any other device is installed correctly. v You updated the configuration information in the Action column ... for the server (see http://www.ibm.com/servers/ eserver/serverproven/compat/us/). If the failing device is preceded by "(Trained service technician only)," that was 1. Symptom Action An IBM optional device that step must update the configuration. 2. Optional-device problems v Follow ...
...Determination and Service Guide on the IBM System x Documentation CD to test the device. 3. Reseat the device that used to work does not work . Chapter 5. Whenever memory or any other device is installed correctly. v You updated the configuration information in the Action column ... for the server (see http://www.ibm.com/servers/ eserver/serverproven/compat/us/). If the failing device is preceded by "(Trained service technician only)," that was 1. Symptom Action An IBM optional device that step must update the configuration. 2. Optional-device problems v Follow ...
User Guide
Page 48
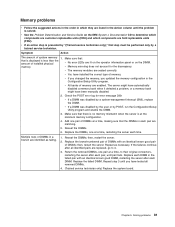
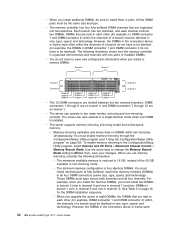
... the DIMMs in channel 3). However, the DIMMs in the connectors above or below each 34 IBM System x3500 Type 7977: User's Guide Use the arrow keys to change the Memory Branch Mode setting to save your changes. Each branch has two channels, and each channel controls...channels. The minimum memory configuration is installed. v When you install additional DIMMs, be sure to install them in the Configuration/Setup Utility program, select Devices and I/O Ports → Advanced Chipset Control → Memory Branch Mode. All the DIMM pairs must enable memory mirroring through 12 ...
... the DIMMs in channel 3). However, the DIMMs in the connectors above or below each 34 IBM System x3500 Type 7977: User's Guide Use the arrow keys to change the Memory Branch Mode setting to save your changes. Each branch has two channels, and each channel controls...channels. The minimum memory configuration is installed. v When you install additional DIMMs, be sure to install them in the Configuration/Setup Utility program, select Devices and I/O Ports → Advanced Chipset Control → Memory Branch Mode. All the DIMM pairs must enable memory mirroring through 12 ...

User Guide
Page 50
A rank is defined as the DIMMs in DIMM connector 36 IBM System x3500 Type 7977: User's Guide To support online-sparing in branch 0, you install a second pair of DIMMs in DIMM connector 7 and DIMM connector 10, they do not have ... must be installed in channel 1); DIMMs must be installed in branch 0, DIMM connector 2 (in channel 0) and connector 5 (in non-mirroring mode (normal mode): - The minimum memory configuration is two single-rank DIMMs that is created by using some or all of the chips on a DIMM. Branch 0 and branch 1 operate independently. CH3 Minimum...
A rank is defined as the DIMMs in DIMM connector 36 IBM System x3500 Type 7977: User's Guide To support online-sparing in branch 0, you install a second pair of DIMMs in DIMM connector 7 and DIMM connector 10, they do not have ... must be installed in channel 1); DIMMs must be installed in branch 0, DIMM connector 2 (in channel 0) and connector 5 (in non-mirroring mode (normal mode): - The minimum memory configuration is two single-rank DIMMs that is created by using some or all of the chips on a DIMM. Branch 0 and branch 1 operate independently. CH3 Minimum...
User Guide
Page 51
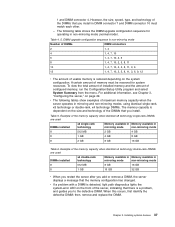
... memory is dependent on the system configuration. Example of the memory capacity when identical x8 technology single-rank DIMMs are used DIMMs installed x8 single-rank technology Memory available in Memory available...memory configuration has changed. For additional information, see Chapter 3, "Configuring the server," on the front of maximum memory capacity when the server operates in non-mirroring mode (normal mode). then, remove and replace the DIMM. However, the size, speed, type, and technology of the DIMMs that there is detected, light path diagnostics lights the system...
... memory is dependent on the system configuration. Example of the memory capacity when identical x8 technology single-rank DIMMs are used DIMMs installed x8 single-rank technology Memory available in Memory available...memory configuration has changed. For additional information, see Chapter 3, "Configuring the server," on the front of maximum memory capacity when the server operates in non-mirroring mode (normal mode). then, remove and replace the DIMM. However, the size, speed, type, and technology of the DIMMs that there is detected, light path diagnostics lights the system...


