
Owners Manual
Page 2
... catcher, or unclogging the discharge chute. • Operate machine only in speed or direction, which could overturn the machine. Stop the blades when crossing gravel surfaces. • Do not operate machine without the entire grass catcher, discharge chute, or other reproductive harm. Always ...parts to come to a complete stop before turning. • Never leave a running machine unattended. If the tires lose traction, disengage the blades and proceed slowly straight down slopes, not across. • Watch for Ride-On Mowers DANGER: THIS CUTTING MACHINE IS CAPABLE OF AMPUTATING HANDS...
... catcher, or unclogging the discharge chute. • Operate machine only in speed or direction, which could overturn the machine. Stop the blades when crossing gravel surfaces. • Do not operate machine without the entire grass catcher, discharge chute, or other reproductive harm. Always ...parts to come to a complete stop before turning. • Never leave a running machine unattended. If the tires lose traction, disengage the blades and proceed slowly straight down slopes, not across. • Watch for Ride-On Mowers DANGER: THIS CUTTING MACHINE IS CAPABLE OF AMPUTATING HANDS...

Owners Manual
Page 3
... carry children, even with the engine running . • Check grass catcher components and the discharge chute frequently and replace with the blades shut off and be run over or backed over by the machine. • Never allow extra distance to the presence of a ... watchful care of bystanders before and while backing. • Never carry children, even with manufacturer's recommended parts, when necessary. • Mower blades are explosive. • Extinguish all times until fueling is not possible, then refuel such equipment with a portable container, rather than the operator...
... carry children, even with the engine running . • Check grass catcher components and the discharge chute frequently and replace with the blades shut off and be run over or backed over by the machine. • Never allow extra distance to the presence of a ... watchful care of bystanders before and while backing. • Never carry children, even with manufacturer's recommended parts, when necessary. • Mower blades are explosive. • Extinguish all times until fueling is not possible, then refuel such equipment with a portable container, rather than the operator...
Owners Manual
Page 4
CCA: Case Size: 28 230 U1R Blade Bolt Torque: 45-55 FT. LBS. CONGRATULATIONS on or near any unimproved forest-covered, brush-covered or grass-covered land unless the engine's exhaust system ...
CCA: Case Size: 28 230 U1R Blade Bolt Torque: 45-55 FT. LBS. CONGRATULATIONS on or near any unimproved forest-covered, brush-covered or grass-covered land unless the engine's exhaust system ...
Owners Manual
Page 6
... START ENGINE" and "PURGE TRANSMISSION" in the Operation section of this manual). 6 TO ROLL TRACTOR OFF SKID (See Operation section for replacing motion and mower blade drive belts in the Service and Adjustments section of this manual). • Roll tractor forward off the skid. CHECK TIRE PRESSURE The tires on tires...
... START ENGINE" and "PURGE TRANSMISSION" in the Operation section of this manual). 6 TO ROLL TRACTOR OFF SKID (See Operation section for replacing motion and mower blade drive belts in the Service and Adjustments section of this manual). • Roll tractor forward off the skid. CHECK TIRE PRESSURE The tires on tires...
Owners Manual
Page 8
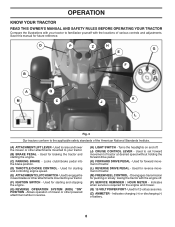
... raise and lower the mower or other attachments mounted to set forward movement of battery. 8 Used for starting and controlling engine speed. (E) ATTACHMENTCLUTCHSWITCH-Usedtoengagethe mower blades or other powered attachment while in reverse. (H) LIGHT SWITCH - Indicates charging (+) or discharging (-) of tractor at desired speed without holding the forward drive pedal. (K) FORWARD...
... raise and lower the mower or other attachments mounted to set forward movement of battery. 8 Used for starting and controlling engine speed. (E) ATTACHMENTCLUTCHSWITCH-Usedtoengagethe mower blades or other powered attachment while in reverse. (H) LIGHT SWITCH - Indicates charging (+) or discharging (-) of tractor at desired speed without holding the forward drive pedal. (K) FORWARD...

Owners Manual
Page 9
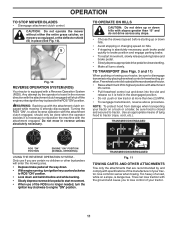
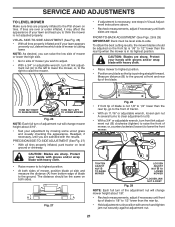
Pedal should remain in severe eye damage. NOTE: Failure to stop mower blades, place attachment clutch control in foreign objects thrown into full "BRAKE" position. NOTE: Under certain conditions when tractor is standing idle with an operator ...to "backfire". • Turn ignition key (F) to leave the seat without first setting the parking brake will hold , release pres- C B Fig. 4 STOPPING (See Fig. 5) MOWER BLADES • To stop the engine. Always remove key when leaving tractor to prevent unauthorized use. • Never use the choke to move throttle control between...
Pedal should remain in severe eye damage. NOTE: Failure to stop mower blades, place attachment clutch control in foreign objects thrown into full "BRAKE" position. NOTE: Under certain conditions when tractor is standing idle with an operator ...to "backfire". • Turn ignition key (F) to leave the seat without first setting the parking brake will hold , release pres- C B Fig. 4 STOPPING (See Fig. 5) MOWER BLADES • To stop the engine. Always remove key when leaving tractor to prevent unauthorized use. • Never use the choke to move throttle control between...
Owners Manual
Page 10
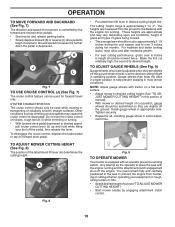
... centrally positioned in same adjustment hole. Ground speed increases the further down the pedal is approximately 1" to prevent the engine from the ground to the blade tip with tractor on a flat level surface. • Adjust mower to begin movement. K J L Fig. 7 TO USE CRUISE CONTROL (J) (See... rough, rolling terrain or hills. • Select desired height of cut (see "TO ADJUST MOWER CUTTING HEIGHT") • Start mower blades by engaging attachment clutch control. 10 The heights are slightly off the ground. Any attempt by the forward and reverse drive pedals. •...
... centrally positioned in same adjustment hole. Ground speed increases the further down the pedal is approximately 1" to prevent the engine from the ground to the blade tip with tractor on a flat level surface. • Adjust mower to begin movement. K J L Fig. 7 TO USE CRUISE CONTROL (J) (See... rough, rolling terrain or hills. • Select desired height of cut (see "TO ADJUST MOWER CUTTING HEIGHT") • Start mower blades by engaging attachment clutch control. 10 The heights are slightly off the ground. Any attempt by the forward and reverse drive pedals. •...
Owners Manual
Page 11
... are certain no longer needed, turn the ignition key clockwise to lose control of tying hood to tractor (rope, cord, etc.). OPERATION TO STOP MOWER BLADES • Disengage attachment clutch control. TO OPERATE ON HILLS CAUTION: Do not drive up or down hills with specifications of the manufacturer of a load, while...
... are certain no longer needed, turn the ignition key clockwise to lose control of tying hood to tractor (rope, cord, etc.). OPERATION TO STOP MOWER BLADES • Disengage attachment clutch control. TO OPERATE ON HILLS CAUTION: Do not drive up or down hills with specifications of the manufacturer of a load, while...
Owners Manual
Page 14
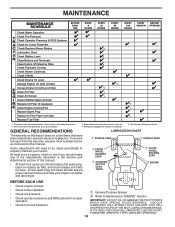
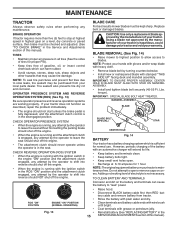
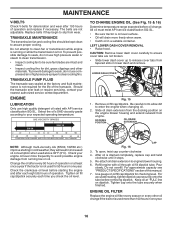
...➁ Refer to Maintenance "ENGINE" Section IMPORTANT: DO NOT OIL OR GREASE THE PIVOT POINTS WHICH HAVE SPECIAL NYLON BEARINGS. Replace blades more often when mowing in Maintenance Section. IF YOU FEEL THEY MUST BE LUBRICATED, USE ONLY A DRY, POWDERED GRAPHITE TYPE LUBRICANT ...Check tire pressure. • Check operator presence and ROS systems for proper operation. • Check for Loose Fasteners C Check/Replace Mower Blades T Lubrication Chart 0 Check Battery Level R Clean Battery and Terminals Clean Debris Off Steering Plate Check Transaxle Cooling Check Mower Levelness Check V-...
...➁ Refer to Maintenance "ENGINE" Section IMPORTANT: DO NOT OIL OR GREASE THE PIVOT POINTS WHICH HAVE SPECIAL NYLON BEARINGS. Replace blades more often when mowing in Maintenance Section. IF YOU FEEL THEY MUST BE LUBRICATED, USE ONLY A DRY, POWDERED GRAPHITE TYPE LUBRICANT ...Check tire pressure. • Check operator presence and ROS systems for proper operation. • Check for Loose Fasteners C Check/Replace Mower Blades T Lubrication Chart 0 Check Battery Level R Clean Battery and Terminals Clean Debris Off Steering Plate Check Transaxle Cooling Check Mower Levelness Check V-...
Owners Manual
Page 15
...of your tractor is not necessary. If your tractor is running, any attempt by the operator to stop at 6-10 amperes for normal use. BLADE REMOVAL (See Fig. 14) • Raise mower to highest position to allow access to slow leaks, tire sealant may cause tire damage. ... section of this manual). Coat terminals with plain water and dry. TIRES • Maintain proper air pressure in the disengaged position. Using a blade not approved by the operator to "leak" power. However, periodic charging of electrolyte is hazardous, could damage your tractor and void your local ...
...of your tractor is not necessary. If your tractor is running, any attempt by the operator to stop at 6-10 amperes for normal use. BLADE REMOVAL (See Fig. 14) • Raise mower to highest position to allow access to slow leaks, tire sealant may cause tire damage. ... section of this manual). Coat terminals with plain water and dry. TIRES • Maintain proper air pressure in the disengaged position. Using a blade not approved by the operator to "leak" power. However, periodic charging of electrolyte is hazardous, could damage your tractor and void your local ...
Owners Manual
Page 16
... and extend outward from tapered slots in lower dash and remove. Pour slowly. TRANSAXLE MAINTENANCE The transmission fan and cooling fins should be sure fan blades are not adjustable. To prevent damage to seals, do not use compressed air or high pressure sprayer to your nearest authorized service center/department. Select...
... and extend outward from tapered slots in lower dash and remove. Pour slowly. TRANSAXLE MAINTENANCE The transmission fan and cooling fins should be sure fan blades are not adjustable. To prevent damage to seals, do not use compressed air or high pressure sprayer to your nearest authorized service center/department. Select...
Owners Manual
Page 18
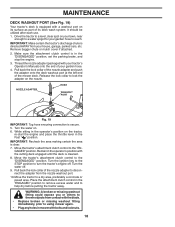
... operator's position with bolts and locknuts. 18 WARNING: A broken or missing washout fitting could expose you or others to thrown objects from contact with the blade. • Replace broken or missing washout fitting immediately, prior to disconnect the adapter from your house, garage, parked cars, etc. It should be utilized after...
... operator's position with bolts and locknuts. 18 WARNING: A broken or missing washout fitting could expose you or others to thrown objects from contact with the blade. • Replace broken or missing washout fitting immediately, prior to disconnect the adapter from your house, garage, parked cars, etc. It should be utilized after...
Owners Manual
Page 19
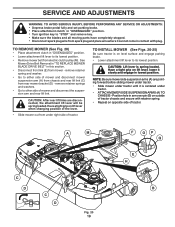
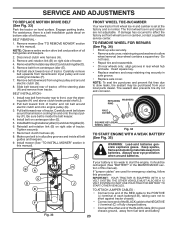
See Mower Drive Belt Removal in "TO REPLACE MOWER BLADE DRIVE BELT" in this section. • Disconnect front link (E) from under right side of tractor. Have a tight grip on lift lever when changing position of ... fully and set parking brake. • Place attachment clutch in "DISENGAGED" position. • Turn ignition key to "STOP" and remove key. • Make sure the blades and all moving parts have completely stopped. • Disconnect spark plug wire from spark plug and place wire where it cannot come in contact with...
See Mower Drive Belt Removal in "TO REPLACE MOWER BLADE DRIVE BELT" in this section. • Disconnect front link (E) from under right side of tractor. Have a tight grip on lift lever when changing position of ... fully and set parking brake. • Place attachment clutch in "DISENGAGED" position. • Turn ignition key to "STOP" and remove key. • Make sure the blades and all moving parts have completely stopped. • Disconnect spark plug wire from spark plug and place wire where it cannot come in contact with...
Owners Manual
Page 20
... as shown in this manual. Work from left side of link (E) into slots in this section. See Mower Drive Belt Installation in "TO REPLACE MOWER BLADE DRIVE BELT" in the Operation section of this section of tractor. • Check Front-To-Back Adjustment in "TO LEVEL MOWER" in front mower bracket...
... as shown in this manual. Work from left side of link (E) into slots in this section. See Mower Drive Belt Installation in "TO REPLACE MOWER BLADE DRIVE BELT" in the Operation section of this section of tractor. • Check Front-To-Back Adjustment in "TO LEVEL MOWER" in front mower bracket...
Owners Manual
Page 21
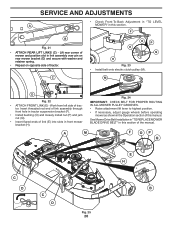
... LEFT TO LOWER MOWER Fig. 26 NOTE: Each full turn front link adjustment nut (B) clockwise (tighten) to raise the front of the blade. The distance should be level side-to the ground. SERVICE AND ADJUSTMENTS TO LEVEL MOWER Make sure tires are properly inflated to its highest...ADJUSTMENT (See Fig. 26) • With all tires properly inflated, park tractor on tires. Readjust, if necessary, until both sides of mower, position blade at front and rear tip of mower, or, counterclockwise (loosen) to 1/2" lower than the rear tip. • Hold adjustment nut in Visual Adjustment ...
... LEFT TO LOWER MOWER Fig. 26 NOTE: Each full turn front link adjustment nut (B) clockwise (tighten) to raise the front of the blade. The distance should be level side-to the ground. SERVICE AND ADJUSTMENTS TO LEVEL MOWER Make sure tires are properly inflated to its highest...ADJUSTMENT (See Fig. 26) • With all tires properly inflated, park tractor on tires. Readjust, if necessary, until both sides of mower, position blade at front and rear tip of mower, or, counterclockwise (loosen) to 1/2" lower than the rear tip. • Hold adjustment nut in Visual Adjustment ...
Owners Manual
Page 22
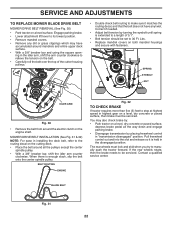
...a level, dry concrete or paved surface, then brake must lock and skid when you try to be serviced. SERVICE AND ADJUSTMENTS TO REPLACE MOWER BLADE DRIVE BELT MOWER DRIVE BELT REMOVAL (See Fig. 30) • Park tractor on the engine shaft. Pull freewheel control out and into the ...8226; Place the belt around mandrels and entire upper deck surface. • With a 3/8" breaker bar and using the square opening in "transmission disengaged" position. BLADE BELT Fig. 31 22 MOWER DRIVE BELT INSTALLATION (See Fig. 31 & 32) NOTE: For ease in installing the deck belt, refer to 30 Ft. ...
...a level, dry concrete or paved surface, then brake must lock and skid when you try to be serviced. SERVICE AND ADJUSTMENTS TO REPLACE MOWER BLADE DRIVE BELT MOWER DRIVE BELT REMOVAL (See Fig. 30) • Park tractor on the engine shaft. Pull freewheel control out and into the ...8226; Place the belt around mandrels and entire upper deck surface. • With a 3/8" breaker bar and using the square opening in "transmission disengaged" position. BLADE BELT Fig. 31 22 MOWER DRIVE BELT INSTALLATION (See Fig. 31 & 32) NOTE: For ease in installing the deck belt, refer to 30 Ft. ...
Owners Manual
Page 23
... REMOVE WHEEL FOR REPAIRS (See Fig. 34) • Block up axle securely. • Remove axle cover, retaining ring and washers to front, over cooling fan blades (F). 7. If "jumper cables" are not adjustable. Removebeltfromstationaryidler(C)andclutchingidler(D). 5. If damage has occurred to slow leaks, tire sealant may be recharged. (See "BATTERY" in all pulley...
... REMOVE WHEEL FOR REPAIRS (See Fig. 34) • Block up axle securely. • Remove axle cover, retaining ring and washers to front, over cooling fan blades (F). 7. If "jumper cables" are not adjustable. Removebeltfromstationaryidler(C)andclutchingidler(D). 5. If damage has occurred to slow leaks, tire sealant may be recharged. (See "BATTERY" in all pulley...
Owners Manual
Page 26
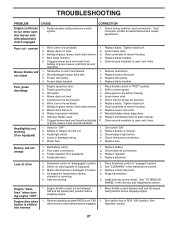
...7. Water in fuel. 8. Dirty engine air screen/fins. 11. Clean/replace muffler. 13. Check all wiring. 4. Excessive vibration 1. Bent blade mandrel. 3. Tighten blade bolt. 2. Bad spark plug. 5. Water in fuel. 9. Engine valves out of power 1. Empty fuel tank and carburetor, refill tank with...and carburetor, refill tank with fresh, clean gas. 9. Loose or damaged wiring. 13. See "To Adjust Carburetor" in Service Adjustments 15. Replace blade. Engine not "CHOKED" properly. 3. Replace spark plug. 5. Check all wiring. 9. Dirty fuel filter. 5. Loose or damaged wiring. 7. ...
...7. Water in fuel. 8. Dirty engine air screen/fins. 11. Clean/replace muffler. 13. Check all wiring. 4. Excessive vibration 1. Bent blade mandrel. 3. Tighten blade bolt. 2. Bad spark plug. 5. Water in fuel. 9. Engine valves out of power 1. Empty fuel tank and carburetor, refill tank with...and carburetor, refill tank with fresh, clean gas. 9. Loose or damaged wiring. 13. See "To Adjust Carburetor" in Service Adjustments 15. Replace blade. Engine not "CHOKED" properly. 3. Replace spark plug. 5. Check all wiring. 9. Dirty fuel filter. 5. Loose or damaged wiring. 7. ...
Owners Manual
Page 27
...trash around mandrels to open vent holes. 1. Faulty light switch. 4. Loss of grass, leaves, trash under mower. 7. CORRECTION 1. Frozen blade mandrel. 1. Remove obstruction. 2. Clean underside of grass, leaves, trash under mower. 4. Replace with attachment clutch engaged 1. Bulb(s) or ... axle key at rear wheel. Reverse operation system (ROS) is not "ON" while mower or other attachment is engaged. 1. Tighten blade bolt. 2. Replace blade mandrel. Buildup of mower housing. 8. Turn switch "ON". 2. Poor cable connections. 3. Poor cut - Mower drive belt worn. ...
...trash around mandrels to open vent holes. 1. Faulty light switch. 4. Loss of grass, leaves, trash under mower. 7. CORRECTION 1. Frozen blade mandrel. 1. Remove obstruction. 2. Clean underside of grass, leaves, trash under mower. 4. Replace with attachment clutch engaged 1. Bulb(s) or ... axle key at rear wheel. Reverse operation system (ROS) is not "ON" while mower or other attachment is engaged. 1. Tighten blade bolt. 2. Replace blade mandrel. Buildup of mower housing. 8. Turn switch "ON". 2. Poor cable connections. 3. Poor cut - Mower drive belt worn. ...
Owners Manual
Page 41
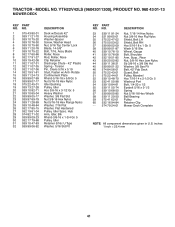
...47-63 32 539 99 06-92 DESCRIPTION Deck w/Decals 42" Housing Assembly Washer-Spacer Screw, Washer Head Nut, 9/16 Top Center Lock Blade, 14-5/8" Bolt, 7/16, Assy Blade Roller, Nose Rod, Roller, Nose Clip Retainer Discharge Chute - 42" Plastic Spring - Hub Arm, Idler, Blk Rhsnb 3/8-16 x 1-3/4 ...Gr. 5 Pulley, Idler Retainer 5/16c U Type Washer, 5/16 Std Flt KEY PART NO. TRACTOR - YTH22V42LS (96043011300), PRODUCT NO. 960 43 01-13 MOWER ...
...47-63 32 539 99 06-92 DESCRIPTION Deck w/Decals 42" Housing Assembly Washer-Spacer Screw, Washer Head Nut, 9/16 Top Center Lock Blade, 14-5/8" Bolt, 7/16, Assy Blade Roller, Nose Rod, Roller, Nose Clip Retainer Discharge Chute - 42" Plastic Spring - Hub Arm, Idler, Blk Rhsnb 3/8-16 x 1-3/4 ...Gr. 5 Pulley, Idler Retainer 5/16c U Type Washer, 5/16 Std Flt KEY PART NO. TRACTOR - YTH22V42LS (96043011300), PRODUCT NO. 960 43 01-13 MOWER ...


