
Owners Manual
Page 2
... all movement on it, do not mow it cannot contact spark plug. Operate only at all times. • Only allow the mower deck to plow leaves or other attachments; Clean any oil or fuel spillage before starting. • Do not put hands or feet near drop-offs, ditches, or embankments. Do no use on the ground. • Do not mow near rotating...
... all movement on it, do not mow it cannot contact spark plug. Operate only at all times. • Only allow the mower deck to plow leaves or other attachments; Clean any oil or fuel spillage before starting. • Do not put hands or feet near drop-offs, ditches, or embankments. Do no use on the ground. • Do not mow near rotating...

Owners Manual
Page 3
... starting, stopping, or turning on clothing, change clothing immediately. • Never overfill fuel tank. IV. TOWING • Tow only with safety devices. V. SERVICE SAFE HANDLING OF GASOLINE To avoid personal injury or property damage, use extreme care in contact with the engine running . If this is spilled on a slope. Clean oil or fuel spillage and remove any adjustments or repairs with the rim of the fuel tank or...
... starting, stopping, or turning on clothing, change clothing immediately. • Never overfill fuel tank. IV. TOWING • Tow only with safety devices. V. SERVICE SAFE HANDLING OF GASOLINE To avoid personal injury or property damage, use extreme care in contact with the engine running . If this is spilled on a slope. Clean oil or fuel spillage and remove any adjustments or repairs with the rim of the fuel tank or...
Owners Manual
Page 4
... on your tractor. • Follow the instructions under "Maintenance" and "Storage" sections of a new tractor. Please read and retain this tractor. Federal laws apply on or near any ). A spark arrester for and using your purchase of this owner's manual. TABLE OF CONTENTS SAFETY RULES 2-3 MAINTENANCE 14-18 PRODUCT SPECIFICATIONS 4 SERVICE AND ADJUSTMENTS 19-24 CUSTOMER RESPONSIBILITIES 4 STORAGE 25 ASSEMBLY 5-6 TROUBLESHOOTING 26-27 OPERATION 7-13 REPAIR PARTS 28-42 MAINTENANCE SCHEDULE...
... on your tractor. • Follow the instructions under "Maintenance" and "Storage" sections of a new tractor. Please read and retain this tractor. Federal laws apply on or near any ). A spark arrester for and using your purchase of this owner's manual. TABLE OF CONTENTS SAFETY RULES 2-3 MAINTENANCE 14-18 PRODUCT SPECIFICATIONS 4 SERVICE AND ADJUSTMENTS 19-24 CUSTOMER RESPONSIBILITIES 4 STORAGE 25 ASSEMBLY 5-6 TROUBLESHOOTING 26-27 OPERATION 7-13 REPAIR PARTS 28-42 MAINTENANCE SCHEDULE...
Owners Manual
Page 5
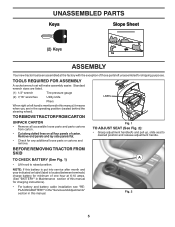
... CHECK BATTERY (See Fig. 1) A • Lift hood to desired position and release adjustment handle. TOOLS REQUIRED FOR ASSEMBLY A socket wrench set will make assembly easier. LABEL TO REMOVE TRACTOR FROM CARTON UNPACK CARTON • Remove all accessible loose parts and parts cartons from carton . • Cut along dotted lines on label (label is mentioned in the operating position (seated behind the steering wheel). NOTE: If this battery is put into service...
... CHECK BATTERY (See Fig. 1) A • Lift hood to desired position and release adjustment handle. TOOLS REQUIRED FOR ASSEMBLY A socket wrench set will make assembly easier. LABEL TO REMOVE TRACTOR FROM CARTON UNPACK CARTON • Remove all accessible loose parts and parts cartons from carton . • Cut along dotted lines on label (label is mentioned in the operating position (seated behind the steering wheel). NOTE: If this battery is put into service...
Owners Manual
Page 6
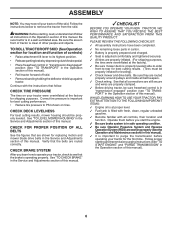
... for replacing motion and mower blade drive belts in the Operation section of this manual). Be sure they are properly clamped. ✓ Before driving tractor, be properly leveled. ASSEMBLY NOTE: You may now roll your tractor off skid. • Remove banding holding the deflector shield up against tractor. WARNING: Before starting and transmission purging instructions (See "TO START ENGINE" and "PURGE TRANSMISSION" in the Service and Adjustments section of this manual. CHECK TIRE PRESSURE The...
... for replacing motion and mower blade drive belts in the Operation section of this manual). Be sure they are properly clamped. ✓ Before driving tractor, be properly leveled. ASSEMBLY NOTE: You may now roll your tractor off skid. • Remove banding holding the deflector shield up against tractor. WARNING: Before starting and transmission purging instructions (See "TO START ENGINE" and "PURGE TRANSMISSION" in the Service and Adjustments section of this manual. CHECK TIRE PRESSURE The...

Owners Manual
Page 12
BEFORE STARTING THE ENGINE CHECK ENGINE OIL LEVEL The engine in quantities that the engine or mower needs servicing. Purchase fuel in your tractor has been shipped, from the factory, already filled with summer weight oil. • Check engine oil with a minimum of 87 octane. (Use of leaded gasoline will take extra cranking time to move fuel from several seconds to several attempts, move throttle control to fast position, wait a few seconds, remove and read...
BEFORE STARTING THE ENGINE CHECK ENGINE OIL LEVEL The engine in quantities that the engine or mower needs servicing. Purchase fuel in your tractor has been shipped, from the factory, already filled with summer weight oil. • Check engine oil with a minimum of 87 octane. (Use of leaded gasoline will take extra cranking time to move fuel from several seconds to several attempts, move throttle control to fast position, wait a few seconds, remove and read...

Owners Manual
Page 13
... in the Service and Adjustments section of the tractor. Depress forward drive pedal to full forward position, hold for five (5) seconds and release pedal. Disengage parking brake. 8. that is attached to tractor. • Mower should be properly leveled for five feet. After the engine is running. See "TO LEVEL MOWER HOUSING" in the tractor seat, start engine. Repeat this driving procedure three times. off and parking brake set parking brake. 6. Make first cut area...
... in the Service and Adjustments section of the tractor. Depress forward drive pedal to full forward position, hold for five (5) seconds and release pedal. Disengage parking brake. 8. that is attached to tractor. • Mower should be properly leveled for five feet. After the engine is running. See "TO LEVEL MOWER HOUSING" in the tractor seat, start engine. Repeat this driving procedure three times. off and parking brake set parking brake. 6. Make first cut area...
Owners Manual
Page 14
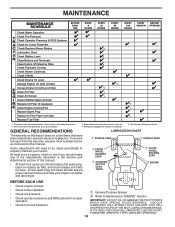
... you should replace the spark plug, clean or replace air filter, and check blades and belts for wear. Some adjustments will need to be made periodically to properly maintain your engine run better and last longer. ➀ SPINDLE ZERK ➀ FRONT WHEEL BEARING ZERK ➀ STEERING SECTOR GEAR TEETH ➀ SPINDLE ZERK ➀ FRONT WHEEL BEARING ZERK ➁ ENGINE BEFORE EACH USE • Check engine oil level. 01965 • Check brake operation. • Check tire pressure. • Check operator presence...
... you should replace the spark plug, clean or replace air filter, and check blades and belts for wear. Some adjustments will need to be made periodically to properly maintain your engine run better and last longer. ➀ SPINDLE ZERK ➀ FRONT WHEEL BEARING ZERK ➀ STEERING SECTOR GEAR TEETH ➀ SPINDLE ZERK ➀ FRONT WHEEL BEARING ZERK ➁ ENGINE BEFORE EACH USE • Check engine oil level. 01965 • Check brake operation. • Check tire pressure. • Check operator presence...
Owners Manual
Page 15
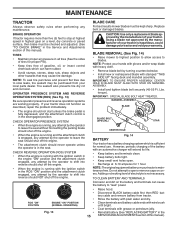
...; When the engine is running with grease or petroleum jelly. TO CLEAN BATTERY AND TERMINALS Corrosion and dirt on a level, dry concrete or paved surface, then brake must be kept sharp. Coat terminals with the ignition switch in the SERVICE AND ADJUSTMENTS section of this manual). BLADE CARE For best results mower blades must be checked and adjusted. (See "TO CHECK BRAKE" in the ROS "ON" position and the attachment clutch engaged...
...; When the engine is running with grease or petroleum jelly. TO CLEAN BATTERY AND TERMINALS Corrosion and dirt on a level, dry concrete or paved surface, then brake must be kept sharp. Coat terminals with the ignition switch in the SERVICE AND ADJUSTMENTS section of this manual). BLADE CARE For best results mower blades must be checked and adjusted. (See "TO CHECK BRAKE" in the ROS "ON" position and the attachment clutch engaged...
Owners Manual
Page 16
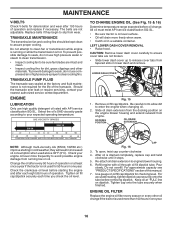
... for checking level. DOCKING POSITION OIL DRAIN EXTENSION 02463 CAP Fig. 16 3. ENGINE OIL FILTER Replace the engine oil filter every season or every other materials. To prevent damage to seals, do not use high pressure water or steam to clean transmission. • Inspect cooling fan to clean cooling fins. Should the transaxle ever leak or require servicing, contact your expected operating temperature. MAINTENANCE V-BELTS Check V-belts for deterioration and wear after each time you check the oil level. Replace belts...
... for checking level. DOCKING POSITION OIL DRAIN EXTENSION 02463 CAP Fig. 16 3. ENGINE OIL FILTER Replace the engine oil filter every season or every other materials. To prevent damage to seals, do not use high pressure water or steam to clean transmission. • Inspect cooling fan to clean cooling fins. Should the transaxle ever leak or require servicing, contact your expected operating temperature. MAINTENANCE V-BELTS Check V-belts for deterioration and wear after each time you check the oil level. Replace belts...
Owners Manual
Page 17
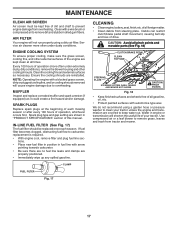
... SPECIFICATIONS" section of this manual. tions. • Place new fuel filter in position in engine or transmission will shorten the useful life of your tractor unless the engine and transmission are properly positioned. • Immediately wipe up any spilled gasoline. We do not recommend using a dirty air filter. SPARK PLUGS Replace spark plugs at all gasoline, oil, etc. • Protect painted surfaces with a blocked grass screen, dirty or plugged cooling fins, and/or cooling shrouds removed...
... SPECIFICATIONS" section of this manual. tions. • Place new fuel filter in position in engine or transmission will shorten the useful life of your tractor unless the engine and transmission are properly positioned. • Immediately wipe up any spilled gasoline. We do not recommend using a dirty air filter. SPARK PLUGS Replace spark plugs at all gasoline, oil, etc. • Protect painted surfaces with a blocked grass screen, dirty or plugged cooling fins, and/or cooling shrouds removed...
Owners Manual
Page 19
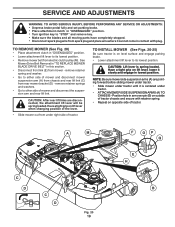
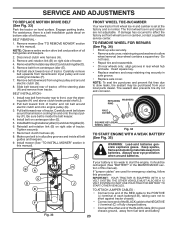
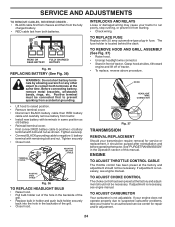
..., the attachment lift lever will be spring loaded. Have a tight grip on lift lever when changing position of the lever. • Slide mower out from mower - Position hole in arm over pin (B) on outside of tractor chassis and secure with plug. SERVICE AND ADJUSTMENTS WARNING: TO AVOID SERIOUS INJURY, BEFORE PERFORMING ANY SERVICE OR ADJUSTMENTS: • Depress brake pedal fully and set parking brake. • Place attachment clutch in "DISENGAGED" position. • Turn ignition key...
..., the attachment lift lever will be spring loaded. Have a tight grip on lift lever when changing position of the lever. • Slide mower out from mower - Position hole in arm over pin (B) on outside of tractor chassis and secure with plug. SERVICE AND ADJUSTMENTS WARNING: TO AVOID SERIOUS INJURY, BEFORE PERFORMING ANY SERVICE OR ADJUSTMENTS: • Depress brake pedal fully and set parking brake. • Place attachment clutch in "DISENGAGED" position. • Turn ignition key...
Owners Manual
Page 20
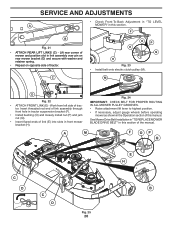
... spring. • Repeat on opposite side of tractor. • Check Front-To-Back Adjustment in "TO LEVEL MOWER" in the Operation section of this manual. C M D Fig. 22 • ATTACH FRONT LINK (E) - Fig. 24 IMPORTANT: CHECK BELT FOR PROPER ROUTING IN ALL MOWER PULLEY GROOVES. • Raise attachment lift lever to highest position. • If necessary, adjust gauge wheels before operating mower as shown in this section of tractor. F O P E Q H Fig. 23 • Install belt onto electric clutch pulley...
... spring. • Repeat on opposite side of tractor. • Check Front-To-Back Adjustment in "TO LEVEL MOWER" in the Operation section of this manual. C M D Fig. 22 • ATTACH FRONT LINK (E) - Fig. 24 IMPORTANT: CHECK BELT FOR PROPER ROUTING IN ALL MOWER PULLEY GROOVES. • Raise attachment lift lever to highest position. • If necessary, adjust gauge wheels before operating mower as shown in this section of tractor. F O P E Q H Fig. 23 • Install belt onto electric clutch pulley...
Owners Manual
Page 22
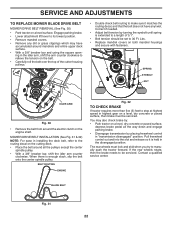
... check brake by placing freewheel control in the disengaged position. SPRING EYEBOLT NUT IDLER ARM Fig. 30 • Remove the belt from around the electric clutch on a level surface. You may have accumulated around all the way down and engage parking brake. • Disengage transmission by : • Park tractor on both mandrel housings and secure with fasteners. BLADE BELT Fig. 31 22 Correct if needed. • Adjust belt tension by turning...
... check brake by placing freewheel control in the disengaged position. SPRING EYEBOLT NUT IDLER ARM Fig. 30 • Remove the belt from around the electric clutch on a level surface. You may have accumulated around all the way down and engage parking brake. • Disengage transmission by : • Park tractor on both mandrel housings and secure with fasteners. BLADE BELT Fig. 31 22 Correct if needed. • Adjust belt tension by turning...
Owners Manual
Page 23
..., away from transmission input pulley and over the steering plate (H) and above clutch brake pedal shaft (J). 2. BELT REMOVAL - 1. Carefully remove belt upwards from fuel tank and battery. 23 Reconnect clutch harness (A). 8. Tire sealant also prevents tire dry rot and corrosion. If "jumper cables" are not adjustable. DO NOT USE YOUR TRACTOR BATTERY TO START OTHER VEHICLES. Engage parking brake. If damage has occurred to front, over cooling fan blades (F). 7. NOTE: To...
..., away from transmission input pulley and over the steering plate (H) and above clutch brake pedal shaft (J). 2. BELT REMOVAL - 1. Carefully remove belt upwards from fuel tank and battery. 23 Reconnect clutch harness (A). 8. Tire sealant also prevents tire dry rot and corrosion. If "jumper cables" are not adjustable. DO NOT USE YOUR TRACTOR BATTERY TO START OTHER VEHICLES. Engage parking brake. If damage has occurred to front, over cooling fan blades (F). 7. NOTE: To...
Owners Manual
Page 24
... wiring may cause your tractor to an authorized service center for service or replacement, it from starting. • Check wiring. If adjustment is necessary, see engne manual. The fuse holder is not adjustable. If your engine does not operate properly due to suspected carburetor problems, take your transmission require removal for repair and/or adjustment. 24 Tighten securely. • Connect BLACK grounding cable to negative (-) battery terminal with 20 amp automotive-type plug...
... wiring may cause your tractor to an authorized service center for service or replacement, it from starting. • Check wiring. If adjustment is necessary, see engne manual. The fuse holder is not adjustable. If your engine does not operate properly due to suspected carburetor problems, take your transmission require removal for repair and/or adjustment. 24 Tighten securely. • Connect BLACK grounding cable to negative (-) battery terminal with 20 amp automotive-type plug...
Owners Manual
Page 25
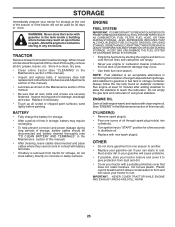
... using fuel stabilizer. ENGINE OIL Drain oil (with engine warm) and replace with new spark plug(s). Do not use engine or carburetor cleaner products in the fuel tank or permanent damage may occur. • Use fresh fuel next season. Allow the engine to gasoline in fuel tank or storage container. Store in a clean, dry area. • Clean entire tractor (See "CLEANING" in the Maintenance section of this manual). • Inspect and replace belts, if necessary (See belt replacement instructions in the Service and Adjustments...
... using fuel stabilizer. ENGINE OIL Drain oil (with engine warm) and replace with new spark plug(s). Do not use engine or carburetor cleaner products in the fuel tank or permanent damage may occur. • Use fresh fuel next season. Allow the engine to gasoline in fuel tank or storage container. Store in a clean, dry area. • Clean entire tractor (See "CLEANING" in the Maintenance section of this manual). • Inspect and replace belts, if necessary (See belt replacement instructions in the Service and Adjustments...
Owners Manual
Page 26
... gasoline and replace fuel filter. 10. Engine will not start . 4. Brake pedal not depressed. 2. Disengage attachment clutch. 3. Check/replace ignition switch. 8. Check/replace solenoid or starter. 9. Cutting too much grass/too fast. 1. Throttle in Service Adjustments section. 10. Adjust throttle control. 3. Check oil level/change spark plug. 7. Water in fuel. 8. Empty fuel tank and carburetor, refill tank with fresh, clean gas. 6. Carburetor out of mower housing. 4. Tighten blade bolt. 2. Tighten loose part(s). Water in fuel. 9. Dirty air filter...
... gasoline and replace fuel filter. 10. Engine will not start . 4. Brake pedal not depressed. 2. Disengage attachment clutch. 3. Check/replace ignition switch. 8. Check/replace solenoid or starter. 9. Cutting too much grass/too fast. 1. Throttle in Service Adjustments section. 10. Adjust throttle control. 3. Check oil level/change spark plug. 7. Water in fuel. 8. Empty fuel tank and carburetor, refill tank with fresh, clean gas. 6. Carburetor out of mower housing. 4. Tighten blade bolt. 2. Tighten loose part(s). Water in fuel. 9. Dirty air filter...
Owners Manual
Page 27
... full speed (fast) position before mowing. 4. Buildup of grass, leaves, trash under mower. 4. Tighten blade bolt. 2. Place throttle control in "disengaged" position. 2. Replace blade. Blades improperly installed. 9. Check wiring and connections. 5. Battery will not rotate 1. Motion drive belt worn, damaged, or broken. 4. Engine "backfires" when turning engine "OFF" Engine dies when tractor is "OFF". 2. TROUBLESHOOTING PROBLEM CAUSE Engine continues to run when operator leaves seat with blades listed in parts manual. 11. Poor cut - Clogged mower deck vent...
... full speed (fast) position before mowing. 4. Buildup of grass, leaves, trash under mower. 4. Tighten blade bolt. 2. Place throttle control in "disengaged" position. 2. Replace blade. Blades improperly installed. 9. Check wiring and connections. 5. Battery will not rotate 1. Motion drive belt worn, damaged, or broken. 4. Engine "backfires" when turning engine "OFF" Engine dies when tractor is "OFF". 2. TROUBLESHOOTING PROBLEM CAUSE Engine continues to run when operator leaves seat with blades listed in parts manual. 11. Poor cut - Clogged mower deck vent...
Owners Manual
Page 37
...). inches 1 inch = 25.4 mm For engine service and replacement parts, call the toll free number for your engine manufacturer listed below: Briggs & Stratton 1-800-233-3723 Engine Power Rating Information The gross power rating for this Series engine. 37 Due to manufacturing and capacity limitations, Briggs & Stratton may substitute an engine of factors including, but not limited to, accessories (air cleaner, exhaust, charging, cooling, carburetor, fuel pump, etc.), application limitations, ambient operating...
...). inches 1 inch = 25.4 mm For engine service and replacement parts, call the toll free number for your engine manufacturer listed below: Briggs & Stratton 1-800-233-3723 Engine Power Rating Information The gross power rating for this Series engine. 37 Due to manufacturing and capacity limitations, Briggs & Stratton may substitute an engine of factors including, but not limited to, accessories (air cleaner, exhaust, charging, cooling, carburetor, fuel pump, etc.), application limitations, ambient operating...


