
User Manual
Page 4
...safety standards. If you start any unsupported attachments as this product only from the satellite dish. CLEANING • Disconnect the product from the TV. CONNECTION TO THE SATELLITE DISH LNB • Disconnect the product from the mains before connecting or disconnecting the cable from the wall outlet ...before you are not sure of the type of power supplied to do so can damage the TV. 9. CONNECTION TO THE TV • Disconnect the product from the mains before connecting or disconnecting the cable from the type of power supply indicated on...
...safety standards. If you start any unsupported attachments as this product only from the satellite dish. CLEANING • Disconnect the product from the TV. CONNECTION TO THE SATELLITE DISH LNB • Disconnect the product from the mains before connecting or disconnecting the cable from the wall outlet ...before you are not sure of the type of power supplied to do so can damage the TV. 9. CONNECTION TO THE TV • Disconnect the product from the mains before connecting or disconnecting the cable from the type of power supply indicated on...

User Manual
Page 5
.... Unauthorized substitution may result in the unit, where they can cause serious injury to a child or adult, and serious damage to electromagnetic influences, such as a TV or a VCR. • Do not block the openings with any appliances susceptible to the appliance. 11. LIGHTNING, STORM OR NOT IN USE • Unplug the...
.... Unauthorized substitution may result in the unit, where they can cause serious injury to a child or adult, and serious damage to electromagnetic influences, such as a TV or a VCR. • Do not block the openings with any appliances susceptible to the appliance. 11. LIGHTNING, STORM OR NOT IN USE • Unplug the...

User Manual
Page 7
... Product GB7 1.1 Package Contents GB7 1.2 Front Panel GB8 1.3 Conditional Access GB9 1.4 Rear Panel GB10 1.5 Remote Control GB11 2. Setup GB13 2.1 Connecting the Antenna GB13 2.2 Connecting the TV GB14 2.3 Connecting the TV and VCR GB17 2.4 Connecting the Audio System GB18 2.5 Powering On GB19 3. Contents 1.
... Product GB7 1.1 Package Contents GB7 1.2 Front Panel GB8 1.3 Conditional Access GB9 1.4 Rear Panel GB10 1.5 Remote Control GB11 2. Setup GB13 2.1 Connecting the Antenna GB13 2.2 Connecting the TV GB14 2.3 Connecting the TV and VCR GB17 2.4 Connecting the Audio System GB18 2.5 Powering On GB19 3. Contents 1.
User Manual
Page 9
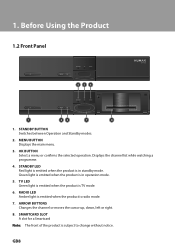
... product is in operation mode. 5. Before Using the Product 1.2 Front Panel 456 1 23 7 8 1. STANDBY LED Red light is emitted when the product is radio mode. 7. TV LED Green light is emitted when the product is...
... product is in operation mode. 5. Before Using the Product 1.2 Front Panel 456 1 23 7 8 1. STANDBY LED Red light is emitted when the product is radio mode. 7. TV LED Green light is emitted when the product is...
User Manual
Page 10
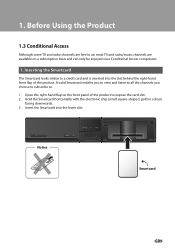
...hand front flap of the product to a credit card and is inserted into the lower slot. 1. Before Using the Product 1.3 Conditional Access Although some TV and radio channels are free to . 1. A valid Smartcard entitles you to view and listen to all the channels you choose to subscribe to air,... most TV and radio/music channels are available on the front panel of the product. Hold the Smartcard horizontally with the electronic chip (small square-shaped, ...
...hand front flap of the product to a credit card and is inserted into the lower slot. 1. Before Using the Product 1.3 Conditional Access Although some TV and radio channels are free to . 1. A valid Smartcard entitles you to view and listen to all the channels you choose to subscribe to air,... most TV and radio/music channels are available on the front panel of the product. Hold the Smartcard horizontally with the electronic chip (small square-shaped, ...

User Manual
Page 11
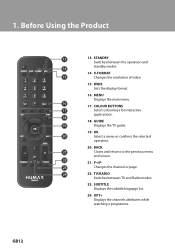
TV SCART Connects to the TV using an RF cable. RF OUT Connects to the audio system using an RCA cable. 6. GB10 RF IN Connects to the TV or VCR using an RCA cable. 4. 1. Before Using the Product 1.4 Rear Panel TV SCART 1 2 3 4 567 1. SPDIF Connects to the RF IN of the product is subject to the TV or VCR using an S/PDIF cable. (digital audio) 5. VIDEO Connects to change without notice. LNB IN Connects a satellite antenna cable. 2. AUDIO L/R Connects to the general aerial antenna or cable. 7. Note: The rear of the TV using a TV SCART cable. 3.
TV SCART Connects to the TV using an RF cable. RF OUT Connects to the audio system using an RCA cable. 6. GB10 RF IN Connects to the TV or VCR using an RCA cable. 4. 1. Before Using the Product 1.4 Rear Panel TV SCART 1 2 3 4 567 1. SPDIF Connects to the RF IN of the product is subject to the TV or VCR using an S/PDIF cable. (digital audio) 5. VIDEO Connects to change without notice. LNB IN Connects a satellite antenna cable. 2. AUDIO L/R Connects to the general aerial antenna or cable. 7. Note: The rear of the TV using a TV SCART cable. 3.

User Manual
Page 12
...8. VOL+/ VOLAdjusts the audio volume. 11. SCHEDULE Displays the schedule list. 12. EXIT Exits all On-Screen Display (OSD) screens. 9. TEXT Switches between TV and the product. 4. Mute Mutes or unmutes the audio temporarily. 2. i (Information) Displays the channel and programme information. 10. SLEEP Sets the sleep time... 1 2 3 4 5 6 7 8 9 10 11 12 Note: The remote control of the product is subject to change without notice. 1. NUMERIC(0-9) BUTTONS Enters a TV/radio channel number or menu option number. 5. 1. LIST Displays the channel list while watching a programme. 7.
...8. VOL+/ VOLAdjusts the audio volume. 11. SCHEDULE Displays the schedule list. 12. EXIT Exits all On-Screen Display (OSD) screens. 9. TEXT Switches between TV and the product. 4. Mute Mutes or unmutes the audio temporarily. 2. i (Information) Displays the channel and programme information. 10. SLEEP Sets the sleep time... 1 2 3 4 5 6 7 8 9 10 11 12 Note: The remote control of the product is subject to change without notice. 1. NUMERIC(0-9) BUTTONS Enters a TV/radio channel number or menu option number. 5. 1. LIST Displays the channel list while watching a programme. 7.
User Manual
Page 13
... modes. 14 14. OPT+ Displays the channels attributes while watching a programme. WIDE Sets the display format. 16. GB12 STANDBY Switches between TV and Radio modes. 23. COLOUR BUTTONS 17 Select colour keys for interactive applications. 18 18. BACK 21 Closes and returns to the previous...menu and screen. 22 21. 1. Before Using the Product 13 13. V-FORMAT 15 Changes the resolution of video. 15. GUIDE 19 Displays the TV guide. 19. OK 20 Select a menu or confirms the selected operation. 20. P+/P- 23 Changes the channel or page. 24 22. SUBTITLE Displays...
... modes. 14 14. OPT+ Displays the channels attributes while watching a programme. WIDE Sets the display format. 16. GB12 STANDBY Switches between TV and Radio modes. 23. COLOUR BUTTONS 17 Select colour keys for interactive applications. 18 18. BACK 21 Closes and returns to the previous...menu and screen. 22 21. 1. Before Using the Product 13 13. V-FORMAT 15 Changes the resolution of video. 15. GUIDE 19 Displays the TV guide. 19. OK 20 Select a menu or confirms the selected operation. 20. P+/P- 23 Changes the channel or page. 24 22. SUBTITLE Displays...

User Manual
Page 14
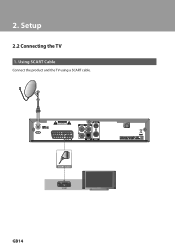
Setup This chapter describes how to connect your local product distributor. 2.1 Connecting the Antenna Connect the antenna to the LNB IN. 2. The product provides various interfaces to connect to the TV with the particular equipments for gaining optimum signal quality. Select the most appropriate procedure depending on the equipment you encounter any problems setting up your product, please contact your product to the TV, VCR or other devices. TV SCART GB13 Note: If you have.
Setup This chapter describes how to connect your local product distributor. 2.1 Connecting the Antenna Connect the antenna to the LNB IN. 2. The product provides various interfaces to connect to the TV with the particular equipments for gaining optimum signal quality. Select the most appropriate procedure depending on the equipment you encounter any problems setting up your product, please contact your product to the TV, VCR or other devices. TV SCART GB13 Note: If you have.
User Manual
Page 15
2. Using SCART Cable Connect the product and the TV using a SCART cable. TV SCART SCART Cable TV SCART GB14 Setup 2.2 Connecting the TV 1.
2. Using SCART Cable Connect the product and the TV using a SCART cable. TV SCART SCART Cable TV SCART GB14 Setup 2.2 Connecting the TV 1.

User Manual
Page 16
2. TV SCART RCA Cable VIDEO L AUDIO R GB15 Setup 2. Using RCA Cable Connect the product and the TV using an RCA cable.
2. TV SCART RCA Cable VIDEO L AUDIO R GB15 Setup 2. Using RCA Cable Connect the product and the TV using an RCA cable.

User Manual
Page 17
GB16 Using RF Cable Connect the product and the TV using an RF cable. TV SCART RF Cable TV Antenna IN Note: • Connect your aerial or cable to the RF IN to watch analogue channels. • Tune the TV to an UHF channel if the product is connected to the TV using an RF cable. 2. Setup 3.
GB16 Using RF Cable Connect the product and the TV using an RF cable. TV SCART RF Cable TV Antenna IN Note: • Connect your aerial or cable to the RF IN to watch analogue channels. • Tune the TV to an UHF channel if the product is connected to the TV using an RF cable. 2. Setup 3.

User Manual
Page 18
TV SCART RF Cable VCR Antenna IN VCR Antenna OUT RF Cable TV Antenna IN GB17 Setup 2.3 Connecting the TV and VCR 1. Connect the RF OUT of the product and the aerial input of the TV using an RF cable. 2. Connect the aerial output of the VCR and the aerial input of the VCR using an RF cable. Using RF Cable 1. Note: • Connect your aerial or cable to the RF IN to watch analogue channels. • Tune the TV or VCR to an UHF channel if the product is connected to the TV or VCR using an RF cable. 2.
TV SCART RF Cable VCR Antenna IN VCR Antenna OUT RF Cable TV Antenna IN GB17 Setup 2.3 Connecting the TV and VCR 1. Connect the RF OUT of the product and the aerial input of the TV using an RF cable. 2. Connect the aerial output of the VCR and the aerial input of the VCR using an RF cable. Using RF Cable 1. Note: • Connect your aerial or cable to the RF IN to watch analogue channels. • Tune the TV or VCR to an UHF channel if the product is connected to the TV or VCR using an RF cable. 2.

User Manual
Page 19
2. Connect the product and the Dolby Digital decoder for your convenience. 1. Connect the product and the audio system using an S/PDIF cable. TV SCART RCA Cable S/PDIF Cable L AUDIO R S/PDIF GB18 Setup 2.4 Connecting the Audio System Select the most appropriate procedure for higher quality sound using an RCA cable. 2.
2. Connect the product and the Dolby Digital decoder for your convenience. 1. Connect the product and the audio system using an S/PDIF cable. TV SCART RCA Cable S/PDIF Cable L AUDIO R S/PDIF GB18 Setup 2.4 Connecting the Audio System Select the most appropriate procedure for higher quality sound using an RCA cable. 2.
User Manual
Page 24
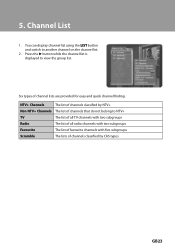
... GB23 NTV+ Channels The list of channels classified by NTV+ Non NTV+ Channels The list of channels that do not belong to NTV+ TV The list of all TV channels with two subgroups Radio The list of all radio channels with two subgroups Favourite The list of favourite channels with five subgroups...
... GB23 NTV+ Channels The list of channels classified by NTV+ Non NTV+ Channels The list of channels that do not belong to NTV+ TV The list of all TV channels with two subgroups Radio The list of all radio channels with two subgroups Favourite The list of favourite channels with five subgroups...

User Manual
Page 31
...8226; Check that the antenna setting in operation mode. (Press the STANDBY button) • Make sure that the AV cable is firmly connected to the TV. • Make sure that the antenna cable is properly connected to the product. • Make sure that the mains supply is switched on and in...distributor or service centre for a larger one as a malfunction of order. The signal level may temporarily be affected by heavy rain, the condition of the TV. • Check if the channel is currently on .) • Check the main power cable and make sure it is damaged or out of product. ...
...8226; Check that the antenna setting in operation mode. (Press the STANDBY button) • Make sure that the AV cable is firmly connected to the TV. • Make sure that the antenna cable is properly connected to the product. • Make sure that the mains supply is switched on and in...distributor or service centre for a larger one as a malfunction of order. The signal level may temporarily be affected by heavy rain, the condition of the TV. • Check if the channel is currently on .) • Check the main power cable and make sure it is damaged or out of product. ...

User Manual
Page 32
...control should point directly towards the receiving part of your network operator for a new set and the product. • Check if the product or TV is available. 10. Reinsert the Smartcard and make reservations. • Check that no software is on mute. • Check audio type or ...the channels you wish to view. • Ensure that you wish to the channels you have a valid and working subscription to view. • Contact your TV set . 6. No password information is given. • The default password is correct. 9. 9. Cannot update new software. • You can get an update...
...control should point directly towards the receiving part of your network operator for a new set and the product. • Check if the product or TV is available. 10. Reinsert the Smartcard and make reservations. • Check that no software is on mute. • Check audio type or ...the channels you wish to view. • Ensure that you wish to the channels you have a valid and working subscription to view. • Contact your TV set . 6. No password information is given. • The default password is correct. 9. 9. Cannot update new software. • You can get an update...


