
User Manual
Page 3
... conditions of any importance to help understand, use and maintain the installation. Refer servicing to qualified service personnel. This symbol indicates dangerous voltage inside . GB2 User's Manual Instruction about the 'WEEE' Symbol This product should not be disposed with other apparatus. • Note Indicates additional information to make the user aware of possible problems and information of the purchase contract. Note: Please...
... conditions of any importance to help understand, use and maintain the installation. Refer servicing to qualified service personnel. This symbol indicates dangerous voltage inside . GB2 User's Manual Instruction about the 'WEEE' Symbol This product should not be disposed with other apparatus. • Note Indicates additional information to make the user aware of possible problems and information of the purchase contract. Note: Please...
User Manual
Page 4
... mains before connecting or disconnecting the cable from the type of power supply indicated on an unstable cart, stand, tripod, bracket, or table where it has more than 10 cm clearance from the mains before cleaning. • Use a light damp cloth (no objects filled with international safety standards. Failure to liquid of any maintenance or installation procedures. 2. GB3 User's Manual Safety...
... mains before connecting or disconnecting the cable from the type of power supply indicated on an unstable cart, stand, tripod, bracket, or table where it has more than 10 cm clearance from the mains before cleaning. • Use a light damp cloth (no objects filled with international safety standards. Failure to liquid of any maintenance or installation procedures. 2. GB3 User's Manual Safety...
User Manual
Page 6
... Shift Operations GB38 6. Channel List GB40 7. Contents 1. Installation Wizard GB22 3.1 Language GB22 3.2 Pre-programmed Channel GB22 3.3 Antenna Setting GB23 3.4 Software Update GB23 3.5 Result GB24 3.6 Installation Checklist GB24 4. Before Using the Product GB7 1.1 Package Contents GB7 1.2 Front Panel GB8 1.3 Conditional Access GB9 1.4 Rear Panel GB11 1.5 Remote Control GB12 1.6 Remote Control Batteries GB15 2. Setup GB16 2.1 Connecting to the Antenna GB16 2.2 Connecting TV GB17 2.3 Connecting the TV and VCR GB19 2.4 Connecting the Audio System GB20 2.5 Powering On...
... Shift Operations GB38 6. Channel List GB40 7. Contents 1. Installation Wizard GB22 3.1 Language GB22 3.2 Pre-programmed Channel GB22 3.3 Antenna Setting GB23 3.4 Software Update GB23 3.5 Result GB24 3.6 Installation Checklist GB24 4. Before Using the Product GB7 1.1 Package Contents GB7 1.2 Front Panel GB8 1.3 Conditional Access GB9 1.4 Rear Panel GB11 1.5 Remote Control GB12 1.6 Remote Control Batteries GB15 2. Setup GB16 2.1 Connecting to the Antenna GB16 2.2 Connecting TV GB17 2.3 Connecting the TV and VCR GB19 2.4 Connecting the Audio System GB20 2.5 Powering On...
User Manual
Page 7
... 8.1 PIN-Code Change GB47 8.2 Smartcard GB48 8.3 CI-Module GB48 8.4 System GB48 8.5 Software Update GB49 8.6 Search GB49 8.7 Picture GB50 8.8 Dolby Digital GB51 8.9 Channel List GB51 9. Edit Channels GB65 11.1 Edit Channel Lists GB65 11.2 Edit Preferred Channels GB66 11.3 Edit Favourite Groups GB67 11.4 Channel Change Mode GB68 12. Default Setting GB77 13. Appendix GB80 14.1 Menu Map GB80 14.2 Trouble Shooting GB81 14.3 Error Message GB83 14.4 Specification GB85 14.6 Service and Support GB89 GB6 User's Manual Installation GB69 12.1 Antenna Connection...
... 8.1 PIN-Code Change GB47 8.2 Smartcard GB48 8.3 CI-Module GB48 8.4 System GB48 8.5 Software Update GB49 8.6 Search GB49 8.7 Picture GB50 8.8 Dolby Digital GB51 8.9 Channel List GB51 9. Edit Channels GB65 11.1 Edit Channel Lists GB65 11.2 Edit Preferred Channels GB66 11.3 Edit Favourite Groups GB67 11.4 Channel Change Mode GB68 12. Default Setting GB77 13. Appendix GB80 14.1 Menu Map GB80 14.2 Trouble Shooting GB81 14.3 Error Message GB83 14.4 Specification GB85 14.6 Service and Support GB89 GB6 User's Manual Installation GB69 12.1 Antenna Connection...

User Manual
Page 12
... Connects to change without notice. Note: The rear of the product is subject to the audio system using an RCA cable. 7. TV SCART Connects to the TV or VCR using an S/PDIF cable. (digital audio) 9. ON/OFF Powers on/off. AUDIO L/R Connects to the TV using a VCR SCART cable. 5. 1. LNB OUT Connects another digital satellite receiver. 3. VCR SCART Connects to update software. 8. RS-232C Connects to the PC to the VCR or DVD using a TV SCART cable. 4. LNB IN 1, 2 Connects a satellite antenna cable. GB11 User's Manual Before Using the Product 1.4 Rear Panel...
... Connects to change without notice. Note: The rear of the product is subject to the audio system using an RCA cable. 7. TV SCART Connects to the TV or VCR using an S/PDIF cable. (digital audio) 9. ON/OFF Powers on/off. AUDIO L/R Connects to the TV using a VCR SCART cable. 5. 1. LNB OUT Connects another digital satellite receiver. 3. VCR SCART Connects to update software. 8. RS-232C Connects to the PC to the VCR or DVD using a TV SCART cable. 4. LNB IN 1, 2 Connects a satellite antenna cable. GB11 User's Manual Before Using the Product 1.4 Rear Panel...
User Manual
Page 17
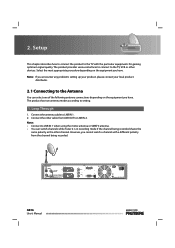
... interfaces to connect to setting. 1. Note: If you encounter any problems setting up your product, please contact your local product distributor. 2.1 Connecting to the Antenna You can switch channels while Tuner 2 is in recording mode if the channel being recorded. However, you have . The product has two antenna modes according to the TV, VCR or other channel. 2. GB16 User's Manual Connect the antenna cable to LNB IN 1 when using the motor antenna or SMATV antenna. •...
... interfaces to connect to setting. 1. Note: If you encounter any problems setting up your product, please contact your local product distributor. 2.1 Connecting to the Antenna You can switch channels while Tuner 2 is in recording mode if the channel being recorded. However, you have . The product has two antenna modes according to the TV, VCR or other channel. 2. GB16 User's Manual Connect the antenna cable to LNB IN 1 when using the motor antenna or SMATV antenna. •...
User Manual
Page 24
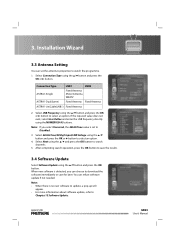
... information about software update, refer to Disabled. 3. Select Next using the / button and press the OK or button to save for later. After completing search operation, press the OK button to select an option. You can set to Chapter.13 Software Update. Installation Wizard 3.3 Antenna Setting You can refuse software update if not needed. If the required value does not exist, select User Define and enter the LNB frequency directly using the / button and press the OK button...
... information about software update, refer to Disabled. 3. Select Next using the / button and press the OK or button to save for later. After completing search operation, press the OK button to select an option. You can set to Chapter.13 Software Update. Installation Wizard 3.3 Antenna Setting You can refuse software update if not needed. If the required value does not exist, select User Define and enter the LNB frequency directly using the / button and press the OK button...
User Manual
Page 25
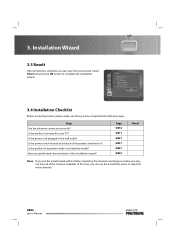
... antennas connected correctly? 3. GB24 User's Manual Is the product connected to complete the installation wizard. 3.6 Installation Checklist Before using the product, please make sure that you can use the installation menu to search for more channels. Have you can view the result screen. Page GB16 GB17 GB21 GB21 GB21 GB22 Done? Is the product in the wall outlet? In this case, you performed channel search in the installation wizard? Installation...
... antennas connected correctly? 3. GB24 User's Manual Is the product connected to complete the installation wizard. 3.6 Installation Checklist Before using the product, please make sure that you can use the installation menu to search for more channels. Have you can view the result screen. Page GB16 GB17 GB21 GB21 GB21 GB22 Done? Is the product in the wall outlet? In this case, you performed channel search in the installation wizard? Installation...

User Manual
Page 26
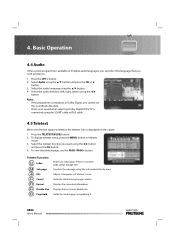
... button to stop the audio temporarily. Select the required subtitle language using the NUMERIC(0-9) buttons to move to 10.2.1 Subtitle Language. Press the MUTE button to switch between TV channels and radio channels. GB25 User's Manual Refer to the channel directly. 3. 4. Basic Operation This chapter describes the basic functions of the product such as switching channels, volume control and other basic features. 4.1 Switching Channel You can switch channels using one of the screen. Enter the channel number using the / button...
... button to stop the audio temporarily. Select the required subtitle language using the NUMERIC(0-9) buttons to move to 10.2.1 Subtitle Language. Press the MUTE button to switch between TV channels and radio channels. GB25 User's Manual Refer to the channel directly. 3. 4. Basic Operation This chapter describes the basic functions of the product such as switching channels, volume control and other basic features. 4.1 Switching Channel You can switch channels using one of the screen. Enter the channel number using the / button...
User Manual
Page 27
... the channel supports teletext, the teletext icon is available in teletext mode. 3. Hides the teletext except page number. Holds the current page not updating it. Press the TELETEXT(BLUE) button. 2. Select the teletext function you wish to listen to index page. Searches the sub-page using the / button. 4. Adjusts transparency of teletext screen. To view the teletext page, use the PAGE-/PAGE+ button. GB26 User's Manual Select the audio direction...
... the channel supports teletext, the teletext icon is available in teletext mode. 3. Hides the teletext except page number. Holds the current page not updating it. Press the TELETEXT(BLUE) button. 2. Select the teletext function you wish to listen to index page. Searches the sub-page using the / button. 4. Adjusts transparency of teletext screen. To view the teletext page, use the PAGE-/PAGE+ button. GB26 User's Manual Select the audio direction...
User Manual
Page 42
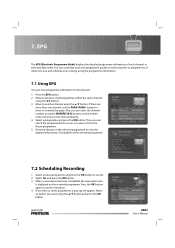
... press the OK button. If you can enter the channel number using the / button. Move to previous /next programme within the same channel using the programme information. 7.1 Using EPG You can customize your own programme guide to list the channels or programmes of the selected programme. 7.2 Scheduling Recording 1. Then you select a series programme, a pop-up will appear. You can view programme information for all channels. 1. Select a future programme...
... press the OK button. If you can enter the channel number using the / button. Move to previous /next programme within the same channel using the programme information. 7.1 Using EPG You can customize your own programme guide to list the channels or programmes of the selected programme. 7.2 Scheduling Recording 1. Then you select a series programme, a pop-up will appear. You can view programme information for all channels. 1. Select a future programme...
User Manual
Page 47
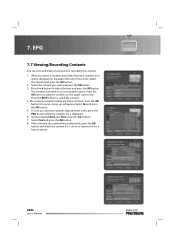
Press the EXIT button to play the contents on air are future contents. GB46 User's Manual Select Yes and press the OK button. 5. Select Find and press the OK button. 8. The contents marked in white are marked in specific date and time order, press the PRO button while the contents list is displayed. 6. When you want and press the OK button. 3. Press the OK button to...
Press the EXIT button to play the contents on air are future contents. GB46 User's Manual Select Yes and press the OK button. 5. Select Find and press the OK button. 8. The contents marked in white are marked in specific date and time order, press the PRO button while the contents list is displayed. 6. When you want and press the OK button. 3. Press the OK button to...
User Manual
Page 48
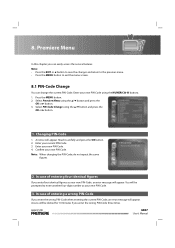
... new PIN-Code. 3. Enter your new PIN-Code using the NUMERIC(0-9) buttons. 1. In case of entering a wrong PIN-Code If you enter the wrong PIN-Code when entering the current PIN-Code, an error message will be prompted to exit the menu screen. 8.1 PIN-Code Change You can easily access the service features. Premiere Menu In this chapter you enter the wrong PIN-Code three times. Select Premiere Menu using the / button and press the OK or button. 1. Read it carefully and press the OK button. 2. GB47 User's Manual Enter your new PIN-Code...
... new PIN-Code. 3. Enter your new PIN-Code using the NUMERIC(0-9) buttons. 1. In case of entering a wrong PIN-Code If you enter the wrong PIN-Code when entering the current PIN-Code, an error message will be prompted to exit the menu screen. 8.1 PIN-Code Change You can easily access the service features. Premiere Menu In this chapter you enter the wrong PIN-Code three times. Select Premiere Menu using the / button and press the OK or button. 1. Read it carefully and press the OK button. 2. GB47 User's Manual Enter your new PIN-Code...
User Manual
Page 53
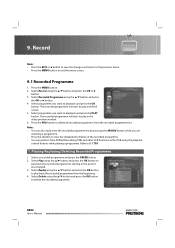
... watching a programme. • Press the i button to view the detailed information of the recorded programme. • You can perform Time Shifted Recording (TSR) and other VCR functions within TSR using the / button and press the OK button to playback and press the OK button. Select Delete using the playback control buttons while playing a programme. Refer to exit the menu screen. 9.1 Recorded Programme 1. Select Play using the / button and press the OK or button. 4. Select Recorded Programme using the / button...
... watching a programme. • Press the i button to view the detailed information of the recorded programme. • You can perform Time Shifted Recording (TSR) and other VCR functions within TSR using the / button and press the OK button to playback and press the OK button. Select Delete using the playback control buttons while playing a programme. Refer to exit the menu screen. 9.1 Recorded Programme 1. Select Play using the / button and press the OK or button. 4. Select Recorded Programme using the / button...
User Manual
Page 81
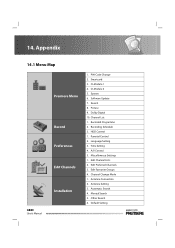
...Dolby Digital 10. Channel List 1. HDD Control 1. Miscellaneous Settings 1. Antenna Connection 2. Manual Search 5. Search 8. Parental Control 2. Edit Favourite Groups 4. Other Search 6. CI-Module 1 4. A/V Control 5. Default Setting PIN-Code Change 2. Edit Preferred Channels 3. Channel Change Mode 1. Picture 9. CI-Module 2 5. Software Update 7. Language Setting 3. Recording Schedule 3. 14. Antenna Setting 3. Edit Channel Lists 2. Automatic Search 4. Smartcard 3. Appendix 14.1 Menu Map Premiere Menu Record Preferences Edit Channels Installation...
...Dolby Digital 10. Channel List 1. HDD Control 1. Miscellaneous Settings 1. Antenna Connection 2. Manual Search 5. Search 8. Parental Control 2. Edit Favourite Groups 4. Other Search 6. CI-Module 1 4. A/V Control 5. Default Setting PIN-Code Change 2. Edit Preferred Channels 3. Channel Change Mode 1. Picture 9. CI-Module 2 5. Software Update 7. Language Setting 3. Recording Schedule 3. 14. Antenna Setting 3. Edit Channel Lists 2. Automatic Search 4. Smartcard 3. Appendix 14.1 Menu Map Premiere Menu Record Preferences Edit Channels Installation...
User Manual
Page 82
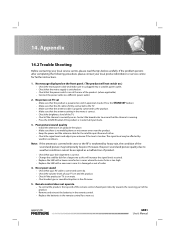
... the menu is powered on at the rear of the sound and picture may be poor. 14. If the problem persists after completing the following procedure, please contact your local service centre, please read the tips below carefully. GB81 User's Manual Appendix 14.2 Trouble Shooting Before contacting your local product distributor or service centre for a new set • Make sure that the antenna setting in the remote control for further instructions. 1.
... the menu is powered on at the rear of the sound and picture may be poor. 14. If the problem persists after completing the following procedure, please contact your local service centre, please read the tips below carefully. GB81 User's Manual Appendix 14.2 Trouble Shooting Before contacting your local product distributor or service centre for a new set • Make sure that the antenna setting in the remote control for further instructions. 1.
User Manual
Page 84
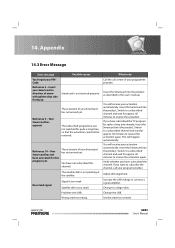
... this program yet. Reference 3 - Insert your activation automatically. You have subscribed the channel. You will receive your Smartcard in the user's manual. Set the antenna correctly. Appendix 14.3 Error Message Error message You forgot your Smartcard has not arrived yet. No or bad signal Signal is not pointing at the satellite. This will receive your programme provider. The activation of arrow with LNB. The activation of your activation automatically. Wrong antenna setting. Switch...
... this program yet. Reference 3 - Insert your activation automatically. You have subscribed the channel. You will receive your Smartcard in the user's manual. Set the antenna correctly. Appendix 14.3 Error Message Error message You forgot your Smartcard has not arrived yet. No or bad signal Signal is not pointing at the satellite. This will receive your programme provider. The activation of arrow with LNB. The activation of your activation automatically. Wrong antenna setting. Switch...
User Manual
Page 85
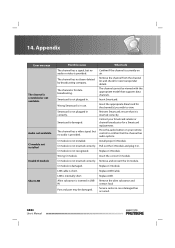
... the audio button on air. Replace CI-Module. CI module is internally short. Replace CI module. Replace LNB Cable. LNB is not inserted correctly. CI module not installed Invalid CI module Short LNB Possible causes What to view. Insert Smartcard. Insert the appropriate Smartcard for a Smartcard replacement. ensure that supports data channels. Appendix Error message The channel is not plugged in . Smartcard is scrambled or not available. GB84 User's Manual Insert...
... the audio button on air. Replace CI-Module. CI module is internally short. Replace CI module. Replace LNB Cable. LNB is not inserted correctly. CI module not installed Invalid CI module Short LNB Possible causes What to view. Insert Smartcard. Insert the appropriate Smartcard for a Smartcard replacement. ensure that supports data channels. Appendix Error message The channel is not plugged in . Smartcard is scrambled or not available. GB84 User's Manual Insert...

User Manual
Page 88
... view the start times. 8. GB87 User's Manual LNB (Low Noise Block) A device that allows customers to list current and scheduled programs that a frequency can control numerous LNBs through a broadcast system. DiSEqC (Digital Satellite Equipment Control) A DiSEqC compatible receiver relies on a switching box which detects the 22kHz tone pulsing rapidly on each channel, including a short summary or commentary for their selection. it is mounted on an arm facing your satellite dish, focusing on satellite signals...
... view the start times. 8. GB87 User's Manual LNB (Low Noise Block) A device that allows customers to list current and scheduled programs that a frequency can control numerous LNBs through a broadcast system. DiSEqC (Digital Satellite Equipment Control) A DiSEqC compatible receiver relies on a switching box which detects the 22kHz tone pulsing rapidly on each channel, including a short summary or commentary for their selection. it is mounted on an arm facing your satellite dish, focusing on satellite signals...
User Manual
Page 89
SCART A 21-pin connector standard to display two different TV channels (or TV inputs) on a single screen. 17. GB88 User's Manual a cable with a ferromagnetic material. It allows the transfer of digital audio between two devices without any conversion to support trick-play. 20. Each transponder can record and playback programmes directly using the embedded hard disk drive(s). 18. PVR (Personal Video Recorder) Video recorder that contains updateable chip memory. HDD (Hard Disk Drive) The primary computer...
SCART A 21-pin connector standard to display two different TV channels (or TV inputs) on a single screen. 17. GB88 User's Manual a cable with a ferromagnetic material. It allows the transfer of digital audio between two devices without any conversion to support trick-play. 20. Each transponder can record and playback programmes directly using the embedded hard disk drive(s). 18. PVR (Personal Video Recorder) Video recorder that contains updateable chip memory. HDD (Hard Disk Drive) The primary computer...


