
User Manual
Page 2
... and Notes Throughout the whole manual, pay special attention to your product for purchasing a HUMAX product. Copyright (Copyright © 2011 HUMAX Corporation) Not to help understand, use and maintain the product at maximum performance. Refer servicing to safely install, use and maintain the installation. 1 Note Indicates additional information to make the user aware of possible problems and information of any importance to be...
... and Notes Throughout the whole manual, pay special attention to your product for purchasing a HUMAX product. Copyright (Copyright © 2011 HUMAX Corporation) Not to help understand, use and maintain the product at maximum performance. Refer servicing to safely install, use and maintain the installation. 1 Note Indicates additional information to make the user aware of possible problems and information of any importance to be...
User Manual
Page 4
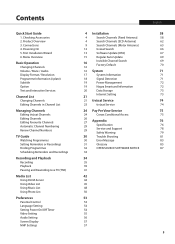
... Parental Control Language Setting Setting Power On/Off Timer Video Setting Audio Setting Screen Display MHP Settings 4 Installation 4 Search Channels [Fixed Antenna] 4 Search Channels [SCD Antenna] 9 Search Channels [Motor Antenna] 12 tivùsat Search 13 Software Update (OTA) 15 Regular Auto Update Invisible Channel Search 16 Factory Default 16 16 System 17 System Information 18 Signal Detection 19 Power Management 19 Nagra Smartcard Information 20 Data Storage Internet Setting 21 21 tivùsat Service 23 tivùsat Service 24 Pay Per View Service...
... Parental Control Language Setting Setting Power On/Off Timer Video Setting Audio Setting Screen Display MHP Settings 4 Installation 4 Search Channels [Fixed Antenna] 4 Search Channels [SCD Antenna] 9 Search Channels [Motor Antenna] 12 tivùsat Search 13 Software Update (OTA) 15 Regular Auto Update Invisible Channel Search 16 Factory Default 16 16 System 17 System Information 18 Signal Detection 19 Power Management 19 Nagra Smartcard Information 20 Data Storage Internet Setting 21 21 tivùsat Service 23 tivùsat Service 24 Pay Per View Service...
User Manual
Page 8
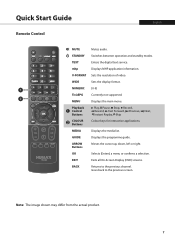
... video. Displays the main menu. Returns to the previous screen. Note: The image shown may differ from the actual product. 7 Displays the programme guide. Goes back to the previous channel. Sets the display format. (0-9) Currently not supported. Displays the media list. Selects (Enters) a menu or confirms a selection. Exits all On-Screen Display (OSD) screens. Displays MHP application information. Moves the cursor up, down, left or right. Switches between operation and standby modes. Enters the digital text service. Play...
... video. Displays the main menu. Returns to the previous screen. Note: The image shown may differ from the actual product. 7 Displays the programme guide. Goes back to the previous channel. Sets the display format. (0-9) Currently not supported. Displays the media list. Selects (Enters) a menu or confirms a selection. Exits all On-Screen Display (OSD) screens. Displays MHP application information. Moves the cursor up, down, left or right. Switches between operation and standby modes. Enters the digital text service. Play...
User Manual
Page 10
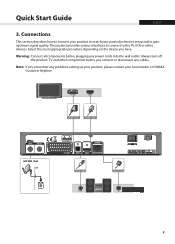
... problems setting up your product, please contact your particular devices setup and to gain optimum signal quality. Select the most appropriate procedure depending on the device you connect or disconnect any power cords into the wall outlet. Always turn off the product, TV and other devices. TV SCART HDMI SCART Cable HDMI Cable HOT BIRD 13.0E Wall S/PDIF Cable S/PDIF Ethernet Cable LAN Router 9 Connections...
... problems setting up your product, please contact your particular devices setup and to gain optimum signal quality. Select the most appropriate procedure depending on the device you connect or disconnect any power cords into the wall outlet. Always turn off the product, TV and other devices. TV SCART HDMI SCART Cable HDMI Cable HOT BIRD 13.0E Wall S/PDIF Cable S/PDIF Ethernet Cable LAN Router 9 Connections...
User Manual
Page 16
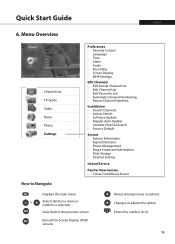
Quick Start Guide English 6. Menu Overview Channel List TV Guide Video Music Photo Settings Preferences • Parental Control • Language • Time • Video • Audio • Recording • Screen Display • MHP Settings Edit Channels • Edit tivùsat Channel List • Edit Channel List • Edit Favourite List • Automatic Channel Numbering • Renew Channel Numbers Installation • Search Channels • tivùsat Search • Software Update • Regular Auto Update • Invisible Channel Search • Factory Default ...
Quick Start Guide English 6. Menu Overview Channel List TV Guide Video Music Photo Settings Preferences • Parental Control • Language • Time • Video • Audio • Recording • Screen Display • MHP Settings Edit Channels • Edit tivùsat Channel List • Edit Channel List • Edit Favourite List • Automatic Channel Numbering • Renew Channel Numbers Installation • Search Channels • tivùsat Search • Software Update • Regular Auto Update • Invisible Channel Search • Factory Default ...
User Manual
Page 19
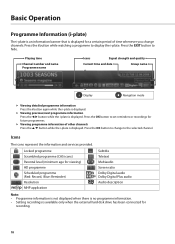
Press the EXIT button to display the i-plate. Locked programme Scrambled programme (CAS icons) Parental level (minimum age for viewing) HD programme Scheduled programme (Red: Record, Blue: Reminder) Resolution MHP application Subtitle Teletext Multiaudio Screen ratio Dolby Digital audio Dolby Digital Plus audio AD Audio description Note: • Programme information is not displayed when there is no programme information. • Setting recordings is available only when the external hard disk drive has been connected for future programmes. Viewing previous/next programme...
Press the EXIT button to display the i-plate. Locked programme Scrambled programme (CAS icons) Parental level (minimum age for viewing) HD programme Scheduled programme (Red: Record, Blue: Reminder) Resolution MHP application Subtitle Teletext Multiaudio Screen ratio Dolby Digital audio Dolby Digital Plus audio AD Audio description Note: • Programme information is not displayed when there is no programme information. • Setting recordings is available only when the external hard disk drive has been connected for future programmes. Viewing previous/next programme...
User Manual
Page 34
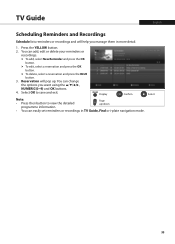
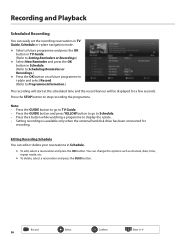
... buttons. 4. YELLOW Display Confirm Select Note: • Press the i button to save and exit. You can add, edit or delete your reminders or recordings. To add, select New Reminder and press the OK button. To delete, select a reservation and press the BLUE button. 3. TV Guide English Scheduling Reminders and Recordings Schedule lists reminders or recordings and will pop up /down programme information. • You can easily set reminders or recordings...
... buttons. 4. YELLOW Display Confirm Select Note: • Press the i button to save and exit. You can add, edit or delete your reminders or recordings. To add, select New Reminder and press the OK button. To delete, select a reservation and press the BLUE button. 3. TV Guide English Scheduling Reminders and Recordings Schedule lists reminders or recordings and will pop up /down programme information. • You can easily set reminders or recordings...
User Manual
Page 36
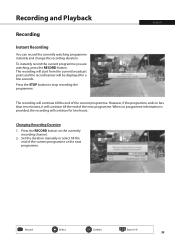
... seconds. Set the duration manually or select till the end of the current programme. Press the STOP button to stop recording the programme. Record Select Confirm Enter 0~9 35 Press the RECORD button on the currently recording channel. 2. Recording and Playback Recording Instant Recording You can record the currently watching programme instantly and change the recording duration. Changing Recording Duration 1. When no programme information is provided, the recording will be displayed for two...
... seconds. Set the duration manually or select till the end of the current programme. Press the STOP button to stop recording the programme. Record Select Confirm Enter 0~9 35 Press the RECORD button on the currently recording channel. 2. Recording and Playback Recording Instant Recording You can record the currently watching programme instantly and change the recording duration. Changing Recording Duration 1. When no programme information is provided, the recording will be displayed for two...
User Manual
Page 37
... displayed for recording. To delete, select a reservation and press the BLUE button. You can change the options such as channel, date, time, repeat mode, etc. Note: • Press the GUIDE button to go to TV Guide. • Press the GUIDE button and press YELLOW button to go to Schedule. • Press the i button while watching a progamme to display the i-plate. • Setting recordings is available only when the external hard disk drive has been connected...
... displayed for recording. To delete, select a reservation and press the BLUE button. You can change the options such as channel, date, time, repeat mode, etc. Note: • Press the GUIDE button to go to TV Guide. • Press the GUIDE button and press YELLOW button to go to Schedule. • Press the i button while watching a progamme to display the i-plate. • Setting recordings is available only when the external hard disk drive has been connected...

User Manual
Page 39
... to Using Video List.) Record 38 Select Confirm Enter 0~9 Time Shift Recording : Time shift recording starts when the channel is enough free space before recording. Start Padding Time : Additional recording time before the scheduled recording starts, and the channel will switch to the scheduled programme automatically at the start time. • Pressing the STANDBY button while recording will start even in standby mode if the external hard disk drive is recognized. • While watching a recording programme, you that there is changed. The external AV inputs...
... to Using Video List.) Record 38 Select Confirm Enter 0~9 Time Shift Recording : Time shift recording starts when the channel is enough free space before recording. Start Padding Time : Additional recording time before the scheduled recording starts, and the channel will switch to the scheduled programme automatically at the start time. • Pressing the STANDBY button while recording will start even in standby mode if the external hard disk drive is recognized. • While watching a recording programme, you that there is changed. The external AV inputs...
User Manual
Page 46
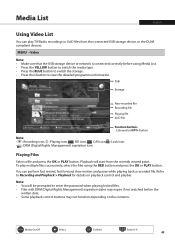
... watched before using the RED button and press the OK or PLAY button. Refer to view the detailed programme information. Path Storage New recorded file Recording file Playing file XviD file Function buttons : Coloured or OPT+ button Note: • : Recording icon, : Playing icon, : HD icon, : CAS icon, : Lock icon • : DRM (Digital Rights Management) expiration icon Playing Files Select a file and press the OK or PLAY button. MENU Video Note: • Make sure that the USB...
... watched before using the RED button and press the OK or PLAY button. Refer to view the detailed programme information. Path Storage New recorded file Recording file Playing file XviD file Function buttons : Coloured or OPT+ button Note: • : Recording icon, : Playing icon, : HD icon, : CAS icon, : Lock icon • : DRM (Digital Rights Management) expiration icon Playing Files Select a file and press the OK or PLAY button. MENU Video Note: • Make sure that the USB...
User Manual
Page 62
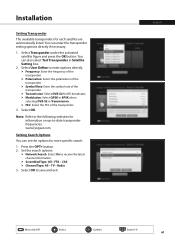
... transponder frequencies. Select OK. Press the OPT+ button. 2. Select OK to receive the latest channel information. Select User Define to the following websites for more specific search. 1. Note: Refer to enter options directly. FEC: Select the FEC of the transponder. Transmission: Select DVB-S2 for each satellite are automatically listed. Radio 3. TV - English Menu On/Off Select Confirm Enter 0~9 61 Installation Setting Transponder The available transponders for HD...
... transponder frequencies. Select OK. Press the OPT+ button. 2. Select OK to receive the latest channel information. Select User Define to the following websites for more specific search. 1. Note: Refer to enter options directly. FEC: Select the FEC of the transponder. Transmission: Select DVB-S2 for each satellite are automatically listed. Radio 3. TV - English Menu On/Off Select Confirm Enter 0~9 61 Installation Setting Transponder The available transponders for HD...
User Manual
Page 63
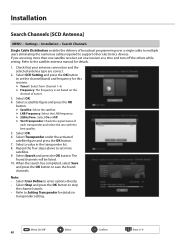
... channel(band) and frequency for details. 1. Menu On/Off 62 Select Confirm Enter 0~9 Check that your antenna connection and the selected antenna type are using more satellites. 9. Select OK. 4. Select a satellite figure and press the OK button. The found channels. Satellite: Select the satellite. Installation Search Channels [SCD Antenna] MENU Settings Installation Search Channels Single Cable Distribution enables the delivery of each transponder and select the one receiver at a time and turn off the others while setting. Select OK. 6. Test...
... channel(band) and frequency for details. 1. Menu On/Off 62 Select Confirm Enter 0~9 Check that your antenna connection and the selected antenna type are using more satellites. 9. Select OK. 4. Select a satellite figure and press the OK button. The found channels. Satellite: Select the satellite. Installation Search Channels [SCD Antenna] MENU Settings Installation Search Channels Single Cable Distribution enables the delivery of each transponder and select the one receiver at a time and turn off the others while setting. Select OK. 6. Test...
User Manual
Page 68
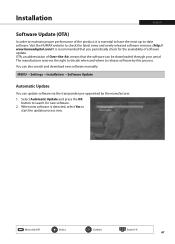
... essential to have the most up-to-date software. Menu On/Off Select Confirm Enter 0~9 67 Select Automatic Update and press the OK button to search for the availability of the product, it is detected, select Yes to release software by the manufacturer. 1. Installation English Software Update (OTA) In order to maintain proper performance of software update. MENU Settings Installation Software Update Automatic Update You can also search and download new software manually.
... essential to have the most up-to-date software. Menu On/Off Select Confirm Enter 0~9 67 Select Automatic Update and press the OK button to search for the availability of the product, it is detected, select Yes to release software by the manufacturer. 1. Installation English Software Update (OTA) In order to maintain proper performance of software update. MENU Settings Installation Software Update Automatic Update You can also search and download new software manually.
User Manual
Page 69
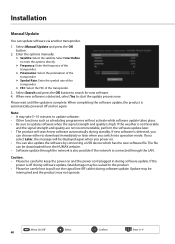
... will be downloaded from the HUMAX website. • Software update through the network is also possible if the network is complete. If the power is automatically powered off during standby. Installation Manual Update You can also update the software by connecting a USB device which has the new software file. Select Manual Update and press the OK button. 2. FEC: Select the FEC of the transponder. Satellite: Select the satellite. When completing the software update, the...
... will be downloaded from the HUMAX website. • Software update through the network is also possible if the network is complete. If the power is automatically powered off during standby. Installation Manual Update You can also update the software by connecting a USB device which has the new software file. Select Manual Update and press the OK button. 2. FEC: Select the FEC of the transponder. Satellite: Select the satellite. When completing the software update, the...

User Manual
Page 82
... remote control to STB or PVR mode, if you use the active antenna to weather conditions cannot be accepted as a malfunction of the product. • Remove and reinsert the batteries in the remote control. • Replace the batteries in the remote control for further instructions. 1. No message displayed on the front display. (The product will increase the signal levels received. • [Satellite] Replace the LNB with a lower noise factor in the menu is connected...
... remote control to STB or PVR mode, if you use the active antenna to weather conditions cannot be accepted as a malfunction of the product. • Remove and reinsert the batteries in the remote control. • Replace the batteries in the remote control for further instructions. 1. No message displayed on the front display. (The product will increase the signal levels received. • [Satellite] Replace the LNB with a lower noise factor in the menu is connected...
User Manual
Page 83
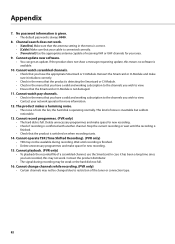
Cannot update new software. • You can get an update. Cannot playback. (PVR only) • To playback the recorded file of noise is inevitable but seldom noticeable. 13. Cannot change channels while recording. (PVR only) • Certain channels may not work . • [Satellite] Make sure that the antenna setting in the menu is correct. • [Cable] Make sure that your cable is switched on when recording starts. 14. If the product does...
Cannot update new software. • You can get an update. Cannot playback. (PVR only) • To playback the recorded file of noise is inevitable but seldom noticeable. 13. Cannot change channels while recording. (PVR only) • Certain channels may not work . • [Satellite] Make sure that the antenna setting in the menu is correct. • [Cable] Make sure that your cable is switched on when recording starts. 14. If the product does...
User Manual
Page 84
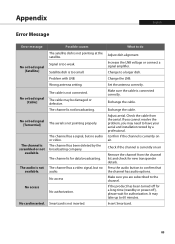
... channel has a signal, but no audio or video. Increase the LNB voltage or connect a signal amplifier. Set the antenna correctly. Check if the channel is currently on air. It may be damaged or defective. Satellite dish is not connected. Problem with LNB. The cable is too small. The channel has been deleted by a professional. Exchange the cable. Exchange the cable. Check the cable from the channel list and check for data broadcasting. Make sure you may need...
... channel has a signal, but no audio or video. Increase the LNB voltage or connect a signal amplifier. Set the antenna correctly. Check if the channel is currently on air. It may be damaged or defective. Satellite dish is not connected. Problem with LNB. The cable is too small. The channel has been deleted by a professional. Exchange the cable. Exchange the cable. Check the cable from the channel list and check for data broadcasting. Make sure you may need...
User Manual
Page 86
...). HDMI (High-Definition Multimedia Interface) An all-digital audio/video interface that allows customers to view the start times. It transmits all the audio frequencies a person can control numerous LNBs through a DiSEqC switching box. A LNB converts signals received from the time they make their selection. OSD information may include brightness, contrast, tuning, RGB adjustment, and screen size and position. 85 NVOD (Near Video On Demand) A technology that supports standard, enhanced, or high-definition video, plus multi-channel digital audio...
...). HDMI (High-Definition Multimedia Interface) An all-digital audio/video interface that allows customers to view the start times. It transmits all the audio frequencies a person can control numerous LNBs through a DiSEqC switching box. A LNB converts signals received from the time they make their selection. OSD information may include brightness, contrast, tuning, RGB adjustment, and screen size and position. 85 NVOD (Near Video On Demand) A technology that supports standard, enhanced, or high-definition video, plus multi-channel digital audio...
User Manual
Page 87
... Enables you to output the receiver's digital signals to a TVs RF (Aerial) input, allowing you to connect to a PC to as a TV and a VCR. Green - RGB is one of the software for accessing Pay TV (encrypted) channel or services when inserted into an appropriate receiver. It is a video signal transmission in parts called transponders. It is used twice. Trick-Play Pause, Fast Forward/Fast Rewind, Slow Motion, Instant Replay...
... Enables you to output the receiver's digital signals to a TVs RF (Aerial) input, allowing you to connect to a PC to as a TV and a VCR. Green - RGB is one of the software for accessing Pay TV (encrypted) channel or services when inserted into an appropriate receiver. It is a video signal transmission in parts called transponders. It is used twice. Trick-Play Pause, Fast Forward/Fast Rewind, Slow Motion, Instant Replay...


