
User Manual
Page 3
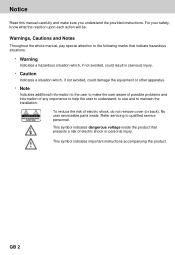
... inside . Notice ** Read this manual carefully and make the user aware of possible problems and information of any importance to help the user to understand, to use and to maintain the installation. ** ** To reduce the risk of electric shock or personal injury. ** This symbol indicates important instructions accompanying the product. ** GB 2 No user serviceable parts inside the product that indicate...
... inside . Notice ** Read this manual carefully and make the user aware of possible problems and information of any importance to help the user to understand, to use and to maintain the installation. ** ** To reduce the risk of electric shock or personal injury. ** This symbol indicates important instructions accompanying the product. ** GB 2 No user serviceable parts inside the product that indicate...

User Manual
Page 4
... following safety precautions carefully. ** Safety Instructions and Precautions ** 1. The buried cable of power source indicated on the marking label. CLEANING ** Disconnect the receiver from the wall outlet before connecting or disconnecting the cable from the aerial. GB 3 Disconnect the receiver from the mains before connecting or disconnecting the cable from the mains before cleaning. Use a light damp cloth (no objects filled...
... following safety precautions carefully. ** Safety Instructions and Precautions ** 1. The buried cable of power source indicated on the marking label. CLEANING ** Disconnect the receiver from the wall outlet before connecting or disconnecting the cable from the aerial. GB 3 Disconnect the receiver from the mains before connecting or disconnecting the cable from the mains before cleaning. Use a light damp cloth (no objects filled...

User Manual
Page 5
...twist the power cord too much. Disconnect the power cord in additional damage to the STB and reduce its life span. If you continue to use the ...Keep heating appliances as far as possible from the power cord in order not to electromagnetic influences, such as the original part. Do not use the product when defective, serious damage can cause damage to the unit... have followed the manufacturer's instructions for the modules and smart cards. A falling product can fall. In doing so can be sure the service technician uses replacement parts specified by the manufacturer, or...
...twist the power cord too much. Disconnect the power cord in additional damage to the STB and reduce its life span. If you continue to use the ...Keep heating appliances as far as possible from the power cord in order not to electromagnetic influences, such as the original part. Do not use the product when defective, serious damage can cause damage to the unit... have followed the manufacturer's instructions for the modules and smart cards. A falling product can fall. In doing so can be sure the service technician uses replacement parts specified by the manufacturer, or...
User Manual
Page 6
Setup 2.1 Connecting Aerial 2.2 Powering On 3. Before Using the Receiver 1.1 Package Contents 1.2 Front Panel 1.3 Rear Panel 1.4 Remote Control 2. Installation Wizard 3.1 Language 3.2 Country Setting 3.3 Time Setting 4. Basic Operation 4.1 Switching Channel 4.2 Volume Control 4.3 Motion Still 4.4 Change the Subtitle Language 4.5 Change an Audio Language 4.6 Programme Information (I- Channel List 5.1 Displaying and Switching Channel List 5.2 Changing Channel List Group 5.3 Edit Channels 5.4 Edit Favourite Channels 5.5 Channel Change Mode 6. plate) 4.7 Option List 5. Programme Guide ...
Setup 2.1 Connecting Aerial 2.2 Powering On 3. Before Using the Receiver 1.1 Package Contents 1.2 Front Panel 1.3 Rear Panel 1.4 Remote Control 2. Installation Wizard 3.1 Language 3.2 Country Setting 3.3 Time Setting 4. Basic Operation 4.1 Switching Channel 4.2 Volume Control 4.3 Motion Still 4.4 Change the Subtitle Language 4.5 Change an Audio Language 4.6 Programme Information (I- Channel List 5.1 Displaying and Switching Channel List 5.2 Changing Channel List Group 5.3 Edit Channels 5.4 Edit Favourite Channels 5.5 Channel Change Mode 6. plate) 4.7 Option List 5. Programme Guide ...
User Manual
Page 7
... GB62 ** GB62 GB63 GB64 GB66 GB67 Software Update 9.1 OTA (Over the Air) 10. System Information 10.1 Status 10.2 Signal Detection 10.3 Conditional Access (for Conax embedded) 11. Manipulating your TV using Remote Control 13. Games 12. Menu Map 14. Glossary 17. Installation 8.1 Automatic Search 8.2 Manual Search 8.3 Default Setting 9. Setting Preferences ** 7.1 Parental Control 7.2 Language Setting 7.3 Time Setting 7.4 Schedule 7.5 A/V Control 7.6 UHF Tuning 7.7 Miscellaneous Settings 8. Trouble Shooting 14.1 Trouble Shooting 14.2 Error Message 15. Specification 16.
... GB62 ** GB62 GB63 GB64 GB66 GB67 Software Update 9.1 OTA (Over the Air) 10. System Information 10.1 Status 10.2 Signal Detection 10.3 Conditional Access (for Conax embedded) 11. Manipulating your TV using Remote Control 13. Games 12. Menu Map 14. Glossary 17. Installation 8.1 Automatic Search 8.2 Manual Search 8.3 Default Setting 9. Setting Preferences ** 7.1 Parental Control 7.2 Language Setting 7.3 Time Setting 7.4 Schedule 7.5 A/V Control 7.6 UHF Tuning 7.7 Miscellaneous Settings 8. Trouble Shooting 14.1 Trouble Shooting 14.2 Error Message 15. Specification 16.

User Manual
Page 12
... ** Controls the TV. ** 3. Play the audio continuously. ** 17.SUBTITLE ** Changes the subtitle language. ** 18.V-/V+ ** Adjusts the audio volume. ** 19.i (INFORMATION) ** Displays the information about the channel and programme. ** 20.MUTE ** Pauses the audio temporarily. That is, volume on/off temporarily. ** 21.AUX ** Controls input mode of TV. ** 22.TV/RADIO ** Switches between Operation and Standby modes. ** 13.GUIDE ** Displays the Programme Guide. ** 14.EXIT ** Exits the main menu or Guide screen...
... ** Controls the TV. ** 3. Play the audio continuously. ** 17.SUBTITLE ** Changes the subtitle language. ** 18.V-/V+ ** Adjusts the audio volume. ** 19.i (INFORMATION) ** Displays the information about the channel and programme. ** 20.MUTE ** Pauses the audio temporarily. That is, volume on/off temporarily. ** 21.AUX ** Controls input mode of TV. ** 22.TV/RADIO ** Switches between Operation and Standby modes. ** 13.GUIDE ** Displays the Programme Guide. ** 14.EXIT ** Exits the main menu or Guide screen...

User Manual
Page 14
GB 13 Connect the power cord of the external Dolby Digital amplifier. 2.2 Powering On 1. The Standby LED indicator is turned on by pressing the STANDBY button at Remote Control. Do this by connecting the STB to a wall outlet. 2. ** ** 2. Connect a S/PDIF Fiber-Optic cable ** ** If you are watching a programme with a Dolby Digital soundtrack, you can enjoy the higher quality sound of the Dolby Digital audio by connecting the optical S/PDIF output of the STB to the optical S/PDIF input of the receiver to an external Dolby Digital amplifier. Power on Green.
GB 13 Connect the power cord of the external Dolby Digital amplifier. 2.2 Powering On 1. The Standby LED indicator is turned on by pressing the STANDBY button at Remote Control. Do this by connecting the STB to a wall outlet. 2. ** ** 2. Connect a S/PDIF Fiber-Optic cable ** ** If you are watching a programme with a Dolby Digital soundtrack, you can enjoy the higher quality sound of the Dolby Digital audio by connecting the optical S/PDIF output of the STB to the optical S/PDIF input of the receiver to an external Dolby Digital amplifier. Power on Green.

User Manual
Page 17
... information. 4.2 Volume Control 1. Select your desired channel numeric using Programme Guide or Channel List. Press the MUTE buttons to the channel directly. 3. Press the FREEZE button again to pause the current programme. Then the subtitle will be displayed in the selected language at remote control to continue the programme. 4.4 Change the Subtitle Language If the current programme provides Subtitle information, you can select a default subtitle language by selecting MENU - GB...
... information. 4.2 Volume Control 1. Select your desired channel numeric using Programme Guide or Channel List. Press the MUTE buttons to the channel directly. 3. Press the FREEZE button again to pause the current programme. Then the subtitle will be displayed in the selected language at remote control to continue the programme. 4.4 Change the Subtitle Language If the current programme provides Subtitle information, you can select a default subtitle language by selecting MENU - GB...

User Manual
Page 19
... indicates the minimum level of Channel change mode and Channel List Name: if you selected, is targeted at. Channel Change Mode , the Icon of ages that the programme is displayed. 7. Note: If there is no available programme information, programme information is provided 6. Channel change mode is a Dolby Digital one page, use button to move to the previous or next page. Edit channels - Displayed only when the programme...
... indicates the minimum level of Channel change mode and Channel List Name: if you selected, is targeted at. Channel Change Mode , the Icon of ages that the programme is displayed. 7. Note: If there is no available programme information, programme information is provided 6. Channel change mode is a Dolby Digital one page, use button to move to the previous or next page. Edit channels - Displayed only when the programme...

User Manual
Page 26
... of Favourite channel list. ** ** Sort Sorts channels by number or name in all TV/Radio channel list. ** ** Unselect All Unselect all the selected channel. Press the MENU button. 2. button, Note: • Press the BACK or button to save the changes and return to select Edit Favourite Channels menu. ** The buttons for each menu. Press the MENU - 2 - 2 in order at remote control to the previous menu. Select Edit Favourite Channels using the the...
... of Favourite channel list. ** ** Sort Sorts channels by number or name in all TV/Radio channel list. ** ** Unselect All Unselect all the selected channel. Press the MENU button. 2. button, Note: • Press the BACK or button to save the changes and return to select Edit Favourite Channels menu. ** The buttons for each menu. Press the MENU - 2 - 2 in order at remote control to the previous menu. Select Edit Favourite Channels using the the...

User Manual
Page 30
... sub-group using the button, and then press the OK button. 5. The Programme Guide for all channels. 1. Also, you can view programme information for selected channel list is the following programme. 5. Viewing Guide Information by Groups You can enter your desired channel number using the NUMERICAL (0~9) button at remote control to move to previous or next programme within the same channel using button. 6. Programme Guide ** The Programme Guide displays programme...
... sub-group using the button, and then press the OK button. 5. The Programme Guide for all channels. 1. Also, you can view programme information for selected channel list is the following programme. 5. Viewing Guide Information by Groups You can enter your desired channel number using the NUMERICAL (0~9) button at remote control to move to previous or next programme within the same channel using button. 6. Programme Guide ** The Programme Guide displays programme...

User Manual
Page 37
... Language Setting using the button. 2. Setting Preferences ** 3. Enter the new password again to display the available Language List. 3. Select Menu/Audio/Subtitle Language using the press the OK or button. Press the OK or button to display the Language or Dolby Digital option. 3. Change Password You can select the priority of audio. 1. If you cannot change the existing password into new one. 1. Default language is "0000". Select Change Password using the press the OK or button. Note: The Default Password is...
... Language Setting using the button. 2. Setting Preferences ** 3. Enter the new password again to display the available Language List. 3. Select Menu/Audio/Subtitle Language using the press the OK or button. Press the OK or button to display the Language or Dolby Digital option. 3. Change Password You can select the priority of audio. 1. If you cannot change the existing password into new one. 1. Default language is "0000". Select Change Password using the press the OK or button. Note: The Default Password is...

User Manual
Page 45
... button. Select one of channel using the OK or button. Select Frequency using the OK button. button, and press the 2. Frequency Enter the your desired frequency channel to search directly. button, and press the 2. Enter frequency using the or button. button, and press the OK 2. button, GB 44 When entering frequency channel value, the appropriate frequency value is automatically displayed on Channel. 1. Select Mode using the NUMERICAL (0-9) button and press OK button. 3. 8. Installation ** 8.2 Manual Search You can search channels manually...
... button. Select one of channel using the OK or button. Select Frequency using the OK button. button, and press the 2. Frequency Enter the your desired frequency channel to search directly. button, and press the 2. Enter frequency using the or button. button, and press the OK 2. button, GB 44 When entering frequency channel value, the appropriate frequency value is automatically displayed on Channel. 1. Select Mode using the NUMERICAL (0-9) button and press OK button. 3. 8. Installation ** 8.2 Manual Search You can search channels manually...

User Manual
Page 47
... button to 6. GB 46 Installation ** 8.3 Default Setting Default Setting restores the receiver to the previous menu. button, and press the 3. Select No and press the OK return to the default settings. Enter Password using the NUMERICAL (0-9) button. 4. 8. Press the MENU button. 2. Select Default Setting using the OK or button. When default setting is completed, Installation Wizard is automatically displayed, which helps Channel Search. Installation Wizard. Select Yes and press the OK setting to start loading default setting. Confirm again to Factory Default...
... button to 6. GB 46 Installation ** 8.3 Default Setting Default Setting restores the receiver to the previous menu. button, and press the 3. Select No and press the OK return to the default settings. Enter Password using the NUMERICAL (0-9) button. 4. 8. Press the MENU button. 2. Select Default Setting using the OK or button. When default setting is completed, Installation Wizard is automatically displayed, which helps Channel Search. Installation Wizard. Select Yes and press the OK setting to start loading default setting. Confirm again to Factory Default...

User Manual
Page 48
... where this software update can take place by "beaming" latest software versions over the air", means that the quality of receiving signal strength is simply another alternative for the availability of software upgrades. 9.1 OTA (Over the Air) OTA, an abbreviation of this product, it may take 5 ~ 10 minutes to pull out the Signal line (co-axial Cable) during software update, it is...
... where this software update can take place by "beaming" latest software versions over the air", means that the quality of receiving signal strength is simply another alternative for the availability of software upgrades. 9.1 OTA (Over the Air) OTA, an abbreviation of this product, it may take 5 ~ 10 minutes to pull out the Signal line (co-axial Cable) during software update, it is...
User Manual
Page 52
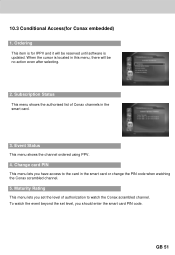
... authorised list of authorization to watch the event beyond the set level, you have access to the card in the smart card. 3. Change card PIN This menu lets you should enter the smart card PIN code. Ordering This item is updated. GB 51 When the cursor is located in this menu, there will be no action even after selecting. 2. Event Status This menu shows the channel ordered using PPV...
... authorised list of authorization to watch the event beyond the set level, you have access to the card in the smart card. 3. Change card PIN This menu lets you should enter the smart card PIN code. Ordering This item is updated. GB 51 When the cursor is located in this menu, there will be no action even after selecting. 2. Event Status This menu shows the channel ordered using PPV...
User Manual
Page 54
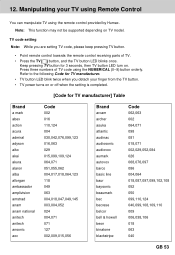
... 040 GB 53 Keep pressing TV button for 3 seconds, then TV button LED turn on or off when the setting is completed. ** [Code for TV manufacturer. • TV button LED blink twice when you are setting TV code, please keep pressing TV button. • Point remote control towards the remote control receiving parts of TV code using the remote control provided by Humax. Manipulating your finger from the TV button. • TV power turns on . 12...
... 040 GB 53 Keep pressing TV button for 3 seconds, then TV button LED turn on or off when the setting is completed. ** [Code for TV manufacturer. • TV button LED blink twice when you are setting TV code, please keep pressing TV button. • Point remote control towards the remote control receiving parts of TV code using the remote control provided by Humax. Manipulating your finger from the TV button. • TV power turns on . 12...
User Manual
Page 64
... the receiving part of the TV. - Check the brightness level of the TV and product. - Check the Mute status of TV. - Check the battery of Remote control. 6. Check whether the Smart Card is firmly connected to the TV. - If the product does not work normally after completing the following trouble shooting, please contact your local service, please make sure following instructions. Check...
... the receiving part of the TV. - Check the brightness level of the TV and product. - Check the Mute status of TV. - Check the battery of Remote control. 6. Check whether the Smart Card is firmly connected to the TV. - If the product does not work normally after completing the following trouble shooting, please contact your local service, please make sure following instructions. Check...
User Manual
Page 65
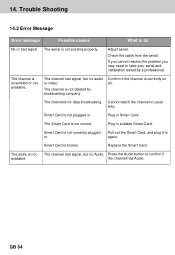
... the problem you may need to have your aerial and installation tested by broadcasting company. Plug in Smart Card. Replace the Smart Card. The channel has signal, but no Audio. The channel has signal, but no audio or video. The channel is not correct. Cannot watch the channel in . 14. Check the cable from the aerial. The Smart Card is not deleted by a professional. Smart Card is scrambled or not available. The channel is broken. Trouble...
... the problem you may need to have your aerial and installation tested by broadcasting company. Plug in Smart Card. Replace the Smart Card. The channel has signal, but no Audio. The channel has signal, but no audio or video. The channel is not correct. Cannot watch the channel in . 14. Check the cable from the aerial. The Smart Card is not deleted by a professional. Smart Card is scrambled or not available. The channel is broken. Trouble...

User Manual
Page 68
... through aerial. ** SCART ** A 21-pin connector used for connection of digital channels/services. These services may transmit a service information table(network information) that is expressed in the network ** OSD (On Screen Display) ** The function that displays the information about all available services in the unit of cycles or events per one or several MUX frequencies with high frequency. ** Frequency ** The number of hertz ** FTA (Free- OSD information includes brightness, contrast...
... through aerial. ** SCART ** A 21-pin connector used for connection of digital channels/services. These services may transmit a service information table(network information) that is expressed in the network ** OSD (On Screen Display) ** The function that displays the information about all available services in the unit of cycles or events per one or several MUX frequencies with high frequency. ** Frequency ** The number of hertz ** FTA (Free- OSD information includes brightness, contrast...


