
User Manual
Page 2
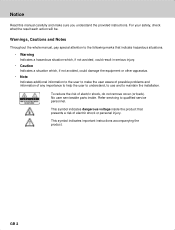
... your safety, check what the result each action will be. Notice ** Read this manual carefully and make the user aware of possible problems and information of any importance to help the user to understand, to use and to maintain the installation. ** ** To reduce the risk of electric shock or personal injury. ** This symbol indicates important instructions accompanying the product.
... your safety, check what the result each action will be. Notice ** Read this manual carefully and make the user aware of possible problems and information of any importance to help the user to understand, to use and to maintain the installation. ** ** To reduce the risk of electric shock or personal injury. ** This symbol indicates important instructions accompanying the product.
User Manual
Page 3
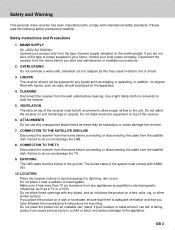
... the appliance. Failure to any maintenance or installation procedures. ** 2. The buried cable of power supplied to your home, consult your product only from the satellite dish. LIQUIDS ** The receiver should be placed on the marking label. Do not stack electronic equipment on soft furnishings or carpets. Safety and Warning ** This personal video recorder has been manufactured to comply with SABS...
... the appliance. Failure to any maintenance or installation procedures. ** 2. The buried cable of power supplied to your home, consult your product only from the satellite dish. LIQUIDS ** The receiver should be placed on the marking label. Do not stack electronic equipment on soft furnishings or carpets. Safety and Warning ** This personal video recorder has been manufactured to comply with SABS...
User Manual
Page 5
... Scene 5.4 Fast Forward to the Next Scene 5.5 Recording 5.6 Additional Time Shift Operations Using Time Bar GB8 GB8 GB10 GB11 GB12 GB14 GB14 GB15 GB16 GB16 GB16 GB16 GB18 GB18 GB19 GB19 GB19 GB19 GB20 GB20 GB22 GB25 GB25 GB25 GB26 GB26 GB26 GB27 GB 5 Installation Wizard ** 3.1 Language 3.2 Area Setting 3.3 Antenna Setting 3.4 Automatic Search 3.5 Time Setting 4. Basic Operation ** 4.1 Switching Channel 4.2 Volume Control 4.3 Change the Subtitle Language 4.4 Change a Audio Language 4.5 Programme Information (i-plate) 4.6 Option List 5.
... Scene 5.4 Fast Forward to the Next Scene 5.5 Recording 5.6 Additional Time Shift Operations Using Time Bar GB8 GB8 GB10 GB11 GB12 GB14 GB14 GB15 GB16 GB16 GB16 GB16 GB18 GB18 GB19 GB19 GB19 GB19 GB20 GB20 GB22 GB25 GB25 GB25 GB26 GB26 GB26 GB27 GB 5 Installation Wizard ** 3.1 Language 3.2 Area Setting 3.3 Antenna Setting 3.4 Automatic Search 3.5 Time Setting 4. Basic Operation ** 4.1 Switching Channel 4.2 Volume Control 4.3 Change the Subtitle Language 4.4 Change a Audio Language 4.5 Programme Information (i-plate) 4.6 Option List 5.
User Manual
Page 6
... Channel List Group 7.3 Edit Channels 7.4 Edit Favourite Channels 7.5 Channel Looping Mode 8. Programme Guide 8.1 Viewing Programme Guide Information 8.2 Finding a Programme 8.3 Viewing Reserved Programme 9. Contents ** 6. Setting Preferences 9.1 Parental Control 9.2 Language Setting 9.3 Time Setting 9.4 Schedule 9.5 A/V Control 9.6 UHF 9.7 Miscellaneous 10. Recording and Playback 6.1 Instant Recording 6.2 Recording Reservation 6.3 Programme Playback 6.4 Editing Recorded Programmes 6.5 Checking Hard Disk Drive 7. Installation 10.1 Antenna Setting 10.2 Automatic Search 10.3 Manual Search...
... Channel List Group 7.3 Edit Channels 7.4 Edit Favourite Channels 7.5 Channel Looping Mode 8. Programme Guide 8.1 Viewing Programme Guide Information 8.2 Finding a Programme 8.3 Viewing Reserved Programme 9. Contents ** 6. Setting Preferences 9.1 Parental Control 9.2 Language Setting 9.3 Time Setting 9.4 Schedule 9.5 A/V Control 9.6 UHF 9.7 Miscellaneous 10. Recording and Playback 6.1 Instant Recording 6.2 Recording Reservation 6.3 Programme Playback 6.4 Editing Recorded Programmes 6.5 Checking Hard Disk Drive 7. Installation 10.1 Antenna Setting 10.2 Automatic Search 10.3 Manual Search...
User Manual
Page 13
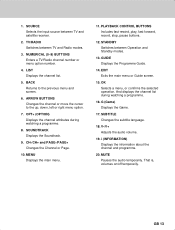
... 11. SUBTITLE ** Changes the subtitle language. ** 18. MUTE ** Pauses the audio temporarily. OPT+ (OPTION) ** Displays the channel attributes during watching a programme. ** 16. GUIDE ** Displays the Programme Guide. ** 14. EXIT ** Exits the main menu or Guide screen. ** 15. And displays the channel list during watching a programme. ** 8. SOURCE ** Selects the input source between TV and Radio modes. ** 3. NUMERICAL (0~9) BUTTONS ** Enters a TV/Radio channel number or menu option number. ** 4. G (Game) ** Displays the Game. ** 17. i (INFORMATION) ** Displays the...
... 11. SUBTITLE ** Changes the subtitle language. ** 18. MUTE ** Pauses the audio temporarily. OPT+ (OPTION) ** Displays the channel attributes during watching a programme. ** 16. GUIDE ** Displays the Programme Guide. ** 14. EXIT ** Exits the main menu or Guide screen. ** 15. And displays the channel list during watching a programme. ** 8. SOURCE ** Selects the input source between TV and Radio modes. ** 3. NUMERICAL (0~9) BUTTONS ** Enters a TV/Radio channel number or menu option number. ** 4. G (Game) ** Displays the Game. ** 17. i (INFORMATION) ** Displays the...
User Manual
Page 17
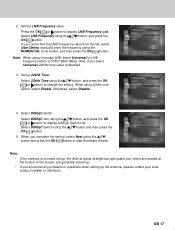
... setting up 22kHz Tone. ** Select 22kHz Tone using the button, and press the OK or button to display LNB Frequency List. Select DiSEqC switch. ** Select DiSEqC item using the button, and press the OK or button to start Automatic Search. ** Note: • If the antenna is disabled. 3. Select LNB Frequency using 22kHz tone switch, select Enable. Otherwise, select Disable. 4. When you cannot find the LNB Frequency value from the list, select User Define, manually enter the frequency using Universal LNB, select Universal...
... setting up 22kHz Tone. ** Select 22kHz Tone using the button, and press the OK or button to display LNB Frequency List. Select DiSEqC switch. ** Select DiSEqC item using the button, and press the OK or button to start Automatic Search. ** Note: • If the antenna is disabled. 3. Select LNB Frequency using 22kHz tone switch, select Enable. Otherwise, select Disable. 4. When you cannot find the LNB Frequency value from the list, select User Define, manually enter the frequency using Universal LNB, select Universal...
User Manual
Page 19
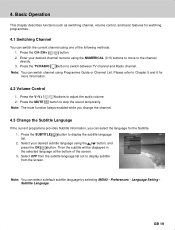
... select the language for the Subtitle. 1. button to stop the sound temporarily. Language Setting Subtitle Language. Enter your desired subtitle language using Programme Guide or Channel List. Note: The mute function keeps enabled while you change the channel. 4.3 Change the Subtitle Language If the current programme provides Subtitle information, you can switch channel using the button, and press the OK button. Preferences - Please refer to the channel directly. 3. Then the subtitle will be displayed in the selected language...
... select the language for the Subtitle. 1. button to stop the sound temporarily. Language Setting Subtitle Language. Enter your desired subtitle language using Programme Guide or Channel List. Note: The mute function keeps enabled while you change the channel. 4.3 Change the Subtitle Language If the current programme provides Subtitle information, you can switch channel using the button, and press the OK button. Preferences - Please refer to the channel directly. 3. Then the subtitle will be displayed in the selected language...
User Manual
Page 28
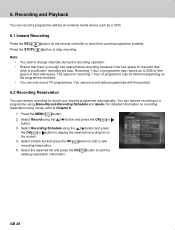
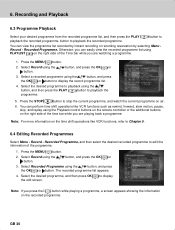
... using Guide, refer to display the reserved recording list on the remote controller to record your desired programme automatically. button to add a new 5. button and press the OK or 3. Recording and Playback ** You can reserve recording to record the current programme instantly. You cannot record radio programmes with this product. 6.2 Recording Reservation You can record a programme without an external media device such as a VCR. 6.1 Instant Recording Press the REC button on the screen. 4. 6. Recording...
... using Guide, refer to display the reserved recording list on the remote controller to record your desired programme automatically. button to add a new 5. button and press the OK or 3. Recording and Playback ** You can reserve recording to record the current programme instantly. You cannot record radio programmes with this product. 6.2 Recording Reservation You can record a programme without an external media device such as a VCR. 6.1 Instant Recording Press the REC button on the screen. 4. 6. Recording...
User Manual
Page 30
... the PLAY button to You can easily view the recorded programme list using PLAYLIST on the right side of the Time bar while you are playing back a programme. ** Note: For more information on the time shift operations like VCR functions such as rewind, forward, slow motion, pause, skip, and replay using the button, and press the OK or button. Select Recorded Programme using the Playback control buttons on the remote controller or the additional buttons...
... the PLAY button to You can easily view the recorded programme list using PLAYLIST on the right side of the Time bar while you are playing back a programme. ** Note: For more information on the time shift operations like VCR functions such as rewind, forward, slow motion, pause, skip, and replay using the button, and press the OK or button. Select Recorded Programme using the Playback control buttons on the remote controller or the additional buttons...
User Manual
Page 42
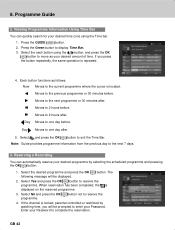
... the Green button to one day after . Moves to the previous programme or 30 minutes before . Day Moves to display Time Bar. 3. Reserving a Recording You can quickly search for your desired programme by watching time, you press the button repeatedly, the same operation is displayed on the reserved programme. 3. The 2. Each button functions as your desired amount of time. Enter your Password. If the channel is located. Programme Guide...
... the Green button to one day after . Moves to the previous programme or 30 minutes before . Day Moves to display Time Bar. 3. Reserving a Recording You can quickly search for your desired programme by watching time, you press the button repeatedly, the same operation is displayed on the reserved programme. 3. The 2. Each button functions as your desired amount of time. Enter your Password. If the channel is located. Programme Guide...
User Manual
Page 58
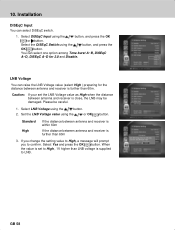
..., a message will prompt you to LNB. GB 58 You can select one option among Tone burst A~B, DiSEqC A~D, DiSEqC A~D for the distance between antenna and receiver is close, the LNB may be careful. 1. Installation ** DiSEqC Input You can raise the LNB Voltage value (select High ) preparing for 2.0 and Disable. ** LNB Voltage You can select DiSEqC switch. 1. 10. Select the DiSEqC Swtich using the button. 2. Select DiSEqC Input using...
..., a message will prompt you to LNB. GB 58 You can select one option among Tone burst A~B, DiSEqC A~D, DiSEqC A~D for the distance between antenna and receiver is close, the LNB may be careful. 1. Installation ** DiSEqC Input You can raise the LNB Voltage value (select High ) preparing for 2.0 and Disable. ** LNB Voltage You can select DiSEqC switch. 1. 10. Select the DiSEqC Swtich using the button. 2. Select DiSEqC Input using...
User Manual
Page 67
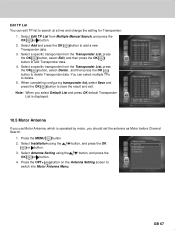
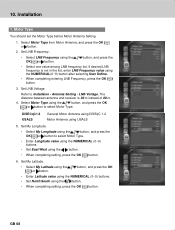
... list to search at a time and change the setting for Transponder. 1. Note: When you select Default List and press OK default Transponder List is displayed. ** 10.5 Motor Antenna If you use Motor Antenna, which is operated by motor, you should set the antenna as Motor before Channel Search. 1. Select Installation using the OK or button. button, and press the 4. Press the MENU button. 2. When completing configuring transponder list, select Save and press the OK button to add a new 3. Select Antenna Setting using...
... list to search at a time and change the setting for Transponder. 1. Note: When you select Default List and press OK default Transponder List is displayed. ** 10.5 Motor Antenna If you use Motor Antenna, which is operated by motor, you should set the antenna as Motor before Channel Search. 1. Select Installation using the OK or button. button, and press the 4. Press the MENU button. 2. When completing configuring transponder list, select Save and press the OK button to add a new 3. Select Antenna Setting using...
User Manual
Page 68
... / button. • When completing setting, press the OK button. 6. Set LNB Voltage ** Refer to select Motor Type. ** DiSECqC1.2 General Motor Antenna using DiSEqC 1.2 USALS Motor Antenna using the NUMERICAL(0~9) button after selecting User Define. • When completing entering LNB Frequency, press the OK button. 3. GB 68 10. Select Motor Type from Motor Antenna, and press the OK or button. 2. The distance between antenna and receiver is not in the list, enter LNB Frequency value using USALS 5. Set...
... / button. • When completing setting, press the OK button. 6. Set LNB Voltage ** Refer to select Motor Type. ** DiSECqC1.2 General Motor Antenna using DiSEqC 1.2 USALS Motor Antenna using the NUMERICAL(0~9) button after selecting User Define. • When completing entering LNB Frequency, press the OK button. 3. GB 68 10. Select Motor Type from Motor Antenna, and press the OK or button. 2. The distance between antenna and receiver is not in the list, enter LNB Frequency value using USALS 5. Set...
User Manual
Page 73
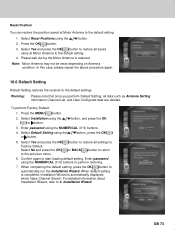
.... 10.6 Default Setting Default Setting restores the receiver to the default settings Warning: Please note that once you perform Default Setting, all settings to or BACK button to restore all data such as Antenna Setting information Channel List, and User Configured data are deleted. Press the MENU button. 2. Enter password using the or button. Select No and press the OK to automatically run the Installation Wizard. When completing the default setting, press the OK button to the previous menu. Select Default Setting using the NUMERICAL (0~9) buttons. 4. button, press...
.... 10.6 Default Setting Default Setting restores the receiver to the default settings Warning: Please note that once you perform Default Setting, all settings to or BACK button to restore all data such as Antenna Setting information Channel List, and User Configured data are deleted. Press the MENU button. 2. Enter password using the or button. Select No and press the OK to automatically run the Installation Wizard. When completing the default setting, press the OK button to the previous menu. Select Default Setting using the NUMERICAL (0~9) buttons. 4. button, press...
User Manual
Page 74
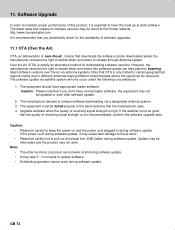
... the Air) OTA, an abbreviation of this software update can be received). Over the Air (OTA) is not recommendable, perform the software upgrade later. ** Caution: • Please be tuned properly to update software. • Scheduling operation cannot work after software update. 2. The equipment must be careful to maintain proper performance of over-the-air , means that downloads the software can take 5 ~10 minutes to the same antenna that...
... the Air) OTA, an abbreviation of this software update can be received). Over the Air (OTA) is not recommendable, perform the software upgrade later. ** Caution: • Please be tuned properly to update software. • Scheduling operation cannot work after software update. 2. The equipment must be careful to maintain proper performance of over-the-air , means that downloads the software can take 5 ~10 minutes to the same antenna that...

User Manual
Page 76
... HUMAX are listed in Installation -Antenna Setting-Satellite Alternative menu and that have all other Antenna Setting correct. ** GB 76 When completing the software update, the product is not found by Automatic, use Manual Update. 4. If new software is automatically powered off and on again. Select Yes and press the OK button to find HUMAX software update site and update software automatically. 1. Software Upgrade ** If using the button, and press the OK or button. 2. Select Automatic Update from Software Update screen using Automatic Update...
... HUMAX are listed in Installation -Antenna Setting-Satellite Alternative menu and that have all other Antenna Setting correct. ** GB 76 When completing the software update, the product is not found by Automatic, use Manual Update. 4. If new software is automatically powered off and on again. Select Yes and press the OK button to find HUMAX software update site and update software automatically. 1. Software Upgrade ** If using the button, and press the OK or button. 2. Select Automatic Update from Software Update screen using Automatic Update...
User Manual
Page 77
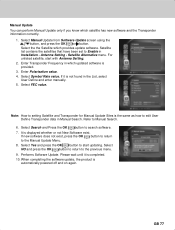
... the OK button to start with Antenna Setting. 2. Select Manual Update from Software Update screen using the button, and press the OK or button. Antenna Setting - Satellite Alternative menu. ** ** Manual Update You can perform Manual Update only if you know which updated software is provided. 3. Enter Transponder Frequency in Installation - Select Search and Press the OK button to the previous menu. 9. Enter Polarisation value. 4. Note: How to setting Satellite and Transponder for Manual Update Sites is not found in Manual Search. It is automatically powered off...
... the OK button to start with Antenna Setting. 2. Select Manual Update from Software Update screen using the button, and press the OK or button. Antenna Setting - Satellite Alternative menu. ** ** Manual Update You can perform Manual Update only if you know which updated software is provided. 3. Enter Transponder Frequency in Installation - Select Search and Press the OK button to the previous menu. 9. Enter Polarisation value. 4. Note: How to setting Satellite and Transponder for Manual Update Sites is not found in Manual Search. It is automatically powered off...
User Manual
Page 83
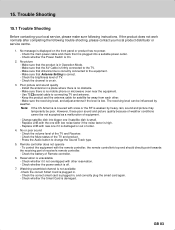
... high. - Keep the product and the antenna cable for satellite far away from each other reservation. - Change satellite dish into a suitable power outlet. - Check whether the power switch is damaged. Check whether the Smart Card is off. 7. Check the main power cable and check that it not overlapped with other . - Press the Audio button to connecting TV and antenna. - Remote controller does not operate - Use 75 coaxial cable to change the Sound Track type. 5. Replace LNB with...
... high. - Keep the product and the antenna cable for satellite far away from each other reservation. - Change satellite dish into a suitable power outlet. - Check whether the power switch is damaged. Check whether the Smart Card is off. 7. Check the main power cable and check that it not overlapped with other . - Press the Audio button to connecting TV and antenna. - Remote controller does not operate - Use 75 coaxial cable to change the Sound Track type. 5. Replace LNB with...
User Manual
Page 84
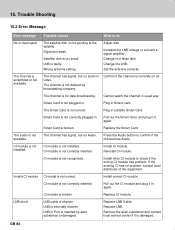
... shorten. LNB cable is not recognized. LNB In Port is broken. Change the LNB. Plug in . Smart Card is inserted by broadcasting company. Replace LNB Cable. CI module is broken. CI module is not installed. Smart Card is not plugged in usual way. Press the Audio button to check if the exiting CI module has problem. CI module is scrambled or not available. Trouble Shooting ** 15.2 Error Message Error message No or bad signal The channel is...
... shorten. LNB cable is not recognized. LNB In Port is broken. Change the LNB. Plug in . Smart Card is inserted by broadcasting company. Replace LNB Cable. CI module is broken. CI module is not installed. Smart Card is not plugged in usual way. Press the Audio button to check if the exiting CI module has problem. CI module is scrambled or not available. Trouble Shooting ** 15.2 Error Message Error message No or bad signal The channel is...
User Manual
Page 87
..., which is used for digital audio output. OSD information includes brightness, contrast, tuning, RGB adjustment, and screen size and positions (top, left, width, and height), and so on the screen directly. It outputs audio signals directly as digital audio signals without additional payments to a particular satellite, note that every station fills the EPG differently or not, so differences in the EPG are not necessarily receiver errors. ** Frequency The number of cycles...
..., which is used for digital audio output. OSD information includes brightness, contrast, tuning, RGB adjustment, and screen size and positions (top, left, width, and height), and so on the screen directly. It outputs audio signals directly as digital audio signals without additional payments to a particular satellite, note that every station fills the EPG differently or not, so differences in the EPG are not necessarily receiver errors. ** Frequency The number of cycles...


