
User Manual
Page 3
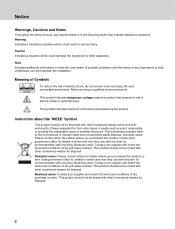
... additional information to make the user aware of possible problems and information of any importance to the following marks that presents a risk of electric shock or personal injury. ** This symbol indicates important instructions accompanying the product. ** Instruction about the 'WEEE' Symbol This product should not be disposed with other types of wastes and recycle it responsibly to qualified service...
... additional information to make the user aware of possible problems and information of any importance to the following marks that presents a risk of electric shock or personal injury. ** This symbol indicates important instructions accompanying the product. ** Instruction about the 'WEEE' Symbol This product should not be disposed with other types of wastes and recycle it responsibly to qualified service...

User Manual
Page 4
... precautions carefully. ** Safety Instructions and Precautions ** 1. If you start any unsupported attachments as this product only from the type of the product. ** 6. Use a light damp cloth (no objects filled with international safety standards. CLEANING ** Disconnect the product from the TV. CONNECTION TO THE SATELLITE DISH LNB ** Disconnect the product from the mains before connecting or disconnecting the cable from the mains before...
... precautions carefully. ** Safety Instructions and Precautions ** 1. If you start any unsupported attachments as this product only from the type of the product. ** 6. Use a light damp cloth (no objects filled with international safety standards. CLEANING ** Disconnect the product from the TV. CONNECTION TO THE SATELLITE DISH LNB ** Disconnect the product from the mains before connecting or disconnecting the cable from the mains before...
User Manual
Page 8
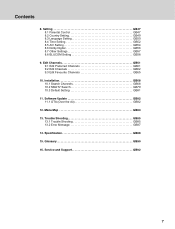
....2 SMATV Search GB79 10.3 Default Setting GB81 11. Specification GB88 15. Service and Support GB92 7 Software Update GB82 11.1 OTA (Over the Air GB82 12. Trouble Shooting GB85 13.1 Trouble Shooting GB85 13.2 Error Message GB87 14. Setting GB47 8.1 Parental Control GB47 8.2 Country Setting GB49 8.3 Language Setting GB50 8.4 Time Setting GB52 8.5 A/V Setting GB54 8.6 Dolby Digital GB56 8.7 Other Settings GB57 8.8 BLUCOM Setting GB58 9. Edit Channels GB61 9.1 Edit Preferred Channels GB61 9.2 Edit Channels GB62 9.3 Edit Favourite Channels GB65 10. Menu Map GB84...
....2 SMATV Search GB79 10.3 Default Setting GB81 11. Specification GB88 15. Service and Support GB92 7 Software Update GB82 11.1 OTA (Over the Air GB82 12. Trouble Shooting GB85 13.1 Trouble Shooting GB85 13.2 Error Message GB87 14. Setting GB47 8.1 Parental Control GB47 8.2 Country Setting GB49 8.3 Language Setting GB50 8.4 Time Setting GB52 8.5 A/V Setting GB54 8.6 Dolby Digital GB56 8.7 Other Settings GB57 8.8 BLUCOM Setting GB58 9. Edit Channels GB61 9.1 Edit Preferred Channels GB61 9.2 Edit Channels GB62 9.3 Edit Favourite Channels GB65 10. Menu Map GB84...

User Manual
Page 12
1. VCR SCART ** Connects to the VCR/DVD using a TV SCART cable. 4. RS-232C ** Connects to the PC to the TV or VCR and outputs audio signals. 6. Before Using the Product 1.4 Rear Panel ** 1. LNB OUT ** Connects another digital satellite receiver. ** 3. LNB IN ** Connects a satellite antenna cable. ** 2. AUDIO L/R ** Connects to update software. 8. S/PDIF ** Outputs the digital audio signals. 11 TV SCART ** Connects to the TV or VCR and outputs video signals. 7. VIDEO ** Connects to the TV set using a VCR SCART cable. 5.
1. VCR SCART ** Connects to the VCR/DVD using a TV SCART cable. 4. RS-232C ** Connects to the PC to the TV or VCR and outputs audio signals. 6. Before Using the Product 1.4 Rear Panel ** 1. LNB OUT ** Connects another digital satellite receiver. ** 3. LNB IN ** Connects a satellite antenna cable. ** 2. AUDIO L/R ** Connects to update software. 8. S/PDIF ** Outputs the digital audio signals. 11 TV SCART ** Connects to the TV or VCR and outputs video signals. 7. VIDEO ** Connects to the TV set using a VCR SCART cable. 5.

User Manual
Page 14
...On-Screen Display (OSD) screens. ** 15.V-/V+ ** Adjusts the audio volume. ** 16.MUTE ** Mutes or unmutes the audio temporarily. ** 17.i (Information) ** Displays the channel and programme information. ** 18.TEXT ** Switches between TV and radio modes. ** 3. SOURCE ** Selects the input source between TV and the product. ** 2. LIST ** Displays the channel list. ** 5. 1. NUMERIC(0-9) BUTTONS ** Enters a TV/radio channel number or menu option number. 4. Displays the channel list while watching a programme. ** 8. OK ** Selects a menu or confirms the selected operation. Before Using...
...On-Screen Display (OSD) screens. ** 15.V-/V+ ** Adjusts the audio volume. ** 16.MUTE ** Mutes or unmutes the audio temporarily. ** 17.i (Information) ** Displays the channel and programme information. ** 18.TEXT ** Switches between TV and radio modes. ** 3. SOURCE ** Selects the input source between TV and the product. ** 2. LIST ** Displays the channel list. ** 5. 1. NUMERIC(0-9) BUTTONS ** Enters a TV/radio channel number or menu option number. 4. Displays the channel list while watching a programme. ** 8. OK ** Selects a menu or confirms the selected operation. Before Using...
User Manual
Page 15
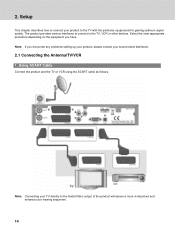
... signal quality. The product provides various interfaces to connect to the Audio/Video output of the product will assure a more vivid picture and enhance your viewing enjoyment. 14 2. Setup 2. Select the most appropriate procedure depending on the equipment you have. ** Note: If you encounter any problems setting up your product, please contact your product to connect your local product distributor. 2.1 Connecting the Antenna/TV/VCR 1. Using...
... signal quality. The product provides various interfaces to connect to the Audio/Video output of the product will assure a more vivid picture and enhance your viewing enjoyment. 14 2. Setup 2. Select the most appropriate procedure depending on the equipment you have. ** Note: If you encounter any problems setting up your product, please contact your product to connect your local product distributor. 2.1 Connecting the Antenna/TV/VCR 1. Using...

User Manual
Page 17
2. Setup 2.2 Connecting the Audio System Connect the product and the audio system using the RCA (Audio L, R) cable as follows. ** 16 If you wish to connect the optical S/PDIF terminal and Dolby Digital decoder to listen to digital audio, connect as follows.
2. Setup 2.2 Connecting the Audio System Connect the product and the audio system using the RCA (Audio L, R) cable as follows. ** 16 If you wish to connect the optical S/PDIF terminal and Dolby Digital decoder to listen to digital audio, connect as follows.

User Manual
Page 22
...or change the settings. 4.1 Switching Channel Switching Channel allows you to switch the current channel using one of the product such as switching channel, volume control, option list and programme information. You can switch channels using the NUMERIC(0-9) buttons to move to stop the audio temporarily. Press the P-/P+ button. 2. Press the MUTE button to the channel directly. 3. Enter the channel number using the channel list or EPG. Press the V-/V+ button to switch between TV channels and radio channels. Basic Operation 4. Note: The mute function remains set...
...or change the settings. 4.1 Switching Channel Switching Channel allows you to switch the current channel using one of the product such as switching channel, volume control, option list and programme information. You can switch channels using the NUMERIC(0-9) buttons to move to stop the audio temporarily. Press the P-/P+ button. 2. Press the MUTE button to the channel directly. 3. Enter the channel number using the channel list or EPG. Press the V-/V+ button to switch between TV channels and radio channels. Basic Operation 4. Note: The mute function remains set...

User Manual
Page 32
... the user selects. 1. Press the BLUE button on the remote control. 3. Press the LIST button while watching a programme. 2. Channel List 5.3 Bouquet List Bouquet List displays the list of channels included in the bouquet the user selects. 1. Press the LIST button again and select a bouquet to view, and press the OK button. 4. To view the satellite list, press the OPT button. Press the LIST button while watching a programme. 2. 5. To change the CAS displayed, press the BLUE button again. 31 Press the LIST button again...
... the user selects. 1. Press the BLUE button on the remote control. 3. Press the LIST button while watching a programme. 2. Channel List 5.3 Bouquet List Bouquet List displays the list of channels included in the bouquet the user selects. 1. Press the LIST button again and select a bouquet to view, and press the OK button. 4. To view the satellite list, press the OPT button. Press the LIST button while watching a programme. 2. 5. To change the CAS displayed, press the BLUE button again. 31 Press the LIST button again...

User Manual
Page 41
Confirm your new PIN-Code. 5. Enter your new PIN-Code. ** Note: When changing the PIN-Code, do not repeat the same figures. 40 Enter your current PIN-Code. 4. entavio Menu 3. 7.
Confirm your new PIN-Code. 5. Enter your new PIN-Code. ** Note: When changing the PIN-Code, do not repeat the same figures. 40 Enter your current PIN-Code. 4. entavio Menu 3. 7.

User Manual
Page 45
... the list, select User Define. Select one option among Universal, 9750, 10600, 5150, 10750, 11475 and User Define using the OK or 3. Select On/Off using the button. 2. Select OK and press the OK button. Select LNB Frequency using the OK or button. Enter the value for channel search. 1. On Dual LNB is set to complete. ** LNB Frequency 1. Select Antenna Setting and press the OK button. 4. Press the MENU button. 2. entavio Menu 7.4 Antenna Setting You can view the setting information for Satellite, LNB Frequency...
... the list, select User Define. Select one option among Universal, 9750, 10600, 5150, 10750, 11475 and User Define using the OK or 3. Select On/Off using the button. 2. Select OK and press the OK button. Select LNB Frequency using the OK or button. Enter the value for channel search. 1. On Dual LNB is set to complete. ** LNB Frequency 1. Select Antenna Setting and press the OK button. 4. Press the MENU button. 2. entavio Menu 7.4 Antenna Setting You can view the setting information for Satellite, LNB Frequency...
User Manual
Page 50
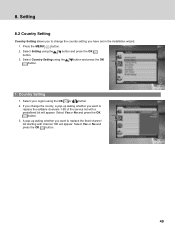
... asking whether you have set in the installation wizard. 1. button and press the OK 1. Country Setting 1. Select Setting using the OK or button. 2. 8. button and press the OK 3. If you change the country setting you want to replace the editable channels 1-99 of the service list with channel 100 will appear. Select Yes or No and press the OK button. 49 Press the MENU button. 2. Select Country Setting using the button.
... asking whether you have set in the installation wizard. 1. button and press the OK 1. Country Setting 1. Select Setting using the OK or button. 2. 8. button and press the OK 3. If you change the country setting you want to replace the editable channels 1-99 of the service list with channel 100 will appear. Select Yes or No and press the OK button. 49 Press the MENU button. 2. Select Country Setting using the button.

User Manual
Page 71
... User Define and enter the LNB frequency directly. ** • LNB Voltage 1. Select one option among Universal, 9750, 10600, 5150, 11475, 10750 and User Define using the OK or button. ** Note: When LNB Voltage is set the motor type before performing channel search. 1. Select LNB Frequency using the button. 2. Select LNB Voltage using the button. 2. "Only for LNB cable over 30m, Set LNB power High." 70 Press the OPT button to switch to Motor before motor antenna setting. • LNB Frequency 1. Select one option from Standard and...
... User Define and enter the LNB frequency directly. ** • LNB Voltage 1. Select one option among Universal, 9750, 10600, 5150, 11475, 10750 and User Define using the OK or button. ** Note: When LNB Voltage is set the motor type before performing channel search. 1. Select LNB Frequency using the button. 2. Select LNB Voltage using the button. 2. "Only for LNB cable over 30m, Set LNB power High." 70 Press the OPT button to switch to Motor before motor antenna setting. • LNB Frequency 1. Select one option from Standard and...
User Manual
Page 80
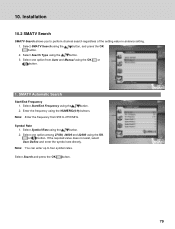
... exist, select User Define and enter the symbol rate directly. Note: You can enter up to perform channel search regardless of the setting value in antenna setting. 1. Select Symbol Rate using the OK or button. Installation 10.2 SMATV Search SMATV Search allows you to four symbol rates. ** Select Search and press the OK button. 79 Select Search Type using the OK or button. 1. SMATV Automatic Search Start/End Frequency 1. Select one option among 27500...
... exist, select User Define and enter the symbol rate directly. Note: You can enter up to perform channel search regardless of the setting value in antenna setting. 1. Select Symbol Rate using the OK or button. Installation 10.2 SMATV Search SMATV Search allows you to four symbol rates. ** Select Search and press the OK button. 79 Select Search Type using the OK or button. 1. SMATV Automatic Search Start/End Frequency 1. Select one option among 27500...

User Manual
Page 82
... assists channel search. For detailed ** information about installation wizard, refer to the previous menu, select No and press the OK or BACK button. 5. Select Installation using the button. button and press the OK 4. You will be prompted to enter your password again before starting to factory default. Select Yes and press the OK button to restore all user configured data will be deleted. 1. button, and press the OK 3. Enter the password to the factory default...
... assists channel search. For detailed ** information about installation wizard, refer to the previous menu, select No and press the OK or BACK button. 5. Select Installation using the button. button and press the OK 4. You will be prompted to enter your password again before starting to factory default. Select Yes and press the OK button to restore all user configured data will be deleted. 1. button, and press the OK 3. Enter the password to the factory default...

User Manual
Page 83
OTA is a standard for downloading software versions. Update may be careful not to pull out the signal line (LNB cable) during software update, fatal damage may be caused to the product. • Please be interrupted and the product may not operate. Visit the Humax website to -date software. However, the manufacturers reserve the right for deciding the release of software through a broadcast system. The equipment...
OTA is a standard for downloading software versions. Update may be careful not to pull out the signal line (LNB cable) during software update, fatal damage may be caused to the product. • Please be interrupted and the product may not operate. Visit the Humax website to -date software. However, the manufacturers reserve the right for deciding the release of software through a broadcast system. The equipment...
User Manual
Page 86
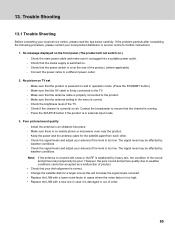
... product. - Keep the power and the antenna cable for further instructions. ** 1. No picture on air. Trouble Shooting 13. Check the brightness level of the product. (where applicable) - The signal level may be effected by weather conditions. Check the main power cable and make sure it is currently on TV set - Check the signal levels and adjust your dish alignment is correct. • Change the satellite dish for a larger...
... product. - Keep the power and the antenna cable for further instructions. ** 1. No picture on air. Trouble Shooting 13. Check the brightness level of the product. (where applicable) - The signal level may be effected by weather conditions. Check the main power cable and make sure it is currently on TV set - Check the signal levels and adjust your dish alignment is correct. • Change the satellite dish for a larger...
User Manual
Page 87
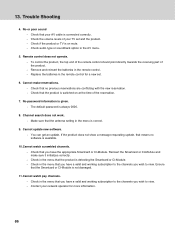
... view. Replace the batteries in the remote control. - Channel search does not work. - Cannot update new software. - You can get an update. 13. Check the volume levels of your network operator for a new set and the product. - Check if the product or TV is on at the time of the product. - No password information is always 0000. ** 8. Check in the menu that your AV cable is available. ** 10.Cannot watch pay channels. - Remove...
... view. Replace the batteries in the remote control. - Channel search does not work. - Cannot update new software. - You can get an update. 13. Check the volume levels of your network operator for a new set and the product. - Check if the product or TV is on at the time of the product. - No password information is always 0000. ** 8. Check in the menu that your AV cable is available. ** 10.Cannot watch pay channels. - Remove...
User Manual
Page 88
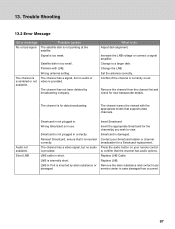
... the satellite. Press the audio button on air. Change the LNB. Set the antenna correctly. LNB cable is too small. Insert Smartcard. Satellite dish is short. Audio not available. The channel has a video signal, but no audio is provided. Replace LNB Cable. Remove the channel from the channel list and check for data broadcasting. The channel cannot be viewed with LNB. Reinsert Smartcard; Problem with the appropriate model that the channel has audio options. Change to do Adjust dish alignment. The channel has a signal, but no audio or video...
... the satellite. Press the audio button on air. Change the LNB. Set the antenna correctly. LNB cable is too small. Insert Smartcard. Satellite dish is short. Audio not available. The channel has a video signal, but no audio is provided. Replace LNB Cable. Remove the channel from the channel list and check for data broadcasting. The channel cannot be viewed with LNB. Reinsert Smartcard; Problem with the appropriate model that the channel has audio options. Change to do Adjust dish alignment. The channel has a signal, but no audio or video...
User Manual
Page 91
... error control of data transmission. ** Frequency The property of 16Hz and 20KHz. Sometimes it is sent and updated by the channel broadcaster. ** FEC (Forward Error Correction) A technique for each program. Glossary 15. OSD information may include brightness, contrast, tuning, RGB adjustment, and screen size and position. ** OTA (Over The Air) A standard for equipment, through a DiSEqC switching box. ** EPG(Electronic Programme Guide) An electronic equivalent to view channels or services...
... error control of data transmission. ** Frequency The property of 16Hz and 20KHz. Sometimes it is sent and updated by the channel broadcaster. ** FEC (Forward Error Correction) A technique for each program. Glossary 15. OSD information may include brightness, contrast, tuning, RGB adjustment, and screen size and position. ** OTA (Over The Air) A standard for equipment, through a DiSEqC switching box. ** EPG(Electronic Programme Guide) An electronic equivalent to view channels or services...


