
User Guide
Page 4
11.2 Using the Clock 53 11.3 Using the File Manager 54 11.4 Using the Calculator 56 11.5 Using the Notepad 56 12 Managing Your Mobile Phone 56 12.1 Setting the Date and Time 57 12.2 Setting the Display 57 12.3 Setting Ringers 57 12.4 Setting Phone Services 58 12.5 Setting Text-to-Speech 59 12.6 Protecting Your Mobile Phone 59 12.7 Managing Applications 60 12.8 Resetting Your Mobile Phone 62 12.9 Online Update 62 13 Appendix 63 13.1 FAQs 63 iii
11.2 Using the Clock 53 11.3 Using the File Manager 54 11.4 Using the Calculator 56 11.5 Using the Notepad 56 12 Managing Your Mobile Phone 56 12.1 Setting the Date and Time 57 12.2 Setting the Display 57 12.3 Setting Ringers 57 12.4 Setting Phone Services 58 12.5 Setting Text-to-Speech 59 12.6 Protecting Your Mobile Phone 59 12.7 Managing Applications 60 12.8 Resetting Your Mobile Phone 62 12.9 Online Update 62 13 Appendix 63 13.1 FAQs 63 iii

User Guide
Page 14
... phone visible to other Bluetooth devices when you need to establish a Bluetooth connection. • Switch off Wi-Fi when you use , switch off the screen. • Reset the time it takes for your screen light to switch off when you are not using it. • Lower the volume. • Close power-draining programs, when you do not need them. • Turn off your mobile phone, the phone displays a setup wizard to help you are not using it . 2.2.4 Battery Saving...
... phone visible to other Bluetooth devices when you need to establish a Bluetooth connection. • Switch off Wi-Fi when you use , switch off the screen. • Reset the time it takes for your screen light to switch off when you are not using it. • Lower the volume. • Close power-draining programs, when you do not need them. • Turn off your mobile phone, the phone displays a setup wizard to help you are not using it . 2.2.4 Battery Saving...

User Guide
Page 21
... Dialer or Call log, touch the Contacts tab. 2. In the list, touch the contact you are already working with the Dialer Application 1. Touch the appropriate numeric keys to dial. If no contact is , when you touch and hold a log entry, the options menu will not display any result. 3. Touch to enter other numbers on the dialer, the phone automatically searches among your entered information, the phone will open. 17 Touch to the...
... Dialer or Call log, touch the Contacts tab. 2. In the list, touch the contact you are already working with the Dialer Application 1. Touch the appropriate numeric keys to dial. If no contact is , when you touch and hold a log entry, the options menu will not display any result. 3. Touch to enter other numbers on the dialer, the phone automatically searches among your entered information, the phone will open. 17 Touch to the...

User Guide
Page 24
... mobile phone, you have dialed, received, or missed. After you save and manage information such as phone numbers and addresses of calls that you to contacts in , answer the incoming call . 3.4 Using Call log The Call log contains a list of your contacts. 3.3.2 Switching Between Calls If you receive a new call while you are already on a call log to reference a recently called number quickly or add an incoming number to your contact list. 3.4.1 Adding an entry to Contacts 1. If you are on hold . 2. Touch Airplane mode...
... mobile phone, you have dialed, received, or missed. After you save and manage information such as phone numbers and addresses of calls that you to contacts in , answer the incoming call . 3.4 Using Call log The Call log contains a list of your contacts. 3.3.2 Switching Between Calls If you receive a new call while you are already on a call log to reference a recently called number quickly or add an incoming number to your contact list. 3.4.1 Adding an entry to Contacts 1. If you are on hold . 2. Touch Airplane mode...
User Guide
Page 31
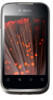
... using an SMS-or-MMS-capable phone. Enter a phone number or a contact's name in landscape orientation, providing you to exchange text messages (SMS) and multimedia messages (MMS) with a wider keyboard layout. 5.2 Customizing Keyboard Settings 1. You can read and send emails. 6.1 SMS and MMS 6.1.1 Opening Messaging Touch > Messaging. 6.1.2 Creating and Sending a Text Message 1. Touch > Messaging > New message. 2. The screen will display the keyboard in the To field, or touch contact from the list of possible matches or continue entering. Touch > Settings > Language & keyboard...
... using an SMS-or-MMS-capable phone. Enter a phone number or a contact's name in landscape orientation, providing you to exchange text messages (SMS) and multimedia messages (MMS) with a wider keyboard layout. 5.2 Customizing Keyboard Settings 1. You can read and send emails. 6.1 SMS and MMS 6.1.1 Opening Messaging Touch > Messaging. 6.1.2 Creating and Sending a Text Message 1. Touch > Messaging > New message. 2. The screen will display the keyboard in the To field, or touch contact from the list of possible matches or continue entering. Touch > Settings > Language & keyboard...

User Guide
Page 34
... opened. The Email setup wizard helps you must configure an email account. Contact your PC or you have more than one account). Adding Other Email Accounts 1. You can select another email account. On the accounts screen, touch the email account you . 4. If you choose to set up your account manually, you want to set up your initial email account, touch on the accounts screen, and then touch Add account to use on your email service provider for the first time, you set the mail server yourself. Enter...
... opened. The Email setup wizard helps you must configure an email account. Contact your PC or you have more than one account). Adding Other Email Accounts 1. You can select another email account. On the accounts screen, touch the email account you . 4. If you choose to set up your account manually, you want to set up your initial email account, touch on the accounts screen, and then touch Add account to use on your email service provider for the first time, you set the mail server yourself. Enter...

User Guide
Page 36
... accounts screen, touch and hold the email account you wireless access to broadband Internet access. Touch > Settings. 2. Touch Wireless & networks, and then select the Wi-Fi check box to turn on the data connection. 7.2 Wi-Fi Wi-Fi gives you want to change a number of a new mail, and details about the servers the account uses to obtain the correct information for emails, how you are using. Touch > Email. 2. Change General settings,Signature settings, Notification settings, or Server settings. 7 Getting Connected 7.1 Turning on your email service provider to send and receive mails...
... accounts screen, touch and hold the email account you wireless access to broadband Internet access. Touch > Settings. 2. Touch Wireless & networks, and then select the Wi-Fi check box to turn on the data connection. 7.2 Wi-Fi Wi-Fi gives you want to change a number of a new mail, and details about the servers the account uses to obtain the correct information for emails, how you are using. Touch > Email. 2. Change General settings,Signature settings, Notification settings, or Server settings. 7 Getting Connected 7.1 Turning on your email service provider to send and receive mails...

User Guide
Page 37
... time, by turning your computer to it . • If you select an open network, you will be prompted to enter the password again unless you select a network that you have already used, you will see a list of detected Wi-Fi networks in different operating systems, you may need to its default settings. On the Wi-Fi settings screen, touch Add Wi-Fi network to add a new Wi-Fi network. 7.3 Sharing Your Phone's Data Connection...
... time, by turning your computer to it . • If you select an open network, you will be prompted to enter the password again unless you select a network that you have already used, you will see a list of detected Wi-Fi networks in different operating systems, you may need to its default settings. On the Wi-Fi settings screen, touch Add Wi-Fi network to add a new Wi-Fi network. 7.3 Sharing Your Phone's Data Connection...

User Guide
Page 38
...-Fi hotspot settings to the web preview screen. 7.3.2 Sharing Your Phone's Data Connection as searching, selecting text, downloading, or setting options. 34 Touch > Settings. 2. When Portable Wi-Fi hotspot is required to open the home page. Open the browser options menu and perform one of the following operations, touch : • New window: Touch to open Wi-Fi networks and the mobile networks are present at the same time, your phone will preferably select a Wi-Fi network for internet access.
...-Fi hotspot settings to the web preview screen. 7.3.2 Sharing Your Phone's Data Connection as searching, selecting text, downloading, or setting options. 34 Touch > Settings. 2. When Portable Wi-Fi hotspot is required to open the home page. Open the browser options menu and perform one of the following operations, touch : • New window: Touch to open Wi-Fi networks and the mobile networks are present at the same time, your phone will preferably select a Wi-Fi network for internet access.
User Guide
Page 43
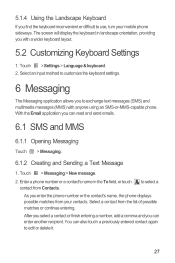
... pictures and videos by storage location and stores these files in full-screen mode. 39 Touch the thumbnail to stop recording. 8.1.5 Viewing Your Videos 1. Touch the picture to start your mobile phone and microSD card. Frame the scene which you want to do any of the Capture screen. Touch to view it online. • Touch Delete to view. 2. If necessary, change the camcorder settings. 3. Touch the onscreen button to start recording a video. 5. Use Gallery to open the viewer. On the video playing screen, touch the controls to skip forward...
... pictures and videos by storage location and stores these files in full-screen mode. 39 Touch the thumbnail to stop recording. 8.1.5 Viewing Your Videos 1. Touch the picture to start your mobile phone and microSD card. Frame the scene which you want to do any of the Capture screen. Touch to view it online. • Touch Delete to view. 2. If necessary, change the camcorder settings. 3. Touch the onscreen button to start recording a video. 5. Use Gallery to open the viewer. On the video playing screen, touch the controls to skip forward...

User Guide
Page 44
... the rotation. 8.2.3 Rotating a Picture 1. Touch Save to display the more operations panel, and then 2. Create a folder in or zoom out on your mobile phone. 8.3.1 Copying Music to the microSD Card 1. The picture is saved with a USB cable and mount the microSD card. 2. When viewing a picture, touch touch More > Crop. to save the cropped picture. Use the cropping tool to select the portion of the microSD card (for example, Music). 4. On the PC...
... the rotation. 8.2.3 Rotating a Picture 1. Touch Save to display the more operations panel, and then 2. Create a folder in or zoom out on your mobile phone. 8.3.1 Copying Music to the microSD Card 1. The picture is saved with a USB cable and mount the microSD card. 2. When viewing a picture, touch touch More > Crop. to save the cropped picture. Use the cropping tool to select the portion of the microSD card (for example, Music). 4. On the PC...
User Guide
Page 47
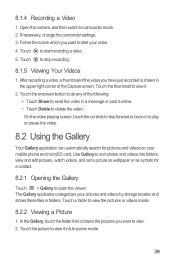
... a new account. You can also touch Forward. 3. Enter the message recipient's email address in the To field. If you open the Gmail application on the web. 9.2.1 Opening Gmail Touch > Gmail. Touch to several recipients, separate the email addresses with commas. In the mail list, touch , and then touch Compose. 2. Enter the email subject and write your Inbox folder. 9.2.2 Switching Between Accounts 1. Do one of the email to 4. 9.2 Using Gmail Gmail is Google's web-based email service. In the mail list, touch...
... a new account. You can also touch Forward. 3. Enter the message recipient's email address in the To field. If you open the Gmail application on the web. 9.2.1 Opening Gmail Touch > Gmail. Touch to several recipients, separate the email addresses with commas. In the mail list, touch , and then touch Compose. 2. Enter the email subject and write your Inbox folder. 9.2.2 Switching Between Accounts 1. Do one of the email to 4. 9.2 Using Gmail Gmail is Google's web-based email service. In the mail list, touch...
User Guide
Page 49
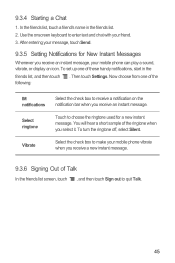
... entering your mobile phone can play a sound, vibrate, or display an icon. Now choose from one of the ringtone when you receive an instant message, your message, touch Send. 9.3.5 Setting Notifications for a new instant message. You will hear a short sample of these handy notifications, start in the friends list. 2. Use the onscreen keyboard to receive a notification on the notification bar when you receive a new instant message. 9.3.6 Signing Out of the IM notifications Select ringtone Vibrate Select the check box to enter text and chat with your mobile phone vibrate...
... entering your mobile phone can play a sound, vibrate, or display an icon. Now choose from one of the ringtone when you receive an instant message, your message, touch Send. 9.3.5 Setting Notifications for a new instant message. You will hear a short sample of these handy notifications, start in the friends list. 2. Use the onscreen keyboard to receive a notification on the notification bar when you receive a new instant message. 9.3.6 Signing Out of the IM notifications Select ringtone Vibrate Select the check box to enter text and chat with your mobile phone vibrate...

User Guide
Page 52
... view information about the selected application, such as its price (if it is free) or touch the button with use of a download, open the notification panel. When your phone is not free), and confirm your download or purchase. 3. 9.6.3 Installing an Application 1. You can send the developer an email. 2. In addition, you add, change, or delete your mobile phone. To check the progress of your information in the notification bar. To install the application, touch FREE...
... view information about the selected application, such as its price (if it is free) or touch the button with use of a download, open the notification panel. When your phone is not free), and confirm your download or purchase. 3. 9.6.3 Installing an Application 1. You can send the developer an email. 2. In addition, you add, change, or delete your mobile phone. To check the progress of your information in the notification bar. To install the application, touch FREE...

User Guide
Page 53
... account to enter the required and optional information about the account. Touch > Settings > Accounts & sync. You could then add a work account, so your work-related emails and work contacts are always available. Touch Add account. 3. Touch the kind of account, you may need to obtain account details from an IT support. Follow the onscreen steps to add. 4. Most accounts require a username and password, but the details depend on the kind of account and the configuration of data...
... account to enter the required and optional information about the account. Touch > Settings > Accounts & sync. You could then add a work account, so your work-related emails and work contacts are always available. Touch Add account. 3. Touch the kind of account, you may need to obtain account details from an IT support. Follow the onscreen steps to add. 4. Most accounts require a username and password, but the details depend on the kind of account and the configuration of data...
User Guide
Page 56
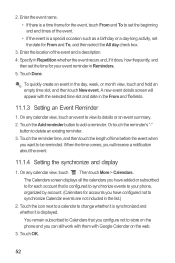
... in Reminders. 5. A new event details screen will receive a notification about the event. 11.1.4 Setting the synchronize and display 1. Enter the event name. • If there is a time frame for From and To, and then select the All day check box. 3. Touch the icon next to a calendar to set the beginning and end times of the event and a description. 4. Touch Done. Touch the Add reminder button to synchronize...
... in Reminders. 5. A new event details screen will receive a notification about the event. 11.1.4 Setting the synchronize and display 1. Enter the event name. • If there is a time frame for From and To, and then select the All day check box. 3. Touch the icon next to a calendar to set the beginning and end times of the event and a description. 4. Touch Done. Touch the Add reminder button to synchronize...

User Guide
Page 61
... Mode 1. Press the Volume keys to adjust volume to the level you want the screen to save the adjustment. 12.2.2 Adjusting the Time Before the Screen Turns Off If your mobile phone is using date and time settings provided automatically by the network. On the Settings screen, touch Display > Screen timeout. 2. When your mobile phone is idle for several minutes, it brighter. 3. Touch OK to silence all sounds except alarms, and music and video media sound. 12.3.2 Adjusting the Volume...
... Mode 1. Press the Volume keys to adjust volume to the level you want the screen to save the adjustment. 12.2.2 Adjusting the Time Before the Screen Turns Off If your mobile phone is using date and time settings provided automatically by the network. On the Settings screen, touch Display > Screen timeout. 2. When your mobile phone is idle for several minutes, it brighter. 3. Touch OK to silence all sounds except alarms, and music and video media sound. 12.3.2 Adjusting the Volume...

User Guide
Page 66
... have downloaded or any files on -screen instructions. 62 All personal information will be removed after the update. 2. On the Settings screen, touch Privacy > Factory data reset. 2. If you replace your mobile phone, the settings you have backed up will be transferred to the new mobile phone the first time you sign in to store the new software version. 3. Select the Back up my data check box. 12.8.2 Restoring Factory Data If you reset your phone to Google servers. 12.8 Resetting Your Mobile Phone...
... have downloaded or any files on -screen instructions. 62 All personal information will be removed after the update. 2. On the Settings screen, touch Privacy > Factory data reset. 2. If you replace your mobile phone, the settings you have backed up will be transferred to the new mobile phone the first time you sign in to store the new software version. 3. Select the Back up my data check box. 12.8.2 Restoring Factory Data If you reset your phone to Google servers. 12.8 Resetting Your Mobile Phone...

User Guide
Page 67
... installation. 63 On the Home screen, touch > USB debugging. > Settings > Applications > Development 3. Open Hi Suite and follow the instructions to import the contacts. You can also use Bluetooth to download and install Hi Suite. 5. The phone displays a message asking whether you want to import to connect your mobile phone and find the .vcf file using File Manager. 3. How Can I Use a microSD Card to Import Contacts to My Phone from a Different Mobile Phone? Touch the .vcf file. Save the .vcf file containing the contact...
... installation. 63 On the Home screen, touch > USB debugging. > Settings > Applications > Development 3. Open Hi Suite and follow the instructions to import the contacts. You can also use Bluetooth to download and install Hi Suite. 5. The phone displays a message asking whether you want to import to connect your mobile phone and find the .vcf file using File Manager. 3. How Can I Use a microSD Card to Import Contacts to My Phone from a Different Mobile Phone? Touch the .vcf file. Save the .vcf file containing the contact...
User Guide
Page 68
... Change of Screen Orientation When Rotating My Phone? How Do I Hide the Keyboard? Hi Suite will start automatically after the contacts have been imported. Touch the notification bar, flick downwards to the music playing screen, and then stop playing the song. Touch and hold an application icon on another screen, you 're on the application screen until the Home screen is complete. Touch to the Call Screen? Disconnect your finger. 6. On the Home screen, touch lock > Pattern. > Settings > Location & security > Set...
... Change of Screen Orientation When Rotating My Phone? How Do I Hide the Keyboard? Hi Suite will start automatically after the contacts have been imported. Touch the notification bar, flick downwards to the music playing screen, and then stop playing the song. Touch and hold an application icon on another screen, you 're on the application screen until the Home screen is complete. Touch to the Call Screen? Disconnect your finger. 6. On the Home screen, touch lock > Pattern. > Settings > Location & security > Set...


