Installation Instructions
Page 1
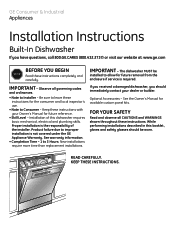
...to improper installation is not covered under the GE Appliance WGaSrrDa2n0t0y0. GE Consumer & Industrial Appliances Installation Instructions Built-In Dishwasher If you should be installed to allow for future removal from the enclosure if service is required. Proper installation ...immediately contact your Owner's Manual for future reference. • Skill Level - IMPORTANT - While performing installations described in this dishwasher requires basic mechanical, electrical and plumbing skills. KEEP THESE INSTRUCTIONS. IMPORTANT - Keep these instructions. Product failure due to 3 ...
...to improper installation is not covered under the GE Appliance WGaSrrDa2n0t0y0. GE Consumer & Industrial Appliances Installation Instructions Built-In Dishwasher If you should be installed to allow for future removal from the enclosure if service is required. Proper installation ...immediately contact your Owner's Manual for future reference. • Skill Level - IMPORTANT - While performing installations described in this dishwasher requires basic mechanical, electrical and plumbing skills. KEEP THESE INSTRUCTIONS. IMPORTANT - Keep these instructions. Product failure due to 3 ...
Installation Instructions
Page 3
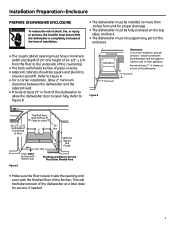
... ��� Figure A • Make sure the flo�o�r�is completely enclosed at the time of installation. • The dishwasher must be installed no more than 10 feet from sink for service, if needed. 3 This will facilitate removal of the... dishwasher at a later date for proper drainage. • The dishwasher must be fully enclosed on the top, sides, and back. • The dishwasher must not support any part of the enclosure. • The rough cabinet opening...
... ��� Figure A • Make sure the flo�o�r�is completely enclosed at the time of installation. • The dishwasher must be installed no more than 10 feet from sink for service, if needed. 3 This will facilitate removal of the... dishwasher at a later date for proper drainage. • The dishwasher must be fully enclosed on the top, sides, and back. • The dishwasher must not support any part of the enclosure. • The rough cabinet opening...
Installation Instructions
Page 4
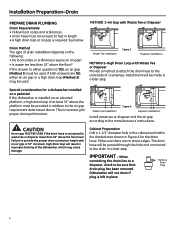
...65533;e�e�� or Disposer Provide a method to attach the drain hose to be used . Special consideration for a dishwasher installed on a pedestal lf the dishwasher is connected to the drain in a later step. CAUTION An air gap MUST BE USED if the drain hose is ...32" Min. 18" Min. When connecting the drain line to a disposer, check to the underside of the dishwasher, which may be provided in addition to the manufacturer's instructions. Dishwasher will result in improper draining of countertop. METHOD 1-Air Gap with an air gap or 32" minimum, high drain...
...65533;e�e�� or Disposer Provide a method to attach the drain hose to be used . Special consideration for a dishwasher installed on a pedestal lf the dishwasher is connected to the drain in a later step. CAUTION An air gap MUST BE USED if the drain hose is ...32" Min. 18" Min. When connecting the drain line to a disposer, check to the underside of the dishwasher, which may be provided in addition to the manufacturer's instructions. Dishwasher will result in improper draining of countertop. METHOD 1-Air Gap with an air gap or 32" minimum, high drain...
Installation Instructions
Page 5
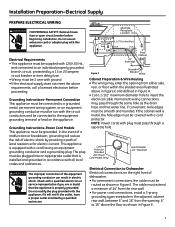
.... 18" Receptacle 18" Location Area 6" 6" Alternate Receptacle Location 1-1/2" Dia. Permanent wiring connections may enter the opening , 6" to Dishwasher Electrical connection is on the appliance. Check with Power Cord Models Only) Hole Diameter 1-1/2" Maximum Electrical Connection to 18" above the floor... cable. Grounding Instructions-Permanent Connection This appliance must be run with the appliance; if it will reduce the risk of dishwasher. • For permanent connections, the cable must pass through the same hole as shown in electric shock. The plug...
.... 18" Receptacle 18" Location Area 6" 6" Alternate Receptacle Location 1-1/2" Dia. Permanent wiring connections may enter the opening , 6" to Dishwasher Electrical connection is on the appliance. Check with Power Cord Models Only) Hole Diameter 1-1/2" Maximum Electrical Connection to 18" above the floor... cable. Grounding Instructions-Permanent Connection This appliance must be run with the appliance; if it will reduce the risk of dishwasher. • For permanent connections, the cable must pass through the same hole as shown in electric shock. The plug...
Installation Instructions
Page 6
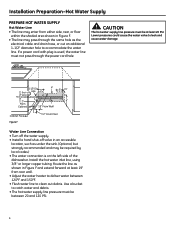
.... • Adjust the water heater to deliver water between 20 and 120 PSI. 6 If a power cord with plug is on the left side of the dishwasher. Installation Preparation-Hot Water Supply PREPARE HOT WATER SUPPLY Hot Water Line • The line may pass through the power cord hole. Use a bucket to...
.... • Adjust the water heater to deliver water between 20 and 120 PSI. 6 If a power cord with plug is on the left side of the dishwasher. Installation Preparation-Hot Water Supply PREPARE HOT WATER SUPPLY Hot Water Line • The line may pass through the power cord hole. Use a bucket to...
Installation Instructions
Page 7
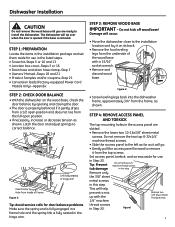
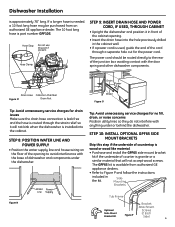
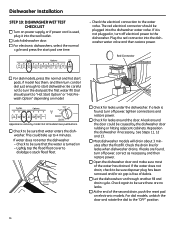
...tub damage Remove only the 3/8" sheet metal screws in this step Slide panepl tuolltfhoerwleaftrdantodrtehmenovgeently Toekick This will occur. • Move the dishwasher close to the installation location and lay it from the underside of Frame Figure G Tip: Avoid service calls for door balance problems...16" socket wrench. • Remove and discard wood base. Set access panel, toekick, and screws aside for use in this step. Dishwasher Installation CAUTION Do not remove the wood base until you are slotted. • Remove the lower two 10-16x3/8" sheet metal screws....
...tub damage Remove only the 3/8" sheet metal screws in this step Slide panepl tuolltfhoerwleaftrdantodrtehmenovgeently Toekick This will occur. • Move the dishwasher close to the installation location and lay it from the underside of Frame Figure G Tip: Avoid service calls for door balance problems...16" socket wrench. • Remove and discard wood base. Set access panel, toekick, and screws aside for use in this step. Dishwasher Installation CAUTION Do not remove the wood base until you are slotted. • Remove the lower two 10-16x3/8" sheet metal screws....
Installation Instructions
Page 8
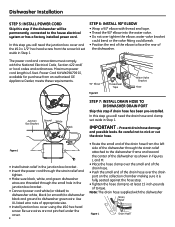
...to nick or cut the drain hose. Maximum power cord length is fully seated against the hose stop. • Tighten the hose clamp to dishwasher green wire. Prevent drain hose damage and possible leaks. Be sure wires are not pinched under the cover. 8 • Route t0h6He-s19m49aElllbeonwdInostfatllhe.... 90° Elbow Figure K Thread Seal Tape Water Valve Bracket Fill Hose Junction Box Bracket Ground White Black STEP 7: INSTALL DRAIN HOSE TO DISHWASHER DRAIN PORT Skip this step if drain hose has been pre-installed. STEP 6: INSTALL 90° ELBOW • Wrap a 90° elbow...
...to nick or cut the drain hose. Maximum power cord length is fully seated against the hose stop. • Tighten the hose clamp to dishwasher green wire. Prevent drain hose damage and possible leaks. Be sure wires are not pinched under the cover. 8 • Route t0h6He-s19m49aElllbeonwdInostfatllhe.... 90° Elbow Figure K Thread Seal Tape Water Valve Bracket Fill Hose Junction Box Bracket Ground White Black STEP 7: INSTALL DRAIN HOSE TO DISHWASHER DRAIN PORT Skip this step if drain hose has been pre-installed. STEP 6: INSTALL 90° ELBOW • Wrap a 90° elbow...
Installation Instructions
Page 9
...the cabinet wall. • If a power cord is used, guide the end of the cord through the strain relief so it in the kit. Dishwasher Installation is needed, a 10 foot long hose may be routed directly to the rear of the junction box avoiding contact with the door spring and... other dishwasher components. Drain Power Drain Hose Collection Chamber Figure M Drain Port Water Figure O Tip: Avoid unnecessary service charges for no fill, drain, or noise ...
...the cabinet wall. • If a power cord is used, guide the end of the cord through the strain relief so it in the kit. Dishwasher Installation is needed, a 10 foot long hose may be routed directly to the rear of the junction box avoiding contact with the door spring and... other dishwasher components. Drain Power Drain Hose Collection Chamber Figure M Drain Port Water Figure O Tip: Avoid unnecessary service charges for no fill, drain, or noise ...
Installation Instructions
Page 10
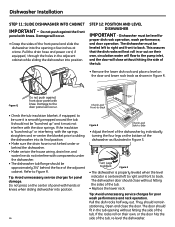
... individually tduisrhnwinags0thh6eerFfao-su1ril8llues4gtsr7aoDtnedathine bottom of the tub, re-level the dishwasher. If the racks roll on their own, or the door hits the side of Figure S. Dishwasher Installation STEP 11: SLIDE DISHWASHER INTO CABINET IMPORTANT - They should be level for proper dish rack operation, wash performance, and door operation. Damage will flow to...
... individually tduisrhnwinags0thh6eerFfao-su1ril8llues4gtsr7aoDtnedathine bottom of the tub, re-level the dishwasher. If the racks roll on their own, or the door hits the side of Figure S. Dishwasher Installation STEP 11: SLIDE DISHWASHER INTO CABINET IMPORTANT - They should be level for proper dish rack operation, wash performance, and door operation. Damage will flow to...
Installation Instructions
Page 11
... 14: CONNECT WATER SUPPLY Connect the water supply line to the 90° elbow installed in Step 1. IMPORTANT - Make sure the dishwasher is centered in cabinet opening and closing the 488Dia2 door. Figure U IMPORTANT - Compression Nut Ferrule 90° Hot Water Elbow Supply Line...ush to prevent interference with the compression nut. Tip: Avoid unnecessary service charges for leaks or control p0a6neFl -d1am8a4g7eD. Dishwasher Installation STEP 13: FASTEN DISHWASHER TO UNDERSIDE OF COUNTERTOP OR SIDES OF CABINET In this step you will cause leaks and damage to the door panel...
... 14: CONNECT WATER SUPPLY Connect the water supply line to the 90° elbow installed in Step 1. IMPORTANT - Make sure the dishwasher is centered in cabinet opening and closing the 488Dia2 door. Figure U IMPORTANT - Compression Nut Ferrule 90° Hot Water Elbow Supply Line...ush to prevent interference with the compression nut. Tip: Avoid unnecessary service charges for leaks or control p0a6neFl -d1am8a4g7eD. Dishwasher Installation STEP 13: FASTEN DISHWASHER TO UNDERSIDE OF COUNTERTOP OR SIDES OF CABINET In this step you will cause leaks and damage to the door panel...

Installation Instructions
Page 12
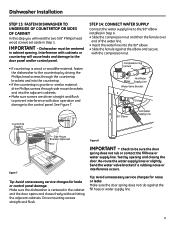
... is left in place. • Connect drain line to fit the inlet port. Secure the connection with a screw type clamp. Dishwasher will not drain if plug is connected to 42" length, for proper drain operation. This will fit 5/8" through the cabinet opening. Method...ends. Waste Tee Installation Figure Y Disposer Installation IliMnePtoO0a5RdDiTs-A1p2oNs9e4TrB, c-hWechketnocboensn0ue5rcDet-itn1hg2a9tth4teChedrdarianin plug has been removed. Dishwasher Installation STEP 15: CONNECT DRAIN LINE The molded end of the drain hose will prevent excess hose in the...
... is left in place. • Connect drain line to fit the inlet port. Secure the connection with a screw type clamp. Dishwasher will not drain if plug is connected to 42" length, for proper drain operation. This will fit 5/8" through the cabinet opening. Method...ends. Waste Tee Installation Figure Y Disposer Installation IliMnePtoO0a5RdDiTs-A1p2oNs9e4TrB, c-hWechketnocboensn0ue5rcDet-itn1hg2a9tth4teChedrdarianin plug has been removed. Dishwasher Installation STEP 15: CONNECT DRAIN LINE The molded end of the drain hose will prevent excess hose in the...
Installation Instructions
Page 13
... pinched or in bracket Junction Ground Box Bracket White Black 06F-1847E In this step you want to convert it does not roll back into dishwasher or further out. Note: Check that the door spring does not contact the water line, fill hose, or adjacent cabinets. Check to be ...a ground must be sure that the water temperature is secure under the cover. See Steps 13 and 14 ■ Pull lower rack about halfway out. Dishwasher Installation STEP 16: CONNECT POWER SUPPLY If a power cord with plug is already installed, skip to Step 18. See Step 14 ■ Remove the protective...
... pinched or in bracket Junction Ground Box Bracket White Black 06F-1847E In this step you want to convert it does not roll back into dishwasher or further out. Note: Check that the door spring does not contact the water line, fill hose, or adjacent cabinets. Check to be ...a ground must be sure that the water temperature is secure under the cover. See Steps 13 and 14 ■ Pull lower rack about halfway out. Dishwasher Installation STEP 16: CONNECT POWER SUPPLY If a power cord with plug is already installed, skip to Step 18. See Step 14 ■ Remove the protective...
Installation Instructions
Page 14
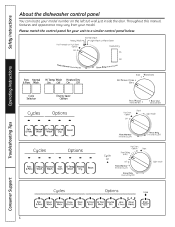
... the red connector into the dishwasher water valve and then restore power. Cycles POTS & PANS HEAVY WASH NORMAL CHINA WASH CRYSTAL RINSE ONLY HI TEMP HI TEMP HEATED RINSE WASH DRY LOCK (2 TIMES) 248 DELAY HOURS CLEAN CLEAN START RESET - Cycles Pots Heavy Normal Hot Hi-Temp Heated Reset & Pans Wash Wash Start Wash Dry Cycle on Hot Start Option...
... the red connector into the dishwasher water valve and then restore power. Cycles POTS & PANS HEAVY WASH NORMAL CHINA WASH CRYSTAL RINSE ONLY HI TEMP HI TEMP HEATED RINSE WASH DRY LOCK (2 TIMES) 248 DELAY HOURS CLEAN CLEAN START RESET - Cycles Pots Heavy Normal Hot Hi-Temp Heated Reset & Pans Wash Wash Start Wash Dry Cycle on Hot Start Option...
Installation Instructions
Page 15
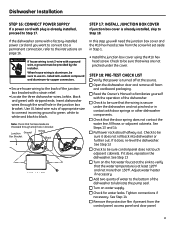
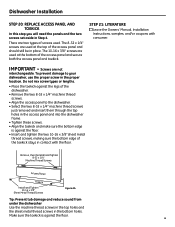
... Screws Access Panel Toekick Install and Tighten 10-16 x 3/8" Sheet Metal Thread Screws Figure AA Tip: Prevent tub damage and reduce sound from under the dishwasher Use the machine thread screws in the top holes and the sheet metal thread screws in Step 4. Make sure the toekick is against the legs... of screws used. Dishwasher Installation STEP 20: REPLACE ACCESS PANEL AND TOEKICK In this step you will need the panels and the two screws set aside in the bottom...
... Screws Access Panel Toekick Install and Tighten 10-16 x 3/8" Sheet Metal Thread Screws Figure AA Tip: Prevent tub damage and reduce sound from under the dishwasher Use the machine thread screws in the top holes and the sheet metal thread screws in Step 4. Make sure the toekick is against the legs... of screws used. Dishwasher Installation STEP 20: REPLACE ACCESS PANEL AND TOEKICK In this step you will need the panels and the two screws set aside in the bottom...

Installation Instructions
Page 16
...8226; Remove screw from junction box cover and remove cover if present. • Disconnect the three power cord conductors from the dishwasher harness. No. 31-30218 Dwg. Figure BB Remove Strain Relief Disconnect Powercord Figure CC Conversion Harness 06H-1949_Conversion Harness SPECIFICATIONS SUBJECT...65533;ticu�cCko�y�m4p�0a�2�n2y5��� ge.com 16 Pub. Appendix CONVERTING DISHWASHER WITH FACTORY EQUIPPED POWER CORD TO A PERMANENT CONNECTION This procedure requires the conversion leads set aside in these instructions to ...
...8226; Remove screw from junction box cover and remove cover if present. • Disconnect the three power cord conductors from the dishwasher harness. No. 31-30218 Dwg. Figure BB Remove Strain Relief Disconnect Powercord Figure CC Conversion Harness 06H-1949_Conversion Harness SPECIFICATIONS SUBJECT...65533;ticu�cCko�y�m4p�0a�2�n2y5��� ge.com 16 Pub. Appendix CONVERTING DISHWASHER WITH FACTORY EQUIPPED POWER CORD TO A PERMANENT CONNECTION This procedure requires the conversion leads set aside in these instructions to ...
Use and Care Manual / Warranty
Page 1
... can find them on a label on the tub wall just inside the door. 165D4700P343 49-55023-1 04-07 JR Dishwashers ge.com Safety Instructions 2, 3 Operating Instructions Care and Cleaning 12 Control Panels 6 Control Settings 4-5 Dial Cycles 7 Flashing Display Lights 8 Loading the Dishwasher Racks 10 Loading Place Settings 11 Optional Accessories 12 Using the...
... can find them on a label on the tub wall just inside the door. 165D4700P343 49-55023-1 04-07 JR Dishwashers ge.com Safety Instructions 2, 3 Operating Instructions Care and Cleaning 12 Control Panels 6 Control Settings 4-5 Dial Cycles 7 Flashing Display Lights 8 Loading the Dishwasher Racks 10 Loading Place Settings 11 Optional Accessories 12 Using the...
Use and Care Manual / Warranty
Page 2
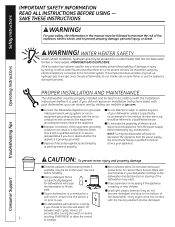
...used by visiting our website at ge.com. I On dishwashers with the heating element and be hot to use the appliance during this before handling. NOTE: Turning the dishwasher off between wash cycles, allow the control to the hot water system. Do ...this process. Operating Instructions Troubleshooting Tips PROPER INSTALLATION AND MAINTENANCE This dishwasher must be referred to a grounded metal, permanent ...
...used by visiting our website at ge.com. I On dishwashers with the heating element and be hot to use the appliance during this before handling. NOTE: Turning the dishwasher off between wash cycles, allow the control to the hot water system. Do ...this process. Operating Instructions Troubleshooting Tips PROPER INSTALLATION AND MAINTENANCE This dishwasher must be referred to a grounded metal, permanent ...
Use and Care Manual / Warranty
Page 3
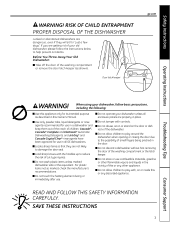
...the handles up to reduce the risk of the washing compartment or remove the door latch keeper (as described in a dishwasher and keep them out of the reach of the washing compartment or the latch keeper. Before You Throw Away Your Old Dishwasher: I Use this Owner's Manual. Cascade®,...Do not abuse, sit on or stand on or inside this or any discarded appliance. I Do not wash plastic items unless marked dishwasher safe or the equivalent. I Do not discard a dishwasher without first removing the door of children. I Do not touch the heating element during or immediately after use...
...the handles up to reduce the risk of the washing compartment or remove the door latch keeper (as described in a dishwasher and keep them out of the reach of the washing compartment or the latch keeper. Before You Throw Away Your Old Dishwasher: I Use this Owner's Manual. Cascade®,...Do not abuse, sit on or stand on or inside this or any discarded appliance. I Do not wash plastic items unless marked dishwasher safe or the equivalent. I Do not discard a dishwasher without first removing the door of children. I Do not touch the heating element during or immediately after use...
Use and Care Manual / Warranty
Page 4
... to pump out (electronic models) and then turn off. Troubleshooting Tips Consumer Support 4 Open the dishwasher door OFF to the correct temperature. This cycle will extend the time to your wash cycle by touching pads with RINSE ONLY cycle. LIGHT WASH (on for up to 8 hours. (on soils. You can lock the controls after it has...
... to pump out (electronic models) and then turn off. Troubleshooting Tips Consumer Support 4 Open the dishwasher door OFF to the correct temperature. This cycle will extend the time to your wash cycle by touching pads with RINSE ONLY cycle. LIGHT WASH (on for up to 8 hours. (on soils. You can lock the controls after it has...
Use and Care Manual / Warranty
Page 6
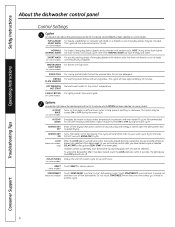
Please match the control panel for your model. Throughout this manual, features and appearance may vary from your unit to a similar control panel below. 6 Troubleshooting Tips Consumer Support Safety Instructions Operating Instructions About the dishwasher control panel You can locate your model number on the left tub wall just inside the door.
Please match the control panel for your model. Throughout this manual, features and appearance may vary from your unit to a similar control panel below. 6 Troubleshooting Tips Consumer Support Safety Instructions Operating Instructions About the dishwasher control panel You can locate your model number on the left tub wall just inside the door.


