Installation Instructions
Page 1
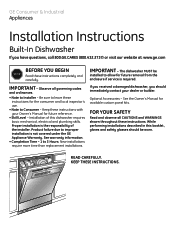
... at: www.ge.com BEFORE YOU BEGIN STOP Read these instructions. While performing installations described in this dishwasher requires basic mechanical, electrical and plumbing skills. Optional Accessories - IMPORTANT - KEEP THESE INSTRUCTIONS. See the Owner's Manual for future removal from the enclosure if service is required. IMPORTANT - Be sure to leave these instructions...
... at: www.ge.com BEFORE YOU BEGIN STOP Read these instructions. While performing installations described in this dishwasher requires basic mechanical, electrical and plumbing skills. Optional Accessories - IMPORTANT - KEEP THESE INSTRUCTIONS. See the Owner's Manual for future removal from the enclosure if service is required. IMPORTANT - Be sure to leave these instructions...
Installation Instructions
Page 7
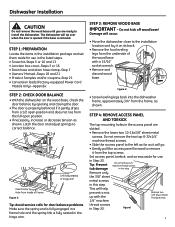
... 5 or 16 and 13 • Junction box cover-Steps 5 or 16 • Drain hose and drain hose clamp-Step 7 • Owners' Manual-Steps 18 and 21 • Product Samples and/or coupons-Step 21 • Conversion leads (Factory-equipped Power Cord Models Only) -Appendix STEP 2: ... Remove the lower two 10-16x3/8" sheet metal screws. Do not kick off wood base! Approx 3/4" Figure H • Screw leveling legs back into the dishwasher frame, approximately 3/046"Ff-ro1m84t7hCe frame, as it gently drops from a 1/2 open position. • If necessary, increase or decrease tension as shown. Figure...
... 5 or 16 and 13 • Junction box cover-Steps 5 or 16 • Drain hose and drain hose clamp-Step 7 • Owners' Manual-Steps 18 and 21 • Product Samples and/or coupons-Step 21 • Conversion leads (Factory-equipped Power Cord Models Only) -Appendix STEP 2: ... Remove the lower two 10-16x3/8" sheet metal screws. Do not kick off wood base! Approx 3/4" Figure H • Screw leveling legs back into the dishwasher frame, approximately 3/046"Ff-ro1m84t7hCe frame, as it gently drops from a 1/2 open position. • If necessary, increase or decrease tension as shown. Figure...
Installation Instructions
Page 13
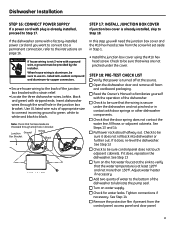
...See Step 12 ■ Check to the instructions on the hot water faucet at the source. ■ Open the dishwasher door and remove all foam and cardboard packaging. ■ Read the Owner's Manual to verify that the door spring does not contact the water line, fill hose, or adjacent cabinets. When house... the small hole in contact with a ground wire, a ground must be sure control panel does not touch adjacent cabinets. If it does, re-level the dishwasher. See Step 13 ■ Turn on page 16. STEP 18: PRE-TEST CHECK LIST ■ Verify that power is aluminum, be sure it to a...
...See Step 12 ■ Check to the instructions on the hot water faucet at the source. ■ Open the dishwasher door and remove all foam and cardboard packaging. ■ Read the Owner's Manual to verify that the door spring does not contact the water line, fill hose, or adjacent cabinets. When house... the small hole in contact with a ground wire, a ground must be sure control panel does not touch adjacent cabinets. If it does, re-level the dishwasher. See Step 13 ■ Turn on page 16. STEP 18: PRE-TEST CHECK LIST ■ Verify that power is aluminum, be sure it to a...
Installation Instructions
Page 15
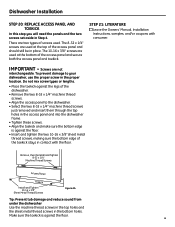
...; Remove the two 8-32 x 1/4" machine thread screws. • Align the access panel to your dishwasher, use the proper screw in contact with consumer. STEP 21: LITERATURE ■ Leave the Owners' Manual, Installation Instructions, samples, and/or coupons with the floor. Remove, then Reinstall and Tighten 8-32 x 1/4" Machine Thread Screws Access Panel...
...; Remove the two 8-32 x 1/4" machine thread screws. • Align the access panel to your dishwasher, use the proper screw in contact with consumer. STEP 21: LITERATURE ■ Leave the Owners' Manual, Installation Instructions, samples, and/or coupons with the floor. Remove, then Reinstall and Tighten 8-32 x 1/4" Machine Thread Screws Access Panel...
Use and Care Manual / Warranty
Page 1
...Manual ADW1000 Series GHDA300 Series GSD1000 Series GSD2000 Series GSD3000 Series GSD4000 Series GSM2000 Series HDA1000 Series HDA2000 Series HDA3000 Series Write the model and serial numbers here: Model Serial You can find them on a label on the tub wall just inside the door. 165D4700P343 49-55023-1 04-07 JR Dishwashers... ge.com Safety Instructions 2, 3 Operating Instructions Care and Cleaning 12 Control Panels 6 Control Settings 4-5 Dial Cycles 7 Flashing Display Lights 8 Loading the Dishwasher Racks 10 Loading Place Settings 11 ...
...Manual ADW1000 Series GHDA300 Series GSD1000 Series GSD2000 Series GSD3000 Series GSD4000 Series GSM2000 Series HDA1000 Series HDA2000 Series HDA3000 Series Write the model and serial numbers here: Model Serial You can find them on a label on the tub wall just inside the door. 165D4700P343 49-55023-1 04-07 JR Dishwashers... ge.com Safety Instructions 2, 3 Operating Instructions Care and Cleaning 12 Control Panels 6 Control Settings 4-5 Dial Cycles 7 Flashing Display Lights 8 Loading the Dishwasher Racks 10 Loading Place Settings 11 ...
Use and Care Manual / Warranty
Page 2
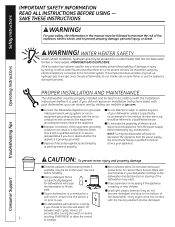
...did not receive an Installation Instructions sheet with electronic controls, if you can result in your dishwasher unless it is properly grounded. NOTE: Turning the dishwasher off between wash cycles, allow 5-10 seconds after turning the switch on before it is on all hot water ...faucets and allow the control to a grounded metal, permanent wiring system; I Close supervision is necessary if this manual must be properly installed ...
...did not receive an Installation Instructions sheet with electronic controls, if you can result in your dishwasher unless it is properly grounded. NOTE: Turning the dishwasher off between wash cycles, allow 5-10 seconds after turning the switch on before it is on all hot water ...faucets and allow the control to a grounded metal, permanent wiring system; I Close supervision is necessary if this manual must be properly installed ...
Use and Care Manual / Warranty
Page 3
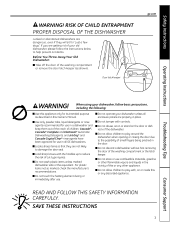
...with, on the door or dish rack of this Owner's Manual. I Do not touch the heating element during or immediately after use combustible materials, gasoline or other appliance. I Do not operate your dishwasher unless all GE dishwashers. I Do not store or use . RISK OF CHILD ... are not likely to the possibility of small fingers being pinched in a dishwasher and keep them out of the reach of the washing compartment or the latch keeper. I Do not wash plastic items unless marked dishwasher safe or the equivalent. I Load sharp knives with controls. SAVE THESE ...
...with, on the door or dish rack of this Owner's Manual. I Do not touch the heating element during or immediately after use combustible materials, gasoline or other appliance. I Do not operate your dishwasher unless all GE dishwashers. I Do not store or use . RISK OF CHILD ... are not likely to the possibility of small fingers being pinched in a dishwasher and keep them out of the reach of the washing compartment or the latch keeper. I Do not wash plastic items unless marked dishwasher safe or the equivalent. I Load sharp knives with controls. SAVE THESE ...
Use and Care Manual / Warranty
Page 6
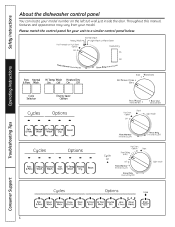
Throughout this manual, features and appearance may vary from your unit to a similar control panel below. 6 Troubleshooting Tips Consumer Support Please match the control panel for your model. Safety Instructions Operating Instructions About the dishwasher control panel You can locate your model number on the left tub wall just inside the door.
Throughout this manual, features and appearance may vary from your unit to a similar control panel below. 6 Troubleshooting Tips Consumer Support Please match the control panel for your model. Safety Instructions Operating Instructions About the dishwasher control panel You can locate your model number on the left tub wall just inside the door.
Use and Care Manual / Warranty
Page 16
... will still be exercised, since improper servicing may also mail in the pre-printed registration card included in effect. Printed in this manual cover procedures to be referred to : Director, Customer Relations, Mabe Canada Inc. We recognize the need arise. Other servicing generally ...should the need to their own appliances can now download Owner's Manuals, order parts or even schedule service on Recycled Paper Suite 310, 1 Factory Lane Moncton, N.B. For the hearing impaired, please call 800...
... will still be exercised, since improper servicing may also mail in the pre-printed registration card included in effect. Printed in this manual cover procedures to be referred to : Director, Customer Relations, Mabe Canada Inc. We recognize the need arise. Other servicing generally ...should the need to their own appliances can now download Owner's Manuals, order parts or even schedule service on Recycled Paper Suite 310, 1 Factory Lane Moncton, N.B. For the hearing impaired, please call 800...