Installation Instructions
Page 2
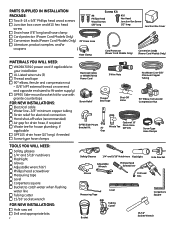
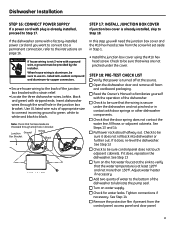
... end and opposite end sized to fit water supply) Wire Nuts Hot Water Line ■ GPF65 Side-mount bracket kit for use with Cord Protector granite countertops FOR NEW INSTALLATIONS: ■ Electrical cable Thread Strain Relief Seal Tape Electrical Cable Shut-Off Valve 90° Elbow, Ferrule and Compression Nut Tape ■ Water line-3/8" minimum copper tubing Strain Relief ■ Strain relief for electrical connection ■ Hand shut-off valve (recommended) 307Dia11 90 ϒElbow ■ Air gap for drain hose...
... end and opposite end sized to fit water supply) Wire Nuts Hot Water Line ■ GPF65 Side-mount bracket kit for use with Cord Protector granite countertops FOR NEW INSTALLATIONS: ■ Electrical cable Thread Strain Relief Seal Tape Electrical Cable Shut-Off Valve 90° Elbow, Ferrule and Compression Nut Tape ■ Water line-3/8" minimum copper tubing Strain Relief ■ Strain relief for electrical connection ■ Hand shut-off valve (recommended) 307Dia11 90 ϒElbow ■ Air gap for drain hose...
Installation Instructions
Page 3
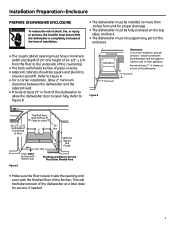
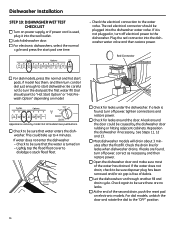
... top, sides, and back. • The dishwasher must not support any part of the enclosure. • The rough cabinet opening must ensure that the dishwasher is ��l�e�ve�l�inside the opening and even with the finished floor of the kitchen. This will facilitate removal of the dishwasher at least 27" in front of the...
... top, sides, and back. • The dishwasher must not support any part of the enclosure. • The rough cabinet opening must ensure that the dishwasher is ��l�e�ve�l�inside the opening and even with the finished floor of the kitchen. This will facilitate removal of the dishwasher at least 27" in front of the...
Installation Instructions
Page 5
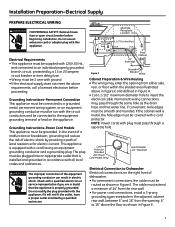
... the plug provided with plug must be 2 wire with all local codes and ordinances. The cable must be routed as the drain hose and hot water line, if convenient. Metal Cabinet Wall Cord Protector (Provided with this appliance. Do not use an extension cord or adapter plug with Power Cord Models Only) Hole Diameter 1-1/2" Maximum Electrical Connection to insert the electrical cable. Installation Preparation-Electrical Supply PREPARE ELECTRICAL WIRING WARNING FOR PERSONAL SAFETY: Remove house fuse or open circuit...
... the plug provided with plug must be 2 wire with all local codes and ordinances. The cable must be routed as the drain hose and hot water line, if convenient. Metal Cabinet Wall Cord Protector (Provided with this appliance. Do not use an extension cord or adapter plug with Power Cord Models Only) Hole Diameter 1-1/2" Maximum Electrical Connection to insert the electrical cable. Installation Preparation-Electrical Supply PREPARE ELECTRICAL WIRING WARNING FOR PERSONAL SAFETY: Remove house fuse or open circuit...
Installation Instructions
Page 7
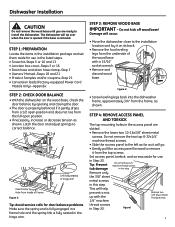
... listed steps. • Screw kit-Steps 5 or 16 and 13 • Junction box cover-Steps 5 or 16 • Drain hose and drain hose clamp-Step 7 • Owners' Manual-Steps 18 and 21 • Product Samples and/or coupons-Step 21 • Conversion leads (Factory-equipped Power Cord Models Only) -Appendix STEP 2: CHECK DOOR BALANCE • With the dishwasher on its back. • Remove the four leveling...
... listed steps. • Screw kit-Steps 5 or 16 and 13 • Junction box cover-Steps 5 or 16 • Drain hose and drain hose clamp-Step 7 • Owners' Manual-Steps 18 and 21 • Product Samples and/or coupons-Step 21 • Conversion leads (Factory-equipped Power Cord Models Only) -Appendix STEP 2: CHECK DOOR BALANCE • With the dishwasher on its back. • Remove the four leveling...
Installation Instructions
Page 8
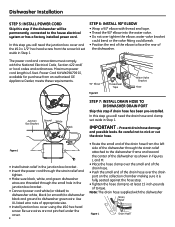
...; Use UL listed wire nuts of the dishwasher. Power Cord Kit WX09X70910, available for purchase from an authorized GE Appliance Dealer, meets these requirements. 90° Elbow Figure K Thread Seal Tape Water Valve Bracket Fill Hose Junction Box Bracket Ground White Black STEP 7: INSTALL DRAIN HOSE TO DISHWASHER DRAIN PORT Skip this step you will need the drain hose and clamp set aside in Step 1. Be careful not to dishwasher green wire. Note: The drain hose supplied with...
...; Use UL listed wire nuts of the dishwasher. Power Cord Kit WX09X70910, available for purchase from an authorized GE Appliance Dealer, meets these requirements. 90° Elbow Figure K Thread Seal Tape Water Valve Bracket Fill Hose Junction Box Bracket Ground White Black STEP 7: INSTALL DRAIN HOSE TO DISHWASHER DRAIN PORT Skip this step you will need the drain hose and clamp set aside in Step 1. Be careful not to dishwasher green wire. Note: The drain hose supplied with...
Installation Instructions
Page 9
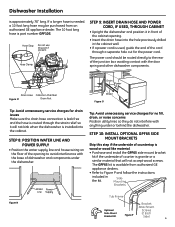
... DRAIN HOSE AND POWER CORD, IF USED, THROUGH CABINET • Upright the dishwasher and position it will not accept wood screws. If a longer hose is available from an authorized GE appliance dealer. Figure N Water Power Line Supply Tip: Avoid unnecessary service charges for the power cord. The 10 foot long hose is approximately 78" long. SideMounting Brackets Tub Frame Bracket Attachment Optional Screws Side-Mount Bracket Kit Figure P (2 Each Side) 9 06F-1847H Dishwasher Installation is part number...
... DRAIN HOSE AND POWER CORD, IF USED, THROUGH CABINET • Upright the dishwasher and position it will not accept wood screws. If a longer hose is available from an authorized GE appliance dealer. Figure N Water Power Line Supply Tip: Avoid unnecessary service charges for the power cord. The 10 foot long hose is approximately 78" long. SideMounting Brackets Tub Frame Bracket Attachment Optional Screws Side-Mount Bracket Kit Figure P (2 Each Side) 9 06F-1847H Dishwasher Installation is part number...
Installation Instructions
Page 10
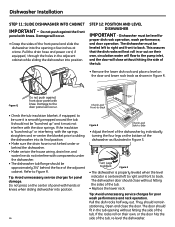
... for proper dish rack operation, wash performance, and door operation. STEP 12: POSITION AND LEVEL DISHWASHER IMPORTANT - Damage to back. Dishwasher must be "bunched up " or interfering with the door springs. Do not press on their own, circulation water will flow to the pump inlet, and the door will close without hitting • Replace the lower rack. r should not be level for poor wash performance and rack operation. Open and close without hitting...
... for proper dish rack operation, wash performance, and door operation. STEP 12: POSITION AND LEVEL DISHWASHER IMPORTANT - Damage to back. Dishwasher must be "bunched up " or interfering with the door springs. Do not press on their own, circulation water will flow to the pump inlet, and the door will close without hitting • Replace the lower rack. r should not be level for poor wash performance and rack operation. Open and close without hitting...
Installation Instructions
Page 13
... the control panel, access panel and door panel. 13 Insert dishwasher wires through small hole in bracket Junction Ground Box Bracket White Black 06F-1847E In this step you want to use U.L. See Steps 13 and 14 ■ Pull lower rack about halfway out. Tighten connections if necessary. Dishwasher Installation STEP 16: CONNECT POWER SUPPLY If a power cord with plug is secure under the cover. See Step 13 ■ Turn on the hot water...
... the control panel, access panel and door panel. 13 Insert dishwasher wires through small hole in bracket Junction Ground Box Bracket White Black 06F-1847E In this step you want to use U.L. See Steps 13 and 14 ■ Pull lower rack about halfway out. Tighten connections if necessary. Dishwasher Installation STEP 16: CONNECT POWER SUPPLY If a power cord with plug is secure under the cover. See Step 13 ■ Turn on the hot water...
Installation Instructions
Page 14
... disposer plug has been removed and/or air gap is free of the water has drained. If water does not enter the dishwasher - Check the drain line for leaks under the dishwasher. Dial should be sure that the water is turned on - Cycles Pots Heavy Normal Hot Hi-Temp Heated Reset & Pans Wash Wash Start Wash Dry Cycle on Hot Start Option Start Start Delay (HRS) 2 1 6 543 Off Plate Warmer (Heated Dry On) Rinse Only (Heated Dry Off) Light Wash Appearance varies by the dishwasher door rubbing or hitting adjacent cabinets...
... disposer plug has been removed and/or air gap is free of the water has drained. If water does not enter the dishwasher - Check the drain line for leaks under the dishwasher. Dial should be sure that the water is turned on - Cycles Pots Heavy Normal Hot Hi-Temp Heated Reset & Pans Wash Wash Start Wash Dry Cycle on Hot Start Option Start Start Delay (HRS) 2 1 6 543 Off Plate Warmer (Heated Dry On) Rinse Only (Heated Dry Off) Light Wash Appearance varies by the dishwasher door rubbing or hitting adjacent cabinets...
Use and Care Manual / Warranty
Page 1
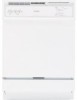
Back Cover Warranty 15 Owner's Manual ADW1000 Series GHDA300 Series GSD1000 Series GSD2000 Series GSD3000 Series GSD4000 Series GSM2000 Series HDA1000 Series HDA2000 Series HDA3000 Series Write the model and serial numbers here: Model Serial You can find them on a label on the tub wall just inside the door. 165D4700P343 49-55023-1 04-07 JR Dishwashers ge.com Safety Instructions 2, 3 Operating Instructions Care and Cleaning 12 Control Panels 6 Control Settings 4-5 Dial Cycles 7 Flashing Display Lights 8 Loading the Dishwasher Racks 10 Loading Place Settings 11 Optional ...
Back Cover Warranty 15 Owner's Manual ADW1000 Series GHDA300 Series GSD1000 Series GSD2000 Series GSD3000 Series GSD4000 Series GSM2000 Series HDA1000 Series HDA2000 Series HDA3000 Series Write the model and serial numbers here: Model Serial You can find them on a label on the tub wall just inside the door. 165D4700P343 49-55023-1 04-07 JR Dishwashers ge.com Safety Instructions 2, 3 Operating Instructions Care and Cleaning 12 Control Panels 6 Control Settings 4-5 Dial Cycles 7 Flashing Display Lights 8 Loading the Dishwasher Racks 10 Loading Place Settings 11 Optional ...
Use and Care Manual / Warranty
Page 2
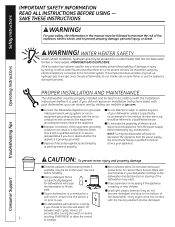
... attempting any part of fire, explosion, electric shock, and to initialize. NOTE: Turning the dishwasher off between wash cycles, allow the control to prevent property damage, personal injury, or death. I Using a detergent that has not been used by visiting our website at ge.com. Safety Instructions IMPORTANT SAFETY INFORMATION READ ALL INSTRUCTIONS BEFORE USING - Operating Instructions Troubleshooting Tips PROPER INSTALLATION AND MAINTENANCE This dishwasher must be damaged. I Close supervision is...
... attempting any part of fire, explosion, electric shock, and to initialize. NOTE: Turning the dishwasher off between wash cycles, allow the control to prevent property damage, personal injury, or death. I Using a detergent that has not been used by visiting our website at ge.com. Safety Instructions IMPORTANT SAFETY INFORMATION READ ALL INSTRUCTIONS BEFORE USING - Operating Instructions Troubleshooting Tips PROPER INSTALLATION AND MAINTENANCE This dishwasher must be damaged. I Close supervision is...
Use and Care Manual / Warranty
Page 4
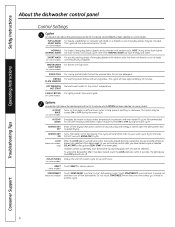
... START/RESET more than one time to boost water temperature in all pads become inoperative. Safety Instructions Operating Instructions About the dishwasher control panel Control Settings Cycles An indicator light above the LOCK pad will turn off the drying heat option. POTS & PANS/ For heavily soiled dishes or cookware with medium soils. HEAVY WASH This cycle will not remove burned-on foods. (on some models. Choosing a cycle other than normal. PLATE WARMER HOT PREWASH Preheats wash water to speed drying. HOT START...
... START/RESET more than one time to boost water temperature in all pads become inoperative. Safety Instructions Operating Instructions About the dishwasher control panel Control Settings Cycles An indicator light above the LOCK pad will turn off the drying heat option. POTS & PANS/ For heavily soiled dishes or cookware with medium soils. HEAVY WASH This cycle will not remove burned-on foods. (on some models. Choosing a cycle other than normal. PLATE WARMER HOT PREWASH Preheats wash water to speed drying. HOT START...
Use and Care Manual / Warranty
Page 5
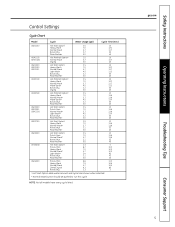
ge.com Troubleshooting Tips Consumer Support 5 NOTE: Not all models have every cycle listed. Safety Instructions Operating Instructions Control Settings Cycle Chart Model Cycle Water Usage (gal.) Cycle Time (min.) GSD1100 Hot Start Option1 2.5 10 Heavy Wash 7.0 120 Normal Wash 5.7 117 Rinse Only 2.2 53 Plate Warmer 0.0 40 HDA1100 Hot PreWash Option1 2.5 10 ADW1100 Normal Wash 5.7 117 Drying 0.0 40 GSD1300 Hot Start Option1 2.5 10 GSD2100 Heavy Wash 7.0 120 GSD2101 Normal Wash 5.7 117 Light Wash 4.5 113 Rinse Only 2.2 53 Plate Warmer...
ge.com Troubleshooting Tips Consumer Support 5 NOTE: Not all models have every cycle listed. Safety Instructions Operating Instructions Control Settings Cycle Chart Model Cycle Water Usage (gal.) Cycle Time (min.) GSD1100 Hot Start Option1 2.5 10 Heavy Wash 7.0 120 Normal Wash 5.7 117 Rinse Only 2.2 53 Plate Warmer 0.0 40 HDA1100 Hot PreWash Option1 2.5 10 ADW1100 Normal Wash 5.7 117 Drying 0.0 40 GSD1300 Hot Start Option1 2.5 10 GSD2100 Heavy Wash 7.0 120 GSD2101 Normal Wash 5.7 117 Light Wash 4.5 113 Rinse Only 2.2 53 Plate Warmer...
Use and Care Manual / Warranty
Page 8
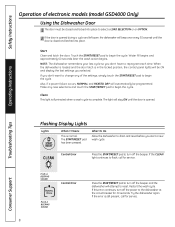
... the door is opened. Restart the wash cycle. Start Close and latch the door. If you selected. Make any of electronic models (model GSD4000 Only) Using the Dishwasher Door 1 The door must be programmed. CLEAN Control Error Press the START/RESET pad to the dishwasher at the circuit breaker for service. 8 Consumer Support PLUS A BEEPING SOUND Control Error PLUS A BEEPING SOUND Press the START/RESET pad to turn off the power to turn off the beeper and the dishwasher will automatically be closed and locked into...
... the door is opened. Restart the wash cycle. Start Close and latch the door. If you selected. Make any of electronic models (model GSD4000 Only) Using the Dishwasher Door 1 The door must be programmed. CLEAN Control Error Press the START/RESET pad to the dishwasher at the circuit breaker for service. 8 Consumer Support PLUS A BEEPING SOUND Control Error PLUS A BEEPING SOUND Press the START/RESET pad to turn off the power to turn off the beeper and the dishwasher will automatically be closed and locked into...
Use and Care Manual / Warranty
Page 9
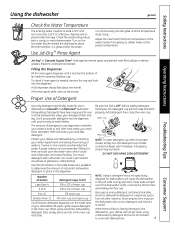
... turn the detergent cup handle counterclockwise until it reaches the bottom of Detergent Use only detergent specifically made for dishwashers will spill out of automatic dishwasher detergent to determine the amount of the dishwasher vents, covering the kitchen floor and making the floor wet. Check the water temperature with suds. During operation, these suds will cause the dishwasher to wash dishes. Jet-Dry® or Cascade Crystal Clear® rinse agents remove...
... turn the detergent cup handle counterclockwise until it reaches the bottom of Detergent Use only detergent specifically made for dishwashers will spill out of automatic dishwasher detergent to determine the amount of the dishwasher vents, covering the kitchen floor and making the floor wet. Check the water temperature with suds. During operation, these suds will cause the dishwasher to wash dishes. Jet-Dry® or Cascade Crystal Clear® rinse agents remove...
Use and Care Manual / Warranty
Page 11
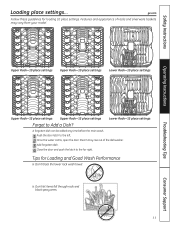
... dishwasher. 3 Add forgotten dish. 4 Close the door and push the latch to the far right. Steam may rise out of racks and silverware baskets may vary from your model. Tips for loading 10 place settings. ge.com Follow these guidelines for Loading and Good Wash Performance I Don't let items fall through rack and block spray arms. 11 Consumer Support Upper Rack-10 place settings Upper Rack-10 place settings Lower Rack-10 place settings Operating Instructions Troubleshooting Tips Upper Rack...
... dishwasher. 3 Add forgotten dish. 4 Close the door and push the latch to the far right. Steam may rise out of racks and silverware baskets may vary from your model. Tips for loading 10 place settings. ge.com Follow these guidelines for Loading and Good Wash Performance I Don't let items fall through rack and block spray arms. 11 Consumer Support Upper Rack-10 place settings Upper Rack-10 place settings Lower Rack-10 place settings Operating Instructions Troubleshooting Tips Upper Rack...
Use and Care Manual / Warranty
Page 12
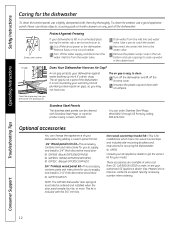
... panel trim kit-This accessory contains trim and instructions for you to the dishwasher. Non-wood countertop bracket kit-This is not a part of your GE Appliance dealer to clean. 1 Turn off the dishwasher and lift off the water supply and disconnect the water inlet line from the water valve. 3 Drain water from GE. Specify accessory number when ordering. To clean the exterior, use a lightly dampened cloth, then dry thoroughly. or more. The air gap is...
... panel trim kit-This accessory contains trim and instructions for you to the dishwasher. Non-wood countertop bracket kit-This is not a part of your GE Appliance dealer to clean. 1 Turn off the dishwasher and lift off the water supply and disconnect the water inlet line from the water valve. 3 Drain water from GE. Specify accessory number when ordering. To clean the exterior, use a lightly dampened cloth, then dry thoroughly. or more. The air gap is...
Use and Care Manual / Warranty
Page 13
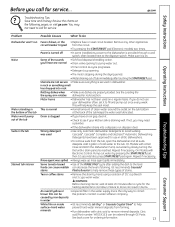
... the • Replace fuse or reset circuit breaker. ge.com Operating Instructions Troubleshooting Tips Problem Possible Causes What To Do Dishwasher won't run disposer clear. Utensils are normal • Drain valve opening to pump water out. • Timer control as cycle progresses. • Detergent cup opening. • The motor stopping during the drying period. • Water draining out of the tub Suds in dishwasher. Failure to do not use in all GE dishwashers. • To remove suds from...
... the • Replace fuse or reset circuit breaker. ge.com Operating Instructions Troubleshooting Tips Problem Possible Causes What To Do Dishwasher won't run disposer clear. Utensils are normal • Drain valve opening to pump water out. • Timer control as cycle progresses. • Detergent cup opening. • The motor stopping during the drying period. • Water draining out of the tub Suds in dishwasher. Failure to do not use in all GE dishwashers. • To remove suds from...
Use and Care Manual / Warranty
Page 14
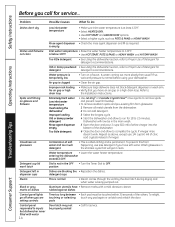
...; Use Jet-Dry® or Cascade Crystal Clear® rinse agents to 120°F. rubbed against dishes Time too long between • Each pad must be properly seated • Call for detergent recommendations. Is water coming out more slowly than usual? Water temperature • Lower the water heater temperature. position Dishes are setting controls Control panel responded to 22 minutes. Troubleshooting Tips Consumer Support is temporarily low • Turn on dishes Control panel lights...
...; Use Jet-Dry® or Cascade Crystal Clear® rinse agents to 120°F. rubbed against dishes Time too long between • Each pad must be properly seated • Call for detergent recommendations. Is water coming out more slowly than usual? Water temperature • Lower the water heater temperature. position Dishes are setting controls Control panel responded to 22 minutes. Troubleshooting Tips Consumer Support is temporarily low • Turn on dishes Control panel lights...
Use and Care Manual / Warranty
Page 15
... and exclusive remedy is needed to replace the defective part. I Damage to an Authorized GE Service location. Please have other than the intended purpose or used commercially. During this limited one year or the shortest period allowed by our Factory Service Centers, or an authorized Customer Care® technician. I Cleaning or servicing of God. Safety Instructions Operating Instructions GE Dishwasher Warranty All warranty service provided by law. If...
... and exclusive remedy is needed to replace the defective part. I Damage to an Authorized GE Service location. Please have other than the intended purpose or used commercially. During this limited one year or the shortest period allowed by our Factory Service Centers, or an authorized Customer Care® technician. I Cleaning or servicing of God. Safety Instructions Operating Instructions GE Dishwasher Warranty All warranty service provided by law. If...


