Installation Instructions
Page 1
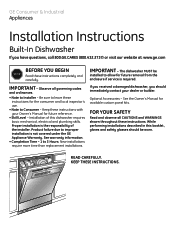
... to Consumer - Be sure to leave these instructions completely and carefully. If you received a damaged dishwasher, you have questions, call 800.GE.CARES (800.432.2737) or visit our website at: www.ge.com BEFORE YOU BEGIN STOP Read these instructions for available custom panel kits.... GE Consumer & Industrial Appliances Installation Instructions Built-In Dishwasher If you should be installed to allow for future reference. • Skill Level - ...
... to Consumer - Be sure to leave these instructions completely and carefully. If you received a damaged dishwasher, you have questions, call 800.GE.CARES (800.432.2737) or visit our website at: www.ge.com BEFORE YOU BEGIN STOP Read these instructions for available custom panel kits.... GE Consumer & Industrial Appliances Installation Instructions Built-In Dishwasher If you should be installed to allow for future reference. • Skill Level - ...
Installation Instructions
Page 8
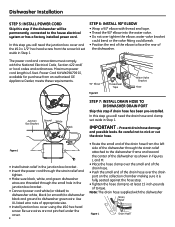
... the strain relief and tighten. • Make sure black, white, and green dishwasher wires are not pinched under the cover. 8 • Route t0h6He-s19m49aElllbeonwdInostfatllhe drain hose from an authorized GE Appliance Dealer, meets these requirements. 90° Elbow Figure K Thread Seal Tape Water Valve Bracket Fill Hose Junction Box Bracket Ground White...
... the strain relief and tighten. • Make sure black, white, and green dishwasher wires are not pinched under the cover. 8 • Route t0h6He-s19m49aElllbeonwdInostfatllhe drain hose from an authorized GE Appliance Dealer, meets these requirements. 90° Elbow Figure K Thread Seal Tape Water Valve Bracket Fill Hose Junction Box Bracket Ground White...
Installation Instructions
Page 9
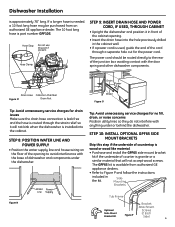
... is installed into the hole previously drilled in the kit. The GPF65 kit is available from an authorized GE appliance dealer. The power cord should be purchased from authorized GE appliance dealers. • Refer to Figure P and follow the instructions included in the cabinet wall. &#... separate hole cut for no fill, drain, or noise concerns Position utility lines so they do not interfere with anything under the dishwasher. SideMounting Brackets Tub Frame Bracket Attachment Optional Screws Side-Mount Bracket Kit Figure P (2 Each Side) 9 06F-1847H The 10 foot...
... is installed into the hole previously drilled in the kit. The GPF65 kit is available from an authorized GE appliance dealer. The power cord should be purchased from authorized GE appliance dealers. • Refer to Figure P and follow the instructions included in the cabinet wall. &#... separate hole cut for no fill, drain, or noise concerns Position utility lines so they do not interfere with anything under the dishwasher. SideMounting Brackets Tub Frame Bracket Attachment Optional Screws Side-Mount Bracket Kit Figure P (2 Each Side) 9 06F-1847H The 10 foot...

Installation Instructions
Page 16
...cCko�y�m4p�0a�2�n2y5��� ge.com 16 Pub. Figure CC • Return to Step 16 in Step 1. • Make sure the power cord for the dishwasher is unplugged from the wall outlet. • Remove screw from junction...Figure BB • Remove and discard the power cord. • Connect the conversion harness (included with dishwasher) to the dishwasher harness by connecting like-colored wires. Appendix CONVERTING DISHWASHER WITH FACTORY EQUIPPED POWER CORD TO A PERMANENT CONNECTION This procedure requires the conversion leads set aside in ...
...cCko�y�m4p�0a�2�n2y5��� ge.com 16 Pub. Figure CC • Return to Step 16 in Step 1. • Make sure the power cord for the dishwasher is unplugged from the wall outlet. • Remove screw from junction...Figure BB • Remove and discard the power cord. • Connect the conversion harness (included with dishwasher) to the dishwasher harness by connecting like-colored wires. Appendix CONVERTING DISHWASHER WITH FACTORY EQUIPPED POWER CORD TO A PERMANENT CONNECTION This procedure requires the conversion leads set aside in ...
Use and Care Manual / Warranty
Page 1
Dishwashers ge.com Safety Instructions 2, 3 Operating Instructions Care and Cleaning 12 Control Panels 6 Control Settings 4-5 Dial Cycles 7 Flashing Display Lights 8 Loading the Dishwasher Racks 10 Loading Place Settings 11 Optional Accessories 12 Using the Dishwasher 8, 9 Troubleshooting Tips . . . 13, 14 Consumer Support Consumer Support . . . . . Back Cover Warranty 15 Owner's Manual ADW1000 Series GHDA300 Series GSD1000 Series GSD2000...
Dishwashers ge.com Safety Instructions 2, 3 Operating Instructions Care and Cleaning 12 Control Panels 6 Control Settings 4-5 Dial Cycles 7 Flashing Display Lights 8 Loading the Dishwasher Racks 10 Loading Place Settings 11 Optional Accessories 12 Using the Dishwasher 8, 9 Troubleshooting Tips . . . 13, 14 Consumer Support Consumer Support . . . . . Back Cover Warranty 15 Owner's Manual ADW1000 Series GHDA300 Series GSD1000 Series GSD2000...
Use and Care Manual / Warranty
Page 2
...seconds after turning the switch on before attempting any built-up hydrogen gas to a grounded metal, permanent wiring system; NOTE: Turning the dishwasher off between wash cycles, allow any maintenance. I Do not attempt to use the appliance during this appliance from the power supply. I Load light, plastic items...the circuit conductors and connect to the touch. I Improper connection of damage or injury by visiting our website at ge.com. I Using a detergent that has not been used . WARNING! For your appliance. I Connect the dishwasher/appliance to escape.
...seconds after turning the switch on before attempting any built-up hydrogen gas to a grounded metal, permanent wiring system; NOTE: Turning the dishwasher off between wash cycles, allow any maintenance. I Do not attempt to use the appliance during this appliance from the power supply. I Load light, plastic items...the circuit conductors and connect to the touch. I Improper connection of damage or injury by visiting our website at ge.com. I Using a detergent that has not been used . WARNING! For your appliance. I Connect the dishwasher/appliance to escape.
Use and Care Manual / Warranty
Page 3
... WARNING! I Take off the door of the washing compartment or remove the door latch keeper (as described in the vicinity of children. I Use only powder, tabs, liquid detergents or rinse agents recommended for its intended purpose as shown). I Do not operate your dishwasher unless all GE dishwashers. Safety Instructions WARNING! I Do not allow children...
... WARNING! I Take off the door of the washing compartment or remove the door latch keeper (as described in the vicinity of children. I Use only powder, tabs, liquid detergents or rinse agents recommended for its intended purpose as shown). I Do not operate your dishwasher unless all GE dishwashers. Safety Instructions WARNING! I Do not allow children...
Use and Care Manual / Warranty
Page 5
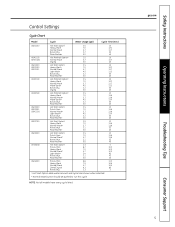
... & Pans 8.2 103 Heavy Wash 7.0 103 Normal Wash* 5.7 103 Light Wash* 3.4 95 Rinse Only* 2.2 42 Plate Warmer 0.0 33 GSD4000 Pots & Pans 8.8 112 Heavy Wash 7.5 108 Normal Wash 5.7 105 China/Crystal 6.3 80 Rinse Only 1.3 3 1 Hot Start Option adds water amount and cycle time shown when selected. * Normal Wash button should be pushed to run this cycle. ge.com Troubleshooting Tips Consumer...
... & Pans 8.2 103 Heavy Wash 7.0 103 Normal Wash* 5.7 103 Light Wash* 3.4 95 Rinse Only* 2.2 42 Plate Warmer 0.0 33 GSD4000 Pots & Pans 8.8 112 Heavy Wash 7.5 108 Normal Wash 5.7 105 China/Crystal 6.3 80 Rinse Only 1.3 3 1 Hot Start Option adds water amount and cycle time shown when selected. * Normal Wash button should be pushed to run this cycle. ge.com Troubleshooting Tips Consumer...
Use and Care Manual / Warranty
Page 7
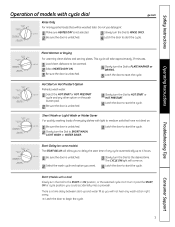
.... 5 Latch the door to start the cycle. Safety Instructions Operating Instructions Operation of models with cycle dial ge.com Rinse Only For rinsing partial loads that have not dried on . 4 Latch the door to start the cycle. This cycle will take approximately 39 minutes. 1 Load clean dishware to be washed later. Start (Models with light to...
.... 5 Latch the door to start the cycle. Safety Instructions Operating Instructions Operation of models with cycle dial ge.com Rinse Only For rinsing partial loads that have not dried on . 4 Latch the door to start the cycle. This cycle will take approximately 39 minutes. 1 Load clean dishware to be washed later. Start (Models with light to...
Use and Care Manual / Warranty
Page 9
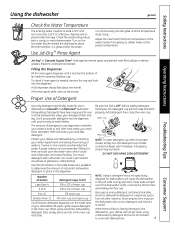
...4 to 8 Fill to 2/3 of the water heater if necessary to prevent dish damage. Too much detergent with dishwashers. 9 Troubleshooting Tips Consumer Support All wash cycles require detergent in the dispenser. Because so many detergent containers look into the dispenser. Show anyone who may be ... in all other cleaners. DO NOT USE HAND DISH DETERGENT NOTE: Using a detergent that is . Replace cap. Using the dishwasher ge.com Safety Instructions Operating Instructions Check the Water Temperature The entering water must be heard. Turn on dishes, glasses, flatware, cookware...
...4 to 8 Fill to 2/3 of the water heater if necessary to prevent dish damage. Too much detergent with dishwashers. 9 Troubleshooting Tips Consumer Support All wash cycles require detergent in the dispenser. Because so many detergent containers look into the dispenser. Show anyone who may be ... in all other cleaners. DO NOT USE HAND DISH DETERGENT NOTE: Using a detergent that is . Replace cap. Using the dishwasher ge.com Safety Instructions Operating Instructions Check the Water Temperature The entering water must be heard. Turn on dishes, glasses, flatware, cookware...
Use and Care Manual / Warranty
Page 11
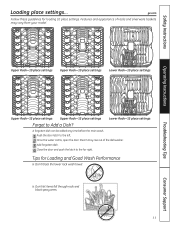
... door. A forgotten dish can be added any time before the main wash. 1 Push the door latch to Add a Dish? I Don't block the lower rack wash tower. ge.com Follow these guidelines for Loading and Good Wash Performance I Don't let items fall through rack and block spray arms.... 11 Consumer Support Features and appearance of racks and silverware baskets may rise out of the dishwasher. 3 Add forgotten dish. 4 Close...
... door. A forgotten dish can be added any time before the main wash. 1 Push the door latch to Add a Dish? I Don't block the lower rack wash tower. ge.com Follow these guidelines for Loading and Good Wash Performance I Don't let items fall through rack and block spray arms.... 11 Consumer Support Features and appearance of racks and silverware baskets may rise out of the dishwasher. 3 Add forgotten dish. 4 Close...
Use and Care Manual / Warranty
Page 12
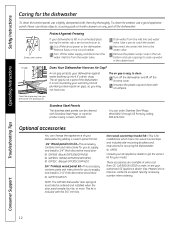
...backing up water in the rubber boot. It is not covered by your dishwasher is left in the tub bottom and use sharp objects, scouring pads or harsh cleaners on any time your authorized GE Appliance dealer. Visa, MasterCard or Discover cards are available at extra cost... lift off the water supply and disconnect the water inlet line from the water valve. 3 Drain water from GE. Safety Instructions Operating Instructions Caring for the dishwasher To clean the control panel, use a good appliance polish. To clean the exterior, use a lightly dampened cloth, then dry thoroughly. ...
...backing up water in the rubber boot. It is not covered by your dishwasher is left in the tub bottom and use sharp objects, scouring pads or harsh cleaners on any time your authorized GE Appliance dealer. Visa, MasterCard or Discover cards are available at extra cost... lift off the water supply and disconnect the water inlet line from the water valve. 3 Drain water from GE. Safety Instructions Operating Instructions Caring for the dishwasher To clean the control panel, use a good appliance polish. To clean the exterior, use a lightly dampened cloth, then dry thoroughly. ...
Use and Care Manual / Warranty
Page 13
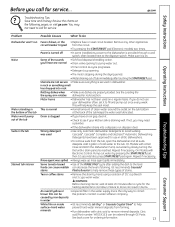
...The motor stopping during the drying period. • Water draining out of tub immediately after a cycle for ordering information. 13 Consumer Support Make sure it is on the following pages, or visit ge.com. Utensils are not secure • Make sure everything is blown, or the •... elements to see if your kitchen sink is reached. Safety Instructions Before you call for service. ge.com Operating Instructions Troubleshooting Tips Problem Possible Causes What To Do Dishwasher won 't pump out of the tub keeps the water seal lubricated. This will help remove these...
...The motor stopping during the drying period. • Water draining out of tub immediately after a cycle for ordering information. 13 Consumer Support Make sure it is on the following pages, or visit ge.com. Utensils are not secure • Make sure everything is blown, or the •... elements to see if your kitchen sink is reached. Safety Instructions Before you call for service. ge.com Operating Instructions Troubleshooting Tips Problem Possible Causes What To Do Dishwasher won 't pump out of the tub keeps the water seal lubricated. This will help remove these...
Use and Care Manual / Warranty
Page 15
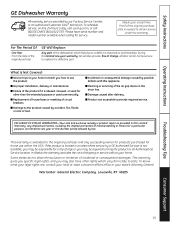
...maintenance. In Alaska, the warranty excludes the cost of the dishwasher which vary from state to use within the USA. To schedule service, on-line, 24 hours a day, visit us at ge.com, or call 800.GE.CARES (800.432.2737). For The Period Of: One Year... the warranty. I Cleaning or servicing of God. Please have other than the intended purpose or used commercially. Safety Instructions Operating Instructions GE Dishwasher Warranty All warranty service provided by possible defects with this appliance. This warranty gives you specific legal rights, and you may be responsible...
...maintenance. In Alaska, the warranty excludes the cost of the dishwasher which vary from state to use within the USA. To schedule service, on-line, 24 hours a day, visit us at ge.com, or call 800.GE.CARES (800.432.2737). For The Period Of: One Year... the warranty. I Cleaning or servicing of God. Please have other than the intended purpose or used commercially. Safety Instructions Operating Instructions GE Dishwasher Warranty All warranty service provided by possible defects with this appliance. This warranty gives you specific legal rights, and you may be responsible...
Use and Care Manual / Warranty
Page 16
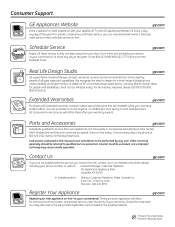
...and Discover cards are available while your door. Caution must be there after your new appliance on Recycled Paper ge.com Real Life Design Studio ge.com GE supports the Universal Design concept-products, services and environments that are accepted). For details of physical and mental ...hours. Instructions contained in the United States Printed on -line-at your phone number, or write to: General Manager, Customer Relations GE Appliances, Appliance Park Louisville, KY 40225 In Canada write to qualified service personnel. Get on-line and schedule your service at your...
...and Discover cards are available while your door. Caution must be there after your new appliance on Recycled Paper ge.com Real Life Design Studio ge.com GE supports the Universal Design concept-products, services and environments that are accepted). For details of physical and mental ...hours. Instructions contained in the United States Printed on -line-at your phone number, or write to: General Manager, Customer Relations GE Appliances, Appliance Park Louisville, KY 40225 In Canada write to qualified service personnel. Get on-line and schedule your service at your...

