

Product Manual
Page 1
... Upright ® Vacuum Cleaner Aspirateur vertical cyclonique Owner's Manual ENGLISH § pp. 1-15 ESPAÑOL § pág 16-24 FRANÇAIS § p. 25-32 Contents Assembling Cleaner 3-4 Carton Contents 3 How To Use 5-8 Cleaner Descriptions 5 Cleaning Tools 7-8 If You Have a Problem 14 Important Safeguards 2 Lubrication 14 Maintenance 8-13 Authorized Service 14 Cleaning Filters 9-10 Clearing Blockages 15 Emptying Dirt Cup 8-9 Replacing Agitator Brush Roll ..11-12 Replacing Belt 10-11 Replacing Powered Hand Tool Agitator Brush Roll 12 Replacing Power Hand Tool Belt...
... Upright ® Vacuum Cleaner Aspirateur vertical cyclonique Owner's Manual ENGLISH § pp. 1-15 ESPAÑOL § pág 16-24 FRANÇAIS § p. 25-32 Contents Assembling Cleaner 3-4 Carton Contents 3 How To Use 5-8 Cleaner Descriptions 5 Cleaning Tools 7-8 If You Have a Problem 14 Important Safeguards 2 Lubrication 14 Maintenance 8-13 Authorized Service 14 Cleaning Filters 9-10 Clearing Blockages 15 Emptying Dirt Cup 8-9 Replacing Agitator Brush Roll ..11-12 Replacing Belt 10-11 Replacing Powered Hand Tool Agitator Brush Roll 12 Replacing Power Hand Tool Belt...

Product Manual
Page 2
... use to whip when rewinding. Do not allow vacuum cleaner to be used by or near children. Review this manual before unplugging. • Do not unplug by pulling on cord. Be sure to this owner's manual. others may damage the cleaner. Wash hands after handling. • Do not operate cleaner in place. Model Serial number Hint: Attach your HOOVER product. Keep cord away from electrical outlet before connecting the powered hand tool. • Do not use with damaged cord or plug...
... use to whip when rewinding. Do not allow vacuum cleaner to be used by or near children. Review this manual before unplugging. • Do not unplug by pulling on cord. Be sure to this owner's manual. others may damage the cleaner. Wash hands after handling. • Do not operate cleaner in place. Model Serial number Hint: Attach your HOOVER product. Keep cord away from electrical outlet before connecting the powered hand tool. • Do not use with damaged cord or plug...
Product Manual
Page 3
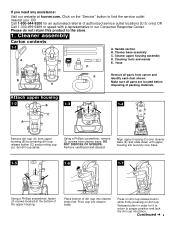
... dirt cup. Handle section B. Cleaner upper housing assembly D. Remove cardboard and discard. Press on dirt cup release button while firmly pressing on the "Service" button to find the service outlet nearest you need any assistance: Visit our website at the bottom of authorized service outlet locations (U.S. Please do not return this product to speak with a representative in order for an automated referral of the upper housing. Cleaning tools and wands E. Using...
... dirt cup. Handle section B. Cleaner upper housing assembly D. Remove cardboard and discard. Press on dirt cup release button while firmly pressing on the "Service" button to find the service outlet nearest you need any assistance: Visit our website at the bottom of authorized service outlet locations (U.S. Please do not return this product to speak with a representative in order for an automated referral of the upper housing. Cleaning tools and wands E. Using...
Product Manual
Page 4
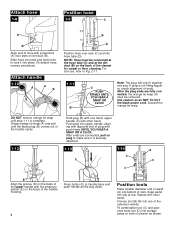
... handle with the small projection (E) on side of cleaner as NOT TO CUT the black power cord. Use caution so as shown. Discard the orange tie wrap. Repeat with other hand. Fit combination tool (C) and powered hand tool (D) into bottom of rack. After ends are fully connected, the orange tie wrap (A) must be removed. Hold plug (B) with one way. Push plug into hose tube (D). NOTE: Hose...
... handle with the small projection (E) on side of cleaner as NOT TO CUT the black power cord. Use caution so as shown. Discard the orange tie wrap. Repeat with other hand. Fit combination tool (C) and powered hand tool (D) into bottom of rack. After ends are fully connected, the orange tie wrap (A) must be removed. Hold plug (B) with one way. Push plug into hose tube (D). NOTE: Hose...
Product Manual
Page 5
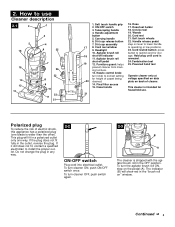
Soft touch handle grip 2. Telescoping handle 4. Handle adjustment button 5. Agitator brush roll 18 shut-off pedal 19 12. Nozzle control knob: turn cleaner ON, push ON/OFF switch once. Hose handle 21 16. Wands 20. Cord reel 21. Powered hand tool Operate cleaner only at voltage specified on data plate on the pedal (A). This plug will show red in the "brush roll on lever to lower handle to operating or low positions. 23. To turn cleaner OFF, push switch again. 2-3 B A The cleaner is...
Soft touch handle grip 2. Telescoping handle 4. Handle adjustment button 5. Agitator brush roll 18 shut-off pedal 19 12. Nozzle control knob: turn cleaner ON, push ON/OFF switch once. Hose handle 21 16. Wands 20. Cord reel 21. Powered hand tool Operate cleaner only at voltage specified on data plate on the pedal (A). This plug will show red in the "brush roll on lever to lower handle to operating or low positions. 23. To turn cleaner OFF, push switch again. 2-3 B A The cleaner is...
Product Manual
Page 6
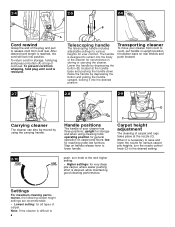
... depressing the button (B) located at the nozzle (C). Transporting cleaner To move your cleaner has three positions; push, turn the nozzle control knob (D) to the desired setting. 2-4 2-5 2-6 B A Cord rewind Grasp the end of the plug and pull to release cord from whipping, hold plug and press on rear wheels and push forward. 2-7 2-8 2-9 D Carrying cleaner The cleaner can also be moved by using cleaning tools; Telescoping handle The telescoping handle includes adjustable settings to the...
... depressing the button (B) located at the nozzle (C). Transporting cleaner To move your cleaner has three positions; push, turn the nozzle control knob (D) to the desired setting. 2-4 2-5 2-6 B A Cord rewind Grasp the end of the plug and pull to release cord from whipping, hold plug and press on rear wheels and push forward. 2-7 2-8 2-9 D Carrying cleaner The cleaner can also be moved by using cleaning tools; Telescoping handle The telescoping handle includes adjustable settings to the...
Product Manual
Page 7
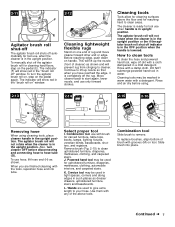
... interiors, and carpeted stairs. Crevice tool may be washed in warm water with a detergent. This will show red in the "brush roll off dirt with grooves (M) on the pedal again. Cleaning tools Tools allow for cleaning surfaces above tools. The cleaner is ready for tool use when handle is in the upright position. Select proper tool I K L 2-15 J 2-16 M Removing hose When using cleaning tools, place cleaner handle in the upright position. Remove brush (Fig. 2-15) to remove. To replace brushes, align bottom...
... interiors, and carpeted stairs. Crevice tool may be washed in warm water with a detergent. This will show red in the "brush roll off dirt with grooves (M) on the pedal again. Cleaning tools Tools allow for cleaning surfaces above tools. The cleaner is ready for tool use when handle is in the upright position. Select proper tool I K L 2-15 J 2-16 M Removing hose When using cleaning tools, place cleaner handle in the upright position. Remove brush (Fig. 2-15) to remove. To replace brushes, align bottom...
Product Manual
Page 8
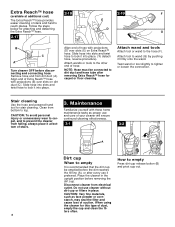
... detach hose, reverse procedure). NOTE: Hose must be emptied before the dirt reaches the fill line (A), or after removing Extra Reach™ hose for this type of hose with projections (B) over slots (E) on dirt duct (C). Attach wand and tools Attach tool or wand to empty Press dirt cup release button (B) and pivot cup out. Twist wand or tool slightly to dirt duct and hose tube after every use if preferred. Stair cleaning Use the hose and powered hand 3. Clean from falling...
... detach hose, reverse procedure). NOTE: Hose must be emptied before the dirt reaches the fill line (A), or after removing Extra Reach™ hose for this type of hose with projections (B) over slots (E) on dirt duct (C). Attach wand and tools Attach tool or wand to empty Press dirt cup release button (B) and pivot cup out. Twist wand or tool slightly to dirt duct and hose tube after every use if preferred. Stair cleaning Use the hose and powered hand 3. Clean from falling...

Product Manual
Page 9
... (A) on filter with the cleaner's combination tool. Replace dirt cup as described in Fig. 3-2. Do not operate cleaner without dirt cup B or filters in Fig. 3-2. Rinse filter frame cartridge and foam filter under cold water. What to buy When purchasing a new secondary filter cartridge, ask for HOOVER part No. 93002518. A let. twist it to return to secure into filter frame. Remove black foam filter. Remove assembly from electrical out- Allow both filter frame and filter to air dry for...
... (A) on filter with the cleaner's combination tool. Replace dirt cup as described in Fig. 3-2. Do not operate cleaner without dirt cup B or filters in Fig. 3-2. Rinse filter frame cartridge and foam filter under cold water. What to buy When purchasing a new secondary filter cartridge, ask for HOOVER part No. 93002518. A let. twist it to return to secure into filter frame. Remove black foam filter. Remove assembly from electrical out- Allow both filter frame and filter to air dry for...

Product Manual
Page 10
... to replace Disconnect cleaner from electrical outlet. HEPA Final filter How to clean Disconnect cleaner from the filter cartridge by brushing with the cleaner's combination tool. Press handle release pedal and place handle in slots, pull filter frame (A) straight out. When purchasing a new belt, ask for HOOVER part No. 93002360. Excessive force is described under the bottom plate of socket. Unplug cleaner before turning it is described below; Do not operate cleaner without dirt cup or filters...
... to replace Disconnect cleaner from electrical outlet. HEPA Final filter How to clean Disconnect cleaner from the filter cartridge by brushing with the cleaner's combination tool. Press handle release pedal and place handle in slots, pull filter frame (A) straight out. When purchasing a new belt, ask for HOOVER part No. 93002360. Excessive force is described under the bottom plate of socket. Unplug cleaner before turning it is described below; Do not operate cleaner without dirt cup or filters...

Product Manual
Page 11
... brush roll. Continued 11 Place handle in direction shown. Lift off agitator brush roll. Removing belt Remove used belt (B) from electrical outlet. The agitator brush roll When to buy When purchasing a new agitator, ask for HOOVER part No. 93002361. 3-19 To check condition of brushes, move edge of belt over large pulley (C) while rolling the pulley in low position and turn cleaner over and remove bottom plate (Fig. 3-13). What to replace When agitator brush roll brushes are worn, the agitator brush roll should be replaced. WARNING: Agitator brush roll can start...
... brush roll. Continued 11 Place handle in direction shown. Lift off agitator brush roll. Removing belt Remove used belt (B) from electrical outlet. The agitator brush roll When to buy When purchasing a new agitator, ask for HOOVER part No. 93002361. 3-19 To check condition of brushes, move edge of belt over large pulley (C) while rolling the pulley in low position and turn cleaner over and remove bottom plate (Fig. 3-13). What to replace When agitator brush roll brushes are worn, the agitator brush roll should be replaced. WARNING: Agitator brush roll can start...

Product Manual
Page 12
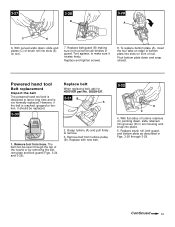
... belt and position belt over pulley (B). To install new belt (with HOOVER part No. 40201-200. Ask for HOOVER part No. 48414-088. 3-24 A 3-25 B 2. Powered hand tool Agitator brush roll replacement When agitator brushes are worn, the brush roll should be replaced. Unscrew the two Phillips screws and remove belt guard (B). Remove agitator including end plates (C) and discard. 4. 3-21 B 3-22 3-23 C Inspecting V-belt The V-belt is designed to last for a long time and is cracked, gouged or broken...
... belt and position belt over pulley (B). To install new belt (with HOOVER part No. 40201-200. Ask for HOOVER part No. 48414-088. 3-24 A 3-25 B 2. Powered hand tool Agitator brush roll replacement When agitator brushes are worn, the brush roll should be replaced. Unscrew the two Phillips screws and remove belt guard (B). Remove agitator including end plates (C) and discard. 4. 3-21 B 3-22 3-23 C Inspecting V-belt The V-belt is designed to last for a long time and is cracked, gouged or broken...
Product Manual
Page 13
... curved ends down, slide end plates (C) of brush roll into slots (E) on front of the nozzle or by removing the bottom plate and belt guard (Figs. 3-24 and 3-25). 2. Turn agitator, to remove. 3. Pivot bottom plate down , slide retainers into grooves (D) in Figs. 3-26 through the top of tool. Replace with new belt. 3-32 D C 4. With flat sides of bottom plate into place. 5. Replace belt guard (B) making sure not...
... curved ends down, slide end plates (C) of brush roll into slots (E) on front of the nozzle or by removing the bottom plate and belt guard (Figs. 3-24 and 3-25). 2. Turn agitator, to remove. 3. Pivot bottom plate down , slide retainers into grooves (D) in Figs. 3-26 through the top of tool. Replace with new belt. 3-32 D C 4. With flat sides of bottom plate into place. 5. Replace belt guard (B) making sure not...

Product Manual
Page 14
... ordering parts. (The model number appears on pedal (Fig. 2-11) to turn agitator brush roll ON • Filters dirty • Clean filters (Figs. 3-6 through 3-18 in the Maintenance section Problem: Powered hand tool brush roll won't turn Possible cause Possible solution • Too much pressure being applied to tool • Continue using the checklist below. Thermal protector An internal thermal protector has been designed into your cleaner by a Hoover Sales and Service Center or an Authorized Hoover Warranty Service Dealer. Check...
... ordering parts. (The model number appears on pedal (Fig. 2-11) to turn agitator brush roll ON • Filters dirty • Clean filters (Figs. 3-6 through 3-18 in the Maintenance section Problem: Powered hand tool brush roll won't turn Possible cause Possible solution • Too much pressure being applied to tool • Continue using the checklist below. Thermal protector An internal thermal protector has been designed into your cleaner by a Hoover Sales and Service Center or an Authorized Hoover Warranty Service Dealer. Check...
Product Manual
Page 15
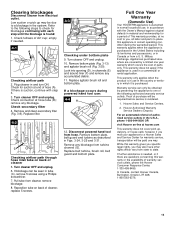
... of cleaner 5. Replace filter. 4-2 C Checking airflow path through hose inlet tube on back of dirt cup; Pull tube from hose. Turn cleaner OFF and unplug. 10. Replace agitator brush roll and bottom plate. Disconnect powered hand tool from cleaner, remove blockage. 8. S. Military Exchange. Warranty service can be seen in tube (C), remove 5 screws using a Phillips screwdriver. 7. Hoover Authorized Warranty Service Dealers (Depots). For an automated referral of hose (A). While this warranty gives you specific legal rights, you , all labor and parts to place this warranty or...
... of cleaner 5. Replace filter. 4-2 C Checking airflow path through hose inlet tube on back of dirt cup; Pull tube from hose. Turn cleaner OFF and unplug. 10. Replace agitator brush roll and bottom plate. Disconnect powered hand tool from cleaner, remove blockage. 8. S. Military Exchange. Warranty service can be seen in tube (C), remove 5 screws using a Phillips screwdriver. 7. Hoover Authorized Warranty Service Dealers (Depots). For an automated referral of hose (A). While this warranty gives you specific legal rights, you , all labor and parts to place this warranty or...


