Hoover UH70115 Support and Manuals
Get Help and Manuals for this Hoover item

View All Support Options Below
Free Hoover UH70115 manuals!
Problems with Hoover UH70115?
Ask a Question
Free Hoover UH70115 manuals!
Problems with Hoover UH70115?
Ask a Question
Popular Hoover UH70115 Manual Pages
Manual - Page 1
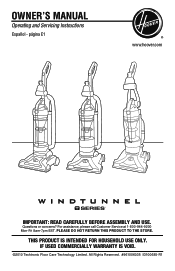
For assistance, please call Customer Service at 1-800-944-9200 Mon-Fri 8am-7pm EST.
THIS PRODUCT IS INTENDED FOR HOUSEHOLD USE ONLY... Floor Care Technology Limited. All Rights Reserved. #961006035 ID100685-R1
Questions or concerns? página E1
www.hoover.com
IMPORTANT: READ CAREFULLY BEFORE ASSEMBLY AND USE. Owner's Manual
Operating and Servicing Instructions
Español -
Manual - Page 2
... this owner's manual. Visit Hoover. Follow the authorized dealer locator link to find the Hoover® authorized dealer nearest you or call 1-800-944-9200 to speak with a customer service representative;
Please enter the complete model and Manufacturing Code in China
Manufacturing code
(Label located on back of vacuum)
Contents
Important Safety Instructions 3 Vacuum Assembly 5
Carton...
Manual - Page 3
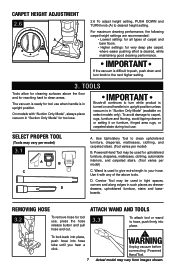
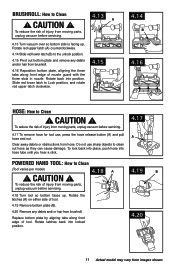
... outlet when not in "Suction Only Mode" (Available on select models only). • Turn off all parts of stairs on floor. Do not place cleaner on stairs or furniture, as it to a service center prior to whip when rewinding (cord rewind available on select models only). • Unplug before connecting Powered Hand Tool. • Do...
Manual - Page 4

...THIS PRODUCT TO THE STORE.
4 Always put the cleaner in "Suction Only Mode" (Available on select models only) during tool use sharp objects to install the proper outlet.
Do not change the plug in...For assistance, please call Customer Service at 1-800-9449200 Mon-Fri 8am-7pm EST. To avoid damage to carpet, rugs, furniture and flooring, avoid tipping cleaner or setting it still does not fit,...
Manual - Page 5
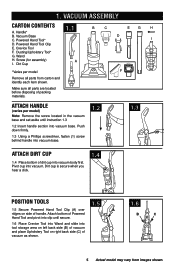
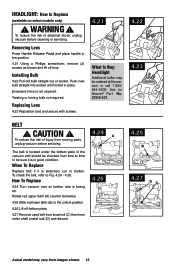
... (C) of Powered
Hand Tool and pivot into clip until instruction 1.3
1.2 Insert handle section into vacuum body first. Crevice Tool F. Make sure all parts from images shown. Handle* B. Powered Hand Tool Clip E. Wand H. Dirt Cup
1.1
A
*Varies per model) Note: Remove the screw located in the vacuum base and set aside until secure.
1.6 Place Crevice Tool into Wand...
Manual - Page 7
... to clean upholstered furniture, draperies, mattresses, clothing, and carpeted stairs. (Tool varies per model)
B. Use it on select models only).
Use Upholstery Tool to carpet, rugs, furniture and flooring, avoid tipping cleaner or setting it with "Suction Only Mode", always place vacuum in "Suction Only Mode" for reaching hard to push, push down and turn...
Manual - Page 8
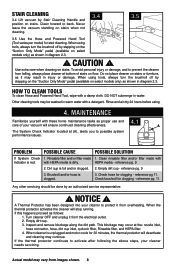
...: with a damp cloth. PROBLEM
POSSIBLE CAUSE
POSSIBLE SOLUTION
If System Check 1. Any other servicing should be washed in injury or damage. Inspect and remove blockage along the dirt path. Stair Cleaning
3.4 Lift vacuum by Stair Cleaning Handle and position on stairs.
This blockage may vary from falling, always place cleaner at (A), alerts you to...
Manual - Page 9
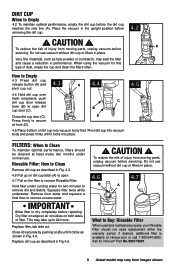
... before servicing. Close dirt cup door (C). Rinsable Filter: How to Clean
Remove dirt cup as face powder or cornstarch, may vary from water and squeeze a final time to remove dirt and debris.
If desired, additional filter is available at least every two months under running water for Hoover® Part No.303173001.
9 Actual model...
Manual - Page 10
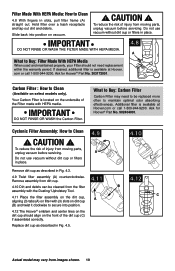
... into position.
4.12 The Hoover® emblem and center lines on the dirt cup should not need to be cleaned from moving parts, unplug vacuum before servicing.
Remove assembly from dirt cup.
4.12
4.10 Dirt and debris can be replaced more often to maintain optimal odor absorbing effectiveness.
Actual model may need replacement
within the warranty period...
Manual - Page 11
... risk of tool. CAUTION ! Replace bottom plate by aligning tabs along front edge of injury from moving parts, unplug vacuum before servicing.
4.18 Turn tool so bottom faces up . CAUTION ! To lock back into place, push hose into position. Rotate latches back into locked position.
4.19 B 4.20
11 Actual model may vary from hose. To...
Manual - Page 12
... shown and lift off bottom plate.
4.27 Remove used belt from brushroll (C) then from motor shaft (metal rod) (D) and discard.
4.26
4.25
b
4.27 DC
Actual model may be ordered at Hoover.
com or call 1-800944-9200.
To reduce the risk of injury from moving parts, unplug vacuum before cleaning or servicing.
Excessive force is facing up.
Manual - Page 13
... the correct orientation.
4.29 Reposition bottom plate, aligning the three tabs along front edge of nozzle guard with your vacuum.
HOOVER® part No. 562289001 or AH20065.
If desired, additional belts can be purchased at Hoover.com or 1-800-944-9200
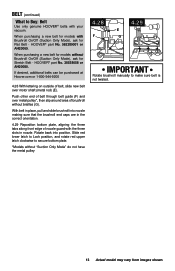
4.28 With lettering on outside of brushroll without Brushroll On/Off (Suction Only Mode...
Manual - Page 14
...not working
Vacuum is difficult to cool for the nearest authorized service representative
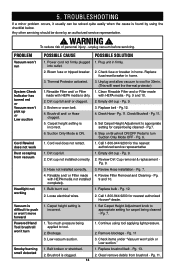
1. TROUBLESHOOTING
If a minor problem occurs, it usually can be done by using tool applying light pressure.
2.
Plug unit in home.
3. Replace fuse/reset breaker in firmly. Empty dirt cup - Replace belt - Cord reel does not retract.
1. Dirt cup full.
1. Review Dirt Cup removal & replacement Pg...
Manual - Page 15
...under "Vacuum Cleaners" or "Household". • Visit our website at hoover.com (U.S. If you . • For an automated referral of the vacuum.) PLEASE DO NOT RETURN THIS PRODUCT TO THE STORE.
15 This will only result in Glenwillow for service. Service
To obtain approved Hoover® service and genuine Hoover® parts, locate the nearest Authorized Hoover® Warranty Service Dealer...
Manual - Page 16

... a Hoover® Authorized Warranty
Service Dealer, cost of shipping will provide labor and parts, at www.hoover. HOW TO MAKE A WARRANTY CLAIM If this Warranty or the availability of the product by any such defect in products purchased in a commercial operation (such as warranted, take or send the product to correct any replacement or repair performed...
Hoover UH70115 Reviews
We have not received any reviews for Hoover yet.