Manual
Page 1
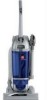
Owner's Manual ENGLISH § pp. 1-12 ESPAÑOL § pág. 13-20 FRANÇAIS § p. 22-28 Read this manual before operating cleaner www.hoover.com Upright Vacuum Cleaner Thank you for your purchase!
Owner's Manual ENGLISH § pp. 1-12 ESPAÑOL § pág. 13-20 FRANÇAIS § p. 22-28 Read this manual before operating cleaner www.hoover.com Upright Vacuum Cleaner Thank you for your purchase!
Manual
Page 2
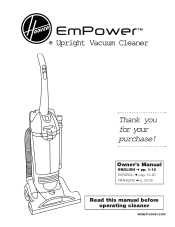
... into water, take it to run appliance over cord. Keep cord away from heated surfaces. • Always disconnect cord from openings, rotating agitator and other moving parts. Thank you for choosing a HOOVER® product. Do not use to pick up very fine materials such as a toy or to a Hoover Factory Service Center or Authorized Hoover Warranty Service Dealer (Depot). • Use vacuum cleaner only for warranty service of your HOOVER product. Empty dirt cup and clean filters frequently when picking...
... into water, take it to run appliance over cord. Keep cord away from heated surfaces. • Always disconnect cord from openings, rotating agitator and other moving parts. Thank you for choosing a HOOVER® product. Do not use to pick up very fine materials such as a toy or to a Hoover Factory Service Center or Authorized Hoover Warranty Service Dealer (Depot). • Use vacuum cleaner only for warranty service of your HOOVER product. Empty dirt cup and clean filters frequently when picking...
Manual
Page 3
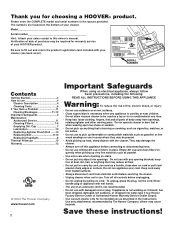
... Center. Remove any assistance: Visit our website at www.hoover.com. Please do not return this product to storage position. Cord clip To help keep the cord out of service outlet locations (U.S. Cleaner * B. only) OR Call 1-330-499-9499 to speak with the tools and hose stored on cleaner) *Packed inside A extension wand Using fold down handle 1-2 1-3 A 1-4 C B Raise upper handle (A) to find the service outlet nearest you need any...
... Center. Remove any assistance: Visit our website at www.hoover.com. Please do not return this product to storage position. Cord clip To help keep the cord out of service outlet locations (U.S. Cleaner * B. only) OR Call 1-330-499-9499 to speak with the tools and hose stored on cleaner) *Packed inside A extension wand Using fold down handle 1-2 1-3 A 1-4 C B Raise upper handle (A) to find the service outlet nearest you need any...
Manual
Page 4
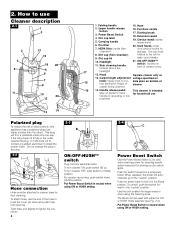
... use . Dusting brush 18. handle to lower for floor cleaning. Push the switch forward for chamber) storage. Upper handle release button 3. Dirt cup latch 5. Extension wand 19. To attach hose, use the end of cleaner body 17 headlight. 12. To turn cleaner ON, push switch (B) up dry debris spills. Furniture nozzle 17. Pre-filter 20. Dirt cup (Twin Chamber) rotates to middle position. ON-OFF-HUSH™ switch: located on pedal to operating or low positions. 13 14 Polarized plug...
... use . Dusting brush 18. handle to lower for floor cleaning. Push the switch forward for chamber) storage. Upper handle release button 3. Dirt cup latch 5. Extension wand 19. To attach hose, use the end of cleaner body 17 headlight. 12. To turn cleaner ON, push switch (B) up dry debris spills. Furniture nozzle 17. Pre-filter 20. Dirt cup (Twin Chamber) rotates to middle position. ON-OFF-HUSH™ switch: located on pedal to operating or low positions. 13 14 Polarized plug...
Manual
Page 5
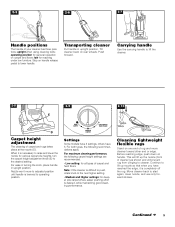
... up the nozzle (front of carpet and hard floors. Cleaning lightweight flexible rugs Stand on carpet and floors; low for general operation on one end of your cleaner has three positions; Settings Some models have 3 settings, others have reached the edge, it is desired, while maintaining good cleaning performance. upright when using cleaning tools; Push forward. Nozzle won't move cleaner toward other end or edge. 2-5 2-6 2-7 Handle positions The handle of rug...
... up the nozzle (front of carpet and hard floors. Cleaning lightweight flexible rugs Stand on carpet and floors; low for general operation on one end of your cleaner has three positions; Settings Some models have 3 settings, others have reached the edge, it is desired, while maintaining good cleaning performance. upright when using cleaning tools; Push forward. Nozzle won't move cleaner toward other end or edge. 2-5 2-6 2-7 Handle positions The handle of rug...

Manual
Page 6
... and set the Power Boost Switch to prevent the cleaner from bottom to rotate while cleaner handle is used to give extra length to rotate. 2-11 Stair cleaning A stair cleaning handle has been designed for ease in using your hose. Attach wand and tools The tools are finished cleaning with any of the hose to cleaner base for extra reach with the dusting brush and/or extension wand. Hose must be used for floor cleaning. 2-17 Turn cleaner...
... and set the Power Boost Switch to prevent the cleaner from bottom to rotate while cleaner handle is used to give extra length to rotate. 2-11 Stair cleaning A stair cleaning handle has been designed for ease in using your hose. Attach wand and tools The tools are finished cleaning with any of the hose to cleaner base for extra reach with the dusting brush and/or extension wand. Hose must be used for floor cleaning. 2-17 Turn cleaner...
Manual
Page 7
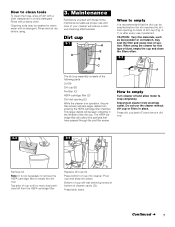
... air dry before the dirt reaches the dirt inlet opening (E) While the cleaner is in operation, the prefilter screen will stop completely. When using . 3. How to clean tools To clean the hose, wipe off and allow motor to empty the dirt cup. Place bottom of dirt cup (Fig. 31) or after every use if preferred. When to empty It is not necessary to remove the HEPA cartridge filter to stop larger debris from electrical...
... air dry before the dirt reaches the dirt inlet opening (E) While the cleaner is in operation, the prefilter screen will stop completely. When using . 3. How to clean tools To clean the hose, wipe off and allow motor to empty the dirt cup. Place bottom of dirt cup (Fig. 31) or after every use if preferred. When to empty It is not necessary to remove the HEPA cartridge filter to stop larger debris from electrical...
Manual
Page 8
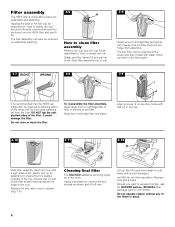
... empty dirt cup" should sufficiently remove dust and fine particles from the filter. It could damage the filter. Replace lid and return cup to the room. Let filter air dry then reposition. DO NOT tap the soft, pleated sides of the filters in hole on assembly to replace this filter, ask for additional cleaning. 3-5 H How to clean filter assembly Remove dirt cup and dirt cup lid as described in "How to empty dirt cup". Do not operate cleaner...
... empty dirt cup" should sufficiently remove dust and fine particles from the filter. It could damage the filter. Replace lid and return cup to the room. Let filter air dry then reposition. DO NOT tap the soft, pleated sides of the filters in hole on assembly to replace this filter, ask for additional cleaning. 3-5 H How to clean filter assembly Remove dirt cup and dirt cup lid as described in "How to empty dirt cup". Do not operate cleaner...
Manual
Page 9
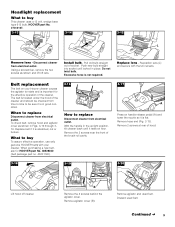
... it is located under the hood of the cleaner. Remove agitator and used belt. Excessive force is stretched, cut or broken. Replace lens - Disconnect cleaner from electrical outlet. Remove the 2 screws near the front of socket. B Remove the 2 screws behind the agitator cover. With the handle in place. Remove hose end (Fig. 2-13). Using a screwdriver, remove the two screws as shown in good condition. To check belt, remove hood and agitator cover...
... it is located under the hood of the cleaner. Remove agitator and used belt. Excessive force is stretched, cut or broken. Replace lens - Disconnect cleaner from electrical outlet. Remove the 2 screws near the front of socket. B Remove the 2 screws behind the agitator cover. With the handle in place. Remove hose end (Fig. 2-13). Using a screwdriver, remove the two screws as shown in good condition. To check belt, remove hood and agitator cover...
Manual
Page 10
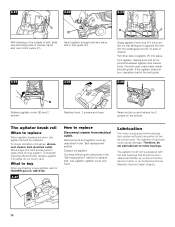
... agitator should be replaced. To check condition of lubricant could cause damage. What to buy When purchasing a new agitator, ask for the life of cleaner cavity and over motor pulley (C). Continue following the directions in belt guide (D). 3-24 3-25 E F Grasp agitator firmly and fit it into position by a Hoover Factory Service Center or an Authorized Hoover Warranty Service Dealer (Depot). 10 The addition of brushes, disconnect cleaner from electrical outlet. Remove...
... agitator should be replaced. To check condition of lubricant could cause damage. What to buy When purchasing a new agitator, ask for the life of cleaner cavity and over motor pulley (C). Continue following the directions in belt guide (D). 3-24 3-25 E F Grasp agitator firmly and fit it into position by a Hoover Factory Service Center or an Authorized Hoover Warranty Service Dealer (Depot). 10 The addition of brushes, disconnect cleaner from electrical outlet. Remove...
Manual
Page 11
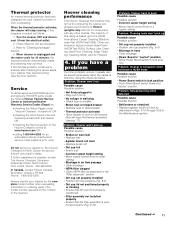
... overheating. Do not send your cleaner to The Hoover Company in wall plug • Check fuse or breaker • Blown fuse or tripped breaker • Replace fuse or reset breaker • Thermal protector activated • Allow cleaner to "Clearing blockages" section. 4. Problem: Cleaner won 't pick up Possible cause Possible solution • Broken or worn belt • Replace belt • Agitator brush roll worn • Replace brush roll • Dirt cup full • Empty cup • Incorrect carpet height setting • Move nozzle...
... overheating. Do not send your cleaner to The Hoover Company in wall plug • Check fuse or breaker • Blown fuse or tripped breaker • Replace fuse or reset breaker • Thermal protector activated • Allow cleaner to "Clearing blockages" section. 4. Problem: Cleaner won 't pick up Possible cause Possible solution • Broken or worn belt • Replace belt • Agitator brush roll worn • Replace brush roll • Dirt cup full • Empty cup • Incorrect carpet height setting • Move nozzle...
Manual
Page 12
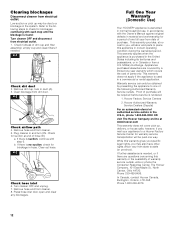
Low suction or pick up , delivery, or house calls; empty cup and clean filters if needed , or if there are covered by presenting the appliance to one year warranty which vary from electrical outlet. Remove dirt cup, look in the system. Press hose inlet door open and clear any blockages. 12 Full One Year Warranty (Domestic Use) Your HOOVER® appliance is used in material and workmanship for a period...
Low suction or pick up , delivery, or house calls; empty cup and clean filters if needed , or if there are covered by presenting the appliance to one year warranty which vary from electrical outlet. Remove dirt cup, look in the system. Press hose inlet door open and clear any blockages. 12 Full One Year Warranty (Domestic Use) Your HOOVER® appliance is used in material and workmanship for a period...


