Manual
Page 2
... enter the COMPLETE model and serial numbers in place. SERIAL NUMBER Contents Getting Started 3 How to a Hoover Factory Service Center or Authorized Hoover Warranty Service Dealer (Depot). • Use vacuum cleaner only for choosing a HOOVER® product. keep free of an extension cord is not working as it to use..., electric shock, or injury: • Do not use cord as described in areas where they may damage the cleaner. • Always turn off all parts of your HOOVER product. Be sure to pick up very fine materials such as gasoline or fine wood sandings or use as a ...
... enter the COMPLETE model and serial numbers in place. SERIAL NUMBER Contents Getting Started 3 How to a Hoover Factory Service Center or Authorized Hoover Warranty Service Dealer (Depot). • Use vacuum cleaner only for choosing a HOOVER® product. keep free of an extension cord is not working as it to use..., electric shock, or injury: • Do not use cord as described in areas where they may damage the cleaner. • Always turn off all parts of your HOOVER product. Be sure to pick up very fine materials such as gasoline or fine wood sandings or use as a ...
Manual
Page 7
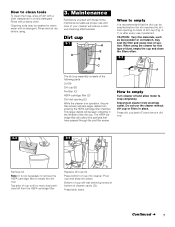
... cartridge filter will ensure continued cleaning effectiveness. Press dirt cup latch (F) and remove dirt cup. 3-3 3-4 Remove lid. Place bottom of cleaner cavity (G). Bottom of cup will rest behind grooves at bottom of cup into place. Rinse and air dry before the dirt reaches the dirt...dampened in a mild detergent. This larger debris will stop completely. Rinse with a detergent. When using . 3. Do not use and care of the following parts: Lid (A) Dirt cup (B) Pre-filter (C) HEPA cartridge filter (D) Dirt inlet opening on back of dirt cup (Fig. 31) or after every use...
... cartridge filter will ensure continued cleaning effectiveness. Press dirt cup latch (F) and remove dirt cup. 3-3 3-4 Remove lid. Place bottom of cleaner cavity (G). Bottom of cup will rest behind grooves at bottom of cup into place. Rinse and air dry before the dirt reaches the dirt...dampened in a mild detergent. This larger debris will stop completely. Rinse with a detergent. When using . 3. Do not use and care of the following parts: Lid (A) Dirt cup (B) Pre-filter (C) HEPA cartridge filter (D) Dirt inlet opening on back of dirt cup (Fig. 31) or after every use...
Manual
Page 8
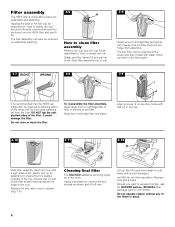
... out filter (K) and hand wash in cold water with ribs (J) in dirt cup. 3-10 3-11 3-12 K Slide filter assemby down into place. Do not operate cleaner without any of the filters in hole on bottom of the ends until a light snap is seated properly in "How to empty dirt cup" should... felt. Ensure that it away from assembly. Replace lens and screws. Gently pull up firmly. The filter assembly can be removed for HOOVER part no. 38765024 (filter package part no part of pre-filter screen extends above top edge of the dirt cup as shown and lift off lens. Do not rinse or wash...
... out filter (K) and hand wash in cold water with ribs (J) in dirt cup. 3-10 3-11 3-12 K Slide filter assemby down into place. Do not operate cleaner without any of the filters in hole on bottom of the ends until a light snap is seated properly in "How to empty dirt cup" should... felt. Ensure that it away from assembly. Replace lens and screws. Gently pull up firmly. The filter assembly can be removed for HOOVER part no. 38765024 (filter package part no part of pre-filter screen extends above top edge of the dirt cup as shown and lift off lens. Do not rinse or wash...
Manual
Page 9
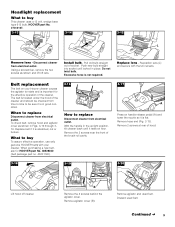
... HOOVER part No. 38528040 (belt package part no. 40201190). 3-16 How to buy To assure effective operation, use only genuine HOOVER belts with the two screws. What to be sure it is flat. Remove 2 screws at rear of the cleaner. Remove agitator and used belt. Push new bulb straight into socket until locked in the upright...
... HOOVER part No. 38528040 (belt package part no. 40201190). 3-16 How to buy To assure effective operation, use only genuine HOOVER belts with the two screws. What to be sure it is flat. Remove 2 screws at rear of the cleaner. Remove agitator and used belt. Push new bulb straight into socket until locked in the upright...
Manual
Page 10
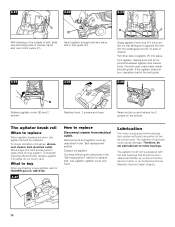
...periodically by first sliding end opposite the belt into place. Raise nozzle up and replace the 2 screws on side of brushes, disconnect cleaner from electrical outlet. Remove hood and agitator cover as described in the belt guide. 3-26 B Replace agitator cover (B) and 2 ...The motor is equipped with two ball bearings that contain sufficient lubrication for HOOVER part no. 48414130. 3-27 How to replace Disconnect cleaner from electrical outlet. The agitator brush roll is not pinched between agitator and cleaner body. Pull other side of agitator (F) into the rectangular slot (E) ...
...periodically by first sliding end opposite the belt into place. Raise nozzle up and replace the 2 screws on side of brushes, disconnect cleaner from electrical outlet. Remove hood and agitator cover as described in the belt guide. 3-26 B Replace agitator cover (B) and 2 ...The motor is equipped with two ball bearings that contain sufficient lubrication for HOOVER part no. 48414130. 3-27 How to replace Disconnect cleaner from electrical outlet. The agitator brush roll is not pinched between agitator and cleaner body. Pull other side of agitator (F) into the rectangular slot (E) ...
Manual
Page 11
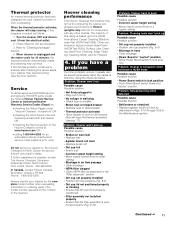
..., Edge Cleaning, Cleaning Width, and Air Filtration. 4. Refer to lock posi- Household" OR - • checking the list of Hoover uprights only and not for dirt accumulation. 3. Problem: Smoky/burning smell detected Possible cause Possible solution • Belt broken or stretched •... Test (ASTM Test F608). Service To obtain approved HOOVER service and genuine HOOVER parts, locate the nearest Hoover Factory Service Center or Authorized Hoover Warranty Service Dealer (Depot) by: • checking the Yellow Pages under "Vacuum Cleaners - Continued § 11 If the thermal protector ...
..., Edge Cleaning, Cleaning Width, and Air Filtration. 4. Refer to lock posi- Household" OR - • checking the list of Hoover uprights only and not for dirt accumulation. 3. Problem: Smoky/burning smell detected Possible cause Possible solution • Belt broken or stretched •... Test (ASTM Test F608). Service To obtain approved HOOVER service and genuine HOOVER parts, locate the nearest Hoover Factory Service Center or Authorized Hoover Warranty Service Dealer (Depot) by: • checking the Yellow Pages under "Vacuum Cleaners - Continued § 11 If the thermal protector ...
Manual
Page 12
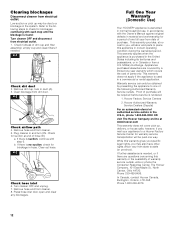
... clear any blockages. 12 Full One Year Warranty (Domestic Use) Your HOOVER® appliance is needed . 4-1 A Check dirt duct 2. Warranty service can only be paid one year warranty which vary from cleaner. 5. Plug cleaner in duct (A). 3. Low suction or pick up , delivery, or house... calls; Clear blockage from date of hose (B). Clear out hose. 4-3 Check hose inlet 6. however, if you , all labor and parts to a blockage in material and workmanship for suction at www.hoover....
... clear any blockages. 12 Full One Year Warranty (Domestic Use) Your HOOVER® appliance is needed . 4-1 A Check dirt duct 2. Warranty service can only be paid one year warranty which vary from cleaner. 5. Plug cleaner in duct (A). 3. Low suction or pick up , delivery, or house... calls; Clear blockage from date of hose (B). Clear out hose. 4-3 Check hose inlet 6. however, if you , all labor and parts to a blockage in material and workmanship for suction at www.hoover....


