Hoover U5753960 - WindTunnel Bagless Upright Vacuum Cleaner Support and Manuals
Get Help and Manuals for this Hoover item
View All Support Options Below
Free Hoover U5753960 manuals!
Problems with Hoover U5753960?
Ask a Question
Free Hoover U5753960 manuals!
Problems with Hoover U5753960?
Ask a Question
Popular Hoover U5753960 Manual Pages
Manual - Page 1
www.hoover.com
®
This product was designed for easy assembly (see page 3) WindTunnel™
Bagless by HOOVER
Congratulations on your purchase!
Manual - Page 2
....
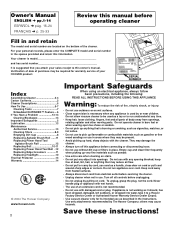
• Do not unplug by cord, use cord as described in the instructions. Do not run unattended at any appliance is used as it to a Hoover Factory Service Center or Authorized Hoover Warranty Service Dealer (Depot).
• Use vacuum cleaner only for warranty service of your HOOVER product. To unplug, grasp the plug, not the cord.
Do not...
Manual - Page 3
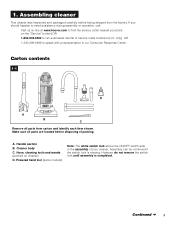
...service outlet nearest you (click on cleaner) D. A. Handle section B. Powered hand tool (some models)
Note: The white switch lock above the ON/OFF switch aids in our Consumer Response Center. Continued § 3 Make sure all parts from the factory.
Carton contents
1-1
D
A B C
Remove all parts...at www.hoover.com to speak with a representative in the assembly of service outlet ...
Manual - Page 4
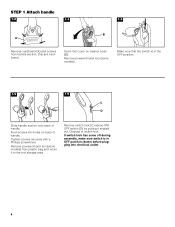
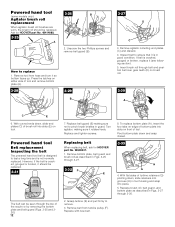
Remove powered hand tool (some models).
If switch lock has come off during assembly, make sure switch is in OFF position (down) before plugging into holes on cleaner body (B). OWNER'S MANUAL FOR
COMPLETE INSTRUCTIONS
B
Remove cardboard (A) and screws from plastic bag and return it straight out.
Tighten screws securely with a Phillips screwdriver. Discard cardboard...
Manual - Page 5
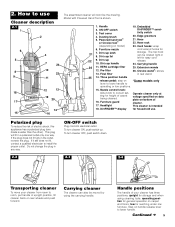
...and floors; If it still does not fit, contact a qualified electrician to
*Some models only
operating or low positions.
15. To turn cleaner ON, push switch up....™ sensitivity switch
20. Hose rack
(depending on handle release lever to correct setting for easy cord release.
24. Pre-filter 13. Handle positions
The handle of electric shock... handle to install the proper outlet.
Manual - Page 6
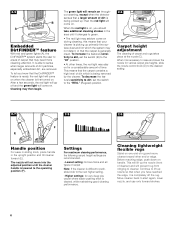
...push down on for various carpet pile heights, slide the nozzle control knob (D) to the desired setting.
2-7
2-8
2-9
F E
Handle position
For ease in sliding knob, place handle in the ...that a larger amount of cleaner) and will remain on . To increase the feature's sensitivity to dirt, set the switch to the "REG." (Regular) position.
2-6
High Bare Floor
D
C
Carpet height adjustment
...
Manual - Page 7
... tipping cleaner or setting it into (P) ....
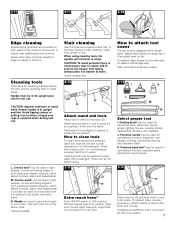
7 Align end of extra reach hose with your hose. Push cover down to OFF position. Guide either side of nozzle parallel to rotate while cleaner handle is in place.
2-14
I
J
K...or tools to the other end of hose.
*Available at bottom of stairs. *some models
Stair cleaning
Use the hose and powered hand tool* or furniture nozzle for tool use...
Manual - Page 8
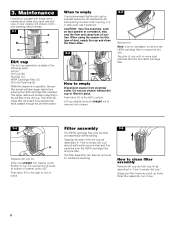
... maintenance tasks as face powder or cornstarch, may seal the filter and cause loss of the following parts: Lid (A) Dirt Cup (B) Pre-filter (C) HEPA Cartridge Filter (D) Dirt Inlet Opening (E)
While ... remove the HEPA cartridge filter to empty
Disconnect cleaner from the HEPA cartridge filter.
3-4 F
G
Replace dirt cup lid. Grasp pre-filter frame and pull up firmly. When to unlock. Tapping the ...
Manual - Page 9
...
L
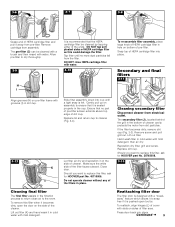
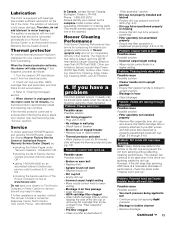
Cleaning final filter
The final filter assists in the cup.
If the filter becomes dirty, remove dirt cup (Fig. 3-2). Should you want to replace this filter, ask for HOOVER part No. 40110006.
Close door.
Reattaching filter door
The filter door is felt. To reattach, align hinges (L) of cover with grooves (I
It is pushed...
Manual - Page 10
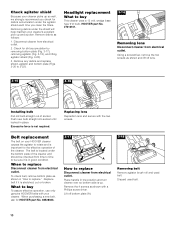
... 912 bulb, HOOVER part No. 27313101.
3-14
Removing lens
Disconnect cleaner from electrical outlet.
2. Place handle in good condition. Replace belt if it is in low position and turn cleaner over so bottom side is up and suction. Remove the 4 screws as follows:
1. Discard used belt.
Remove debris as shown with a Phillips screw driver.
Replacing lens
Reposition...
Manual - Page 11
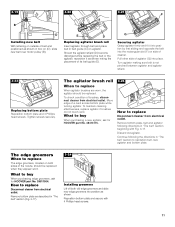
.... How to replace
Disconnect cleaner from electrical outlet.
Pull other side of agitator (G) into the rectangular slot (F) on side of cleaner.
What to buy
When purchasing a new agitator, ask for HOOVER part No. 39511004.
3-19 B
3-20
3-21 F
C
D
Installing new belt With lettering on outside of belt and positioned as shown noting the placement of its belt guide (E). To...
Manual - Page 12
... (A), insert the four tabs on tool. Unscrew the two Phillips screws and remove belt guard (B). If belt is not normally replaced. Turn agitator, making sure not to pinch brush bristles in guard. Replacing belt
When replacing belt, ask for HOOVER part No. 48414088.
3-25
A
3-26
B
2. Replace brush roll, belt guard, and bottom plate as described in Figs. 3-27 through the top...
Manual - Page 13
... that should be lubricated periodically by the complete model number when requesting information or ordering parts. (The model number appears on -line at www.hoover.com
Do not send your cleaner by a Hoover Factory Service Center or an Authorized Hoover Warranty Service Dealer (Depot).
If you have a problem
If a minor problem occurs, it from the electrical outlet.
2. Other performance...
Manual - Page 14
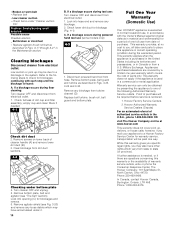
... your appliance to place this warranty or the availability of purchase. While this warranty gives you specific legal rights, you , all labor and parts to a Hoover Factory Service Center for blockages and remove. 6.
Remove agitator shield (see "The belt" section). Check lower dirt duct for a period of one year warranty which vary from date of...
Manual - Page 36
HOOVER y
®son marcas registradas
HOOVER et
®sont des marques déposées
HOOVER and
® are registered trademarks
3-04 U5753-/65-/67-/69-900
Printed in Mexico
56511-C19
Hoover U5753960 Reviews
We have not received any reviews for Hoover yet.