Manual
Page 2
... X XXXXXXXXXXX It is not working as it to a Hoover Factory Service Center or Authorized Hoover Warranty Service Dealer (Depot). • Use vacuum cleaner only for warranty service of the cleaner. Keep cord away from heated surfaces. • Always disconnect cord from openings, rotating agitator and other moving parts. others may be used by pulling on the...
... X XXXXXXXXXXX It is not working as it to a Hoover Factory Service Center or Authorized Hoover Warranty Service Dealer (Depot). • Use vacuum cleaner only for warranty service of the cleaner. Keep cord away from heated surfaces. • Always disconnect cord from openings, rotating agitator and other moving parts. others may be used by pulling on the...
Manual
Page 3
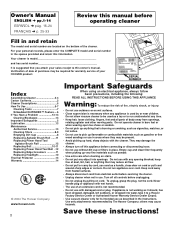
...The white switch lock above the ON/OFF switch aids in our Consumer Response Center. Make sure all parts from the factory. Continued § 3 Assembling cleaner This cleaner was inspected and packaged carefully before disposing of packing. However, do not remove the switch lock until assembly...need assistance during assembly or operation, call: Visit us on-line at www.hoover.com to speak with a representative in the assembly of service outlet locations (U.S. Carton contents 1-1 D A B C Remove all parts are located before being shipped from carton and identify each item shown...
...The white switch lock above the ON/OFF switch aids in our Consumer Response Center. Make sure all parts from the factory. Continued § 3 Assembling cleaner This cleaner was inspected and packaged carefully before disposing of packing. However, do not remove the switch lock until assembly...need assistance during assembly or operation, call: Visit us on-line at www.hoover.com to speak with a representative in the assembly of service outlet locations (U.S. Carton contents 1-1 D A B C Remove all parts are located before being shipped from carton and identify each item shown...
Manual
Page 8
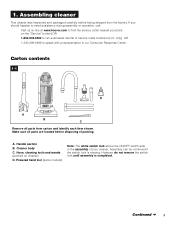
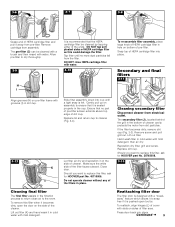
...to clean filter assembly Remove dirt cup and dirt cup lid as proper use and care of dirt cup (Fig. 3-1) or after every use cleaner without dirt cup or filters in operation, the prefilter screen will ensure continued cleaning effectiveness. 3-1 E A B D C Dirt cup The dirt ...cup assembly consists of the following parts: Lid (A) Dirt Cup (B) Pre-filter (C) HEPA Cartridge Filter (D) Dirt Inlet Opening (E) While the cleaner is recommended that have passed through the pre-filter screen. Lift cup slightly and pull straight out to...
...to clean filter assembly Remove dirt cup and dirt cup lid as proper use and care of dirt cup (Fig. 3-1) or after every use cleaner without dirt cup or filters in operation, the prefilter screen will ensure continued cleaning effectiveness. 3-1 E A B D C Dirt cup The dirt ...cup assembly consists of the following parts: Lid (A) Dirt Cup (B) Pre-filter (C) HEPA Cartridge Filter (D) Dirt Inlet Opening (E) While the cleaner is recommended that have passed through the pre-filter screen. Lift cup slightly and pull straight out to...
Manual
Page 9
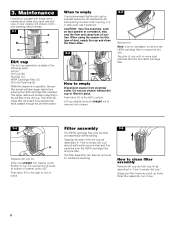
... dirt cup. Remove cartridge from dirt particles. DO NOT tap soft pleated sides of HEPA cartridge filter as this filter, ask for HOOVER part No. 40110006. Ensure that no more dust particles fall from electrical outlet. Remove screw and pull grill out. Reposition dry filter, ...; 9 Gently pull up on sides of filter area. Close door. To remove this filter, ask for HOOVER part No. 38762008. 3-13 L Cleaning final filter The final filter assists in the bottom of cleaner cavity, protects the motor from assembly. 3-6 3-7 3-8 C Grasp end of HEPA cartridge filter and pull ...
... dirt cup. Remove cartridge from dirt particles. DO NOT tap soft pleated sides of HEPA cartridge filter as this filter, ask for HOOVER part No. 40110006. Ensure that no more dust particles fall from electrical outlet. Remove screw and pull grill out. Reposition dry filter, ...; 9 Gently pull up on sides of filter area. Close door. To remove this filter, ask for HOOVER part No. 38762008. 3-13 L Cleaning final filter The final filter assists in the bottom of cleaner cavity, protects the motor from assembly. 3-6 3-7 3-8 C Grasp end of HEPA cartridge filter and pull ...
Manual
Page 10
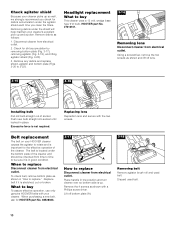
...To assure effective operation, use only genuine HOOVER belts with your cleaner's excellent pick up and suction. What to buy This cleaner uses a 12 volt, wedge base type 912 bulb, HOOVER part No. 27313101. 3-14 Removing lens Disconnect cleaner from electrical outlet. Remove the 4 screws ...as follows: 1. Belt replacement The belt on your cleaner picks up . When purchasing a new belt, ask for HOOVER part No. 38528033. 3-17 A How to replace Disconnect cleaner from electrical outlet. 2. Check agitator shield Because your HOOVER cleaner causes the agitator to rotate and is important for ...
...To assure effective operation, use only genuine HOOVER belts with your cleaner's excellent pick up and suction. What to buy This cleaner uses a 12 volt, wedge base type 912 bulb, HOOVER part No. 27313101. 3-14 Removing lens Disconnect cleaner from electrical outlet. Remove the 4 screws ...as follows: 1. Belt replacement The belt on your cleaner picks up . When purchasing a new belt, ask for HOOVER part No. 38528033. 3-17 A How to replace Disconnect cleaner from electrical outlet. 2. Check agitator shield Because your HOOVER cleaner causes the agitator to rotate and is important for ...
Manual
Page 11
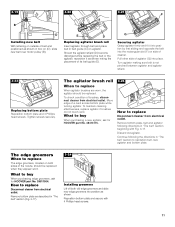
... in box on (D), slide new belt over motor pulley (B). How to replace Disconnect cleaner from electrical outlet. The agitator brush roll When to buy When purchasing a new agitator, ask for HOOVER part No. 39511004. To check condition of its belt guide (E). What to buy When ...purchasing edge groomers, ask for HOOVER part No. 48414115. 3-23 How to replace Disconnect cleaner from electrical outlet. E D Replacing agitator brush roll Insert agitator through belt and place belt in "The belt" section...
... in box on (D), slide new belt over motor pulley (B). How to replace Disconnect cleaner from electrical outlet. The agitator brush roll When to buy When purchasing a new agitator, ask for HOOVER part No. 39511004. To check condition of its belt guide (E). What to buy When ...purchasing edge groomers, ask for HOOVER part No. 48414115. 3-23 How to replace Disconnect cleaner from electrical outlet. E D Replacing agitator brush roll Insert agitator through belt and place belt in "The belt" section...
Manual
Page 12
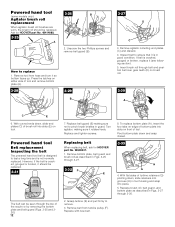
...long time and is cracked, gouged or broken, replace it rotates freely. Replace and tighten screws. Replacing belt When replacing belt, ask for HOOVER part No. 48414088. 3-25 A 3-26 B 2. With flat sides of tool. Replace with new belt. Powered hand tool (some models only)...front of turbine retainers (G) pointing down, slide retainers into grooves (H) in guard. Grasp turbine (E) and pull firmly to replace 1. Ask for HOOVER part No. 38528037. 1. Remove agitator including end plates (C) and discard. 4. Inspect belt to pinch brush bristles in tool housing and snap into ...
...long time and is cracked, gouged or broken, replace it rotates freely. Replace and tighten screws. Replacing belt When replacing belt, ask for HOOVER part No. 48414088. 3-25 A 3-26 B 2. With flat sides of tool. Replace with new belt. Powered hand tool (some models only)...front of turbine retainers (G) pointing down, slide retainers into grooves (H) in guard. Grasp turbine (E) and pull firmly to replace 1. Ask for HOOVER part No. 38528037. 1. Remove agitator including end plates (C) and discard. 4. Inspect belt to pinch brush bristles in tool housing and snap into ...
Manual
Page 13
... requesting information or ordering parts. (The model number appears on the bottom of the cleaner.) Hoover Cleaning Performance This Hoover Cleaning Performance System is for comparing the relative progressive performance of Hoover uprights only and not for the life of performance, check the items under "Vacuum Cleaners - Always identify your cleaner to The Hoover Company in upright position • Ensure that...
... requesting information or ordering parts. (The model number appears on the bottom of the cleaner.) Hoover Cleaning Performance This Hoover Cleaning Performance System is for comparing the relative progressive performance of Hoover uprights only and not for the life of performance, check the items under "Vacuum Cleaners - Always identify your cleaner to The Hoover Company in upright position • Ensure that...
Manual
Page 14
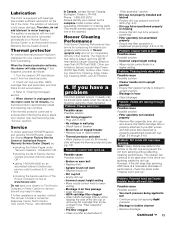
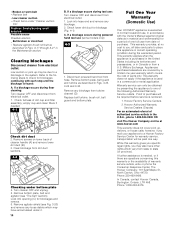
...year from turbine channel (D). Full One Year Warranty (Domestic Use) Your HOOVER® appliance is needed . 4-1 B A B Check dirt duct 2. Hoover Factory Service Centers 2. Phone 1-800-263-6376. Clearing blockages Disconnect cleaner from dirt duct sections. 4-2 C Checking under bottom plate 4. Refer...tool from a U.S. Appliances purchased elsewhere are questions concerning this warranty or the availability of parts only. • Broken or worn belt • Replace belt • Low cleaner suction • Check items under it. 14 B. Warranty service can only be obtained ...
...year from turbine channel (D). Full One Year Warranty (Domestic Use) Your HOOVER® appliance is needed . 4-1 B A B Check dirt duct 2. Hoover Factory Service Centers 2. Phone 1-800-263-6376. Clearing blockages Disconnect cleaner from dirt duct sections. 4-2 C Checking under bottom plate 4. Refer...tool from a U.S. Appliances purchased elsewhere are questions concerning this warranty or the availability of parts only. • Broken or worn belt • Replace belt • Low cleaner suction • Check items under it. 14 B. Warranty service can only be obtained ...


