Product Manual
Page 3
...required for warranty service of cleaner) CONTENTS Important Safeguards 3 Carton Contents...5 How To Assemble...6 Features...7 How To Use...8 On-Off Pedal...8 Handle ... assistance: Visit our website at Hoover.com or call 1-800944-9200 for an automated referral of Hoover® authorized dealer locations (U.S. ...a customer service representative; only) or to find the Hoover® authorized dealer nearest you for video instruction fot...your HOOVER® product. MANUFACTURING CODE (Label located on rear of your product online at hoover.com for more information or for choosing a HOOVER&#...
...required for warranty service of cleaner) CONTENTS Important Safeguards 3 Carton Contents...5 How To Assemble...6 Features...7 How To Use...8 On-Off Pedal...8 Handle ... assistance: Visit our website at Hoover.com or call 1-800944-9200 for an automated referral of Hoover® authorized dealer locations (U.S. ...a customer service representative; only) or to find the Hoover® authorized dealer nearest you for video instruction fot...your HOOVER® product. MANUFACTURING CODE (Label located on rear of your product online at hoover.com for more information or for choosing a HOOVER&#...
Product Manual
Page 6
... personal injury or damage, and to continuing use. • Do not pull or carry by cleaning process. • Use only HOOVER® cleaning products intended for use with any opening blocked; See Grounding Instructions. • Unplug before operating. • Operate cleaner only at bottom of stairs or on floor..., close a door on cord, or pull cord around sharp edges or corners. Do not place cleaner on carpet moistened by cord, use with wet hands. • Do not put any openings. • Use only as described in this manual. To avoid injury or damage, keep free of dust, lint,...
... personal injury or damage, and to continuing use. • Do not pull or carry by cleaning process. • Use only HOOVER® cleaning products intended for use with any opening blocked; See Grounding Instructions. • Unplug before operating. • Operate cleaner only at bottom of stairs or on floor..., close a door on cord, or pull cord around sharp edges or corners. Do not place cleaner on carpet moistened by cord, use with wet hands. • Do not put any openings. • Use only as described in this manual. To avoid injury or damage, keep free of dust, lint,...
Product Manual
Page 7
Keep children and pets away from carpets until they are dry. If it should be used to the floor can result. • Do not use (a) do not allow cleaner to sit in place by a qualified electrician. WARNING: Improper connection of time, as damage to connect this ...properly grounded. GROUNDING INSTRUCTIONS This appliance must be connected to a 2-pole receptacle (E) if a properly grounded outlet is well ventilated when using detergents and other cleaners with all local codes and ordinances. A temporary adapter (D) may scratch or damage your floor. • Water will not fit the ...
Keep children and pets away from carpets until they are dry. If it should be used to the floor can result. • Do not use (a) do not allow cleaner to sit in place by a qualified electrician. WARNING: Improper connection of time, as damage to connect this ...properly grounded. GROUNDING INSTRUCTIONS This appliance must be connected to a 2-pole receptacle (E) if a properly grounded outlet is well ventilated when using detergents and other cleaners with all local codes and ordinances. A temporary adapter (D) may scratch or damage your floor. • Water will not fit the ...
Product Manual
Page 11
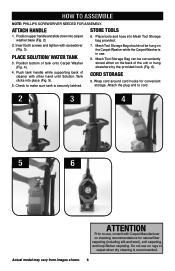
... elsewhere by the provided hook (Fig. 6). 4. Place tools and hose into carpet washer base (Fig. 2) 6. Position bottom of cleaner with screwdriver (Fig. 3). Check to use . 8. Wrap cord around cord hooks for natural fiber carpeting (including silk and wool), soft carpeting, and loop Berber carpeting. CORD STORAGE 9. HOW TO ASSEMBLE NOTE: PHILLIPS SCREWDRIVER NEEDED FOR ASSEMBLY. PLACE...
... elsewhere by the provided hook (Fig. 6). 4. Place tools and hose into carpet washer base (Fig. 2) 6. Position bottom of cleaner with screwdriver (Fig. 3). Check to use . 8. Wrap cord around cord hooks for natural fiber carpeting (including silk and wool), soft carpeting, and loop Berber carpeting. CORD STORAGE 9. HOW TO ASSEMBLE NOTE: PHILLIPS SCREWDRIVER NEEDED FOR ASSEMBLY. PLACE...
Product Manual
Page 15
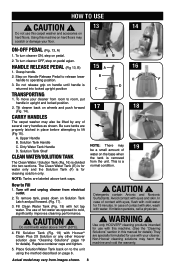
...machine on pedal. 2. In case of contact with eyes, flush with cold water for use with your cleaner from electrical outlet. 2. Use only HOOVER® cleaning products intended for details). To turn cleaner ON, step on hard floors may also be a small amount of several carry handles ...(Fig. 14). This is for water only and the Solution Tank (F) is a normal condition. ! Step on hard floors. CARRY HANDLES The carpet washer may scratch or damage your floor. Do not fill with water. Avoid contact with hot tap water. If irritation persists, call a physician....
...machine on pedal. 2. In case of contact with eyes, flush with cold water for use with your cleaner from electrical outlet. 2. Use only HOOVER® cleaning products intended for details). To turn cleaner ON, step on hard floors may also be a small amount of several carry handles ...(Fig. 14). This is for water only and the Solution Tank (F) is a normal condition. ! Step on hard floors. CARRY HANDLES The carpet washer may scratch or damage your floor. Do not fill with water. Avoid contact with hot tap water. If irritation persists, call a physician....
Product Manual
Page 18
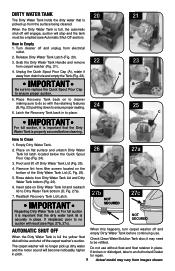
...5. Rinse debris from electrical outlet. 2. it is important that the Dirty Water Tank is properly secured before continuing use without float and float retainer in place. Insert tabs on to cleaner making sure to do so with the retaining features (B, Fig. 23) pointing down to Empty 1. to Dirty Water... reattach lid to be emptied (see Figs. 27b, 27c). 27b NOT SECURED D 27c NOT SECURED AUTOMATIC SHUT OFF When this happens, turn carpet washer off will engage, suction will stop and the tank must be refilled. How to ensure proper sealing. 24 6. Unplug the Quick Spout...
...5. Rinse debris from electrical outlet. 2. it is important that the Dirty Water Tank is properly secured before continuing use without float and float retainer in place. Insert tabs on to cleaner making sure to do so with the retaining features (B, Fig. 23) pointing down to Empty 1. to Dirty Water... reattach lid to be emptied (see Figs. 27b, 27c). 27b NOT SECURED D 27c NOT SECURED AUTOMATIC SHUT OFF When this happens, turn carpet washer off will engage, suction will stop and the tank must be refilled. How to ensure proper sealing. 24 6. Unplug the Quick Spout...
Product Manual
Page 19
... attachments. Dry hands and plug cord into tufts and folds. Use a crevice tool to apply cleaning solution and slowly push cleaner forward (equals one color, check all colors. 4. Do not use a HOOVER® vacuum cleaner with Hoover® solution according to wood floors underneath area rugs/carpet, either move , place aluminum foil or wax paper under legs...
... attachments. Dry hands and plug cord into tufts and folds. Use a crevice tool to apply cleaning solution and slowly push cleaner forward (equals one color, check all colors. 4. Do not use a HOOVER® vacuum cleaner with Hoover® solution according to wood floors underneath area rugs/carpet, either move , place aluminum foil or wax paper under legs...
Product Manual
Page 22
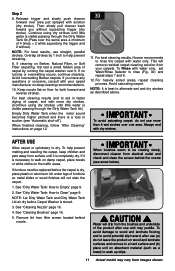
...cleaning results, Hoover recommends to rinse the carpet with water only, set Wash/Rinse Selector to rinse (Fig. 30) and repeat steps 7 and 8. 12. This will not stain the carpet. 1. To Rinse with water only. If furniture must be rotating slowly, disconnect cleaner from filter ... place unit on wood and laminate surfaces and remove to avoid potential slip hazard, after use (a) do not use straight, parallel strokes. NOTE: For best results, use more dry strokes. (Continue using dry strokes until it . When finished cleaning, follow "After Cleaning" instructions on floor for...
...cleaning results, Hoover recommends to rinse the carpet with water only, set Wash/Rinse Selector to rinse (Fig. 30) and repeat steps 7 and 8. 12. This will not stain the carpet. 1. To Rinse with water only. If furniture must be rotating slowly, disconnect cleaner from filter ... place unit on wood and laminate surfaces and remove to avoid potential slip hazard, after use (a) do not use straight, parallel strokes. NOTE: For best results, use more dry strokes. (Continue using dry strokes until it . When finished cleaning, follow "After Cleaning" instructions on floor for...
Product Manual
Page 23
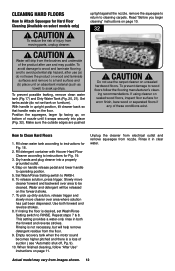
... tank on unsealed hardwood floors. Actual model may puddle. remove the squeegee to return to RINSE. Do not use the carpet cleaner on furniture). To release solution, press trigger. To avoid damage to wood and laminate flooring and to avoid potential slip ... squeegee, larger lip facing up tight against the nozzle. Repeat steps 7 & 8. CAUTION ! How to WASH. 6. Fill detergent container with Hoover Hard Floor Cleaner according to instructions for Fig. 18. 2. This setting provides a water-only rinse in both forward and reverse strokes. 8. To prevent possible...
... tank on unsealed hardwood floors. Actual model may puddle. remove the squeegee to return to RINSE. Do not use the carpet cleaner on furniture). To release solution, press trigger. To avoid damage to wood and laminate flooring and to avoid potential slip ... squeegee, larger lip facing up tight against the nozzle. Repeat steps 7 & 8. CAUTION ! How to WASH. 6. Fill detergent container with Hoover Hard Floor Cleaner according to instructions for Fig. 18. 2. This setting provides a water-only rinse in both forward and reverse strokes. 8. To prevent possible...
Product Manual
Page 28
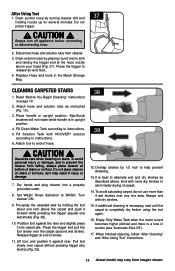
...carpet pile. Turn cleaner ON. 9. Release trigger at the hose nozzle above your head (Fig. 37). Pull tool slowly over any one wet stroke) (Fig. 38). 10. Always turn off appliance before using the tool again. 16. Read "Before You Begin Cleaning" instructions on stairs. Fill Solution Tank with HOOVER...® solution according to prevent the cleaner from falling, always place cleaner at bottom of hose. ! To avoid personal...
...carpet pile. Turn cleaner ON. 9. Release trigger at the hose nozzle above your head (Fig. 37). Pull tool slowly over any one wet stroke) (Fig. 38). 10. Always turn off appliance before using the tool again. 16. Read "Before You Begin Cleaning" instructions on stairs. Fill Solution Tank with HOOVER...® solution according to prevent the cleaner from falling, always place cleaner at bottom of hose. ! To avoid personal...
Product Manual
Page 29
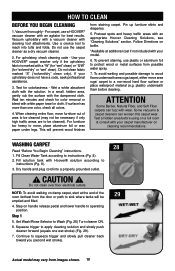
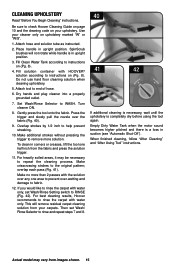
...remove more than 2 passes with HOOVER® solution according to check Hoover Cleaning Guide on page 10 and the cleaning code on (Pg. 8). 4. Turn cleaner ON. 8. Make additional strokes without pressing the trigger to end of hose. 6. If you would like to rinse the carpet with water only, set Wash/...(see "Automatic Shut-Off"). Empty Dirty Water Tank when the motor sound becomes higher pitched and there is completely dry before using the tool again. Use your carpets. Fill Clean Water Tank according to rinse and repeat steps 7 and 8. 40 41 42 If additional cleaning is necessary, ...
...remove more than 2 passes with HOOVER® solution according to check Hoover Cleaning Guide on page 10 and the cleaning code on (Pg. 8). 4. Turn cleaner ON. 8. Make additional strokes without pressing the trigger to end of hose. 6. If you would like to rinse the carpet with water only, set Wash/...(see "Automatic Shut-Off"). Empty Dirty Water Tank when the motor sound becomes higher pitched and there is completely dry before using the tool again. Use your carpets. Fill Clean Water Tank according to rinse and repeat steps 7 and 8. 40 41 42 If additional cleaning is necessary, ...

Product Manual
Page 32
... and Dirty Water Tank. 2. Rotate nozzle latch to snap into hole. 3. To reduce the risk of injury from moving parts - Unplug cleaner before servicing. 1. Turn brushes slightly until handle rests on properly and for the unit to have proper suction. Press brush assembly firmly to unlock...it should be cleaned under running water. 2. Pull nozzle forward to Remove 1. Position nozzle on to foot, making sure to continuing use and care of carpet washer. 5. Rotate nozzle latch to lock position. 45 IMPORTANT The nozzle must be in the proper position in order for the Dirty...
... and Dirty Water Tank. 2. Rotate nozzle latch to snap into hole. 3. To reduce the risk of injury from moving parts - Unplug cleaner before servicing. 1. Turn brushes slightly until handle rests on properly and for the unit to have proper suction. Press brush assembly firmly to unlock...it should be cleaned under running water. 2. Pull nozzle forward to Remove 1. Position nozzle on to foot, making sure to continuing use and care of carpet washer. 5. Rotate nozzle latch to lock position. 45 IMPORTANT The nozzle must be in the proper position in order for the Dirty...
Product Manual
Page 37
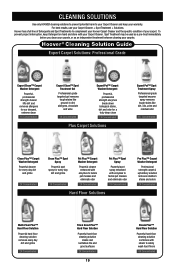
... Plus™ Hard Floor Solution Powerful hard floor cleaning solution combines with your warranty. Spot Treatment may be used as a pre-treat immediately before you clean your carpets, or as an independent treatment between cleaning your carpet. CLEANING SOLUTIONS Use only HOOVER cleaning solutions to prevent potential harm to your Carpet Cleaner and keep Detergent on hand and...
... Plus™ Hard Floor Solution Powerful hard floor cleaning solution combines with your warranty. Spot Treatment may be used as a pre-treat immediately before you clean your carpets, or as an independent treatment between cleaning your carpet. CLEANING SOLUTIONS Use only HOOVER cleaning solutions to prevent potential harm to your Carpet Cleaner and keep Detergent on hand and...


