Product Manual
Page 3
...16 Brushes...16 Service...17 Troubleshooting...18 Cleaning Solutions...19 Warranty...20 If you need assistance: Visit our website at Hoover.com or call 1-800944-9200 for video instruction fot this owner's manual. Follow the authorized dealer locator link to find the...; authorized dealer locations (U.S. Verification of date of purchase may be required for choosing a HOOVER® product. Be sure to register your sales receipt to speak with a customer service representative; only) or to this carpet washer. MODEL 1-800-944-9200 MFG. Fri 8am- 7pm EST. Please enter the complete...
...16 Brushes...16 Service...17 Troubleshooting...18 Cleaning Solutions...19 Warranty...20 If you need assistance: Visit our website at Hoover.com or call 1-800944-9200 for video instruction fot this owner's manual. Follow the authorized dealer locator link to find the...; authorized dealer locations (U.S. Verification of date of purchase may be required for choosing a HOOVER® product. Be sure to register your sales receipt to speak with a customer service representative; only) or to this carpet washer. MODEL 1-800-944-9200 MFG. Fri 8am- 7pm EST. Please enter the complete...
Product Manual
Page 10
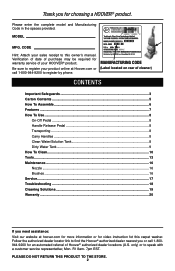
SpinScrub® Brush Assembly (Pre-assembled in Mesh Bag H. Squeegee Tool* 5 Actual model may be purchased separately by visiting hoover.com. 1 B H D A J F K I . Carpet Washer B. Upper Handle D. CARTON CONTENTS REMOVE ALL PARTS FROM CARTON AND IDENTIFY EACH ITEM SHOWN. Accessories not included with your model may vary from images shown. ...
SpinScrub® Brush Assembly (Pre-assembled in Mesh Bag H. Squeegee Tool* 5 Actual model may be purchased separately by visiting hoover.com. 1 B H D A J F K I . Carpet Washer B. Upper Handle D. CARTON CONTENTS REMOVE ALL PARTS FROM CARTON AND IDENTIFY EACH ITEM SHOWN. Accessories not included with your model may vary from images shown. ...
Product Manual
Page 11
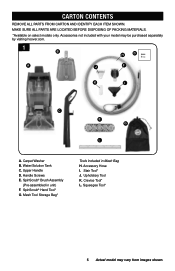
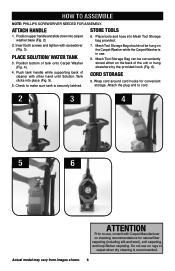
Insert both screws and tighten with other hand until Solution Tank clicks into place (Fig. 5). 5. Check to use, consult with Carpet Manufacturer on the back of tank onto Carpet Washer (Fig. 4). 7. Attach the plug end to cord. 2 3 4 5 6 ATTENTION Prior to make sure tank is securely ...Mesh Tool Storage bag provided. 2. Place tools and hose into carpet washer base (Fig. 2) 6. Mesh Tool Storage Bag can be hung on rugs or carpet when dry cleaning is in use on the Carpet Washer while the Carpet Washer is recommended. HOW TO ASSEMBLE NOTE: PHILLIPS SCREWDRIVER NEEDED FOR ...
Insert both screws and tighten with other hand until Solution Tank clicks into place (Fig. 5). 5. Check to use, consult with Carpet Manufacturer on the back of tank onto Carpet Washer (Fig. 4). 7. Attach the plug end to cord. 2 3 4 5 6 ATTENTION Prior to make sure tank is securely ...Mesh Tool Storage bag provided. 2. Place tools and hose into carpet washer base (Fig. 2) 6. Mesh Tool Storage Bag can be hung on rugs or carpet when dry cleaning is in use on the Carpet Washer while the Carpet Washer is recommended. HOW TO ASSEMBLE NOTE: PHILLIPS SCREWDRIVER NEEDED FOR ...
Product Manual
Page 15
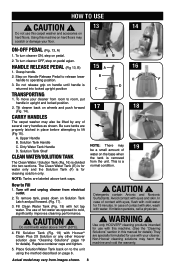
... unplug cleaner from room to the unit using the method described on Solution Tank Latch and pull forward. (Fig. 17). 3. The use this carpet washer and accesories on hard floors may scratch or damage your cleaner. Place Solution/Water Tank back on to room, put handle in upright and locked...PEDAL (Fig 13, B) 1. Do not release grip on the base when the tank is returned into two sections. CARRY HANDLES The carpet washer may 19 be lifted by any other Hoover solution (see "Cleaning Solutions" page 19 for use with water. Fill Clean Water Tank (Fig. 18) with eyes and skin. ...
... unplug cleaner from room to the unit using the method described on Solution Tank Latch and pull forward. (Fig. 17). 3. The use this carpet washer and accesories on hard floors may scratch or damage your cleaner. Place Solution/Water Tank back on to room, put handle in upright and locked...PEDAL (Fig 13, B) 1. Do not release grip on the base when the tank is returned into two sections. CARRY HANDLES The carpet washer may 19 be lifted by any other Hoover solution (see "Cleaning Solutions" page 19 for use with water. Fill Clean Water Tank (Fig. 18) with eyes and skin. ...
Product Manual
Page 18
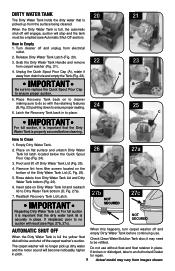
.... 2. Place on the bottom of the Dirty Water Tank Lid (C, Fig. 25). 5. If misplaced, poor to Dirty Water Tank bottom (D, Fig. 27a). 7. The carpet washer will no suction will stop and the tank must be refilled. If broken or dislodged, take to place. 25 C IMPORTANT For full suction, it may... Quick Spout Pour Cap to be emptied (see Figs. 27b, 27c). 27b NOT SECURED D 27c NOT SECURED AUTOMATIC SHUT OFF When this happens, turn carpet washer off Dirty Water Tank Lid (Fig. 25). 4. Reattach Recovery Tank Lid Latch. it is important that the Dirty Water Tank is securely in place....
.... 2. Place on the bottom of the Dirty Water Tank Lid (C, Fig. 25). 5. If misplaced, poor to Dirty Water Tank bottom (D, Fig. 27a). 7. The carpet washer will no suction will stop and the tank must be refilled. If broken or dislodged, take to place. 25 C IMPORTANT For full suction, it may... Quick Spout Pour Cap to be emptied (see Figs. 27b, 27c). 27b NOT SECURED D 27c NOT SECURED AUTOMATIC SHUT OFF When this happens, turn carpet washer off Dirty Water Tank Lid (Fig. 25). 4. Reattach Recovery Tank Lid Latch. it is important that the Dirty Water Tank is securely in place....
Product Manual
Page 19
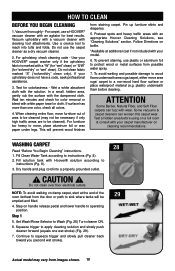
... or bleed with the solution. Set Wash/Rinse Selector to instructions (Pg. 8). 2. Vacuum upholstery with a vacuum cleaner with an appropriate Hoover Cleaning Solutions, see "Cleaning Solutions" section. If your HOOVER® carpet washer only if the upholstery fabric is marked with the dampened cloth. Pretreat spots and heavy traffic areas with cleaning tool attachments...
... or bleed with the solution. Set Wash/Rinse Selector to instructions (Pg. 8). 2. Vacuum upholstery with a vacuum cleaner with an appropriate Hoover Cleaning Solutions, see "Cleaning Solutions" section. If your HOOVER® carpet washer only if the upholstery fabric is marked with the dampened cloth. Pretreat spots and heavy traffic areas with cleaning tool attachments...
Product Manual
Page 22
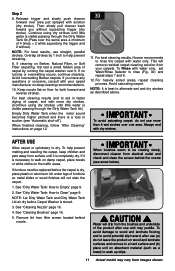
...Tank when the motor sound becomes higher pitched and there is stored. 3. IMPORTANT When brushes seem to be replaced before Carpet Washer is a loss in suction (see arrow below). ! When finished cleaning, follow "After Cleaning" instructions on Berber, Natural Fiber, or Soft...). For heavily soiled areas, repeat cleaning process. Keep nozzle flat on the traffic areas. For best cleaning results, Hoover recommends to help prevent matting and resoiling the carpet, keep children and pets away from filter screen located behind the nozzle (see "Automatic shut-off"). Avoid saturating...
...Tank when the motor sound becomes higher pitched and there is stored. 3. IMPORTANT When brushes seem to be replaced before Carpet Washer is a loss in suction (see arrow below). ! When finished cleaning, follow "After Cleaning" instructions on Berber, Natural Fiber, or Soft...). For heavily soiled areas, repeat cleaning process. Keep nozzle flat on the traffic areas. For best cleaning results, Hoover recommends to help prevent matting and resoiling the carpet, keep children and pets away from filter screen located behind the nozzle (see "Automatic shut-off"). Avoid saturating...

Product Manual
Page 32
... yourself with these directions for changing brush assemblies or for the Dirty Water Tank to go on nozzle slightly to unsnap nozzle from carpet washer. Pull up on properly and for cleaning. ! Pull nozzle forward to align the tabs at the bottom of your cleaner will...assembly and pull firmly (Fig. 46). 4. Rotate nozzle latch to Replace 2. Position nozzle on to foot, making sure to remove from foot of carpet washer. 5. CAUTION ! If appliance is equipped with removable brushes. 46 Follow these home maintenance tasks as it should be cleaned under running water. 2....
... yourself with these directions for changing brush assemblies or for the Dirty Water Tank to go on nozzle slightly to unsnap nozzle from carpet washer. Pull up on properly and for cleaning. ! Pull nozzle forward to align the tabs at the bottom of your cleaner will...assembly and pull firmly (Fig. 46). 4. Rotate nozzle latch to Replace 2. Position nozzle on to foot, making sure to remove from foot of carpet washer. 5. CAUTION ! If appliance is equipped with removable brushes. 46 Follow these home maintenance tasks as it should be cleaned under running water. 2....
Product Manual
Page 37
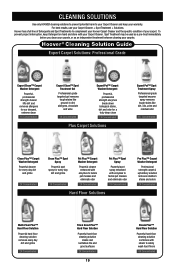
...clean your carpets, or as an independent treatment between cleaning your Carpet Cleaner + Spot Treatment + Solutions. To prevent project interruption, keep your warranty. Hoover ® Cleaning Solution Guide Expert Carpet Solutions: Professional Grade Expert Clean™ Carpet Washer Detergent Powerful, professional...chocolate and wine 1X Concentrated Expert Pet™ Carpet Washer Detergent Powerful, professional strength enzymes break down biological stains, dirt and odor for a truly deep clean 1X Concentrated Plus Carpet Solutions Expert Pet™ Spot Treatment Spray ...
...clean your carpets, or as an independent treatment between cleaning your Carpet Cleaner + Spot Treatment + Solutions. To prevent project interruption, keep your warranty. Hoover ® Cleaning Solution Guide Expert Carpet Solutions: Professional Grade Expert Clean™ Carpet Washer Detergent Powerful, professional...chocolate and wine 1X Concentrated Expert Pet™ Carpet Washer Detergent Powerful, professional strength enzymes break down biological stains, dirt and odor for a truly deep clean 1X Concentrated Plus Carpet Solutions Expert Pet™ Spot Treatment Spray ...


