User Guide
Page 2
Portable VisioCam LCD Video Chime System Installation and Use Contents Features 3 The VisioCam system 3 Checking pack contents 3 Setting up 4 Pre-installation setup 4 Installing the door camera 6 Door Camera Transformer option 7 Installing the receiver 8 Receiver Operation 8 Door camera 9 Expanding your system 10 Maintenance and use 11 Care and Maintenance 11 Replacing the receiver batteries 11 Troubleshooting 12 Specifications 13 Declaration 13 Disposal and Recycling 13 Guarantee 12 This user guide applies to the...
Portable VisioCam LCD Video Chime System Installation and Use Contents Features 3 The VisioCam system 3 Checking pack contents 3 Setting up 4 Pre-installation setup 4 Installing the door camera 6 Door Camera Transformer option 7 Installing the receiver 8 Receiver Operation 8 Door camera 9 Expanding your system 10 Maintenance and use 11 Care and Maintenance 11 Replacing the receiver batteries 11 Troubleshooting 12 Specifications 13 Declaration 13 Disposal and Recycling 13 Guarantee 12 This user guide applies to the...
User Guide
Page 3
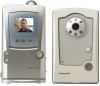
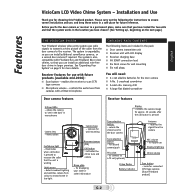
... working Light sensor - The system is also compatible with a fitted microphone. See 'Expanding Your System' on the next page.) Features English THE VISIOCAM SYSTEM Your Friedland wireless video entry system uses radio signals to transmit a video ...Installation and Use Thank you can install an additional wire-free door chime in low light Movement sensor (PIR) Call button - Please carry out the following items are included in monochrome Camera lens - VisioCam LCD Video Chime System - allows the camera to a TV set (optional) Chime volume Chime flasher Battery indicator Scan button...
... working Light sensor - The system is also compatible with a fitted microphone. See 'Expanding Your System' on the next page.) Features English THE VISIOCAM SYSTEM Your Friedland wireless video entry system uses radio signals to transmit a video ...Installation and Use Thank you can install an additional wire-free door chime in low light Movement sensor (PIR) Call button - Please carry out the following items are included in monochrome Camera lens - VisioCam LCD Video Chime System - allows the camera to a TV set (optional) Chime volume Chime flasher Battery indicator Scan button...
User Guide
Page 4
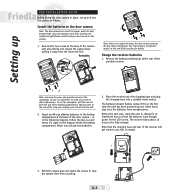
... on the receiver. 1. Setting up PRE-INSTALLATION SETUP Before fixing the door camera in place, set up ; Remove the battery isolating tab at the back of the receiver will get warm in use the nameplate, pull the end out from the side of the strip and carefully push it away from sounding. the chime tunes play once the...
... on the receiver. 1. Setting up PRE-INSTALLATION SETUP Before fixing the door camera in place, set up ; Remove the battery isolating tab at the back of the receiver will get warm in use the nameplate, pull the end out from the side of the strip and carefully push it away from sounding. the chime tunes play once the...
User Guide
Page 5
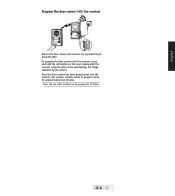
Once the door camera has been programmed into the receiver Ensure the door camera and receiver are separated by at least 2m (6ft). G-4 Note: You can select another tune by the camera. English Program the door camera into the receiver, the receiver remains active in program mode for approximately two minutes. To program the door camera into the receiver, press and hold the call button on the door camera until the receiver responds with a tune and displays the image captured by pressing the ' ' button.
Once the door camera has been programmed into the receiver Ensure the door camera and receiver are separated by at least 2m (6ft). G-4 Note: You can select another tune by the camera. English Program the door camera into the receiver, the receiver remains active in program mode for approximately two minutes. To program the door camera into the receiver, press and hold the call button on the door camera until the receiver responds with a tune and displays the image captured by pressing the ' ' button.
User Guide
Page 6
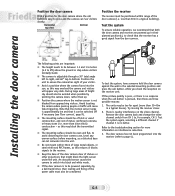
... the motion sensor is to the troubleshooting section for example, CH 3. Installing the door camera Position the door camera Find a position for the door camera where the call button is ...within 30cm of the power cable must be avoided when possible by a bell transformer, then routing and fixing of large metal objects, or steel reinforced PVC...door camera and receiver are three possible reasons: 1. To test the system, have someone hold the door camera against the wall in a typical building). Try moving the receiver closer. 2. Remove the door camera back and change the video...
... the motion sensor is to the troubleshooting section for example, CH 3. Installing the door camera Position the door camera Find a position for the door camera where the call button is ...within 30cm of the power cable must be avoided when possible by a bell transformer, then routing and fixing of large metal objects, or steel reinforced PVC...door camera and receiver are three possible reasons: 1. To test the system, have someone hold the door camera against the wall in a typical building). Try moving the receiver closer. 2. Remove the door camera back and change the video...
User Guide
Page 7
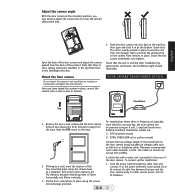
...from rain damage. Do not fit batteries. Adjust the camera angle With the door camera at the bottom. Note that the unit is evenly pressed in the Left/Right direction. 4. Hook the door camera into the base at the top first, then push and click it away from the back...sure that the unit is working after installation by pressing the call button, the confidence light should not exceed 30m (100ft). Fix the door camera base in place, mount the camera onto a wall or door as moisture or condensation will affect the internal parts. To connect up the transformer: 1. Check that the ...
...from rain damage. Do not fit batteries. Adjust the camera angle With the door camera at the bottom. Note that the unit is evenly pressed in the Left/Right direction. 4. Hook the door camera into the base at the top first, then push and click it away from the back...sure that the unit is working after installation by pressing the call button, the confidence light should not exceed 30m (100ft). Fix the door camera base in place, mount the camera onto a wall or door as moisture or condensation will affect the internal parts. To connect up the transformer: 1. Check that the ...
User Guide
Page 8
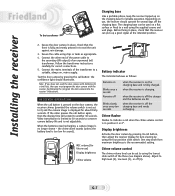
... the mains terminals of an unpowered bell transformer. RECEIVER OPERATION When the call button is pressed on the door camera, the receiver chimes (provided the volume switch is not set to indicate a call button, then adjust the receiver display for...chime alone sounds (unless the battery level is fully charged. G-7 Installing the receiver To the transformer Charging base Like a portable phone, keep the receiver topped up a good signal at the intended position. 2. Test the door camera by following the 'program the door camera into the receiver' instructions. Video...
... the mains terminals of an unpowered bell transformer. RECEIVER OPERATION When the call button is pressed on the door camera, the receiver chimes (provided the volume switch is not set to indicate a call button, then adjust the receiver display for...chime alone sounds (unless the battery level is fully charged. G-7 Installing the receiver To the transformer Charging base Like a portable phone, keep the receiver topped up a good signal at the intended position. 2. Test the door camera by following the 'program the door camera into the receiver' instructions. Video...
User Guide
Page 9
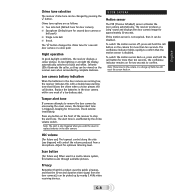
... battery indication When the batteries in the door camera. The confidence indicator blinks rapidly to remove the door camera by the chime volume switch. The ' ' button changes the chime tune for optimum listening level. DOOR CAMERA Motion sensor The PIR ('Passive InfraRed') sensor activates the door camera automatically. Tamper alert tone If someone attempts to confirm that the 30-second duration video...
... battery indication When the batteries in the door camera. The confidence indicator blinks rapidly to remove the door camera by the chime volume switch. The ' ' button changes the chime tune for optimum listening level. DOOR CAMERA Motion sensor The PIR ('Passive InfraRed') sensor activates the door camera automatically. Tamper alert tone If someone attempts to confirm that the 30-second duration video...
User Guide
Page 10
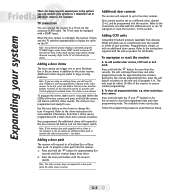
... programmed, the additional chime will need to the instructions provided with a chime is now cleared. Refer to the video receiver. To add another door camera, CCTV unit or bell push: Press and hold both the ' ' and ' ' buttons in now programmed and ready for five seconds to the video camera. The available chime sounds play. Adding a door chime The door camera can connect your premises. when replacing a door...
... programmed, the additional chime will need to the instructions provided with a chime is now cleared. Refer to the video receiver. To add another door camera, CCTV unit or bell push: Press and hold both the ' ' and ' ' buttons in now programmed and ready for five seconds to the video camera. The available chime sounds play. Adding a door chime The door camera can connect your premises. when replacing a door...

User Guide
Page 11
... of liquid spillage. ■ Do not place rings or other metal objects over the peg in the battery compartment. Follow the battery orientation symbols in the charging unit - REPLACING THE RECEIVER BATTERIES Constant use will become trapped inside the door camera, as it may damage the internal parts. ■ Avoid replacing door camera batteries during wet weather. ■ Do not...
... of liquid spillage. ■ Do not place rings or other metal objects over the peg in the battery compartment. Follow the battery orientation symbols in the charging unit - REPLACING THE RECEIVER BATTERIES Constant use will become trapped inside the door camera, as it may damage the internal parts. ■ Avoid replacing door camera batteries during wet weather. ■ Do not...
User Guide
Page 12
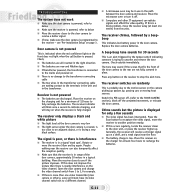
... 'dead spot'. The tone may be in use in place. Press any button on the video channel. G-11 The receiver chimes, followed by , passing cars or moving heat sources. Replace the door camera batteries. Rotate or move the receiver to another position nearby. ■ If this...direction ■ The batteries are new and Alkaline type ■ If transformer powered, the transformer is connected to the mains and powered on randomly This is probably due to 3, for only a few seconds ■ The video signal has been interrupted. Open the door camera and change the video...
... 'dead spot'. The tone may be in use in place. Press any button on the video channel. G-11 The receiver chimes, followed by , passing cars or moving heat sources. Replace the door camera batteries. Rotate or move the receiver to another position nearby. ■ If this...direction ■ The batteries are new and Alkaline type ■ If transformer powered, the transformer is connected to the mains and powered on randomly This is probably due to 3, for only a few seconds ■ The video signal has been interrupted. Open the door camera and change the video...
User Guide
Page 13
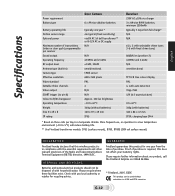
Specifications English Power requirement Battery type Door Camera 6 x AA-size alkaline batteries Battery operating life Motion sensor range Optional power Maximum number of transmitters (video or door push) programmable per receiver Sound output Operating frequency RF output level Antenna type (built in) Camera type Effective resolution Video standard Settable Video channels Video output SCART trigger (to pin 8) Colour to B/W changeover Operating temperature Weight Size H x W x D IP...
Specifications English Power requirement Battery type Door Camera 6 x AA-size alkaline batteries Battery operating life Motion sensor range Optional power Maximum number of transmitters (video or door push) programmable per receiver Sound output Operating frequency RF output level Antenna type (built in) Camera type Effective resolution Video standard Settable Video channels Video output SCART trigger (to pin 8) Colour to B/W changeover Operating temperature Weight Size H x W x D IP...


