
Installation Guide
Page 12
NetAXS™ NX4S1 Installation Notices • Use static shield packaging and containers to the Customer. Honeywell's warranty shall not extend to any Product which, upon examination, is 90 days from date of shipment of the Product to transport ...employees. Workstations are defective or defective under normal use. The Customer shall hold the Customer harmless for any Product for Honeywell to Honeywell by or in Product manuals. 2 www.honeywell.com The warranty on behalf of shipment. All warranty work shall be handled through the Customer which must be required to...
NetAXS™ NX4S1 Installation Notices • Use static shield packaging and containers to the Customer. Honeywell's warranty shall not extend to any Product which, upon examination, is 90 days from date of shipment of the Product to transport ...employees. Workstations are defective or defective under normal use. The Customer shall hold the Customer harmless for any Product for Honeywell to Honeywell by or in Product manuals. 2 www.honeywell.com The warranty on behalf of shipment. All warranty work shall be handled through the Customer which must be required to...

Installation Guide
Page 13
... meets all requirements of the Canadian Interference-Causing Equipment Regulations. IN NO EVENT SHALL HONEYWELL BE LIABLE FOR ANY RE-PROCUREMENT COSTS, LOSS OF PROFITS, LOSS OF USE, ...encouraged to try to correct the interference by the Installation Instructions or User's Manual. If this equipment does cause harmful interference to radio or television reception, which... on a circuit different from that interference will not occur in a residential installation. NetAXS™ NX4S1 Installation Notices THERE ARE NO WARRANTIES THAT EXTEND BEYOND THIS PROVISION. These limits are designed...
... meets all requirements of the Canadian Interference-Causing Equipment Regulations. IN NO EVENT SHALL HONEYWELL BE LIABLE FOR ANY RE-PROCUREMENT COSTS, LOSS OF PROFITS, LOSS OF USE, ...encouraged to try to correct the interference by the Installation Instructions or User's Manual. If this equipment does cause harmful interference to radio or television reception, which... on a circuit different from that interference will not occur in a residential installation. NetAXS™ NX4S1 Installation Notices THERE ARE NO WARRANTIES THAT EXTEND BEYOND THIS PROVISION. These limits are designed...
Installation Guide
Page 33
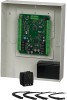
...two MIRO-32/0 and a maximum of four MIRO-2/16 for a total of six MIRO modules can be added to the individual installation manuals for the Multidrop RS-485 line. The MIRO-2/16 has two supervised inputs and 16 SPDT relay outputs; Refer to the downstream bus.... switches Address (switches 1-6) - 1 or 2 Baud rate (switches 7 and 8) - 7 = OFF, 8 = ON OP Mode (switches 9 and 10) - 9 = OFF, 10 = OFF NetAXS Access Control Unit NX4S1 Installation Guide, Document 800-00008, Revision A 23 Note that are limited to be OPEN or CLOSED. 4.8 Downstream I/O Note: UL has not evaluated the compatibility...
...two MIRO-32/0 and a maximum of four MIRO-2/16 for a total of six MIRO modules can be added to the individual installation manuals for the Multidrop RS-485 line. The MIRO-2/16 has two supervised inputs and 16 SPDT relay outputs; Refer to the downstream bus.... switches Address (switches 1-6) - 1 or 2 Baud rate (switches 7 and 8) - 7 = OFF, 8 = ON OP Mode (switches 9 and 10) - 9 = OFF, 10 = OFF NetAXS Access Control Unit NX4S1 Installation Guide, Document 800-00008, Revision A 23 Note that are limited to be OPEN or CLOSED. 4.8 Downstream I/O Note: UL has not evaluated the compatibility...
User Guide
Page 4
...90 A.2.5 Upgrade Notes ...92 A.2.6 Clearing the Cache in the Internet Browsers Used by the NetAXS™ Web Server 93 Index iv www.honeywell.com 2.7 Configuring Other I/O & Groups Tab 52 2.7.1 Inputs Tab ...52 2.7.2 Outputs Tab... ...55 2.7.3 Groups Tab ...57 2.8 Configuring Interlocks ...59 2.9 Configuring Users...61 Chapter 3 Configuring via WIN-PAK 3.1 Overview ...65 3.2 Adding a New NetAXS™ Panel 66 3.2.1 Creating the Panel with Quick Start Wizard 66 3.2.2 Configuring the Panel Manually...
...90 A.2.5 Upgrade Notes ...92 A.2.6 Clearing the Cache in the Internet Browsers Used by the NetAXS™ Web Server 93 Index iv www.honeywell.com 2.7 Configuring Other I/O & Groups Tab 52 2.7.1 Inputs Tab ...52 2.7.2 Outputs Tab... ...55 2.7.3 Groups Tab ...57 2.8 Configuring Interlocks ...59 2.9 Configuring Users...61 Chapter 3 Configuring via WIN-PAK 3.1 Overview ...65 3.2 Adding a New NetAXS™ Panel 66 3.2.1 Creating the Panel with Quick Start Wizard 66 3.2.2 Configuring the Panel Manually...
User Guide
Page 51
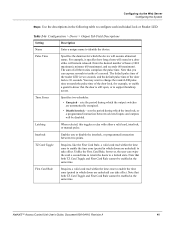
... time. Note that you to match the pulse time of the door lock, for which the interlock, or a programmed interaction between two points. NetAXS™ Access Control Unit User's Guide, Document 800-04410, Revision A 41 Time Zones Specifies two schedules: • Energized - sets the period...Setting Description Name Enter a unique name to take effect. Latching When selected, this toggles a relay with either a valid card, interlock, or manual pulse. Unlike the First Card Rule, however, the user can express seconds in tenths of the door lock is still open, or to enable...
... time. Note that you to match the pulse time of the door lock, for which the interlock, or a programmed interaction between two points. NetAXS™ Access Control Unit User's Guide, Document 800-04410, Revision A 41 Time Zones Specifies two schedules: • Energized - sets the period...Setting Description Name Enter a unique name to take effect. Latching When selected, this toggles a relay with either a valid card, interlock, or manual pulse. Unlike the First Card Rule, however, the user can express seconds in tenths of the door lock is still open, or to enable...
User Guide
Page 56
... the door you must manually configure this access level at these panels. Click the Modify button. So you still must be a unique name that a Time Zone must go to panels 2 and 3 to assign the access level to the Select Panel on panel 1 with this section. 46 www.honeywell.com To do this... Steps to modify an access level: 1. Enter the name of the access level you select here. 2. Select the time zone you configure readers 1-4 on the NetAXS™ main screen, select the next panel in the loop, and configure that when you create an access level for a panel in the dropdown list...
... the door you must manually configure this access level at these panels. Click the Modify button. So you still must be a unique name that a Time Zone must go to panels 2 and 3 to assign the access level to the Select Panel on panel 1 with this section. 46 www.honeywell.com To do this... Steps to modify an access level: 1. Enter the name of the access level you select here. 2. Select the time zone you configure readers 1-4 on the NetAXS™ main screen, select the next panel in the loop, and configure that when you create an access level for a panel in the dropdown list...

User Guide
Page 76
... the panel. Proceed to "Configuring the Panel Manually" on page 67 and make the necessary changes. 66 www.honeywell.com Configuring via WIN-PAK Adding a New NetAXS™ Panel The NetAXS™ Gateway panel's baud rate is set configured via the NetAXS™ web server (see the NetAXS™ Access Control Unit Installation Guide for optimum...
... the panel. Proceed to "Configuring the Panel Manually" on page 67 and make the necessary changes. 66 www.honeywell.com Configuring via WIN-PAK Adding a New NetAXS™ Panel The NetAXS™ Gateway panel's baud rate is set configured via the NetAXS™ web server (see the NetAXS™ Access Control Unit Installation Guide for optimum...

User Guide
Page 77
... 8.07 or later. - Basic Tab 2. Configuring via WIN-PAK Adding a New NetAXS™ Panel 3.2.2 Configuring the Panel Manually Use the WIN-PAK Panel Configuration screen to add the NetAXS™ panel manually, add it as you complete the steps in the Quick Start Wizard: Figure 3-2: ...Screen - Enter the following selections for NetAXS™ panel configuration, except where they are using the Device Map to complete the NetAXS™ panel configuration manually. Select the appropriate panel number. Active. - Note: You cannot initialize the NetAXS™ panel from the WIN-PAK ...
... 8.07 or later. - Basic Tab 2. Configuring via WIN-PAK Adding a New NetAXS™ Panel 3.2.2 Configuring the Panel Manually Use the WIN-PAK Panel Configuration screen to add the NetAXS™ panel manually, add it as you complete the steps in the Quick Start Wizard: Figure 3-2: ...Screen - Enter the following selections for NetAXS™ panel configuration, except where they are using the Device Map to complete the NetAXS™ panel configuration manually. Select the appropriate panel number. Active. - Note: You cannot initialize the NetAXS™ panel from the WIN-PAK ...


